oriolrius.cat

Des del 2000 compartiendo sobre…

Category: Development, Models and Methodologies

Dynaconf: A Comprehensive Guide to Configuration Management in Python

Reading time: 5 – 8 minutes

Dynaconf is a powerful configuration management library for Python that simplifies the process of managing and accessing application settings. It offers a wide range of features, including support for multiple configuration sources, environment variables, and dynamic reloading.

Main features:

  • Multiple configuration sources: Dynaconf can read settings from various sources, including environment variables, files, and even Vault servers. This flexibility allows you to centralize your configuration management and adapt to different deployment environments.
  • Environment variable support: Dynaconf seamlessly integrates with environment variables, making it easy to inject configuration values from your system or containerized environments.
  • Dynamic reloading: Dynaconf can dynamically reload configuration changes without restarting your application, ensuring that your application always reflects the latest settings.

Supported configuration file formats:

Dynaconf supports a variety of configuration file formats, including:

  • TOML (recommended)
  • YAML
  • JSON
  • INI
  • Python files

Installation:

Dynaconf can be installed using either pip or poetry:

pip install dynaconf

# or

poetry add dynaconf

How to initialize Dynaconf

Dynaconf is a powerful configuration management library for Python that simplifies the process of managing and accessing application settings. It offers a wide range of features, including support for multiple configuration sources, environment variables, and dynamic reloading.

To initialize Dynaconf in your project, run the following command in your project’s root directory:

dynaconf init -f toml

This command will create the following files:

  • config.py: This file imports the Dynaconf settings object.
  • settings.toml: This file contains your application settings.
  • .secrets.toml: This file contains your sensitive data, such as passwords and tokens.

config.py

The config.py file is a Python file that imports the Dynaconf settings object. This file is required for Dynaconf to work.

Here is an example of a config.py file:

import dynaconf

settings = dynaconf.settings()

settings.toml

The settings.toml file contains your application settings. This file is optional, but it is the recommended way to store your settings.

Here is an example of a settings.toml file:

[default]
debug = false
host = "localhost"
port = 5000

secrets.toml

The .secrets.toml file contains your sensitive data, such as passwords and tokens. This file is optional, but it is recommended to store your sensitive data in a separate file from your application settings.

Here is an example of a .secrets.toml file:

[default]
database_password = "my_database_password"
api_token = "my_api_token"

Importing and using the Dynaconf settings object

Once you have initialized Dynaconf, you can import the settings object into your Python code. For example:

from config import settings

You can then access your application settings using the settings object. For example:

setting_value = settings.get('KEY')

Dynaconf also supports accessing settings using attributes. For example:

setting_value = settings.KEY

Importing environment variables in Docker-Compose:

When using Dynaconf with Docker-Compose, the best strategy for importing environment variables is to define them in your docker-compose.yml file and then access them using Dynaconf’s envvar_prefix setting.

version: "3.8"

services:
  app:
    build: .
    environment:
      - APP_DEBUG=true
      - APP_HOST=0.0.0.0
      - APP_PORT=8000

In your Python code, you can access these environment variables using Dynaconf:

import dynaconf

settings = dynaconf.settings(envvar_prefix="APP")

debug = settings.get("DEBUG")
host = settings.get("HOST")
port = settings.get("PORT")

Conclusion:

Dynaconf is a versatile and powerful configuration management library for Python that simplifies the process of managing and accessing application settings. Its comprehensive feature set and ease of use make it an ideal choice for a wide range of Python projects.
Add a New Dropdown Menu in OpenWRT LUCI

Reading time: 3 – 5 minutes

OpenWRT, the popular open-source Linux operating system designed for embedded devices, offers the LUCI interface for easy configuration and management. LUCI is essentially the web interface for OpenWRT, and while it’s already feature-rich, sometimes you may want to extend its functionalities based on your needs.

Recently, I had a requirement to enhance my OpenWRT LUCI interface. Specifically, I wanted to introduce a new menu named “Apps” in the LUCI dashboard. The objective was to have each entry within this new menu link to different applications installed on my device. And not just that! I wanted these application pages to pop open in new tabs for ease of access.

The Solution

The changes were made in a single file located at:

/usr/lib/lua/luci/controller/apps.lua

Within this file, I implemented the following code:

module("luci.controller.apps", package.seeall)

function index()
    local page

    page = entry({"admin", "apps"}, firstchild(), _("Apps"), 60)
    page.dependent = false

    entry({"admin", "apps", "portainer"}, call("serve_js_redirect", "https", "9443"), _("Portainer"), 10).leaf = true
    entry({"admin", "apps", "nodered"}, call("serve_js_redirect", "http", "1880"), _("NodeRED"), 20).leaf = true
    entry({"admin", "apps", "grafana"}, call("serve_js_redirect", "http", "3000"), _("Grafana"), 30).leaf = true
    entry({"admin", "apps", "prometheus"}, call("serve_js_redirect", "http", "9090"), _("Prometheus"), 40).leaf = true
end

function serve_js_redirect(protocol, port)
    local ip = luci.http.getenv("SERVER_ADDR")
    local url = protocol .. "://" .. ip .. ":" .. port
    luci.http.prepare_content("text/html; charset=utf-8")
    luci.http.write("<!DOCTYPE html><html><head><meta charset='UTF-8'><title>Redirecting...</title></head><body>")
    luci.http.write("<script type='text/javascript'>")
    luci.http.write("window.onload = function() {")
    luci.http.write("  var newWindow = window.open('".. url .."', '_blank');")
    luci.http.write("  if (!newWindow || newWindow.closed || typeof newWindow.closed == 'undefined') {")
    luci.http.write("    document.getElementById('manualLink').style.display = 'block';")
    luci.http.write("    setTimeout(function() { window.location.href = document.referrer; }, 60000);")  -- Redirigir después de 60 segundos
    luci.http.write("  }")
    luci.http.write("}")
    luci.http.write("</script>")
    luci.http.write("<p id='manualLink' style='display: none;'>The window didn't open automatically. <a href='".. url .."' target='_blank'>Click here</a> to open manually.</p>")
    luci.http.write("</body></html>")
end

Key Points

  • The index function is responsible for defining the new menu and its entries.
  • The serve_js_redirect function creates a web page that uses JavaScript to automatically open the desired application in a new browser tab.
  • A failsafe mechanism is added in the form of a link. If, for any reason (like pop-up blockers), the new tab doesn’t open automatically, the user has the option to manually click on a link to open the application.
  • The script also includes a feature that will redirect the user back to the previous page after 60 seconds if the new tab doesn’t open.

This modification provides a seamless way to integrate external applications directly into the LUCI interface, making navigation and management even more convenient!


Scripted Grafana dashboards

Reading time: < 1 minute A few minutes of video for explaining how to create dashboards on Grafana using Javascript code:

The code used for hello world script is available as a gist.

Python logger, quite interesting wrapper for python logging library

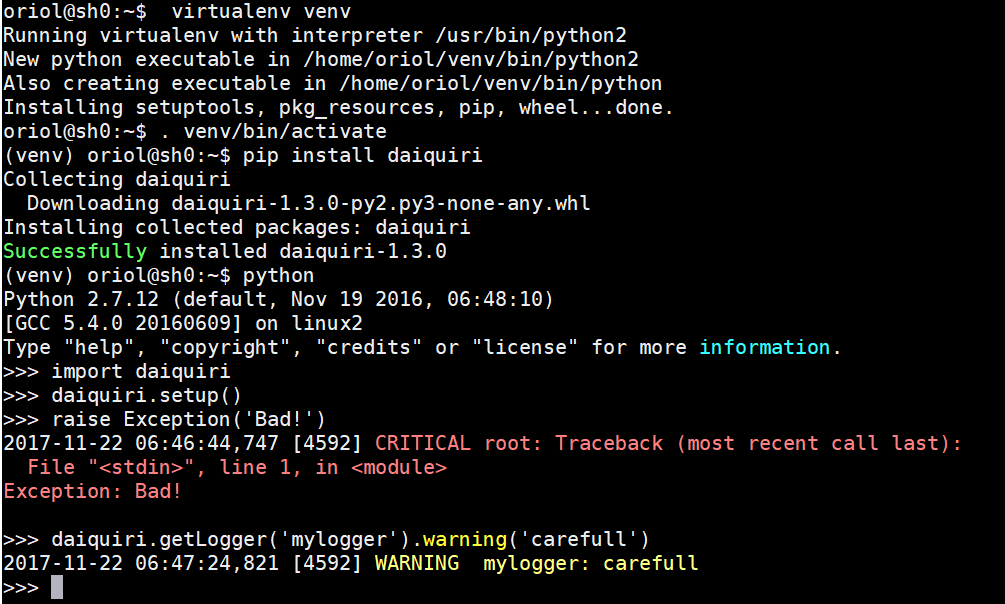
Reading time: < 1 minute Python logging library is really flexible and powerful but usually, you need some time for setting up the basics or just for logging in a simple script, some commands and settings have to be done. Daiquiri is a library which wrapper python logging library and offers a simple interface for start enjoying logging features in python. Next, there is a hello world example extracted from Daiquiri documentation which shows how easy it gets nice output from the console when you're programming simple scripts. daiquiri python library, hello world example


MIT Data Science course: Data to Insights

Reading time: 3 – 4 minutes

This week I finished this course from MIT. After my previous experience on MIT professional courses, I decided to involved in a new one. I know it sounds strange after my really bad feedback in my previous course about IoT, but I decided to give a second opportunity to this kind of courses.
My general opinion about this course is by far better than the previous one, so I’m happy to be done this course. I learn a lot, and of course now is time to put knowledge in practice, so it’s not a minor thing to do. Talking about the difficulty of the course I found two initial modules especially difficult, a lot of mathematics and formulas and it was very difficult to follow explanations because of the complexity of the concepts and mathematical formulas which describe them. In my case some code in any programming language using libraries which abstract mathematical formula complexity would be ideal.

About those two initial modules: “Making sense of unstructured data” and “Regression and Prediction” perhaps the subjects sounds good especially where I want to apply the knowledge, so in IIoT, this is not easy to figure out how to apply that knowledge in time series data. Maybe the best thing that I get from there is what are the main algorithms and theoretical basis that I have to apply in real world projects.

The third module has the subject “Classification, Hypothesis and Deep Learning” and it’s very linked with the previous, by the way, I found easier to understand the related mathematics and how to apply that knowledge. I especially found easy to understand and interesting to apply in IIoT the deep learning chapter, some concepts and basic ideas about neuronal networks are described in a very easy way and graphical synoptic and animations help a lot on following the concepts.

The last two modules about “Recommendation systems” and “Networks and Graphical Models” are presented in a very useful way, very applied to real world and with a lot of examples and I appreciate it. Apart from that teachers did a very good work explaining together and being very progressive in complexity from the bottom up.

If I have to suggest any improvement would be in the practical part, I consider Python a programming language with better future in Data Scientist world than R, may be R has a very good base and history as a language for scientists but I think tools like Jupyter has a better future than legacy tools like RStudio. So get more details and references about how to play with Python based tools and libraries than focus on R would be my recommendation.

Another point to improve, in my opinion, would be add some videos dedicated to using tools and how to apply those tools in case studies. At the end of the day, screencast videos are super useful when you’re not familiar with some technologies.

Summarizing I recommend the course, but don’t expect any fast application of the knowledge is a very theoretical course to get the basics and later get practical skills from your side with case studies or other references.

Table about Industry 4.0 on Catalan Telecommunications day

Reading time: 3 – 4 minutes

Last Thursday I participated in a round table about Industry 4.0 as part of the Catalan Telecommunications Day, really interesting event in a very nice place. I haven’t been in Cosmo Caixa since it was called “Museu de la Ciència” a very long time ago. But I have to say that the place is very trendy and awesome.

diada-telecom

Coming back to the event, I met some good friends and it’s always a pleasure but I also meet very interesting new people with who I’ll be happy to keep on talking and going deep on aligning synergies. One of those are i2cat people, guys we have to find the proper way to collaborate because again and again we meet each other with very compatible points of view.

taula8

About the content of my exposition I want to remark two things:

  • Firstly I think we have the debt to leadership the fourth industrial revolution, and catch up all those companies that never did the third revolution no the present. Catalonia has very powerful minds with a lot of entrepreneurs now it’s time to work together and demonstrate what we can do.
  • Secondly summarize the Fernando Trías de Bes article in “La Vanguardia”
    • In the 90s they said that Internet is going to be like another TV channel in our TVs; companies only need to create a Web page and they are ready for the future. But in the end it changed the ‘P’ of product in the marketing strategy.
    • Early 2000 e-commerce get it real and they said that it’s only another distribution channel, but finally it has been the change of two ‘P’s point of sale and price, both of them became obsolete.
    • In 2006 the revolution come through the social networks, they said only this is only personal webs instead of enterprise web; just create some accounts in those social networks and that’s all.  But ‘P’ of promotion has been redefined with new market segmentation.
    • Since 2010 smartphones sales increased dramatically and they said this is just like a mini PC, just adapt web pages and everything is done. But a lot of markets disappeared or changed deeply: photo cameras, music CDs, telephony, etc. So ‘P’ of point of sale and ‘P’ of product totally redefined. Virtual and physical experiences unified.
    •  First decade of new century Internet 2.0 has been consolidated, they said this is just web where people can participate. Companies only need to add a corner in their webpages where can discuss. ‘P’ of prices digital money and a lot of new business models.
    • Currently we talk about IoT and they say this is about adding electronics to the physical world.  Instead of that what happen is all product in a digital environment tends to be converted in a service. Again the ‘P’ of product is obsolete and has to be totally redefined.

diadatelecos2016123

Having that in mind IMHO we have huge opportunities within reach.

Secure download URLs with expiration time

Reading time: 4 – 6 minutes

Requirements

Imagine a HTTP server with those restrictions:

  • only specific files can be downloaded
  • with a limited time (expiration date)
  • an ID allows to trace who download files
  • with minimal maintenance and dependencies (no databases, or things like that)

the base of the solution that I designed is the URL format:

http://URL_HOST/<signature>/<customer_id>/<expire_date>/<path_n_file>
  • signature: is calculated with the next formula, given a “seed”
    • seed = “This is just a random text.”
    • str = customer_id + expire_date + path_n_file
    • signature = encode_base64( hmac_sha1( seed, str))
  • customer_id: just an arbitrary identifier when you want to distinguish who use the URL
  • expire_date: when the generated URL stops working
  • path_n_file: relative path in your private repository and the file to share

Understanding the ideas explained before I think it’s enough to understand what is the goal of the solution. I developed the solution using NGINX and LUA. But the NGINX version used is not the default version is a very patched version called Openresty. This version is specially famous because some important Chinese webs works with that, for instance, Taobao.com

Expiration URL solution Architecture schema

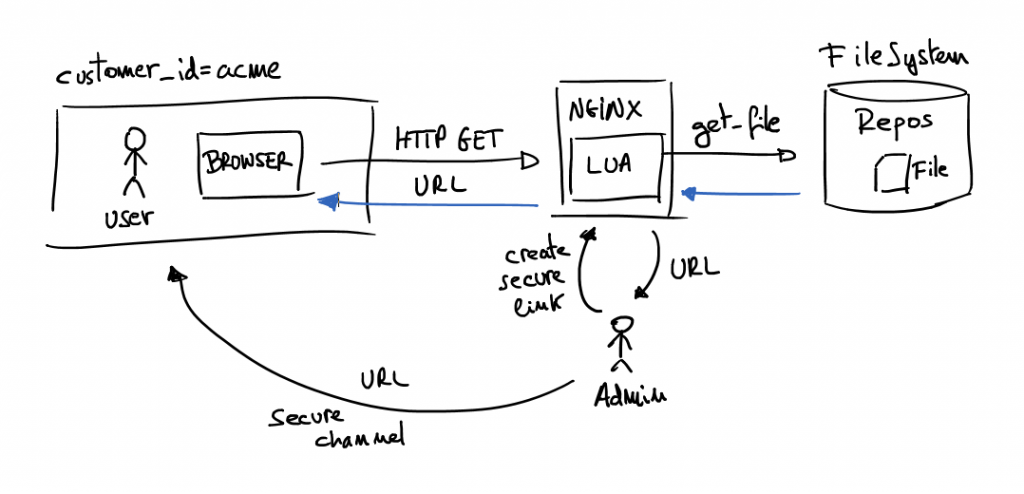
In the above schema there is a master who wants to share a file which is in the internal private repository, but the file has a time restriction and the URL is only for that customer. Then using the command line admin creates a unique URL with desired constrains (expiration date, customer to share and file to share). Next step is send the URL to the customer’s user. When the URL is requested NGINX server evaluates the URL and returns desired file only if the user has a valid URL. It means the URL is not expired, the file already exists, the customer identification is valid and the signature is not modified.

NGINX Configuration

server {
 server_name downloads.local;

 location ~ ^/(?<signature>[^/]+)/(?<customer_id>[^/]+)/(?<expire_date>[^/]+)/(?<path_n_file>.*)$ {
 content_by_lua_file "lua/get_file.lua";
 }

 location / {
 return 403;
 }
}

This is the server part of the NGINX configuration file, the rest of the file can as you want. Understanding this file is really simple, because the “server_name” works as always. Then only locations command are relevant. First “location” is just a regular expression which identifies the relevant variables of the URL and passes them to the LUA script. All other URLs that doesn’t match with the URI pattern fall in path “/” and the response is always “Forbiden” (HTTP 403 code). Then magics happen all in LUA code.

LUA scripts

There are some LUA files required:

  • create_secure_link.lua: creates secure URLs
  • get_file.lua: evaluates URLs and serves content of the required file
  • lib.lua: module developed to reuse code between other lua files
  • sha1.lua: SHA-1 secure hash computation, and HMAC-SHA1 signature computation in Lua (get from https://github.com/kikito/sha.lua)

It’s required to configure “lib.lua” file, at the beginning of the file are three variables to set up:

lib.secret = "This is just a long string to set a seed"
lib.base_url = "http://downloads.local/"
lib.base_dir = "/tmp/downloads/"

Create secure URLs is really simple, take look of the command parameters:

$ ./create_secure_link.lua 

 ./create_secure_link.lua <customer_id> <expiration_date> <relative_path/filename>

Create URLs with expiration date.

 customer_id: any string identifying the customer who wants the URL
 expiration_date: when URL has to expire, format: YYYY-MM-DDTHH:MM
 relative_path/filename: relative path to file to transfer, base path is: /tmp/downloads/

Run example:

$ mkdir -p /tmp/downloads/dir1
$ echo hello > /tmp/downloads/dir1/example1.txt
$ ./create_secure_link.lua acme 2015-08-15T20:30 dir1/example1.txt
http://downloads.local/YjZhNDAzZDY0/acme/2015-08-15T20:30/dir1/example1.txt
$ date
Wed Aug 12 20:27:14 CEST 2015
$ curl http://downloads.local:55080/YjZhNDAzZDY0/acme/2015-08-15T20:30/dir1/example1.txt
hello
$ date
Wed Aug 12 20:31:40 CEST 2015
$ curl http://downloads.local:55080/YjZhNDAzZDY0/acme/2015-08-15T20:30/dir1/example1.txt
Link expired

Little video demostration

Resources

Disclaimer and gratefulness


Hello World using ‘kombu’ library and python

Reading time: 4 – 7 minutes

Some times schemas and snippets don’t need large descriptions. If you think this is not enough in this case tell me and I’m going to add explanations.

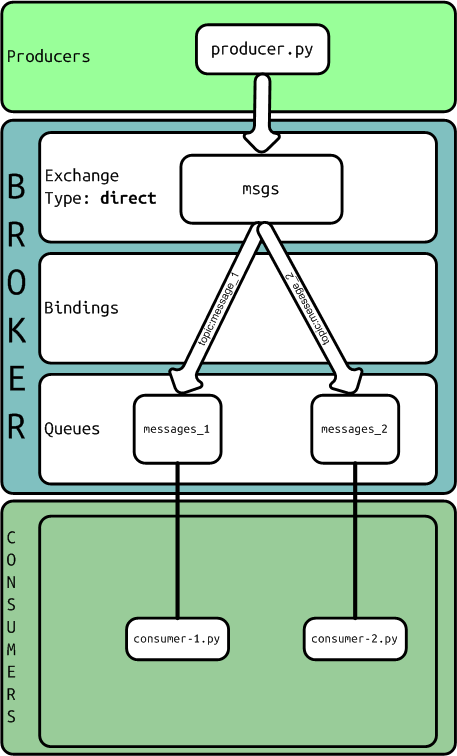
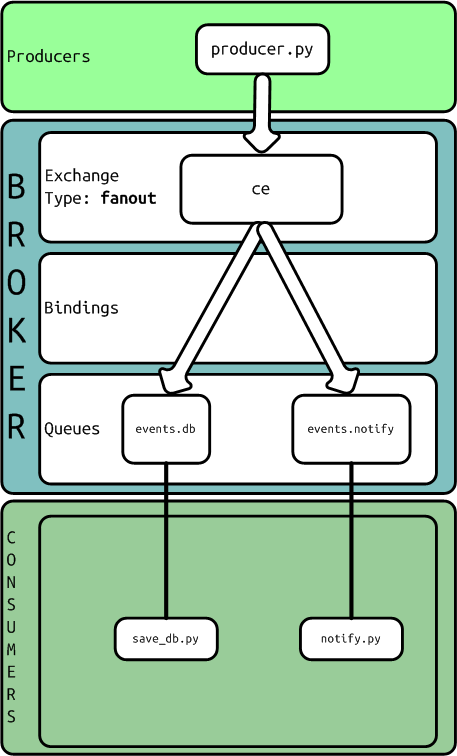
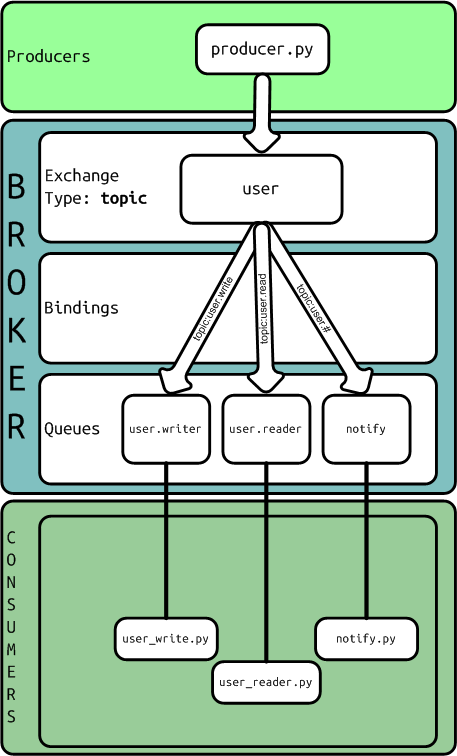
Using a python library called kombu as an abstraction to talk with AMQP broker we are going to develop different message routes setting each type of Exchange. As a backend I used RabbitMQ with default configuration.

AMQP schema using an exchange of type direct

kombu-direct

Queue definition:

from kombu import Exchange, Queue

task_exchange = Exchange("msgs", type="direct")
queue_msg_1 = Queue("messages_1", task_exchange, routing_key = 'message_1')
queue_msg_2 = Queue("messages_2", task_exchange, routing_key = 'message_2')

The producer:

from __future__ import with_statement
from queues import task_exchange

from kombu.common import maybe_declare
from kombu.pools import producers


if __name__ == "__main__":
    from kombu import BrokerConnection

    connection = BrokerConnection("amqp://guest:guest@localhost:5672//")

    with producers[connection].acquire(block=True) as producer:
        maybe_declare(task_exchange, producer.channel)
        
        payload = {"type": "handshake", "content": "hello #1"}
        producer.publish(payload, exchange = 'msgs', serializer="pickle", routing_key = 'message_1')
        
        payload = {"type": "handshake", "content": "hello #2"}
        producer.publish(payload, exchange = 'msgs', serializer="pickle", routing_key = 'message_2')

One consumer:

from queues import queue_msg_1
from kombu.mixins import ConsumerMixin

class C(ConsumerMixin):
    def __init__(self, connection):
        self.connection = connection
        return
    
    def get_consumers(self, Consumer, channel):
        return [Consumer( queue_msg_1, callbacks = [ self.on_message ])]
    
    def on_message(self, body, message):
        print ("RECEIVED MSG - body: %r" % (body,))
        print ("RECEIVED MSG - message: %r" % (message,))
        message.ack()
        return
    

if __name__ == "__main__":
    from kombu import BrokerConnection
    from kombu.utils.debug import setup_logging
    
    setup_logging(loglevel="DEBUG")

    with BrokerConnection("amqp://guest:guest@localhost:5672//") as connection:
        try:
            C(connection).run()
        except KeyboardInterrupt:
            print("bye bye")


AMQP schema using an exchange of type fanout

kombu-fanout

Queue definition:

from kombu import Exchange, Queue

task_exchange = Exchange("ce", type="fanout")
queue_events_db = Queue("events.db", task_exchange)
queue_events_notify = Queue("events.notify", task_exchange)


The producer:

from __future__ import with_statement
from queues import task_exchange

from kombu.common import maybe_declare
from kombu.pools import producers


if __name__ == "__main__":
    from kombu import BrokerConnection

    connection = BrokerConnection("amqp://guest:guest@localhost:5672//")

    with producers[connection].acquire(block=True) as producer:
        maybe_declare(task_exchange, producer.channel)
        
        payload = {"operation": "create", "content": "the object"}
        producer.publish(payload, exchange = 'ce', serializer="pickle", routing_key = 'user.write')

        payload = {"operation": "update", "content": "updated fields", "id": "id of the object"}
        producer.publish(payload, exchange = 'ce', serializer="pickle", routing_key = 'user.write')

One consumer:

from queues import queue_events_db
from kombu.mixins import ConsumerMixin

class C(ConsumerMixin):
    def __init__(self, connection):
        self.connection = connection
        return
    
    def get_consumers(self, Consumer, channel):
        return [Consumer( queue_events_db, callbacks = [self.on_message])]
    
    def on_message(self, body, message):
        print ("save_db: RECEIVED MSG - body: %r" % (body,))
        print ("save_db: RECEIVED MSG - message: %r" % (message,))
        message.ack()
        return


if __name__ == "__main__":
    from kombu import BrokerConnection
    from kombu.utils.debug import setup_logging
    
    setup_logging(loglevel="DEBUG")

    with BrokerConnection("amqp://guest:guest@localhost:5672//") as connection:
        try:
            C(connection).run()
        except KeyboardInterrupt:
            print("bye bye")


AMQP schema using an exchange of type topic

kombu-topic

Queue definition:

from kombu import Exchange, Queue

task_exchange = Exchange("user", type="topic")
queue_user_write = Queue("user.write", task_exchange, routing_key = 'user.write')
queue_user_read = Queue("user.read", task_exchange, routing_key = 'user.read')
queue_notify = Queue("notify", task_exchange, routing_key = 'user.#')


The producer:

from __future__ import with_statement
from queues import task_exchange

from kombu.common import maybe_declare
from kombu.pools import producers


if __name__ == "__main__":
    from kombu import BrokerConnection

    connection = BrokerConnection("amqp://guest:guest@localhost:5672//")

    with producers[connection].acquire(block=True) as producer:
        maybe_declare(task_exchange, producer.channel)
        
        payload = {"operation": "create", "content": "the object"}
        producer.publish(payload, exchange = 'user', serializer="pickle", routing_key = 'user.write')

        payload = {"operation": "update", "content": "updated fields", "id": "id of the object"}
        producer.publish(payload, exchange = 'user', serializer="pickle", routing_key = 'user.write')

        payload = {"operation": "delete", "id": "id of the object"}
        producer.publish(payload, exchange = 'user', serializer="pickle", routing_key = 'user.write')

        payload = {"operation": "read", "id": "id of the object"}
        producer.publish(payload, exchange = 'user', serializer="pickle", routing_key = 'user.read')

One consumer:

from queues import queue_events_db
from kombu.mixins import ConsumerMixin

class C(ConsumerMixin):
    def __init__(self, connection):
        self.connection = connection
        return
    
    def get_consumers(self, Consumer, channel):
        return [Consumer( queue_events_db, callbacks = [self.on_message])]
    
    def on_message(self, body, message):
        print ("save_db: RECEIVED MSG - body: %r" % (body,))
        print ("save_db: RECEIVED MSG - message: %r" % (message,))
        message.ack()
        return


if __name__ == "__main__":
    from kombu import BrokerConnection
    from kombu.utils.debug import setup_logging
    
    setup_logging(loglevel="DEBUG")

    with BrokerConnection("amqp://guest:guest@localhost:5672//") as connection:
        try:
            C(connection).run()
        except KeyboardInterrupt:
            print("bye bye")


Simple queues

Kombu implements SimpleQueue and SimpleBuffer as simple solution for queues with exchange of type ‘direct’, with the same exchange name, routing key and queue name.

Pusher:

from kombu import BrokerConnection

connection = BrokerConnection("amqp://guest:guest@localhost:5672//")
queue = connection.SimpleQueue("logs")

payload = { "severity":"info", "message":"this is just a log", "ts":"2013/09/30T15:10:23" }
queue.put(payload, serializer='pickle')

queue.close()

Getter:

from kombu import BrokerConnection
from Queue import  Empty

connection = BrokerConnection("amqp://guest:guest@localhost:5672//")

queue = connection.SimpleQueue("logs")

while 1:
    try:
        message = queue.get(block=True, timeout=1)
        print message.payload
        message.ack()
    except Empty:
        pass
    except KeyboardInterrupt:
        break
    print message

queue.close()

The files

Download all example files: kombu-tests.tar.gz

Server send push notifications to client browser without polling

Reading time: 5 – 8 minutes

Nowadays last version of browsers support websockets and it’s a good a idea to use them to connect to server a permanent channel and receive push notifications from server. In this case I’m going to use Mosquitto (MQTT) server behind lighttpd with mod_websocket as notifications server. Mosquitto is a lightweight MQTT server programmed in C and very easy to set up. The best advantage to use MQTT is the possibility to create publish/subscriber queues and it’s very useful when you want to have more than one notification channel. As is usual in pub/sub services we can subscribe the client to a well-defined topic or we can use a pattern to subscribe to more than one topic. If you’re not familiarized with MQTT now it’s the best moment to read a little bit about because that interesting protocol. It’s not the purpose of this post to explain MQTT basics.

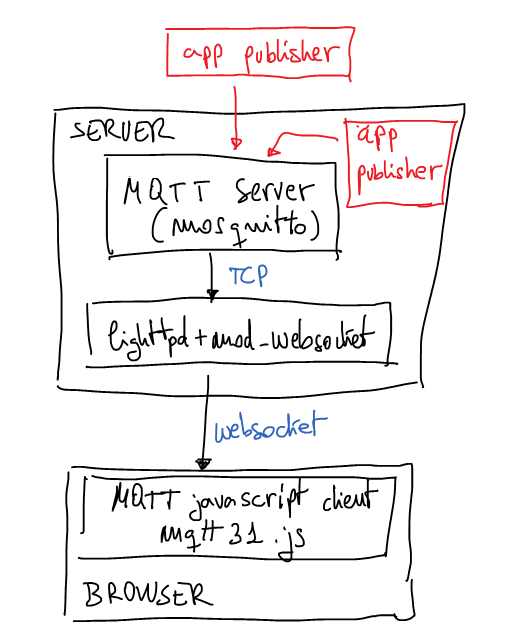
A few weeks ago I set up the next architecture just for testing that idea:

mqtt_schema

weboscket gateway to mosquitto mqtt server with javascrit mqtt client

The browser

Now it’s time to explain this proof of concept. HTML page will contain a simple Javascript code which calls mqttws31.js library from Paho. This Javascript code will connect to the server using secure websockets. It doesn’t have any other security measure for a while may be in next posts I’ll explain some interesting ideas to authenticate the websocket. At the end of the post you can download all source code and configuration files. But now it’s time to understand the most important parts of the client code.

client = new Messaging.Client("ns.example.tld", 443, "unique_client_id");
client.onConnectionLost = onConnectionLost;
client.onMessageArrived = onMessageArrived;
client.connect({onSuccess:onConnect, onFailure:onFailure, useSSL:true});

Last part is very simple, the client connects to the server and links some callbacks to defined functions. Pay attention to ‘useSSL’ connect option is used to force SSL connection with the server.

There are two specially interesting functions linked to callbacks, the first one is:

function onConnect() {
  client.subscribe("/news/+/sport", {qos:1,onSuccess:onSubscribe,onFailure:onSubscribeFailure});
}

As you can imagine this callback will be called when the connections is established, when it happens the client subscribes to all channels called ‘/news/+/sports’, for example, ‘/news/europe/sports/’ or ‘/news/usa/sports/’, etc. We can also use, something like ‘/news/#’ and it will say we want to subscribe to all channels which starts with ‘/news/’. If only want to subscribe to one channel put the full name of the channel on that parameter. Next parameter are dictionary with quality of service which is going to use and links two more callbacks.

The second interesting function to understand is:

function onMessageArrived(message) {
  console.log("onMessageArrived:"+message.payloadString);
};

It’s called when new message is received from the server and in this example, the message is printed in console with log method.

The server

I used an Ubuntu 12.04 server with next extra repositories:

# lighttpd + mod_webserver
deb http://ppa.launchpad.net/roger.light/ppa/ubuntu precise main
deb-src http://ppa.launchpad.net/roger.light/ppa/ubuntu precise main

# mosquitto
deb http://ppa.launchpad.net/mosquitto-dev/mosquitto-ppa/ubuntu precise main
deb-src http://ppa.launchpad.net/mosquitto-dev/mosquitto-ppa/ubuntu precise main

With these new repositories you can install required packages:

apt-get install lighttpd lighttpd-mod-websocket mosquitto mosquitto-clients

After installation it’s very easy to run mosquitto in test mode, use a console for that and write the command: mosquitto, we have to see something like this:

# mosquitto
1379873664: mosquitto version 1.2.1 (build date 2013-09-19 22:18:02+0000) starting
1379873664: Using default config.
1379873664: Opening ipv4 listen socket on port 1883.
1379873664: Opening ipv6 listen socket on port 1883.

The configuration file for lighttpd in testing is:

server.modules = (
        "mod_websocket",
)

websocket.server = (
        "/mqtt" => ( 
                "host" => "127.0.0.1",
                "port" => "1883",
                "type" => "bin",
                "subproto" => "mqttv3.1"
        ),
)

server.document-root        = "/var/www"
server.upload-dirs          = ( "/var/cache/lighttpd/uploads" )
server.errorlog             = "/var/log/lighttpd/error.log"
server.pid-file             = "/var/run/lighttpd.pid"
server.username             = "www-data"
server.groupname            = "www-data"
server.port                 = 80

$SERVER["socket"] == ":443" {
    ssl.engine = "enable" 
    ssl.pemfile = "/etc/lighttpd/certs/sample-certificate.pem" 
    server.name = "ns.example.tld"
}

Remember to change ‘ssl.pemfile’ for your real certificate file and ‘server.name’ for your real server name. Then restart the lighttpd and validate SSL configuration using something like:

openssl s_client -host ns.example.tld -port 443

You have to see SSL negotiation and then you can try to send HTTP commands, for example: “GET / HTTP/1.0” or something like this. Now the server is ready.

The Test

Now you have to load the HTML test page in your browser and validate how the connections is getting the server and then how the mosquitto console says how it receives the connection. Of course, you can modify the Javascript code to print more log information and follow how the client is connected to MQTT server and how it is subscribed to the topic pattern.

If you want to publish something in MQTT server we could use the CLI, with a command mosquitto_pub:

mosquitto_pub -h ns.example.tld -t '/news/europe/sport' -m 'this is the message about european sports'

Take a look in your browser Javascript consle you have to see how the client prints the message on it. If it fails, review the steps and debug each one to solve the problem. If you need help leave me a message. Of course, you can use many different ways to publish messages, for example, you could use python code to publish messages in MQTT server. In the same way you could subscribe not only browsers to topics, for example, you could subscribe a python code:

import mosquitto

def on_connect(mosq, obj, rc):
    print("rc: "+str(rc))

def on_message(mosq, obj, msg):
    print(msg.topic+" "+str(msg.qos)+" "+str(msg.payload))

def on_publish(mosq, obj, mid):
    print("mid: "+str(mid))

def on_subscribe(mosq, obj, mid, granted_qos):
    print("Subscribed: "+str(mid)+" "+str(granted_qos))

def on_log(mosq, obj, level, string):
    print(string)

mqttc = mosquitto.Mosquitto("the_client_id")
mqttc.on_message = on_message
mqttc.on_connect = on_connect
mqttc.on_publish = on_publish
mqttc.on_subscribe = on_subscribe

mqttc.connect("ns.example.tld", 1883, 60)
mqttc.subscribe("/news/+/sport", 0)

rc = 0
while rc == 0:
    rc = mqttc.loop()

Pay attention to server port, it isn’t the ‘https’ port (443/tcp) because now the code is using a real MQTT client. The websocket gateway isn’t needed.

The files

  • mqtt.tar.gz – inside this tar.gz you can find all referenced files

Home heating using Panstamp (Arduino + TI C1101) and SSR

Reading time: 3 – 5 minutes

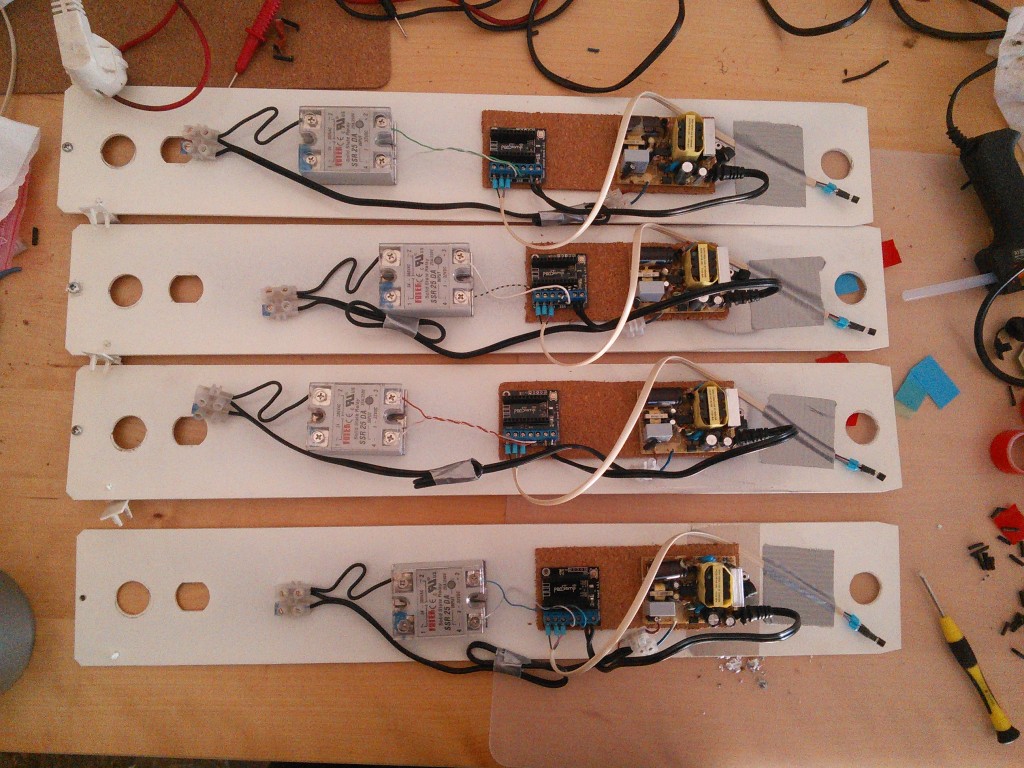
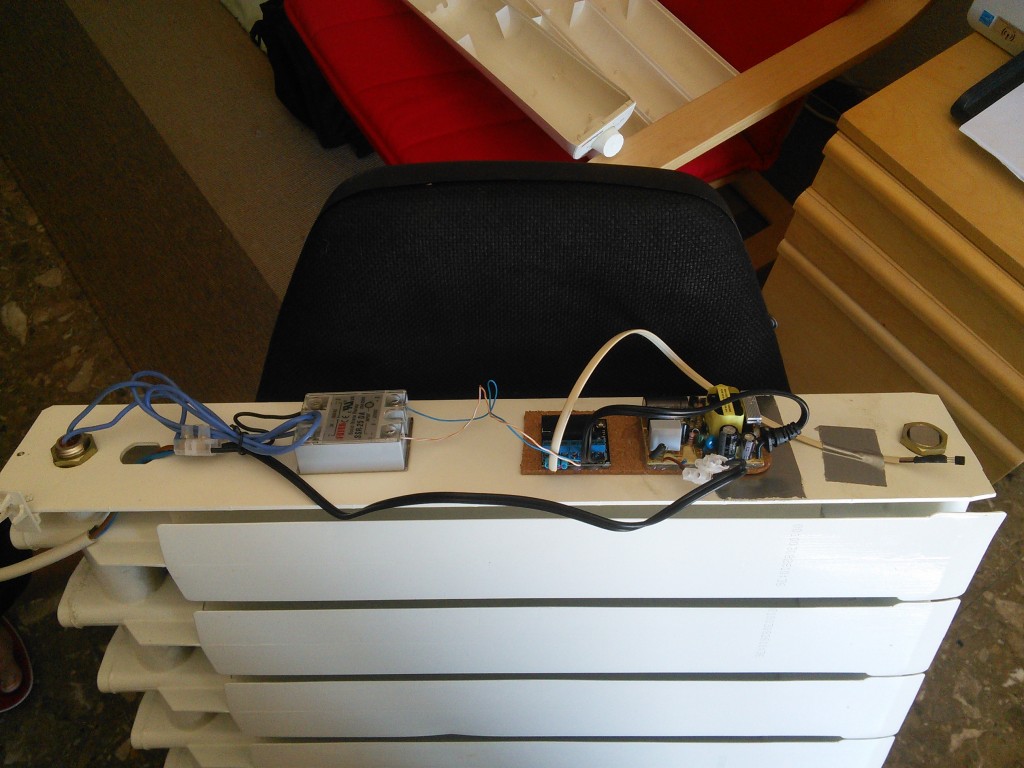
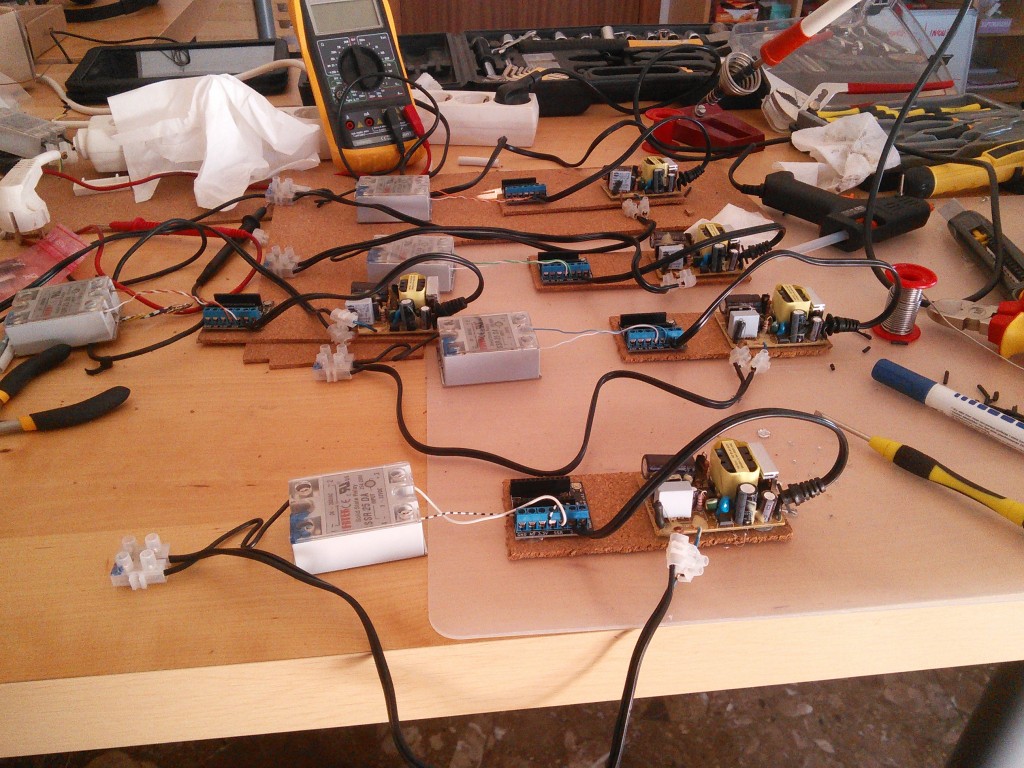
Last weekend I worked on setting up home heaters using Panstamp. Panstamp is an Arduino board with Texas Instruments radio. Next winter we’re going to control our home heater using connected internet devices like the laptop, tablet o mobile phones. In this post I only want to share some pictures about the process to install the electronics inside the heaters changing the old electronic boards with new custom ones.

The parts:

  • AC/DC transformer, outputs 5V. It’s really cheap, in this case free because I have more than 20 of them from old projects.

acdc5v_

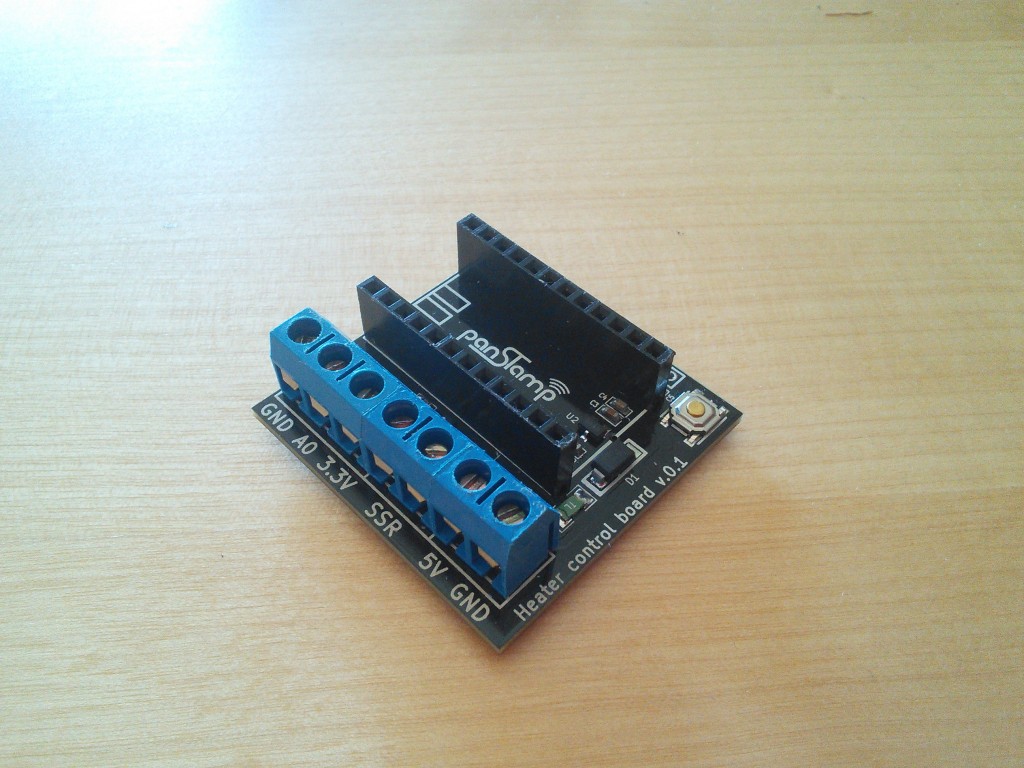
  • A small custom PCB designed and made by Daniel Berenguer, the owner of Panstamp. Thanks again Daniel. I bought the PCBs and parts for around 10€ each one.

IMG_20130923_114830

  • TMP36 temperature sensor. It costs about 1,5€ each one.

IMG_20130923_114814

  • Solid state relay (SSR) bought in Alied Express web site for less than 5€.

ssr

The process:

I used a lot of tools, because DIY aren’t my strong hability.

IMG_20130921_141640

Double-head tape and hot-blue gun are need…

IMG_20130921_133746

because I want to use a cork base under the PSU and PCB

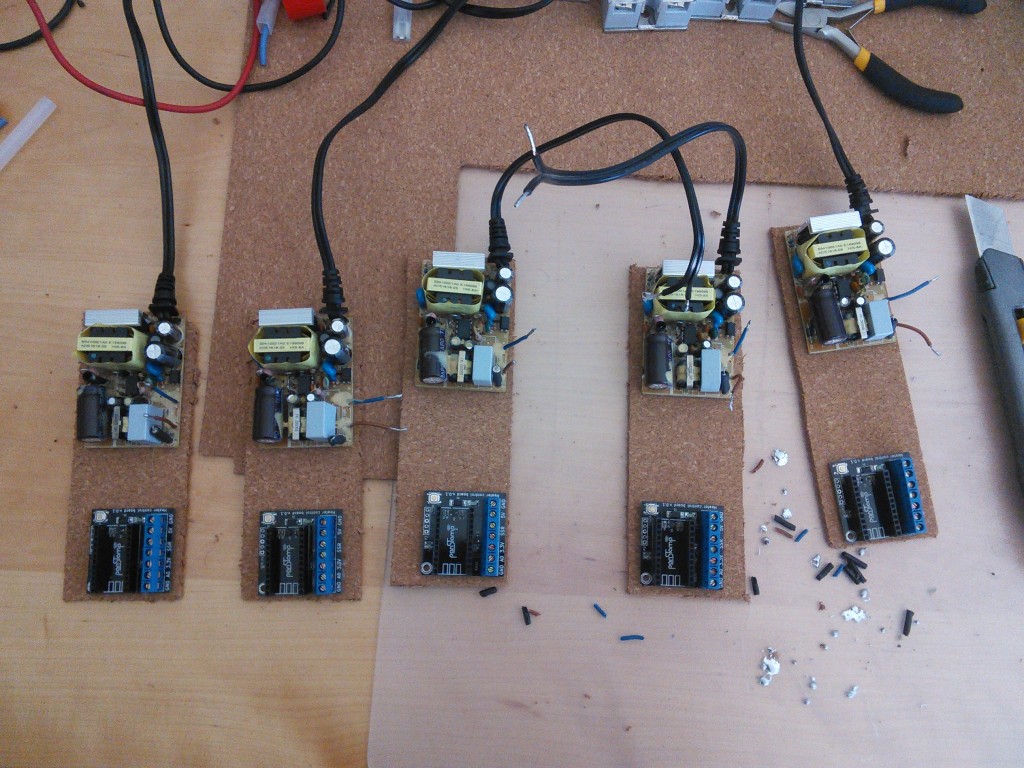
IMG_20130921_133723Parallelization of the last process
IMG_20130921_143116Using a cutter I got the units
IMG_20130921_143434SSR setup
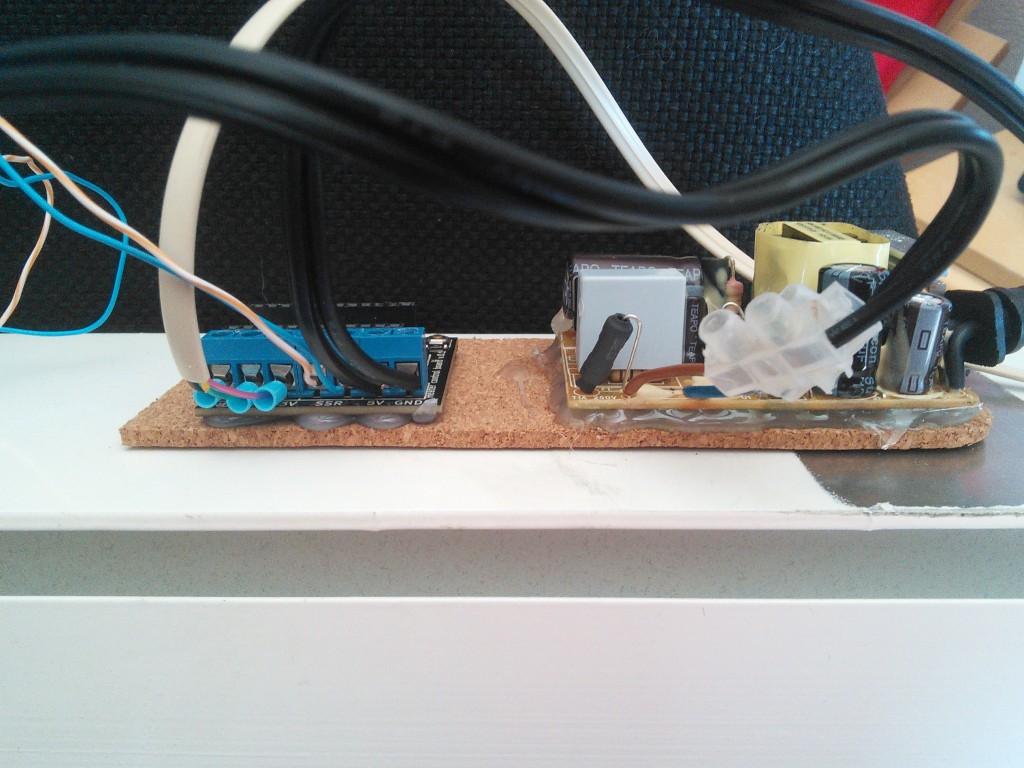
IMG_20130921_164651connecting SSR, PCB and PSU
IMG_20130921_170711assembling everything on heater side panel
IMG_20130921_173937finally, mounting side panel on the heater
IMG_20130921_133547

Next weeks, I’ll come back with this subject to talk about the software part.