oriolrius.cat

Des del 2000 compartiendo sobre…

Category: System administration, Databases, Messaging and Security

RDP vs Team Viewer vs Anydesk

Reading time: 4 – 6 minutes

Lately I bought a Surface Go for working specially as an agenda and for working outside home when I don’t have to work on technical stuff. At some point I considered the idea of working on that device remotely when I’m working with my desktop environment because it could be more comfortable specially because I have a bigger screen and keyboard for interacting with the content that I have on the tablet.

The first thing that I tried to do was enabling Remote Desktop Protocol on my Surface Go. But it was officially impossible because it has Windows 10 Home and the “Home” version doesn’t have this feature. BTW when you are not comfortable with this the best is googling little for finding any hack which allow me to enable the service. And yes, it exists and works really well.

You can find the project which hacks that in Windows 10 Home GitHub it’s called “rdpwrap” and if you want to know more about that go to next links:

After so much effort for getting RDP working on Windows 10 I discovered that RDP doesn’t work like Team Viewer, so you’re not going to control remote desktop while you can view what is happening in that remote session. This is not mandatory for me but in some cases it’s really useful. After some weeks I had to install Team Viewer for getting that feature working and I rediscovered that tool after some years without using it, and I was pleased to discover how good it works and how it improved after some years.

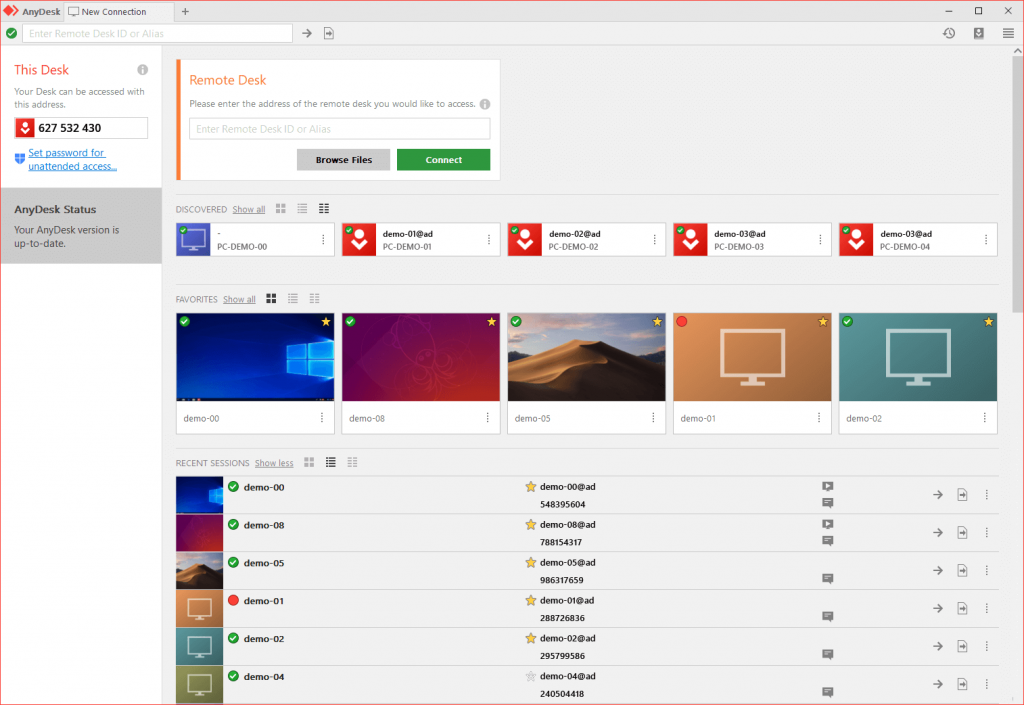
Then something inside me triggered the idea to look it up for an alternative to Team Viewer without so many restrictions and with a better free version. After trying some alternatives to Team Viewer I have to recommend Anydesk as an excellent and simple to use tool. And the most important thing, you don’t have to install anything in your Linux, Mac or Windows computer for using it. The only thing that you have to do is run the executable and use the auto-generated code for connecting to the remote system. I felt very good for those features and currently this is the option which I use for giving some support to friends remotely and for connecting to my Surface Go desktop remotely from my desktop computer.

As you can see this is not an exahustive revision, or comparsion of feautrues of all those three tools. But at the end of the day most of them allow you to do the same things but with slightly different procedures. BTW, the killer feature for me is something that I’ve got from “join.me” in the past, I mean use a tool for remote desktop control without having to install anything in the server and neither in the client part. I didn’t talk about “join.me” because it eats all my resources when I run it, and they focused the tool as a meeting tool and this is not anything that I want. Those extra features killed IMHO the best things that tool had in the past.

TL;DR

The best option IMHO and for my use is Anydesk.

Enjoy it.

Convert JSON file to YAML file using CLI

Reading time: < 1 minute

Just a cookbook about how to get a YAML file when you have a JSON one.

python -c 'import sys, yaml, json; yaml.safe_dump(json.load(sys.stdin), sys.stdout, default_flow_style=False)' < file.json > file.yaml

Nested byobu, re-assigning shortcuts

Reading time: 2 – 2 minutes

I’m a byobu user for a long time, I love it for many reasons. But this is just a quick tip for extreme users like me. I mean people who use byobu for local consoles with remote byobu sessions running on top of SSH, for instance.

When prefix key combinations has to be sent to the remote host we have to press “Control + a + a” and finally the command that we want to send to the remote systems. This is not comfortable many times. So, I modified my configuration file for changing the prefix when I want to send remote commands to the nested byobu.

This is going to work this way:

Control + a

    • as a prefix for local byobu session.

Control + b

    as a prefix for remote byobu session

Take a look on this screen capture where you can see byobu status bars stacked.

If you find useful the configuration that I described the only thing that you have to do is modify the configuration file: ~/.byobu/keybindings.tmux

unbind-key -n C-a 
set -g prefix C-a
set -g prefix2 F12
unbind-key -n C-b 
bind-key -n C-b send-prefix

I hope this is useful as it is for me.

Two new services on joor.net

Reading time: 2 – 3 minutes

Do not expect something exception, or may be anything that nobody else has. Both services are very common and widely available on Internet but I usually have issues when I try to use them.

This is the same reason because I created https://url.joor.net, my own short URL service. Maybe you are asking yourself about which are the next two service that I created for myself; but I exposed to everyone on the Internet.

Firstly I’m talking about a service that returns your public IP address mainly focused to be used from a shell console, but also available by web.

curl -L ip.joor.net

And it only returns your IP address as a plain text, allowing you to do things so useful as assigning the IP address to a variable. Of course, if you access with your web browser is it going to work perfectly to.

Finally, I want to reference a file sharing service also oriented on being used in the console, but it works OK when you use the browser. IMHO, the WUI (Web User Interface) is too much basic and it will be nice if it was more basic user oriented. But the simplicity of the API is the most powerful value of this service and which it makes a Swiss knife in the console. I’m not going to say anything else about the service try it by yourself.

transfer.joor.net

https://x.joor.net

Feel free of sharing your comments with me, thank you for your feedback. BTW, I maintain those services for my private use and I make them available publicly without any kind of warranty.

nethogs: Linux net top tool

Reading time: < 1 minute When a title says all that you have to say, the best is paste the link of the tool and just attach a screenshot: nethogs.

Portable FTP server for Windows

Reading time: 2 – 2 minutes

Usually, simple things are the best, in the case I want to recommend an FTP server for Windows. This is a really simple but super useful FTP server for Windows. I’m using in Windows 10 and it works perfectly. Configuration is done in less than 10″ and installation is not required, I love that. Super portable.

Don’t expect sophisticated options but the most useful and advanced ones are there. If you need something like that my recommendation is:

Quick’n Easy FTP Server Lite by Pablo Software Solutions

Just a summary and extracted from the product webpage this is a summary of features:

  • Simple, intuitive and cool looking user interface, with several pages for managing the users, configuration and security.
  • Easy to setup using the build-in FTP Server Setup Wizard. 
  • Add new user accounts with the User Account Wizard.
  • Support for systems that are a part of a network with a router and/or firewall.
  • Configuration is saved in XML format.
  • Realtime server trace, which displays every command and it’s reply on the screen.
  • Everything can also be logged to a file.

Screenshots are always lovely, some of them are:

[ngg_images source=”galleries” container_ids=”2″ display_type=”photocrati-nextgen_basic_thumbnails” override_thumbnail_settings=”0″ thumbnail_width=”200″ thumbnail_height=”150″ thumbnail_crop=”1″ images_per_page=”0″ number_of_columns=”0″ ajax_pagination=”0″ show_all_in_lightbox=”0″ use_imagebrowser_effect=”0″ show_slideshow_link=”0″ slideshow_link_text=”[Show as slideshow]” order_by=”filename” order_direction=”ASC” returns=”included” maximum_entity_count=”500″]

Finally just say THANKS Pablo for such good job and so useful stuff.

Truncate docker logs

Reading time: < 1 minute Sometimes when a container is running for a long time especially when docker logs command is called the logs dump is extra long and then a recurrent search on google for reminding how to truncate a file is mandatory for avoiding this repeating task this is the trick that it saves me from that uncomfortable long log dump.

truncate -s 0 $(docker inspect --format='{{.LogPath}}' CONTAINER_ID)

HTTPie – command line HTTP client

Reading time: 1 – 2 minutes

I imagine you are used to using curl for many command line scripts, tests, and much more things. I did the same but some weeks ago I discovered HTTPie which is the best substitute that I’ve ever found for curl. Of course, it’s also available for a lot of Linux distributions, Windows, and Mac. But I used it with docker which is much more transparent for the operative system and easy to update. To be more precise I use next alias trick for using this tool:

alias http='sudo docker run -it --rm --net=host clue/httpie'

Official website: httpie.org

Let me paste some highlights about HTTPie:

  • Sensible defaults
  • Expressive and intuitive command syntax
  • Colorized and formatted terminal output
  • Built-in JSON support
  • Persistent sessions
  • Forms and file uploads
  • HTTPS, proxies, and authentication support
  • Support for arbitrary request data and headers
  • Wget-like downloads
  • Extensions
  • Linux, macOS, and Windows support

From the tool webpage a nice comparison about how HTTPie looks like versus curl.

Linux: Mounting file as a partition

Reading time: 1 – 2 minutes

When we have a file with a ‘dd’ of a full disk and we want to mount a partition of that disk, we have to use an offset for jumping to the beginning of the partition that we want to mount.
Using ‘fdisk’ command we can find the partitions of that disk copied inside a file.

fdisk -l FILE_WITH_DISK_INSIDE

Once partition table is shown there is a column called ‘Start’ using the corresponding number in this column for the partition that we want we can obtain the offset required for our mounting point. Reasoning behind that is multiply start sector per number of bytes per sector.

# OFFSET = START * 512
mount -o ro,loop,offset=OFFSET FILE_WITH_DISK_INSIDE /mnt

I hope thanks to this technical note next time that I forget how to get the offset I find it fastly.

UPDATE 2018/08/29:

If you don’t want to do that manually, there is a small tool called losetup which maps the partitions of a disk image on a file.


# example, attaching partitions to loopback devices
losetup -P /dev/loop0 DISK_IMAGE
# just mount the devices now, they are /dev/loop0pX where X is the number of the partition
# dettach this assignament:
losetup -d /dev/loop0

socat tip: create virtual serial port and link it to TCP

Reading time: < 1 minute Create a virtual serial port and publish it on TCP port:

socat pty,link=/dev/virtualcom0,rawer tcp-listen:2101

In another computer, for instance, another virtual port can be created and connected to the previous one:

socat pty,link=/dev/virtualcom0,rawer tcp:SERVER_IP:2101

If in any of those both sides we want to open a real serial port, for instance, in the server case we can run:

socat /dev/ttyS0,rawer tcp-listen:2101

More information on socat manpage.