oriolrius.cat

Des del 2000 compartiendo sobre…

Tag: http

HTTPie – command line HTTP client

Reading time: 1 – 2 minutes

I imagine you are used to using curl for many command line scripts, tests, and much more things. I did the same but some weeks ago I discovered HTTPie which is the best substitute that I’ve ever found for curl. Of course, it’s also available for a lot of Linux distributions, Windows, and Mac. But I used it with docker which is much more transparent for the operative system and easy to update. To be more precise I use next alias trick for using this tool:

alias http='sudo docker run -it --rm --net=host clue/httpie'

Official website: httpie.org

Let me paste some highlights about HTTPie:

  • Sensible defaults
  • Expressive and intuitive command syntax
  • Colorized and formatted terminal output
  • Built-in JSON support
  • Persistent sessions
  • Forms and file uploads
  • HTTPS, proxies, and authentication support
  • Support for arbitrary request data and headers
  • Wget-like downloads
  • Extensions
  • Linux, macOS, and Windows support

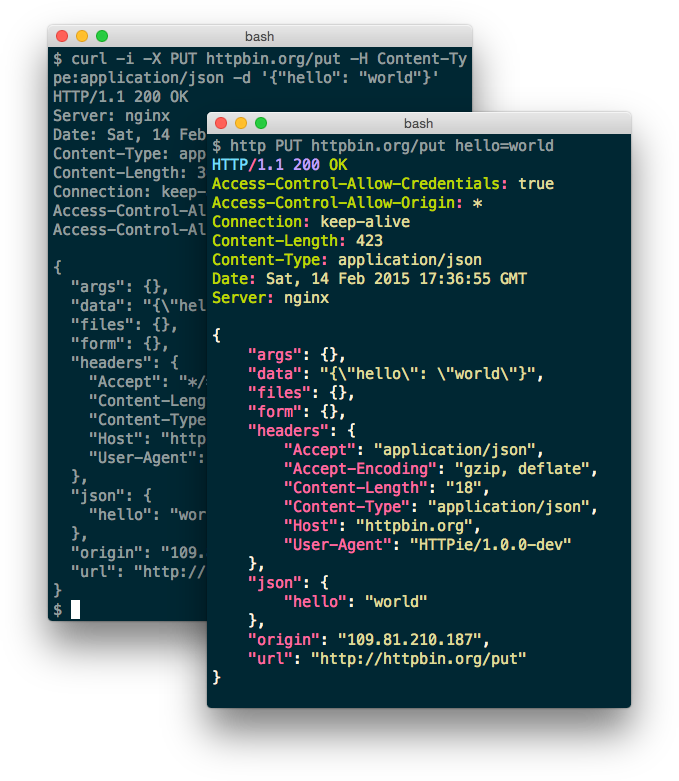
From the tool webpage a nice comparison about how HTTPie looks like versus curl.

Secure download URLs with expiration time

Reading time: 4 – 6 minutes

Requirements

Imagine a HTTP server with those restrictions:

  • only specific files can be downloaded
  • with a limited time (expiration date)
  • an ID allows to trace who download files
  • with minimal maintenance and dependencies (no databases, or things like that)

the base of the solution that I designed is the URL format:

http://URL_HOST/<signature>/<customer_id>/<expire_date>/<path_n_file>
  • signature: is calculated with the next formula, given a “seed”
    • seed = “This is just a random text.”
    • str = customer_id + expire_date + path_n_file
    • signature = encode_base64( hmac_sha1( seed, str))
  • customer_id: just an arbitrary identifier when you want to distinguish who use the URL
  • expire_date: when the generated URL stops working
  • path_n_file: relative path in your private repository and the file to share

Understanding the ideas explained before I think it’s enough to understand what is the goal of the solution. I developed the solution using NGINX and LUA. But the NGINX version used is not the default version is a very patched version called Openresty. This version is specially famous because some important Chinese webs works with that, for instance, Taobao.com

Expiration URL solution Architecture schema

In the above schema there is a master who wants to share a file which is in the internal private repository, but the file has a time restriction and the URL is only for that customer. Then using the command line admin creates a unique URL with desired constrains (expiration date, customer to share and file to share). Next step is send the URL to the customer’s user. When the URL is requested NGINX server evaluates the URL and returns desired file only if the user has a valid URL. It means the URL is not expired, the file already exists, the customer identification is valid and the signature is not modified.

NGINX Configuration

server {
 server_name downloads.local;

 location ~ ^/(?<signature>[^/]+)/(?<customer_id>[^/]+)/(?<expire_date>[^/]+)/(?<path_n_file>.*)$ {
 content_by_lua_file "lua/get_file.lua";
 }

 location / {
 return 403;
 }
}

This is the server part of the NGINX configuration file, the rest of the file can as you want. Understanding this file is really simple, because the “server_name” works as always. Then only locations command are relevant. First “location” is just a regular expression which identifies the relevant variables of the URL and passes them to the LUA script. All other URLs that doesn’t match with the URI pattern fall in path “/” and the response is always “Forbiden” (HTTP 403 code). Then magics happen all in LUA code.

LUA scripts

There are some LUA files required:

  • create_secure_link.lua: creates secure URLs
  • get_file.lua: evaluates URLs and serves content of the required file
  • lib.lua: module developed to reuse code between other lua files
  • sha1.lua: SHA-1 secure hash computation, and HMAC-SHA1 signature computation in Lua (get from https://github.com/kikito/sha.lua)

It’s required to configure “lib.lua” file, at the beginning of the file are three variables to set up:

lib.secret = "This is just a long string to set a seed"
lib.base_url = "http://downloads.local/"
lib.base_dir = "/tmp/downloads/"

Create secure URLs is really simple, take look of the command parameters:

$ ./create_secure_link.lua 

 ./create_secure_link.lua <customer_id> <expiration_date> <relative_path/filename>

Create URLs with expiration date.

 customer_id: any string identifying the customer who wants the URL
 expiration_date: when URL has to expire, format: YYYY-MM-DDTHH:MM
 relative_path/filename: relative path to file to transfer, base path is: /tmp/downloads/

Run example:

$ mkdir -p /tmp/downloads/dir1
$ echo hello > /tmp/downloads/dir1/example1.txt
$ ./create_secure_link.lua acme 2015-08-15T20:30 dir1/example1.txt
http://downloads.local/YjZhNDAzZDY0/acme/2015-08-15T20:30/dir1/example1.txt
$ date
Wed Aug 12 20:27:14 CEST 2015
$ curl http://downloads.local:55080/YjZhNDAzZDY0/acme/2015-08-15T20:30/dir1/example1.txt
hello
$ date
Wed Aug 12 20:31:40 CEST 2015
$ curl http://downloads.local:55080/YjZhNDAzZDY0/acme/2015-08-15T20:30/dir1/example1.txt
Link expired

Little video demostration

Resources

Disclaimer and gratefulness


RTMP source to HLS (HTTP Live Streaming) Apple

Reading time: 2 – 3 minutes

I just solved a very specific problem and I have to write some notes here to remember the solution. Given a RTMP source we have to stream the content to Apple devices like iPad, iPhone and iPod because RTMP couldn’t be played using Safari browser.

If we need to play streaming on Apple devices the best solution is convert it to HLS and publish generated files using HTTP server.

To solve this issue I use rtmpdump and vlc. Firstly rtmpdump gets video stream from source. Secondly the stream is sent to vlc and finally vlc transcodes de video and audio and outputs small .ts files and one .m3u8 index file.

The command is something like this:

rtmpdump -v -r "$RTMP" | sudo -u xymon vlc -I dummy fd://0 vlc://quit --sout="#transcode{width=320,height=240,fps=25,vcodec=h264,vb=256,venc=x264{aud,profile=baseline,level=30,keyint=30,ref=1,nocabac},acodec=mp3,ab=96,audio-sync,deinterlace,channels=2,samplerate=44100}:std{access=livehttp{seglen=10,delsegs=true,numsegs=5,index=$M3U8,index-url=$TS_URL},mux=ts{use-key-frames},dst=$TSF}"

Variables descriptions are:

RTMP=rtmp://example.tld/path/stream_id
WD=/local_path
TS=live-####.ts
TSF=$WD/$TS
TS_URL=http://example.tld/path/$TS
M3U8=$WD/live.m3u8

Then create an HTML file, for example live.html, with a reference to .m3u8 file, the relevant code of the HTML file is like this:

<video width="320" height="240"><source src="http://example.tld/path/live.m3u8" /></video>

A simple code to public files via HTTP:

python -c "import SimpleHTTPServer;SimpleHTTPServer.test()"

Then we only need to open Safary browser in Apple device and set the proper URL, in our case:

http://example.tld/path/live.html

IMPORTANT NOTE: the audio output have to be with two channels and a sample rate of 44KHz in other cases the audio fails.

+1 Scraper (PlusOneScraper)

Reading time: 2 – 3 minutes

Google +1
La nova inteficie web del Google Reader ha portat molta cua a les xarxes socials i als mitjans digitals en general. Quan ets usuario d’un servei cloud, i si aquest és gratuït encara més, has d’estar obert a tot aquest tipus de situacions. Obviament hi ha coses que es fan estrictament per millorar l’experiència d’usuari i d’altres per anar alineats amb l’estrategia de negoci de l’empresa que ofereix el servei, en aquest cas Google.

Doncs bé, en el meu cas no entraré a discutir les moltíssimes sorpreses agradables que m’ha portat la nova interficie, sinó que em centraré a solucionar un dels pocs problemes que m’ha portat la interficie. Abans disposava d’un botó ‘share’ que em generava un petit blog on es penjaben les noticies que jo compartia. A través d’aquell blog la que em seguia podia veure les notícies que anava destacant dels meus feeds i jo mateix podia subscriurem amb un programa de lectura d’RSS per la tablet o el mòbil i així podia atendra les lectures més llargues en diversos moments morts del dia.

El famós botó de ‘share’ ha estat substituit pel ‘+1’ que com molts ja sabeu s’usa en molts llocs, no només al ‘Google Reader’ sinó a moltíssims blogs als que no cal estar sindicat per fer un ‘+1’ als articles que ens agraden, a busquedes de google, etc. De fet, jo pronostico que amb el temps això del ‘+1’ s’extendrà fins a nivell insospitats. Així doncs, a priori la idea és molt bona el problema és que tot el que botem dient que ens agrada s’afegeix al nostres ‘stream’ de ‘Google Plus’ que a dia d’avui no disposa de fil RSS, amb tot el que això suposa com ja he indicat abans.

Tot llegint el blog de l’Enrique Danz resulta que ell també té aquest problema i l’han resolt amb un simple script de PHP que fa d’scraper sobre la llista de ‘+1’ que manté ‘Google Plus’. El codi és senzillíssim d’usar el col·loquem al nostre server LAMP li passem l’usuari de la nostre compte google i l’script ens treu un XML en format RSS amb tot el que hem marcat amb un ‘+1’.

httptunnel: TCP sobre HTTP

Reading time: 2 – 2 minutes

HTTPtunnel logo

Amb httptunnel es poden establir connexions TCP sobre un enllaç HTTP, és a dir, disposem de dues eines el htc i el hts, escencialment el que fa és:

  • hts: publica un port simulant un servidor HTTP al conectar-hi amb htc ens enviarà cap al HOST:PORT configurats
  • htc: es conecta a hts usant HTTP i simulant un client HTTP normal (ffx, crhome, ie, etc) però en realitat transporta paquets TCP en el payload de les queries, l’usuari pot conectar-se a un port local que es publica i que permet accedir al HOST:PORT al que ha conectat hts de forma transparent

Per fer una prova de concepte jo el que he fet és conectar el hts amb un servidor VNC, al costat del htc he connectat un client VNC i he accedit al VNC de forma totalment transparent, a més amb un sniffer he comprovat que els paquets que passeben per la xarxa eren paquets HTTP estàndards, i així era. Tan senzill com això:

server:
./hts -w -F 127.0.0.1:5900 1080

client:
./htc -F 2300 server:1080
vinagre localhost:2300

A més també suporta la possibilitat de fer-ho a través d’un proxy, això si aquest només esta suportat si és sense autenticació o amb autenticació bàsica. Així doncs, a partir d’això em venen al cap algunes millores interessants:

  • suportar autenticació Digest i NTLM.
  • permetre accés al tunel via stdin/stdout (així ho podriem usar amb SSH com a ProxyCommand).
  • poder connectar-se a un segon proxy en l’extrem remot, és a dir, hts no té l’enllaç pre-establert.
  • suportar SSL, així ens estalbiariem haver d’usar stunnel per simular HTTPs.

reDuh: TCP sobre HTTP

Reading time: 1 – 2 minutes

La idea es força simple es tracta de transportar un fluxe TCP sobre d’una connexió HTTP convencional, fiexeu-vos que en aquest cas no estem parlant de proxies ni similars. Sinó de paquets TCP+HTTP que en la part de dades del HTTP tornen a implementar TCP, si fessim un petit esquema seria algo així:

+----+----+------+------+-----+------+
|... | IP | TCP | HTTP | TCP | DATA |
+----+----+------+------+-----+------+

Si realment teniu aquest interés montar reDuh és realment senzill, de fet, suporta servidors amb JSP, PHP i ASP. En escència l’únic que fa és usar aquests protocols per re-obrir una connexió TCP. Així doncs, al servidor on montem aquesta eina hem de tenir certs privilegis per poder obrir sockets des d’un script.
L’eina no és massa recomanable si pensem tenir fluxes de dades molt intensos, per exemple, senssions VNC. Però funciona prou bé si el que volem és transportar una sessió SSH o similar.

Terminals via Web (CLI via Web)

Reading time: 2 – 2 minutes

UPDATE 2017/1/18: I just discovered Wetty which is by far the best option that I found to have a Web Terminal completely easy to use and compatible with Linux terminals. I highly recommend it.

En l’article sobre Turnkey Linux vaig parlar sobre shellinabox, doncs bé per coses de l’atzar he descobert que no és l’únic sistema que preten donar accés a una sessió de shell a través d’una pàgina web.

De fet, les tres eines que he trobat són realment bones, així doncs si algú en sap alguna cosa més sobre elles que m’ho digui perquè no sé amb quina quedar-me:

  • shellinabox: emula un terminal VT100 i es llença com un dimoni que dona accés al host local a través del port que escollim, pot treballar amb o sense SSL.
  • ANYTerm: també suporta SSL però treballa a través d’Apache recolzant-se amb mod_proxy.
  • AJAXTerm: inspirat en ANYTerm però molt més simple d’instal·lar, ja que només depèn de python, o sigui, que treballa com a dimoni en el sistema on volem tenir la shell.

Proxytunnel: connecta un socket a través d’un proxy HTTP i HTTPs

Reading time: 2 – 2 minutes

Descrirure tècnicament el que fa proxytunnel és força senzill, ja que l’únic que fa és connectar l’entrada i sortides estàndard a través d’un socket que va del client al servidor a través d’un servidor proxy HTTP o HTTPs; soportant autenticació de diversos tipus en el servidor proxy.
Gràcies a aquesta funcionalitat tan simple es pot aplicar en infinitat de llocs, per exemple, com a backend d’OpenSSH per tal de poder fer connexions SSH a través d’un proxy HTTP. Això si el proxy haurà de suportar el mètode CONNECT.
Un cop ha establert la connexió amb l’extrem desitjat publica un port a través del qual ens podem connectar a través d’un client TCP convencional i enviar/rebre dades de l’altre extrem del túnel.
Quan treballem sobre proxies HTTP aquests no poden fer inspecció de continguts de capa 7 sinó s’adonaran que el tràfic qeu es passa no és legítim, encanvi si fem el túnel sobre HTTPs això no e un problema ja que no es pode inspeccionar les dades que van per sobre de la capa 4 al anar xifrades.
També cal pensar que és habitual que si el mètode CONNECT, que ha de ser suportat pel proxy esta habilitat (cosa rara que passi) segurament estarà restringit a connectar-se al port 80, 8080 i 443 remots, com a molt. Així doncs, si el que volem és fer una connexió SSH el que hem de fer és publicar el servidor SSH per algún d’aquests ports.
Si esteu interessats en aplicar la solució de la connexió SSH sobre proxy HTTP/s ús recomano seguir el manual que hi ha a la pàgina: DAG WIEERS: Tunneling SSH over HTTP(S).

podcast 1×08: CAS, Central Authentication Server

Reading time: 3 – 4 minutes

L’objectiu d’aquest podcast és donar una visió conceptual del funcionament de CAS 2.0, un servidor d’autenticacions SSO (Single Sign On). Bàsicament esta orientat a usuaris d’aplicacions amb interficie Web. A movilpoint l’estem usant tal com vaig comentar al podcast 1×07.

La diferència entre 1.0 i 2.0 és que la versió 1.0 només podia autenticar usuaris contra aplicacions web i aquests serveis no podien autenticar-se a la seva vegada contra altres serveis (serveis backend).

Amb l’esquema que hi ha a continuació i la previa lectura de les entitats d’un sistema CAS podreu seguir el podcast:


CAS - Central Authentication Server (schema)

A continuació descric les entitats que intervenen en un sistema CAS.

  • Service Ticket (ST): és una cadena de text que usa el client com a credencial per obtenir accés a un servei. Aquest tiquet s’obté del servidor CAS. La forma d’obtenir-lo és a través d’una cookie que es guarda al navegador.
  • Ticket Granting Cookie (TGC): cookie que s’envia al CAS quan un browser ja ha estat autenticat previament per aquest CAS, llavors aquest reconeix la cookie i li dona al browser un Service Ticket (ST) sense haver de passar el procés d’autenticació manual. Caduca en unes 8h aproximadament.
  • NetID: identifica a un ususari, el que coneixem habitualment com username.
  • ServiceID: identificador d’un servei, normalment en format URL.
  • Proxy Ticket (PT): és una altre cadena de text que usa un servei com a credencial per obtenir accés a un servei de backend. O sigui, que el primer servei per tal de desenvolupar la seva activitat li fa falta accedir a un altre servei (servei de backend), per tal d’obtenir accés a aquest darrer servei el primer usarà un proxy ticket. Aquest tiquets s’obtenen al CAS quan el servei que vol l’accés presenta un PGT (Proxy-Granting Ticket) i un identificador de servei que es refereix al servei de backend.
  • Proxy-Granting Ticket (PGT o PGTID): es tracta d’una altre cadena de text que com hem vist al punt anterior l’usa el servei per aconseguir un Proxy Ticket (PT) que li doni accés a un backend service l’accés a aquest servei serà amb les mateixes credencials que l’usuari original, o sigui, el que s’ha autenticat al primer servei.
  • Proxy-Granting Ticket IOU (PGTIOU): com no podia ser d’altre manera és una cadena de text que es passa com a resposta del serviceValidate i del proxyValidate usada per correlacionar un Service Ticket o una validació de Proxy Ticket amb un Proxy-Granting Ticket (PGT) particular.

Ara només queda escoltar el podcast:

[display_podcast]

Els enllaços relacionats amb el podcast:

NOTA: donar les gràcies al Marc Torres per la seva feina, gràcies nano.