oriolrius.cat

Des del 2000 compartiendo sobre…

Tag: router

Add a New Dropdown Menu in OpenWRT LUCI

Reading time: 3 – 5 minutes

OpenWRT, the popular open-source Linux operating system designed for embedded devices, offers the LUCI interface for easy configuration and management. LUCI is essentially the web interface for OpenWRT, and while it’s already feature-rich, sometimes you may want to extend its functionalities based on your needs.

Recently, I had a requirement to enhance my OpenWRT LUCI interface. Specifically, I wanted to introduce a new menu named “Apps” in the LUCI dashboard. The objective was to have each entry within this new menu link to different applications installed on my device. And not just that! I wanted these application pages to pop open in new tabs for ease of access.

The Solution

The changes were made in a single file located at:

/usr/lib/lua/luci/controller/apps.lua

Within this file, I implemented the following code:

module("luci.controller.apps", package.seeall)

function index()
    local page

    page = entry({"admin", "apps"}, firstchild(), _("Apps"), 60)
    page.dependent = false

    entry({"admin", "apps", "portainer"}, call("serve_js_redirect", "https", "9443"), _("Portainer"), 10).leaf = true
    entry({"admin", "apps", "nodered"}, call("serve_js_redirect", "http", "1880"), _("NodeRED"), 20).leaf = true
    entry({"admin", "apps", "grafana"}, call("serve_js_redirect", "http", "3000"), _("Grafana"), 30).leaf = true
    entry({"admin", "apps", "prometheus"}, call("serve_js_redirect", "http", "9090"), _("Prometheus"), 40).leaf = true
end

function serve_js_redirect(protocol, port)
    local ip = luci.http.getenv("SERVER_ADDR")
    local url = protocol .. "://" .. ip .. ":" .. port
    luci.http.prepare_content("text/html; charset=utf-8")
    luci.http.write("<!DOCTYPE html><html><head><meta charset='UTF-8'><title>Redirecting...</title></head><body>")
    luci.http.write("<script type='text/javascript'>")
    luci.http.write("window.onload = function() {")
    luci.http.write("  var newWindow = window.open('".. url .."', '_blank');")
    luci.http.write("  if (!newWindow || newWindow.closed || typeof newWindow.closed == 'undefined') {")
    luci.http.write("    document.getElementById('manualLink').style.display = 'block';")
    luci.http.write("    setTimeout(function() { window.location.href = document.referrer; }, 60000);")  -- Redirigir después de 60 segundos
    luci.http.write("  }")
    luci.http.write("}")
    luci.http.write("</script>")
    luci.http.write("<p id='manualLink' style='display: none;'>The window didn't open automatically. <a href='".. url .."' target='_blank'>Click here</a> to open manually.</p>")
    luci.http.write("</body></html>")
end

Key Points

  • The index function is responsible for defining the new menu and its entries.
  • The serve_js_redirect function creates a web page that uses JavaScript to automatically open the desired application in a new browser tab.
  • A failsafe mechanism is added in the form of a link. If, for any reason (like pop-up blockers), the new tab doesn’t open automatically, the user has the option to manually click on a link to open the application.
  • The script also includes a feature that will redirect the user back to the previous page after 60 seconds if the new tab doesn’t open.

This modification provides a seamless way to integrate external applications directly into the LUCI interface, making navigation and management even more convenient!


OpenVPN between pfSense and Mikrotik

Reading time: 3 – 5 minutes

vpn-pfsense-mikrotik-schemaAssuming previous scenario I’m going to describe the required configurations on pfSense and Mikrotik. Certifcate creation is not part of the scope of this document, if you are not familiar about how to do that it’s a good idea to use the pfSense certificate manager to do it. My last advice is take care with certificates 90% of problems that I found in my life when I was working on VPNs are because of that. Take your time to check it before spend your time playing with other configurations.

In that scenario pfSense will play the role of the VPN server and Mikrotik will be the client, so I’m going to start describing pfSense configurations.

Create OpenVPN server on proper section:

pfsense-openvpn-server


Important things to take in account when you set up the parameters are socket has to be a TCP socket in my case I decided to use port 1201:

pfsense-openvpn-server-configNext settings on the same place are about local network and tunnel IP addresses, this is required to create proper routing rules on the server and the client.

pfsense-openvpn-server-config2


Last part to configure on this sections is extremly simple, only take care to unmark everything and check “address pool” setting.

pfsense-openvpn-server-config3


Remember to open that port on Firewall rules.

pfsense-firewall-rules


A VPN user is required to authenticate the process, just go to “User Management” inside the “System” menu:

pfsense-user-manager-oriol


pfSense is configured, now it’s time to set-up the OpenVPN client on Mikrotik using Winbox. Remember to import the certificates:

certificates-mikrotik


Click on “PPP” this on the left menu:

ppp-mikrotik


Add an OVPN Client connection using the “+” button, the parameters for that connection are:

ppp-interface


Another required thing to define on “PPP” is the profile, click on the tab “Profile” and using the button with symbol “+” create a new profile like that:

ppp-profile


Everything is ready, now it’s time to check if the connection is OK. First go to the OVPN client on Mikrotik, remember this is on “PPP” menu option and inside tab “Interfaces”. Clicking on the interface you’ll see the status details. If it’s disconnect going to pfSense or Mikrotik logs you can see the negotiation details.

Remember usually the problem is with your certificates, but first of all you have to ensure that the negotiation tries to start.

Enjoy it and good luck.


Huawei E960: router HSDPA de Vodafone

Reading time: 4 – 6 minutes

Huawei E960
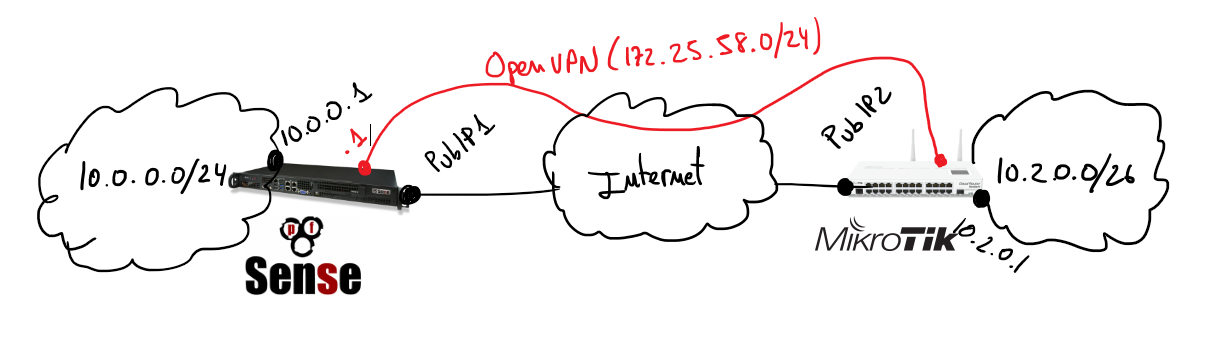
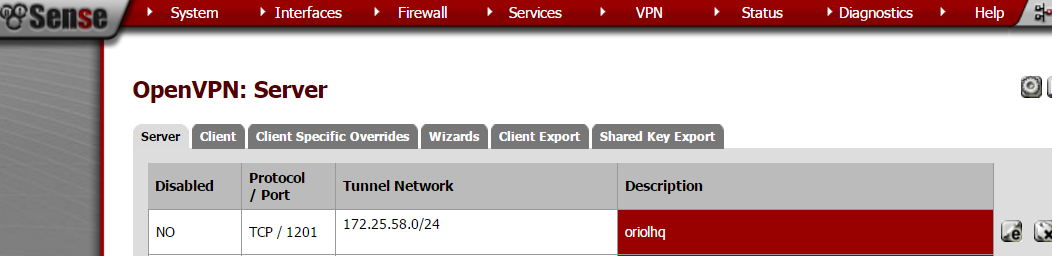
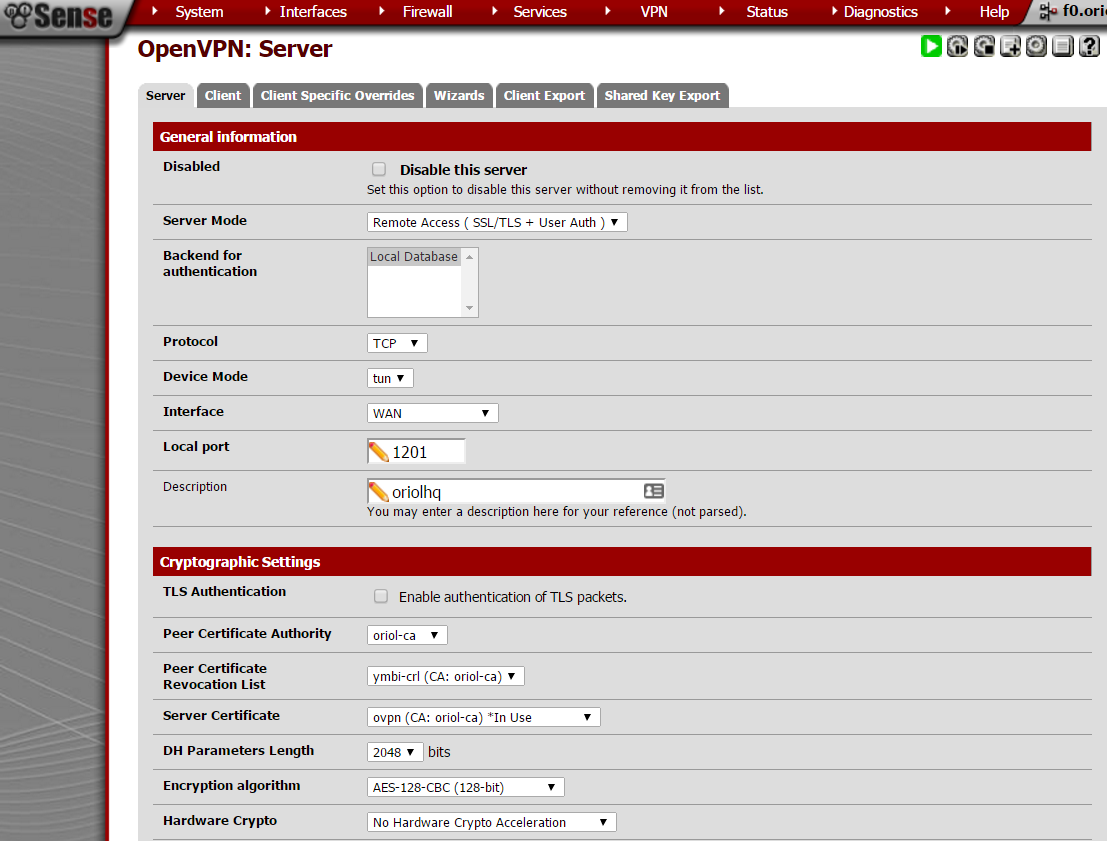
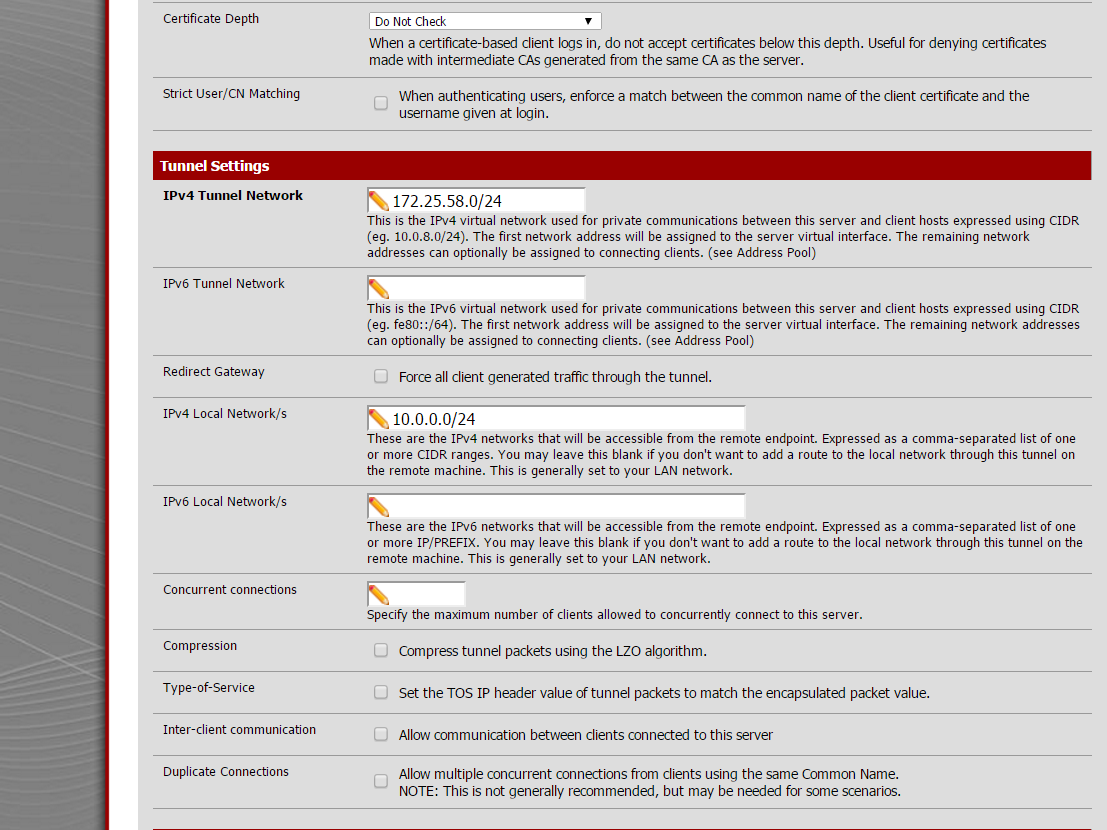
Aquesta tarda he estat provant el Huawei E960 de Voafone, després de l’experiència llarga i dur amb els Linksys WRT54G3G avui tocava descobrir el nou producte de Vodafone. Doncs bé, dir que venint dels Linksys que tants i tants problemes m’han donat, penseu que en tenim ara mateix instal·lats més de 200 i s’espera tenir-ne molts més en els propers mesos i la cosa esta lluny de funcionar bé. Per un costat els problemes de cobertura de l’operadora sobre els que no s’hi poden fer res i per l’altre el fet de que les targetes PCMCIA no acaben de funcionar massa bé ni soles ni amb el router Linksys com a host.

HSDPA router/modem Vodafone

Els problemes típics han estat connexions que el router no informava correctament amb els leds, problemes de bloqueix de SIM per excés de reintents després de que la configuració es guardés malament, molts problemes d’accés a l’interficie web per la configuració i moltes connexions en falç fetes pel propi router. O sigui, connexions no demanades, connexions demanades i no detectades, etc. Per no parlar de la pobre configuració del linux que porta el Linksys dintre que fan que el rendiment del petit switch que incorpora l’aparell funcioni prou malament amb d’altres linux connectats a ell.

Bé doncs, al que toca. El nou router de Vodafone no és pas la ‘panacea‘ ni la solució a tots els malts de caps, però de moment sembla molt més estable i el que ja salta a la vista és que aquest mateix article l’estic escribint connectat des de casa meva a 2.6Mbps que malgrat estar lluny de ser reals donen un bon servei. Així doncs, això pot ser una gran notícia per alguns torrelavidencs que no disposen d’ADSL per manca de qualitat en les seves línies.

Pros a favor del modem/router:

  • Pots connectar-hi un telèfon analògic i usar el router per trucar com si es tractés d’un fix
  • 4 ports ethernet, que sembla que funcionen millor que en el Linksys
  • CD d’instal·lació com a dispositiu Mass Storage USB dins el propi router
  • Alimentació amb connector USB tipus B, via port USB o via transformador
  • Suporta molts mètodes d’autenticació wi-fi, lluny de ser professional però destaca el suport d’WPA2
  • Molt compacte
  • No usa PCMCIA, per tant, disposa d’un compartiment especial per la SIM
  • Sembla estable, de moment
  • Bones orelles, o sigui, deu tenir una bona antena per aconseguir treure connexions HDSPA des del meu poble
  • Fàcil usar-lo en mode DMZ o redirigit conta un servidor/firewall

Contres:

  • No hem funciona com a modem USB a la primera al connectar-lo a un WinXP amb SP2, no he intentat arreglar el problema
  • Interficie web de configuració molt pobre i lletja, malgrat això sembla que funciona ràpid i bé
  • Firewall intern molt lamentable, lleig i limitat. Poc intuitiu el tema del NAT
  • No suporta DynDNS (o similars), el Linksys si que ho suportava

En poques paraules aquest és el meu anàlisis del dispositiu. Com ja deia no és per tirar coets però sembla que algo de millora si que és sobre el Linksys.

UPDATE: ahir estava una mica espès i no se’m va acudir enganxar el test de velocitat que vaig fer amb el dispositiu, aquí teniu el test fet des de casa meva al mig de la muntanya 😉

test speed of Huawei E960 from my home via Vodafone

hw per montar un firewall, router, ap, etc.

Reading time: 2 – 3 minutes

Gràcies al meu nou proveedor de hardware enquestat, mds 2000, m’he posat al dia del catàleg de productes d’AAEON una marca de material embedded molt interessant. El millor del tema és saber que pots comprar-ho a Barcelona mateix i a preu de PVD (Preu de venta distribuidor).

Doncs bé concretament hi ha un model que m’ha agradat molt per montar firewalls en linux (ve amb el Montavista Linux de serie) a casa dels clients, a més gràcies als dos slots mini-PCI tipus III que porta la placa puc posar-hi una o dues targetes wifi. Però el que potser m’ha agrada més són els 6 ports ethernet de que disposa el SBC.

Amb una RAM de 32 o 64Mb segons el model, un processador RISC d’Intel (XScale IXP420/422/425) amb 266 o 533MHz i amb 16Mb de flash. Per si tot això us sembla poc encara n’hi ha més 2 ports serie, 2 ports USB (1 USB 2.0 i 1 USB 1.1) i com no quatre sortides DIO, per controlar altres perifèrics amb protocols I2C, SPI o SMBus.

gene-1425.jpg

Al tractar-se d’un dispositiu embedded les seves mides són minúscules 156mm x 101.6mm i s’alimenta amb corrent continua amb un voltatge que pot anar dels 9 als 24v. O sigui, que tenim on triar. Ara només cal trobar-li una caixa que li vagi com un gua. Amb els ~275$ de cost, més els aproximadament ~10$ de la caixa i uns altres ~15$ de la font d’alimentació podem tenir un firewall, router o el que volguem per un preu molt raonable.

Si voleu aprofundir més sobre el producte: