oriolrius.cat

Des del 2000 compartiendo sobre…

Tag: notifications

Server send push notifications to client browser without polling

Reading time: 5 – 8 minutes

Nowadays last version of browsers support websockets and it’s a good a idea to use them to connect to server a permanent channel and receive push notifications from server. In this case I’m going to use Mosquitto (MQTT) server behind lighttpd with mod_websocket as notifications server. Mosquitto is a lightweight MQTT server programmed in C and very easy to set up. The best advantage to use MQTT is the possibility to create publish/subscriber queues and it’s very useful when you want to have more than one notification channel. As is usual in pub/sub services we can subscribe the client to a well-defined topic or we can use a pattern to subscribe to more than one topic. If you’re not familiarized with MQTT now it’s the best moment to read a little bit about because that interesting protocol. It’s not the purpose of this post to explain MQTT basics.

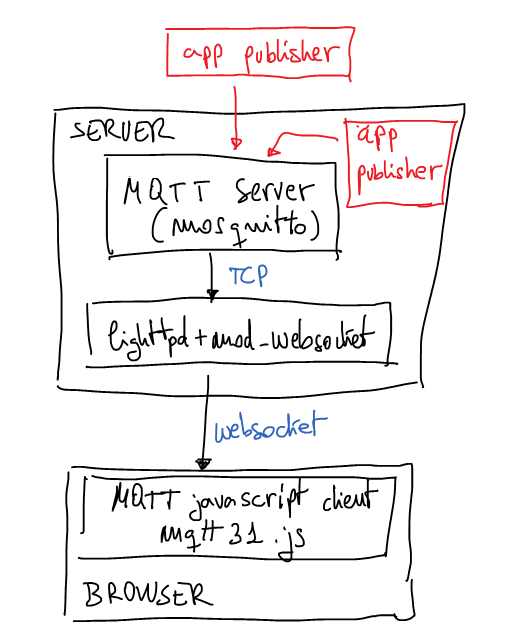
A few weeks ago I set up the next architecture just for testing that idea:

mqtt_schema

weboscket gateway to mosquitto mqtt server with javascrit mqtt client

The browser

Now it’s time to explain this proof of concept. HTML page will contain a simple Javascript code which calls mqttws31.js library from Paho. This Javascript code will connect to the server using secure websockets. It doesn’t have any other security measure for a while may be in next posts I’ll explain some interesting ideas to authenticate the websocket. At the end of the post you can download all source code and configuration files. But now it’s time to understand the most important parts of the client code.

client = new Messaging.Client("ns.example.tld", 443, "unique_client_id");
client.onConnectionLost = onConnectionLost;
client.onMessageArrived = onMessageArrived;
client.connect({onSuccess:onConnect, onFailure:onFailure, useSSL:true});

Last part is very simple, the client connects to the server and links some callbacks to defined functions. Pay attention to ‘useSSL’ connect option is used to force SSL connection with the server.

There are two specially interesting functions linked to callbacks, the first one is:

function onConnect() {
  client.subscribe("/news/+/sport", {qos:1,onSuccess:onSubscribe,onFailure:onSubscribeFailure});
}

As you can imagine this callback will be called when the connections is established, when it happens the client subscribes to all channels called ‘/news/+/sports’, for example, ‘/news/europe/sports/’ or ‘/news/usa/sports/’, etc. We can also use, something like ‘/news/#’ and it will say we want to subscribe to all channels which starts with ‘/news/’. If only want to subscribe to one channel put the full name of the channel on that parameter. Next parameter are dictionary with quality of service which is going to use and links two more callbacks.

The second interesting function to understand is:

function onMessageArrived(message) {
  console.log("onMessageArrived:"+message.payloadString);
};

It’s called when new message is received from the server and in this example, the message is printed in console with log method.

The server

I used an Ubuntu 12.04 server with next extra repositories:

# lighttpd + mod_webserver
deb http://ppa.launchpad.net/roger.light/ppa/ubuntu precise main
deb-src http://ppa.launchpad.net/roger.light/ppa/ubuntu precise main

# mosquitto
deb http://ppa.launchpad.net/mosquitto-dev/mosquitto-ppa/ubuntu precise main
deb-src http://ppa.launchpad.net/mosquitto-dev/mosquitto-ppa/ubuntu precise main

With these new repositories you can install required packages:

apt-get install lighttpd lighttpd-mod-websocket mosquitto mosquitto-clients

After installation it’s very easy to run mosquitto in test mode, use a console for that and write the command: mosquitto, we have to see something like this:

# mosquitto
1379873664: mosquitto version 1.2.1 (build date 2013-09-19 22:18:02+0000) starting
1379873664: Using default config.
1379873664: Opening ipv4 listen socket on port 1883.
1379873664: Opening ipv6 listen socket on port 1883.

The configuration file for lighttpd in testing is:

server.modules = (
        "mod_websocket",
)

websocket.server = (
        "/mqtt" => ( 
                "host" => "127.0.0.1",
                "port" => "1883",
                "type" => "bin",
                "subproto" => "mqttv3.1"
        ),
)

server.document-root        = "/var/www"
server.upload-dirs          = ( "/var/cache/lighttpd/uploads" )
server.errorlog             = "/var/log/lighttpd/error.log"
server.pid-file             = "/var/run/lighttpd.pid"
server.username             = "www-data"
server.groupname            = "www-data"
server.port                 = 80

$SERVER["socket"] == ":443" {
    ssl.engine = "enable" 
    ssl.pemfile = "/etc/lighttpd/certs/sample-certificate.pem" 
    server.name = "ns.example.tld"
}

Remember to change ‘ssl.pemfile’ for your real certificate file and ‘server.name’ for your real server name. Then restart the lighttpd and validate SSL configuration using something like:

openssl s_client -host ns.example.tld -port 443

You have to see SSL negotiation and then you can try to send HTTP commands, for example: “GET / HTTP/1.0” or something like this. Now the server is ready.

The Test

Now you have to load the HTML test page in your browser and validate how the connections is getting the server and then how the mosquitto console says how it receives the connection. Of course, you can modify the Javascript code to print more log information and follow how the client is connected to MQTT server and how it is subscribed to the topic pattern.

If you want to publish something in MQTT server we could use the CLI, with a command mosquitto_pub:

mosquitto_pub -h ns.example.tld -t '/news/europe/sport' -m 'this is the message about european sports'

Take a look in your browser Javascript consle you have to see how the client prints the message on it. If it fails, review the steps and debug each one to solve the problem. If you need help leave me a message. Of course, you can use many different ways to publish messages, for example, you could use python code to publish messages in MQTT server. In the same way you could subscribe not only browsers to topics, for example, you could subscribe a python code:

import mosquitto

def on_connect(mosq, obj, rc):
    print("rc: "+str(rc))

def on_message(mosq, obj, msg):
    print(msg.topic+" "+str(msg.qos)+" "+str(msg.payload))

def on_publish(mosq, obj, mid):
    print("mid: "+str(mid))

def on_subscribe(mosq, obj, mid, granted_qos):
    print("Subscribed: "+str(mid)+" "+str(granted_qos))

def on_log(mosq, obj, level, string):
    print(string)

mqttc = mosquitto.Mosquitto("the_client_id")
mqttc.on_message = on_message
mqttc.on_connect = on_connect
mqttc.on_publish = on_publish
mqttc.on_subscribe = on_subscribe

mqttc.connect("ns.example.tld", 1883, 60)
mqttc.subscribe("/news/+/sport", 0)

rc = 0
while rc == 0:
    rc = mqttc.loop()

Pay attention to server port, it isn’t the ‘https’ port (443/tcp) because now the code is using a real MQTT client. The websocket gateway isn’t needed.

The files

  • mqtt.tar.gz – inside this tar.gz you can find all referenced files
Send email notifications from supervisord

Reading time: 1 – 2 minutes

There is a package called superlance which listens supervisord events. If you install it with:

pip install superlance

Then it’s very easy to setup supervisord to send emails when a daemon changes the state because of a crash or something else.

Lines to add to supervisord configuration file:

[eventlistener:crashmail]
command=/usr/local/bin/crashmail -a -m email1@example.com
events=PROCESS_STATE

if you want to send notifications only for some applications:

[eventlistener:crashmail]
command=/usr/local/bin/crashmail -p program1 -p group1:program2 -m email1@example.com
events=PROCESS_STATE

Of course, superlance can listen many different event signals from supervisor and can take different actions like call to HTTP URL or send SMS. I want to recommend you to take look to the package documentation it could be useful to understand all the superlance power.

long polling amb jquery+jsonp+couchdb (cross domain suportat)

Reading time: 6 – 9 minutes

Porto mesos somiant amb fer la prova de concepte que explico en aquest article, intentaré descriure en que consisteix però ja aviso que la cosa és un pèl complicadilla.

Funcionalitats requerides:

  • long polling: l’objectiu és rebre els canvis d’una base de dades de couchdb en temps real sense haver d’anar preguntant si hi ha canvis, sinó que aquest s’envien cada vegada que es donen de forma automàtica.
  • A través de jQuery el que vull és actualitzar una pàgina web de forma asíncrona, de forma que els nous resultats que vagin entrant a la BBDD es vagin mostrant en temps real a la pantalla.
  • JSONP, és una tècnica que ens permet rebre la sortida JSON de CouchDB i després cridar una funció de callback de JavaScript. El problema és que la funció jQuery.getJSON() original de jQuery té algunes mancances que gràcies a el plugin jQuery-JSONP podem solucionar, aquestes són: (copy/paste de la web del plugin)
    • error recovery in case of network failure or ill-formed JSON responses,
    • precise control over callback naming and how it is transmitted in the URL,
    • multiple requests with the same callback name running concurrently,
    • two caching mechanisms (browser-based and page based),
    • the possibility to manually abort the request just like any other AJAX request,
    • a timeout mechanism.
  • CouchDB és una base de dades NoSQL basada en documents que és capaç d’emetre una senyal (trigger) cada vegada que el contingut d’una base de dades canvia. Per més informació sobre el tema es pot consultar a: CouchDB: The Definitive Guide al capítol Change Notifications.
  • Cross-domain: quan es llença una petició XmlHttpRequest (la base del AJAX) amb JavaScript tenim la limitació de només poder-ho fer sobre el domini que serveix la pàgina web, cap altre port ni subdomini. Obviament tampoc un altre host. Per saltar-se aquesta restricción és quan cal recorrer a JSONP.

La prova de concepte ha estat crear una base de dades anomenada: notifcations on es guarden documents que són notificacions a mostrar a la pàgina web.

Després he programat la següent web:

<html>
<head>
<script type="text/javascript" src="jquery-1.4.2.min.js"></script>
<script type="text/javascript" src="jquery.jsonp-1.1.4.js"></script>
<script type="text/javascript">
function longpoll(since) {
    var url = "http://IP_COUCHDB_SERVER:5984/notifications/_changes?include_docs=true&feed=longpoll&since="+since+"&callback=?";
    console.log("since="+since);
    $.jsonp({
        "url":url,
        "success":function(data) {
            //console.log(data);
            since=data.last_seq;
            try {
                console.log(data.results[0].doc.msg);
            } catch(err) {
                console.log("error:"+err);
            };
            longpoll(since);
        },
        "error":function(msg) {
            //console.log(msg);
            console.log('capturat error');
        }
    });
};

var url = "http://IP_COUCHDB_SERVER:5984/notifications?callback=?";
$.jsonp({
    "url":url,
    "success":function(data) {
        //console.log(data);
        longpoll(data.update_seq);
    },
    "error":function(msg) {
        console.log(msg);
    }
});
</script>
</head>
<body>
cos
</body>
</html>

El codi és força simple de seguir, primer de tot es carreguen les llibreries: jQuery 1.4.2 i jquery-jsonp 1.1.4, ambdues necessaries per cridar el métode $.jsonp que és el que realment farà la feina.

A continuació es declara la funció longpoll que té com a paràmetre el númeral que indica quin ha estat el últim canvi a la base de dades. Aquest s’utiliza per construir la petició que es fa a CouchDB:

var url = "http://IP_COUCHDB_SERVER:5984/notifications/_changes?include_docs=true&feed=longpoll&since="+since+"&callback=?";

La URL el que fa és demanar el següent:

  • els canvis (_changes)
  • incloent els documents que han canviat (include_docs=true)
  • tracta la petició com a long polling (feed=longpoll)
  • mostra els canvis des de la versió X (since=X)
  • quan enviis els canvis fes una crida a la funció de callback definida aquí (callback=?)
    • ‘?’ és substituit per jquery-jsonp per la funció anomenada ‘C’, aquest nom es pot canviar usant paràmetres en la declaració de $.jsonp() que ve a continuació

Els missatges de l’estil ‘console.log()‘ són per tenir un seguiment del que va passant a la consola de javascript del navegador.

$.jsonp() té força paràmetres possibles definits a la API, però en aquesta prova de concepte només uso ‘url’, ‘success’ i ‘error’. El primer esta clar que és, els altres dos són les funcions a cridar quan l’acció va bé o malament respectivament. Dins de la funció posem el codi referent a les accions que volem fer, per exemple, actualitzar la pàgina actual. Com que això només és una prova de concepte el que faig és mostrar missatges per consola i llestos. La part més important és fixar-se que quan la cosa ha anat bé es fa una crida a ella mateix de forma que la cosa no acabi mai. De fet quan hi ha un error es podria també fer una crida a si mateix perquè no pares de provar de llençar la petició un i altre cop, però el que he fet per provar eś que es notifiqui a la consola de javascript i prou.

Fora de la funció longpoll el que es fa és una petició JSONP per saber quina és l’últim número de seqüència de la base de dades, paràmetre necessari per entrar per primera vegada a la funció recursiva de longpoll.

Conclusions

Pot semblar tot una mica enravassat però diria que he simplificat el problema moltíssim, ja que fins ara havia estat teoritzant moltíssim sobre el tema. Fins que ahir i abans d’ahir vaig haver de posar-me a provar-ho a la pràctica per saber exactament com es podia implementar. Sota el meu punt de vista ha quedat tot força net i entenedor.

Pels que sou programadors de webs habitualment haureu tingut necessitats semblants així doncs espero que ús pugui ser tan útil com a mi, de fet, fa unes setmanes que estic treballant amb Tiny Core Linux montant un Quiet PC sobre una DOM de 512MB per usar-la de sistema de monitorització de les meves xarxes i les d’alguns clients, espero que d’aquí uns mesos pugui donar-vos més informació del projecte.