
Ja es poden afegir comentaris al weblog
Reading time: 1 – 2 minutes

Fa temps que com ja haureu notat i com m’han comunicat diverses persones, no hi havia forma d’afegir comentaris al blog. Així que avui m’ha donat la inspiració i he aprofitat per migrar de la versió 3.4 a la 3.6.4 del blog:cms que ja suporta que els usuaris anònims afegeixin comentaris de forma segura sense ‘menjar-se’ tot l’spam. Així docs, a afegir comentaris com a bojos. També inclou d’altres millores aquesta nova versió, mica en mica les aniré configurant però potser la que saltarà a la vista és que ja suporto les technorati tags als items, per tant, el buscador local de techorati ja comença a funcionar a partir d’ara.
Com podreu veure hi ha moltes coses que sortiràn en castellà i no pas en català i algunes fins hi tot en anglès. Espero poder-me posar a traduir-les ben aviat al català. Però aquesta nova versió té molt vocabulari nou i les traduccions al català que tenia hi van fatal. Així que paciència.
Tan de bo no hi hagi gaire errades que se m’hagin passat per alt al fer el canvi de versió. Si us plau comuniqueu-me tot el que aneu trobant perquè ho pugui anar correngint. Moltes gràcies.
Plesk 7.5 – centre de control de hostings
Reading time: 2 – 2 minutes
Aquest item és poc habitual ja que parla d’un producte per linux comercial. Cosa que no m’agrada gaire fer. Però degut a la qualitat del mateix crec que valia la pena dedicar-li una estona en referenciar-lo. Degut a un nou conctacte que he fet gràcies al blog. He congut una gent de Barcelona que tenen un redhat amb un aplicatiu de gestió de dominis molt interessant el plesk. És tipus un webmin però molt més orientat a la gestió de hostings que no pas a la gestió de la màquina en si. No només té una qualitat d’imatge i organització d’informació molt més elegant i còmode que el webmin sinó que a més jo diria que és el millor centre de control de hostings que he vist.

Una cosa interessant és que permet assignar rols de privilegis als usuaris i deixar-los gestionar més o menys informació segons si són l’administrador de tots els hostings, l’administrador d’alguns hostings, d’un hosting o bé simplement un usuari d’un hosting. Tot es fa amb la mateixa interfície i d’una forma molt amigable. Des de canviar una clau, fins a afegir un nou subdomini, passant per reiniciar un servei. Per tant, si algú no sap gaire Linux/Unix i vol disposar d’un servei de gestió de hostings potent i senzill aquest és el meu consell val la pena pagar el cost de les llicències.
Un bon consell pels que els hagi picat la curiositat de saber més coses del Plesk, és que us passeu per la demo de la web.
Grabadora que serigrafia els CDs
Reading time: 1 – 2 minutes

Tot llegint les últimes novetats de hardware m’he trobat una grabadora de DVDs que és capaç de seregrafiar el DVD amb el mateix laser que el graba. La tècnica es diu lightscribe i obviament és una patent. Si la voldeu comprar ja mateix: LaCie d2 DVD±RW with LightScribe 16x no és massa cara, uns 179$.
Tot i que no sé si això és suficient per acabar amb la mandra que fa grabar un CD/DVD… almenys a mi. Ara mateix em sembla que m’acabaré comprant un altre HD més gran abans que grabar tot el que tinc esperant-se a que em digni a perdre el temps grabant-ho a CD/DVD on segurament passarà al oblit per sempre.
Wired & Wireless VoIP phones
Reading time: < 1 minute
Ja he començat a fer proves amb telèfons IP, tan amb cable com sense cable… de moment poca cosa per comentar només la curiositat.

Properament més…
Versió en anglès
Reading time: < 1 minute
Fa temps vaig escriure un article titulat:
Xarxa Wifi Segura: freeRadius + WRT54G = 802.1x (WPA-radius EAP/TLS)
i vaig començar a observar que després de que google l’indexes no paraben d’arribar un munt de visites a l’article, concretament des de gener fins ara n’ha tingut més de 2000. Així doncs li vaig demanar al Carles que me’l traduís a l’anglès ja que entenia que la majoria d’aquestes visites ni idea de català així doncs, com podeu veure acabo de penjar la versió en anglès del mateix, gentilesa del carles. GRÀCIES NANO!!!
Secure wi-fi Net : freeRadius + WRT54G = 802.1x (WPA-radius EAP/TLS)
Secure wi-fi Net : freeRadius + WRT54G = 802.1x (WPA-radius EAP/TLS)
Reading time: 20 – 32 minutes
I wanted to make a high level secure WI-FI network, not like is
been made now with WEP and other foolishness. Then I installed a
FreeRadius server to work with a Linksys
WRT54G. The basic idea is to install a HyperWRT to the WRT54G
(Pof’d advice). After I configure it as WPA-Radius to the firewall were
I installed Freeradius. This
last step is optional because standard WRT54G firmware supports
WPA-Radius.
Network diagram; pay attention at the firewall and AP, the rest it
is not important:

To configure everything I just follow the instructions from the 802.1x HOWTO.
Anyway I made a small guide:
- Install Freeradius in the firewall: emerge freeradius
- Configure Freeradius to work with EAP/TLS
- Generate certificates
- Check freeradius works propertly
- Configure the AP (Linksys WRT54G)
- Configure Windows XP with SP2 clients
- Configure Linux clients
The configuration files I used for freeradius are the next ones:
- /etc/raddb/radiusd.conf:
General Radius configuration file, we must define auth systems and
others to use. There are a lot of parts I haven’t used so I left it as
was coming. I want to thank Pof’s help on borrowing me his
configuration files in order to configure mines. - /etc/raddb/clients.conf:
IPs and network systems that can be radius clients; in our case the AP
(172.16.1.253).
Although the radius power, documentation and lack of time to
experiment gives you this, but if someone can do it better I would
apreciate to know it.
For the generation of certificates the idea is to made them from a
certified entity, but this only happens in films and big companies.
Let’s take OpenSSL and do our work.
If you still haven’t got it, you know: emerge openssl. Sure enough we
aren’t good at PKI and other similar things, then it is better to learn
using freeradius and openssl scripts, because with some modifications
we can create certificates to work with our secure wi-fi networks.
As I was saying wea re going to use the freeradius and openssl
scripts to generate certifieds, then first of all let’s go to the
freeradius folder were we can find a folder called “scripts” with:
CA.certs, certs.sh and xpextensions. I recomend checking order
locations inside scripts because I had problems with this. If you are
lazy to look at the files, you can check mine in this small package: certs.tar.gz
this files are modified to work from the same folder we are working in,
I recomend creating a new and empty folder. Once we have identified the
files, we must have in PATH the script CA.pl, that is a perl script,
but not many times is copied to the PATH so I copied to /usr/bin and I
deleted it after generating the certifieds. I also included the file in
the package, if you are lazy…
Once we have all things in a folder ready to work we can edit
CA.certs to include our information to the variables at the begining of
the file. There is no need to change more variables, it is done
automaticly. Don’t forget the password because we will need it when
configuring the server and the clients.
To generate the certifications just:
# ./certs.shand the output will be something like that:
Generating DH parameters, 512 bit long safe prime, generator 2<br>This is going to take a long time<br>........................+......................................................+...........+................................+..........+.......................+...+...........................................+...............................+............+..............+.................................+.......+..+.................................................+....+....................+.........................................+..+......+................................................+........+.....+...............+...........+.+..................+...........+..................................................+............+......+.+.................+.+.........................+....+................+....+....+.....+.........................+............+......+.+..........................................................+..+...........................................+.........................+.............................+..................................................+...+...++*++*++*++*++*++*<br> See the 'certs' directory for the certificates.<br> The 'certs' directory should be copied to .../etc/raddb/<br> All passwords have been set to 'whatever'Don’t care about the messages, just in case any error happen. Now
you’ll have a new folder inside the folder were you are, called certs
and inside can find all the certifications for the server and the
client. I recomend coppying the contents from ./certs to
/etc/raddb/certs then you’ll not have to change the configuration files
I give you.
The most important thing now is checking the configuration files I
gave you first and check that the radius server starts without
problems, that unfortunately never happens. About the radiusd.conf I
don’t think you might have lots of problems, just check that paths to
the certifications are the correct ones you just have created. Also
check the parameter: private_key_password = whatever.
Change ‘whatever’ for your password, the one you have used for the
variable PASSWORD inside the CA.certs file. If you don’ do that, once
you start the daemon with radiusd -X you will be
asked for a key used to symetricaly crypt the files with a private key,
as is the password I am talking about. If you don’t do that when /etc/init.d/radiusd
start you’ll have an error because the server would not use
the keys to access the certifications.
Just do : radiusd -X and if you get the next
output:
Ready to process requests.everything works fine. Just do CRTL+C and start the Gentoo daemon (/etc/init.d/radiusd
start)
or just leave it like it as it is in a terminal client then you can see
the logs been generated in order to check if everything works ok. If
you want to check the history logs while the daemon is on, just find
them at /var/log/radius/. The start daemon logs are
in startup.log and the connection ones in radius.log.
To see the log in real time just do: tail
-f /var/log/raddb/radius.log
Before configuring the users you need to configure the AP as
radius client. You can configure the AP as you want but I configured it
as a router between two networks; the user’s network with DHCP
(192.168.2.0/24) and the called Internet by the AP (172.16.1.253). I
like configuring this way the network; a cable that is going to the
firewall where can comunicate with the freeRadius. For example; the
firewall interface with IP 172.16.1.254 and the ‘Internet’ interface
from the WRT54G with IP 172.16.1.253. Then you need to make sure that
the IP is allowed to work with radius editing file /etc/raddb/clients.conf
like in the next example:
client 172.16.1.253/32 {<br> secret = SharedSecret99<br> shortname = localhost<br>}See that here appears another password, this ‘pre-shared
key’ is used by the WPA-client (WRT54G) and the radius server
(freeRadius) to crypt their communications. Then you have to make sure
this key is inserted in the AP configuration. Here I am attaching a
screenshot of how the AP wireless security configuration must be to
work with radius server:

<div class="imatge" style="text-align: center;"></div>For the configuration of the Windows client first of all you have
to check if the wifi network card has the correct firmware to work with
WPA with EAP/TLS. If you don’t know it, just use the next manual of how
to configure a WXP and if you cannot find the options I show it is that
your card isnt’ valid. I just tryed in a WXP SP2, for all the rest, I
don’t know.
I made a PDF file with lots of screenshots to easy configure the
WXP client. You have to install two certification files; root.der
and root.p12. You should create them before and can
be find at /etc/raddb/certs.
I recomend you copying this files into a pendrive and use it for all
clients.
How
to install the EAP/TLS clients with Windows XP SP2 in PDF format.
This document is based in: HOWTO:
EAP//TLS Setup for FreeRADIIUS and Wiindows XP Supplliicant in PDF
format too.
About Linux configuration; I haven’t tryed yet because my PCMCIA
wifi card firmware is old. But I am going to try the card integrated in
my laptop that works with ndiswrapper or linuxant Linux drivers, both
of them prepared to use wap_suplicant, necessary for the WPA/TLS
authentication in a Linux box. When I get to the point don’t
worry, I’ll tell you. Don’t want to work much with Windows, I got
nervous at work seing that kaos.
I attach you some references I used to help me:
- 8021X-HOWTO
–
This document describes the software and procedures to set up and use
IEEE 802.1X Port-Based Network Access Control using Xsupplicant as
Supplicant with FreeRADIUS as a back-end Authentication Server. - FreeRADIUS/WinXP
Authentication Setup – This post describes how to build a
FreeRADIUS server for TLS and PEAP authentication, and how to configure
the Windows XP clients (supplicants). The server is configured for a
home (or test) network. - HOWTO on
EAP/TLS authentication between FreeRADIUS and XSupplicant – This
document describes how to setup strong cryptographic authentication
between XSupplicant and FreeRADIUS. This is accomplished using part of
802.1x authentication for wireless network. In particular it uses
EAP/TLS extension, and TLS handshake.
I pretend this helps as much people as possible. Thank you for
your patience.
whatisinmybag
Reading time: 1 – 2 minutes
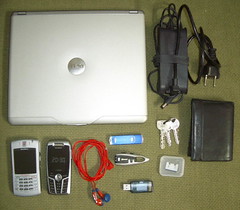
Aquest és el tag que usen moltíssimes imatges del flickr, per tal de problar aquest servei del que tothom parla i que sembla que esta tan bé m’he decidit apuntar a aquesta moda amb el meu “whatisinmybag”. No crec que a ningú li interessi però aquí ho teniu.També dir que aquest post l’he publicat automàticament des de la web de flickr. L’aplicatiu em pensava que seria molt més simple. Però la veritat és que esta molt currat permet organitzar les fotos d’una forma molt senzilla i m’encanta lo de poder posar notes a les imatges. El problema és quan penges massa imatges que ja fa mandar el tema. Però per algunes imatges com la que he usat per exemple ho trobo molt útil.
Si voleu veure la imatge des de flickr amb les notes interactives i tota la pesca: imatge original amb notes interactives.
UPDATE: si voleu saber què és això del flickr i amb català al blog de Lliure Albir: Flickr, que es aixo?.
Pentax Optio s5i
Reading time: 2 – 2 minutes
Sembla que aquesta és la setmana de les càmares de fer fotos digitals. No sé si és perquè s’acosta la primavera i tothom vol fotografiar les noies ‘maques’ del carrer, perquè tothom es vol llençar a viatjar… la qüestió és que en menys de 3 dies 4 o 5 persones m’ha preguntat quina càmara es compren. Començant per mon germà al que ràpidament el vaig posar al corrent de les avantatges de la Pentax Optio s5i l’evolució de la meva Pentax Optio s4. Què té de millor: doncs a part dels 5megapixels, cosa poc important per mi, té millorats tots els petits defectes del meu model. Per exemple, la botonera de la s4 és una mica ‘endeble’. La velocitat a l’hora de grabar informació a la targeta SD és un pèl lenta. Graba video de forma indefinida, la s4 només 30s. Menús d’ús més senzills i amb moltes icones. Pantallà molt més grossa. I d’altres funcions que no trobo tan importants. Com a detall ús confirmo que les bateries que usen són compatibles. Així doncs ara entre les dues càmares tenim 3 bateries.

Així doncs si heu de comprar una pentax ús recomano les avantages de la serie ‘i’. Si com el meu germà no heu pogut resistir l’oferta de pixmania la podeu comprar per uns 230¤ amb IVA. Jo fa 1 any i poc vaig pagar quasi 400¤ per la meva s4. I a pcgreen per uns 24¤ podeu comprar-vos una SD de 256Mb amb la que podeu fer unes 500 fotos a 1megapixel. Ús recomano que si us ha picat el ‘gussanillo’ de la s5i us mireu aquest review.
Llapis digitals (digital pens)
Reading time: 3 – 5 minutes

Ja havia sentit a parlar d’aquest inventillo fa temps: els llapis digitals. Però la veritat mai m’havia posat a llegir com funcionaben exactament. Però l’altre dia llegint el blog de l’ernest em va picar la curiositat de mirar el tema. De fet, ja havia comentat al blog el meu interés per dispositius semblants a aquest, per exemple: DigiMemo A501 – el bloc de notes digital. Potser a nivell funcional m’agrada més aquest bloc de notes que comentava fa uns dies que no pas els llapis que us comento ara. Però estem parlant des d’un punt de vista d’ús particular com a anotacions personals i d’altres similars. Si el que volem és plantejar una aplicació comercial per un negoci: omplir formularis, prendre notes, comandes, etc. trobo que és molt més bona opció la dels llàpis òptics.
El funcionament d’aquesta tecnologia és una patent de l’empresa Anoto, per tant, totes les màrques que volen implementar la tecnologia ho han de fer sota la supervisió de la mateixa. Malgrat no tots els models disponibles de llapis digitals funcionen exactament igual si que tenen alguns detalls de funcionament importants en comú. Per exemple, per treballar necessiten un paper especial, que porta una ‘rejilla’ invisible a l’ull que permet a una petita camara instal·lada al boligraf guardar les referències de posició de tot allo que anem escribint sobre el full de paper. Si si! escribint amb tinta normal i corrent. Com ja us podeu imaginar la gràcia del tema esta en que després podem descarregar tot el que hem escrit i que s’ha guardat al boligraf a l’ordinador.

Així doncs com deia tota la informació que escribim sobre el paper es guardarà a la memòria del llapis, normalment hi caben unes 96 pàgines escrites dins la memòria del mateix i segons la marca aquesta informació que es pot passar a través d’una base USB on punxem el llàpis o través d’un sistema inal·lambric bluetooth. Els models que treballem amb bluetooth sovint també suporten el fet de treballar contra un telèfon mòbil i no només contra un ordinador. La informació que guarda el llàpis es guarda en un format vectorial, que es pot convertir facilment en imatges o passar la informació a través d’aplicatius de reconeixement d’escriptura i de gràfics. Això és possible gràcies a que el fet de guardar la informació com a fitxers vectorials ens permet saber els trassos exactes que s’han fet amb el boligraf.
No hi ha gaires marques que fabriquin llapis digitals, algunes d’elles són: logitech, soy erisson o la que té el model que més m’agrada: Nokia Digital Pen SU-1B. No només a nivell de diseny sinó també a nivell de funcionalitats. Molt comode i útil tan a nivell personal com a nivell professional.
Si algú s’anima a comprar-se un d’aquests dispositius que recordi que ha de comprar-se una llibreta, bloc de notes, fulls o el que sigui que suportin aquesta tecnologia. No va bé qualsevol tipus de paper. Els preus la veritat és que no són excessivament cars, però estan lluc de ser varats. Si voleu veure una mica la gama de papers que hi ha: Digital Paper products. És curiós perquè hi ha papers fins hi tot per treballar amb una agenda que es sincronitza amb Outlook.