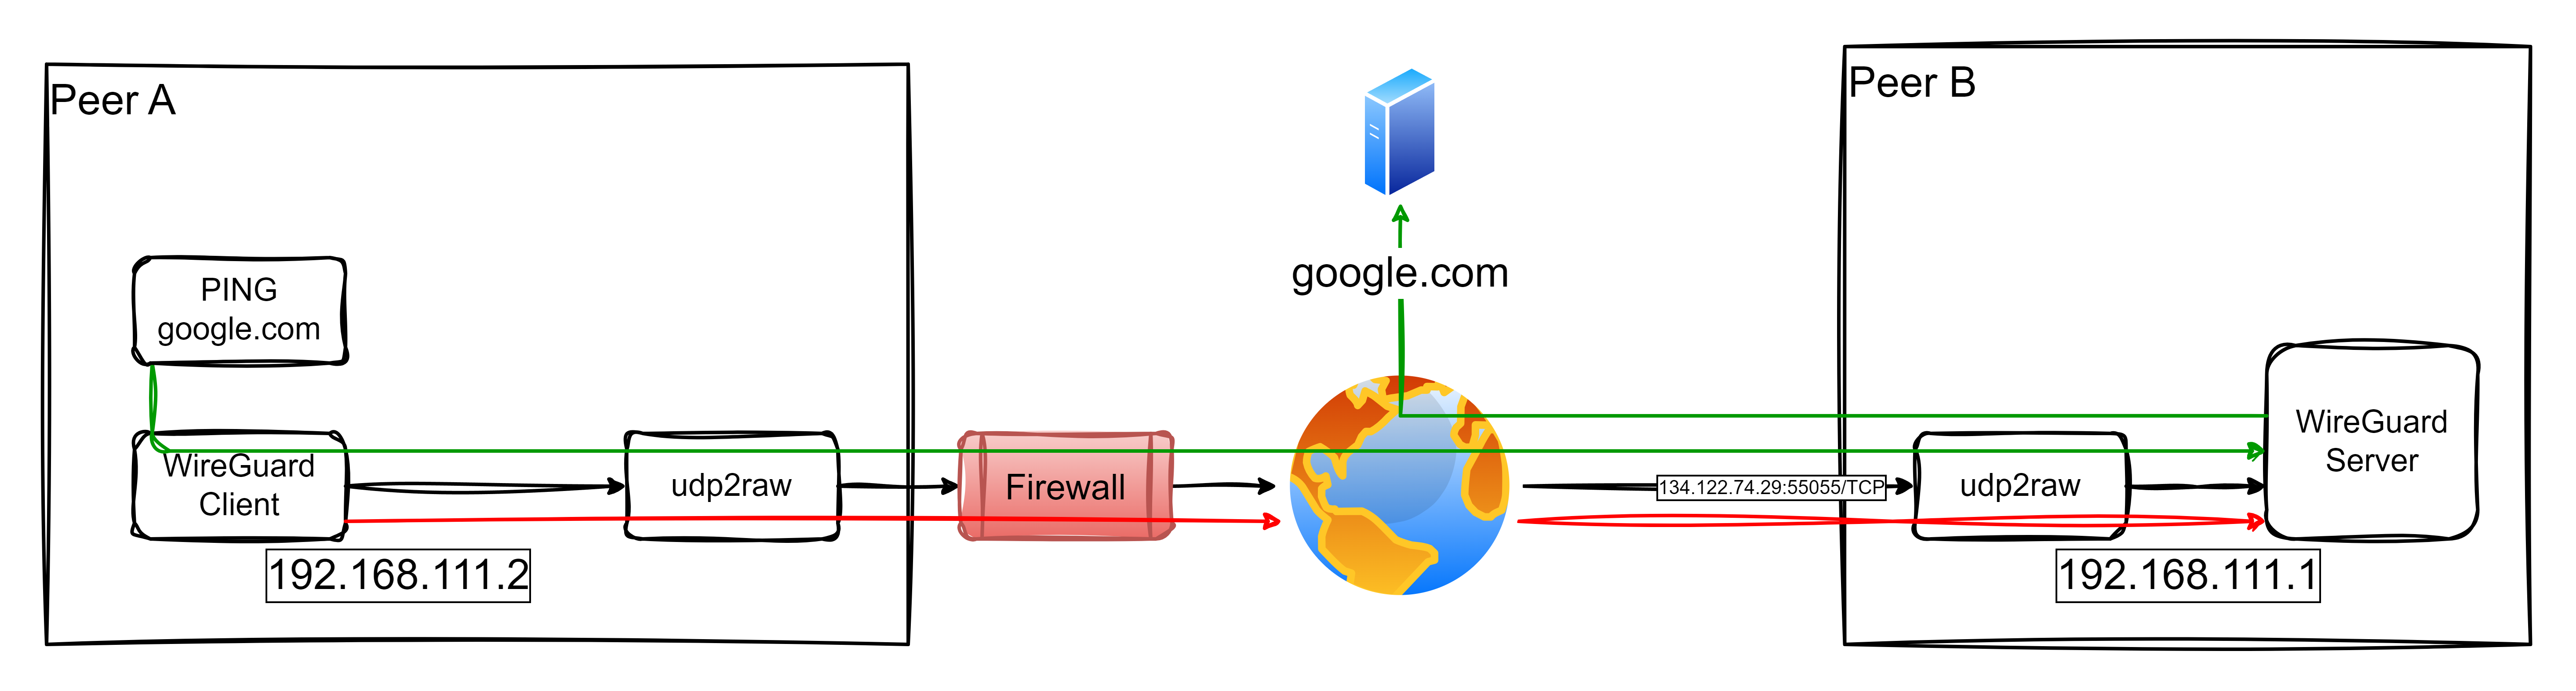
The architecture for this setup is illustrated below:
Install udp2raw, Wireguard and generate keys
cd/tmpwgethttps://github.com/wangyu-/udp2raw/releases/download/20230206.0/udp2raw_binaries.tar.gztarxvfzudp2raw_binaries.tar.gzcpudp2raw_amd64/usr/local/bin/udp2rawrmudp2raw*# based on Ubuntuaptinstallwireguard# we'll work on /etc/wireguardcd/etc/wireguard# generate privatekeywggenkey|sudotee/etc/wireguard/private.keysudochmodgo=/etc/wireguard/private.key# obtain public keysudocat/etc/wireguard/private.key|wgpubkey|sudotee/etc/wireguard/public.key
When eveything is installend and configured, just run in all endpoints next commands:
sudowg-quickupwg0# for status check:wg# udp2raw logs at:tail-f/var/log/udp2raw.log# enable automatic wireward service in Ubuntusudosystemctlenablewg-quick@wg0.service# start and stop service like alwayssudosystemctlstartwg-quick@wg0.servicesudosystemctlstopwg-quick@wg0.servicesudosystemctlstatuswg-quick@wg0.service
Configuration Files
Endpoint A /etc/wireguard/wg0
# local settings for Endpoint A[Interface]PrivateKey=WMUerfcUpSxUlOp1UmaS2uwelnk8AxhAFrlIWpjheWM=Address=192.168.111.1/24ListenPort=51822# receive wg through udp2rawMTU=1342PreUp=udp2raw-s-l167.99.130.97:55055-r127.0.0.1:51822-k"The2password."-a>/var/log/udp2raw.log2>&1&PostDown=killalludp2raw||true# Enable NAT for traffic forwarding (corporate and fallback internet access)PreUp=echo1>/proc/sys/net/ipv4/ip_forward||truePreUp=iptables-tnat-IPOSTROUTING-oeth0-jMASQUERADE||truePreDown=iptables-tnat-DPOSTROUTING-oeth0-jMASQUERADE||true# remote settings for Endpoint B[Peer]PublicKey=XWl8HeAinHlAZTvaCXDlmO9n/CQLg5qH8jmtROK4jBg=AllowedIPs=192.168.111.2/32PersistentKeepalive=120# remote settings for Endpoint C[Peer]PublicKey=I+gi8l9QRe00W8pTpp8CSoIabz/RXXQXwquXj7eKNwU=AllowedIPs=192.168.111.3/32PersistentKeepalive=120
Endpoint B /etc/wireguard/wg0
# Endpoint B[Interface]PrivateKey=+BB3NI2SUYeKcRoPrZE2+Ot5KnLZJBycPzJ17kfbn34=Address=192.168.111.2/24# Route configuration for public IPPreUp=iproutedeldefault||truePreUp=iprouteadd167.99.130.97via10.2.0.1deveth0||truePostDown=iproutedel167.99.130.97via10.2.0.1deveth0||truePostDown=iprouteadddefaultvia10.2.0.1||trueMTU=1342PreUp=udp2raw-c-l127.0.0.1:50001-r167.99.130.97:55055-k"The2password."-a>/var/log/udp2raw.log2>&1&PostDown=killalludp2raw||true# Endpoint A[Peer]PublicKey=z73wM1b7fhMRA8fmeQw4FntRvgJ9JwTdsQHssXHg3DE=Endpoint=127.0.0.1:50001AllowedIPs=0.0.0.0/0PersistentKeepalive=120
Endpoint C /etc/wireguard/wg0
# Endpoint C[Interface]PrivateKey=YCGzsfeed8QumpfE8bdWRheMzBiUsTB7vXj0YVOQQX0=Address=192.168.111.3/24# Route configuration for public IPPreUp=iproutedeldefault||truePreUp=iprouteadd167.99.130.97via10.2.0.1deveth0||truePostDown=iproutedel167.99.130.97via10.2.0.1deveth0||truePostDown=iprouteadddefaultvia10.2.0.1||trueMTU=1342PreUp=udp2raw-c-l127.0.0.1:50001-r167.99.130.97:55055-k"The2password."-a>/var/log/udp2raw.log2>&1&PostDown=killalludp2raw||true# Endpoint A[Peer]PublicKey=z73wM1b7fhMRA8fmeQw4FntRvgJ9JwTdsQHssXHg3DE=Endpoint=127.0.0.1:50001AllowedIPs=0.0.0.0/0PersistentKeepalive=120
In this post, I’ll share how I set up a WireGuard VPN over TCP using udp2raw, which provides secure access to corporate networks and serves as a fallback for internet access when customer networks impose heavy restrictions. Inspired by Pro Custodibus, this solution enables IoT gateways to seamlessly connect to both the company’s internal services and the broader internet under constrained conditions.
Scenario Overview
The architecture for this setup is illustrated below:
Key Features of the Solution:
Access to Corporate Networks: IoT Gateways securely connect to the corporate network for accessing internal services.
Fallback Internet Access: When the customer’s network restricts internet access but allows TCP connections to the company infrastructure, the IoT Gateway routes its internet traffic through the company’s network.
How It Works:
Endpoint A (Client): An IoT Gateway connects through the restrictive customer network.
Endpoint B (Server): The WireGuard server is accessible via a public IP (134.122.74.29) on TCP port 55055.
Traffic flows through a TCP tunnel created with udp2raw, enabling the gateway to securely access the corporate network or relay internet traffic via the company’s infrastructure.
This dual-purpose setup ensures robust connectivity for IoT devices even in challenging environments.
Video Demonstration (in Spanish)
I’ve created a video demonstration in Spanish showcasing the entire setup and functionality of this scenario. The video walks through the following steps:
Explaining the problem and network constraints.
Demonstrating the configuration of both endpoints (client and server).
Showing the connection initiation and testing, including how traffic flows through the VPN tunnel.
Verifying fallback internet access through the company network.
This video is ideal for those who prefer visual explanations or need extra guidance in implementing this solution.
Configuration Files
1. Endpoint B (server, /etc/wireguard/wg0.conf)
This configuration allows Endpoint B to act as a gateway for both corporate access and fallback internet connectivity:
# local settings for Endpoint B[Interface]PrivateKey=EMqyADu4Xeu95ZpNZE97FET5eKzN1WSwBkeBWtX1yGg=Address= 192.168.111.1/32ListenPort= 51822# receive wg through udp2rawMTU= 1342PreUp= udp2raw -s -l 134.122.74.29:55055 -r 127.0.0.1:51822 -k "The2password." -a >/var/log/udp2raw.log 2>&1 &PostDown= killall udp2raw || true# Enable NAT for traffic forwarding (corporate and fallback internet access)PreUp= echo 1 > /proc/sys/net/ipv4/ip_forward || truePreUp= iptables -t nat -I POSTROUTING -o eth0 -j MASQUERADE || truePreDown= iptables -t nat -D POSTROUTING -o eth0 -j MASQUERADE || true# remote settings for Endpoint A[Peer]PublicKey=Xt70DJy8ldPcDNW4YM2Dt94n16pTQKFxhmvpgKvJyng=AllowedIPs= 192.168.111.2/32PersistentKeepalive= 120
Key Points:
NAT Rules: These rules enable traffic originating from Endpoint A to use Endpoint B for accessing the internet.
MTU Adjustment: The MTU is set to 1342 to prevent fragmentation issues over the TCP tunnel.
Assumptions:
eth0, is the name of the interface for reaching Internet.
192.168.111.0/24 is available for point-to-point connections in the tunnels.
ud2raw is in PATH.
Don’t re-use my pub and private keys. Neither the pre-shared key of used by udp2raw.
Endpoint A (client, /etc/wireguard/wg0.conf)
This configuration sets up Endpoint A to route all traffic (corporate and internet) through Endpoint B:
[Interface]PrivateKey=yAxByb468bAuMdg5S6AlfYkxbeYDOMEKxdaJ7d2p83g=Address= 192.168.111.2/32# Route configuration for public IPPreUp= ip route del default || truePreUp= ip route add 134.122.74.29 via 10.2.0.1 dev eth0 || truePostDown= ip route del 134.122.74.29 via 10.2.0.1 dev eth0 || truePostDown= ip route add default via 10.2.0.1 || trueMTU= 1342PreUp= udp2raw -c -l 127.0.0.1:50001 -r 134.122.74.29:55055 -k "The2password." -a >/var/log/udp2raw.log 2>&1 &PostDown= killall udp2raw || true[Peer]PublicKey= VUN2JqZiGQ1V46PDoFECw/nMs3/o6n8PvGMV+ad+Hww=Endpoint= 127.0.0.1:50001AllowedIPs= 0.0.0.0/0PersistentKeepalive= 120
Key Points:
Fallback Internet Routing: The AllowedIPs = 0.0.0.0/0 directive ensures all traffic is routed through Endpoint B, including internet traffic.
Dynamic Route Adjustments: The PreUp and PostDown commands manage routes for efficient fallback connectivity.
Here’s the improved Implementation Steps section based on your feedback and expertise in WireGuard and udp2raw:
Implementation Steps
This section outlines the precise steps required to set up the WireGuard VPN over TCP using udp2raw. Follow these instructions carefully for both Endpoint A (client) and Endpoint B (server).
1. Pre-requisites
WireGuard Installation: Ensure WireGuard is installed on both systems. This can usually be done via the package manager of your operating system (e.g., apt install wireguard for Debian-based distributions).
udp2raw Binary: Download the appropriate udp2raw binary from its GitHub Releases Page. Binaries are available for various architectures. For simplicity:
Extract the binary from the tarball (e.g., udp2raw_amd64 for most x86_64 systems).
Place the binary in a directory accessible from your PATH (e.g., /usr/local/bin).
Verify the installation: which udp2raw udp2raw -h # Should display the help menu
2. Prepare the Configuration Files
The configuration files should be located at /etc/wireguard/wg0.conf. Each endpoint has its own specific configuration:
Endpoint A: Use the wg0.conf provided earlier, replacing placeholders like keys and IPs as needed.
Endpoint B: Use the wg0.conf provided earlier.
Ensure both files reflect the IP addresses, MTU settings, and public/private keys accurately.
3. Generate WireGuard Keys
WireGuard requires public-private key pairs for secure communication. Generate them as follows:
Generate the Private Key: wg genkey > privatekey
Generate the Public Key from the private key: cat privatekey | wg pubkey > publickey
Place the private key in the [Interface] section of the respective configuration file (PrivateKey = ...) and the corresponding public key of the peer in the [Peer] section (PublicKey = ...).
Note: Never share your private keys.
4. Start the VPN Tunnel
Start the Server First (Endpoint B):
Bring up the WireGuard interface using wg-quick: sudo wg-quick up wg0
Verify that the interface is active: wg show
Start the Client (Endpoint A):
Bring up the client WireGuard interface: sudo wg-quick up wg0
Verify that the interface is active: wg show
5. Test the Connection
Once both endpoints are active, initiate traffic from Endpoint A to Endpoint B. This step ensures the udp2raw TCP socket is properly established and functioning:
If the ping succeeds, the connection is working as expected.
If it fails, check the logs for udp2raw and WireGuard on both endpoints for errors: less /var/log/udp2raw.log
Once the initial handshake completes, the tunnel will remain active as long as PersistentKeepalive is configured in the client configuration (e.g., PersistentKeepalive = 120).
6. Validate Fallback Internet Access
To confirm the fallback internet routing through Endpoint B:
On Endpoint A, run a test to confirm external connectivity: curl -I https://www.google.com
If the response headers are received, the internet routing through Endpoint B is functioning.
Verify that the traffic is routed through the WireGuard tunnel: traceroute google.com
If fallback internet access fails, ensure that NAT is correctly configured on Endpoint B: iptables -t nat -L -n
7. Troubleshooting
Log Files:
Check the udp2raw logs on both endpoints for issues (e.g., MTU mismatches, handshake failures).
Review WireGuard logs for additional details.
MTU Issues:
If large packets fail but small packets (e.g., ping) succeed, reduce the MTU (e.g., to 1280).
8. Automate Startup
To ensure the VPN starts automatically on boot:
Enable the WireGuard service: sudo systemctl enable wg-quick@wg0
Add udp2raw commands to a systemd service or the PreUp directive in wg0.conf (as shown in the configuration files).
With these steps, you now have a fully operational WireGuard tunnel over TCP, enabling secure communication between endpoints and fallback internet connectivity via the company’s infrastructure.
Conclusion
This configuration provides a robust solution for IoT Gateways operating in restrictive environments. By leveraging udp2raw, WireGuard traffic is tunneled over TCP, enabling:
Seamless Corporate Access.
Fallback Internet Connectivity through the company network when customer environments impose constraints.
This versatile setup ensures uninterrupted operations and secure communications for IoT devices. Explore the Pro Custodibus guide and udp2raw GitHub repository for additional insights.
Zerotier offers a powerful REST API that allows for seamless integration and management of your network. By default, the API is accessible on TCP port 9993. To securely interact with this API, an authentication token is required.
The authentication token is stored in the following file:
/var/lib/zerotier-one/authtoken.secret
To check if the Zerotier service is running correctly, you can use the curl command with the necessary authentication header. Here’s how to do it:
Networking issues can be a real headache, especially when dealing with containerized applications. Whether it’s latency, routing problems, DNS resolution, firewall issues, or incomplete ARPs, network problems can significantly degrade application performance. Fortunately, there’s a powerful tool that can help you troubleshoot and resolve these issues: netshoot.
What is Netshoot?
Netshoot is a Docker container equipped with a comprehensive set of networking troubleshooting tools. It’s designed to help you diagnose and fix Docker and Kubernetes networking issues. With a proper understanding of how Docker and Kubernetes networking works and the right tools, you can troubleshoot and resolve these networking issues more effectively.
Understanding Network Namespaces
Before diving into the usage of netshoot, it’s essential to understand a key concept: Network Namespaces. Network namespaces provide isolation of the system resources associated with networking. Docker uses network and other types of namespaces (pid,mount,user, etc.) to create an isolated environment for each container. Everything from interfaces, routes, and IPs is completely isolated within the network namespace of the container.
The cool thing about namespaces is that you can switch between them. You can enter a different container’s network namespace, perform some troubleshooting on its network stack with tools that aren’t even installed on that container. Additionally, netshoot can be used to troubleshoot the host itself by using the host’s network namespace. This allows you to perform any troubleshooting without installing any new packages directly on the host or your application’s package.
Using Netshoot with Docker
Container’s Network Namespace
If you’re having networking issues with your application’s container, you can launch netshoot with that container’s network namespace like this:
$ sudo docker run -it --net container:<container_name> nicolaka/netshoot
Host’s Network Namespace
If you think the networking issue is on the host itself, you can launch netshoot with that host’s network namespace:
$ sudo docker run -it --net host nicolaka/netshoot
Network’s Network Namespace
If you want to troubleshoot a Docker network, you can enter the network’s namespace using nsenter. This is explained in the nsenter section below.
Using Netshoot with Docker Compose
You can easily deploy netshoot using Docker Compose using something like this:
Netshoot includes a wide range of powerful tools for network troubleshooting. Here’s a list of the included packages along with a brief description of each:
apache2-utils: Utilities for web server benchmarking and server status monitoring.
bash: A popular Unix shell.
bind-tools: Tools for querying DNS servers.
bird: Internet routing daemon.
bridge-utils: Utilities for configuring the Linux Ethernet bridge.
busybox-extras: Provides several stripped-down Unix tools in a single executable.
conntrack-tools: Tools for managing connection tracking records.
curl: Tool for transferring data with URL syntax.
dhcping: Tool to send DHCP requests to DHCP servers.
drill: Tool similar to dig.
ethtool: Tool for displaying and changing NIC settings.
file: Tool to determine the type of a file.
fping: Tool to ping multiple hosts.
grpcurl: Command-line tool for interacting with gRPC servers.
iftop: Displays bandwidth usage on an interface.
iperf: Tool for measuring TCP and UDP bandwidth performance.
iperf3: A newer version of iperf.
iproute2: Collection of utilities for controlling TCP/IP networking.
ipset: Tool to manage IP sets.
iptables: User-space utility program for configuring the IP packet filter rules.
iptraf-ng: Network monitoring tool.
iputils: Set of small useful utilities for Linux networking.
ipvsadm: Utility to administer the IP Virtual Server services.
jq: Lightweight and flexible command-line JSON processor.
libc6-compat: Compatibility libraries for glibc.
liboping: C library to generate ICMP echo requests.
ltrace: A library call tracer.
mtr: Network diagnostic tool.
net-snmp-tools: Set of SNMP management tools.
netcat-openbsd: Networking tool known as the “Swiss army knife” of networking.
nftables: Successor to iptables.
ngrep: Network packet analyzer.
nmap: Network exploration tool and security scanner.
nmap-nping: Packet generation and response analysis tool.
nmap-scripts: Scripts for nmap.
openssl: Toolkit for the Transport Layer Security (TLS) and Secure Sockets Layer (SSL) protocols.
py3-pip: Package installer for Python.
py3-setuptools: Python Distutils Enhancements.
scapy: Packet manipulation tool.
socat: Relay for bidirectional data transfer.
speedtest-cli: Command-line interface for testing internet bandwidth.
openssh: OpenSSH client and server.
strace: System call tracer.
tcpdump: Packet analyzer.
tcptraceroute: Traceroute implementation using TCP packets.
tshark: Network protocol analyzer.
util-linux: Miscellaneous system utilities.
vim: Highly configurable text editor.
git: Distributed version control system.
zsh: Unix shell.
websocat: Simple WebSocket client.
swaks: Swiss Army Knife for SMTP.
perl-crypt-ssleay: Perl module for OpenSSL.
perl-net-ssleay: Perl module for using OpenSSL.
With this extensive set of tools, netshoot is a powerful ally in diagnosing and resolving network issues in your Docker and Kubernetes environments. Whether you’re dealing with latency, routing problems, DNS resolution, firewall issues, or incomplete ARPs, netshoot has the tools you need to troubleshoot and fix these issues.
If you’re interested in trying out netshoot for yourself, you can find the project on GitHub at https://github.com/nicolaka/netshoot. It’s a powerful tool that can help you troubleshoot and resolve network issues in your Docker and Kubernetes environments.
In this blog post, we’ll explore how to use Docker and the lightweight HTTP server, Darkhttpd, to serve static files. This setup is particularly useful when you need a simple web server for sharing files or hosting a static website. We’ll also discuss how to use a reverse proxy like Traefik to route external traffic to the Darkhttpd service.
Docker Compose Configuration
Below is the docker-compose.yml file that defines the Darkhttpd service:
The image field specifies the Docker image to use for the service.
The container_name field sets the name of the container.
The restart field configures the restart policy for the container.
The volumes field defines the volume mounts for the service.
The entrypoint field overrides the default entrypoint of the image.
The networks field specifies the networks that the service is connected to.
Setting Up the Service
Create a directory named site in the same directory as the docker-compose.yml file. Place the static files you want to serve in this directory.
Replace your_network, your_ipv4_address, and your_network_name in the docker-compose.yml file with the appropriate values for your setup.
Run the following command to start the Darkhttpd service:
docker-compose up -d
Access the static files by navigating to the IP address specified in the docker-compose.yml file.
Using a Reverse Proxy
To route external traffic to the Darkhttpd service, you can use a reverse proxy like Traefik. Configure the reverse proxy to forward requests to the IP address specified in the docker-compose.yml file.
Conclusion
Using Docker and Darkhttpd to serve static files is a simple and efficient solution for sharing files or hosting a static website. By adding a reverse proxy, you can easily route external traffic to the Darkhttpd service. This setup is ideal for scenarios where you need a lightweight web server without the overhead of a full-fledged web server like Apache or Nginx.
In today’s interconnected world, maintaining the security of your server infrastructure is paramount. One critical point of vulnerability is the SSH (Secure Shell) service, which allows remote administration of servers. Despite using a non-default port, many administrators still find their servers bombarded with brute-force and denial-of-service attacks. To address this challenge, I’ve developed a solution called StealthSSHAccess.
The Problem
Attackers often employ brute force attacks to gain unauthorized access to servers via SSH. Even if you’ve changed the default SSH port, determined attackers can still discover the new port and target it. These attacks can lead to service disruption, unauthorized data access, and potential breaches of sensitive information.
The Solution: StealthSSHAccess
StealthSSHAccess is an innovative approach to managing remote SSH access while mitigating the risks associated with brute-force attacks. Let’s delve into how it works and why it’s an effective solution:
Dynamic Access Control
StealthSSHAccess takes a dynamic and personalized approach to SSH access control. It operates as a smart gateway between potential attackers and your SSH service. Here’s a simplified breakdown of how it functions:
Monitoring for Intent: Instead of directly exposing the SSH port, StealthSSHAccess monitors a non-SSH TCP port for connection attempts. Attackers, unaware of this, can’t target the SSH port directly.
Capture and Response: When an attempt is made on the monitored port, StealthSSHAccess captures the IP address of the requester. This initial connection attempt fails, serving as a signal of intent to access SSH.
Secure Access Window: Based on this signal, StealthSSHAccess temporarily opens the SSH port exclusively for the captured IP address. This allows for a secure connection from that specific source.
Time-Bound Access: Access is granted for a predetermined duration. If SSH access isn’t established within this timeframe, the port is automatically closed for that specific IP. This tightens the window of exposure and bolsters security.
Automatic Closure: If the port remains unused during the allowed time, StealthSSHAccess automatically revokes access and closes the port. A continuous monitoring mechanism controls this process.
Benefits and Features
1. Enhanced Security: By hiding the SSH port from attackers, StealthSSHAccess reduces the attack surface and minimizes exposure to potential threats.
2. Selective Accessibility: With StealthSSHAccess, you control who gains access by simply attempting a connection to a specific port. This provides an additional layer of security.
3. Minimal Configuration: Implementing StealthSSHAccess is easy thanks to its Docker-based deployment. This means you can integrate it seamlessly into your existing system.
4. Persistence Across Restarts: StealthSSHAccess ensures continuity by persisting IP timer information across service interruptions or restarts. This keeps the system aware of pending access requests.
Getting Started with StealthSSHAccess
To deploy StealthSSHAccess, follow these steps:
Requirements: Ensure you have Docker and Docker Compose installed.
Configuration: Set up environment variables using the provided .env file. Customize parameters like LOGLEVEL, IFACE, PORT_TO_MONITOR, and more to match your environment.
Building and Running: Build the images using docker-compose build, and then launch the services with docker-compose up -d.
Data Persistence: IP timer data is stored in the ./data directory, so make sure it’s writable by the Docker user.
Security Note: Be aware that these services run with privileged access due to their interaction with the system’s network configuration. Understand the security implications before deployment.
Conclusion
In the ongoing battle against cybersecurity threats, StealthSSHAccess stands as a beacon of innovative protection for your servers. By intelligently managing SSH access and responding dynamically to legitimate requests, this solution offers heightened security without sacrificing convenience. Whether you’re an administrator or a security-conscious user, consider integrating StealthSSHAccess into your infrastructure to safeguard your servers from the persistent threats of the digital landscape.
To explore the project, access the source code, and learn more about its implementation, visit the StealthSSHAccess GitHub repository. Remember, security is a journey, and with StealthSSHAccess, you’re taking a proactive step toward a more resilient and secure server environment.
ansible-galaxy install oriolrius.install_gotop# change SERVER_IP, for the IP address where you want to deploy gotopansible -i SERVER_IP,-u root -m include_role -a name=oriolrius.install_gotop all
We have Docker running with containers that are connected to their own private network. To efficiently manage and monitor these containers, it’s often useful to retrieve their private IP addresses.
With the following command, you can easily obtain the private IP addresses of all running Docker containers:
# upload the id_rsa.pub file# then import the public key file for the user used for connecting via SSHuser ssh-keys import public-key-file=id_rsa.pub user=admin-ssh# and it's done.
Everything was OK with my WSL Ubuntu 20.04. (I added WSL at the beginning of the versions because it runs in Windows Subsystem Linux).
But, with the newest WSL Ubuntu 22.04 I was unsuccessful.
After connecting with verbose details, I found this message, that was the key for solving the problem:
debug1: Offering public key:/home/my_user/.ssh/id_rsa RSA SHA256:2******************************Y agentdebug1: send_pubkey_test: no mutual signature algorithm
Then, I discovered that newest SSH versions aren’t compatible with Mikrotik SSH version. It seems that version isn’t enough newest and are incompatible with how public keys are negotiated at the beginning of the connection.
Finally, the solution was to use an extra parameter for establishing the connection:
Of course, an alternative is using ~/.ssh/config file or the system file: /etc/ssh/ssh_config and add this parameter for everything, or specific hosts. For instance, like this:
Host JUST_A_NAME_OF_THE_CONNECTION
  Hostname THE_IP_ADDRESS_OR_HOSTNAME_OF_THE_TARGET_HOST
  user THE_USER
  PubkeyAcceptedAlgorithms +ssh-rsa