Category: Networking and Internet

Cookbook: set-up a TFTP server on Ubuntu

Reading time: 8 – 12 minutes

Sometimes TFTP is the only protocol available to exchange files with an embedded system. So, it’s very easy to have that supported in our workstation or any other place to exchange files with those systems.

Set up steps:

apt-get install tftpd-hpa

modify file “/etc/default/tftpd-hpa”:

TFTP_OPTIONS="--secure --create"

–secure: Change root directory on startup. This means the remote host does not need to pass along the directory as part of the transfer, and may add security. When –secure is specified, exactly one directory should be specified on the command line. The use of this option is recommended for security as well as compatibility with some boot ROMs which cannot be easily made to include a directory name in its request.

–create Allow new files to be created. By default, tftpd will only allow upload of files that already exist. Files are created with default permissions allowing anyone to read or write them, unless the –permissive or –umask options are specified.

Needed to allow uploads in that directory:

chown -R tftp /var/lib/tftpboot

Restart and check if the service is running:

service tftpd-hpa restart
service tftpd-hpa status
netstat -a | grep tftp

New home server working as a wifi AP and DHCP server

Reading time: 19 – 32 minutes

At the beginning of August I’ve received a new home server, I decided to stop my old HP ML110 G5 and substitute that by a new silent and low power server also based on Intel technologies in this case it’s al i5 with 8G of RAM and 128GB of SSD for less than 300€ including custom costs I think it’s a very good investment.

fmp03-geekbuing

I installed Ubuntu 16.04 LTS server, I don’t tried de Win10 pre-installed. I happy to see a very new and powerful BIOS with tons of options. But in this blog entry I want to explain how to set-up the wifi card as a wifi AP. I didn’t have to do anything to configure the card. It worked by default.

Ralink corp. RT3090 Wireless 802.11n 1T/1R PCIe

The first thing is check if the wifi network is compatible with the AP mode.

iw list
...
Supported interface modes:
         * IBSS
         * managed
         * AP
         * AP/VLAN
         * monitor
         * mesh point
...

Next thing is install the “hostapd” which is going to take care to set-up the AP. The configuration file have to be something like that “/etc/hostapd/hostpad.conf

interface=wlan0   # change that with the wifi interface name
driver=nl80211
ssid=test         # your wifi network name
hw_mode=g
channel=1         # look up for a free channel
macaddr_acl=0
auth_algs=1
ignore_broadcast_ssid=0
wpa=3
wpa_passphrase=1234567890   # passwor to join the wifi network
wpa_key_mgmt=WPA-PSK
wpa_pairwise=TKIP
rsn_pairwise=CCMP

Modify “/etc/default/hostapd” and put that:

DAEMON_CONF="/etc/hostapd/hostapd.conf"

Start the hostapd service:

sudo service hostapd start

Now the AP is running but a DHCP service giving IPs it’s need, I used “isc-dhcp-server”. First thing to configure is “/etc/default/isc-dhcp-server” with the wireless network name:

INTERFACES="wlan0"

Next file to be configured is “/etc/dhcp/dhcpd.conf”:

ddns-update-style none;
log-facility local7;

subnet 192.168.1.0 netmask 255.255.255.0 {
    range 192.168.1.128 192.168.1.253;
    option domain-name-servers 192.168.1.1;
    option routers 192.168.1.1;
}

Don’t forget to start the service:

sudo service isc-dhcp-server start

If it’s needed remember to create the proper iptables rules and enable “ip_forward” in /proc filesystem. I’m not going to describe that because in my case it’s not going to be useful.

This is not a specially interesting post entry but useful as a reference, when you have to use a fast and easy cookbook to setup a wifi AP.

Internet fail over connection with Mikrotik

Reading time: 28 – 46 minutes
internet-failover

Based on my home configuration I’m going to describe how to set up a Mikrotik to manage fail over Internet connection. Next schema describes a Mikrotik gateway with two internet connections (GUIFI and SS). Assuming GUIFI as a default Internet connection periodic checks on Google DNSes (8.8.8.8 and 8.8.4.4) will allow to know when it’s good to change the default route.

If you have some Linux routing background it will be easier to understand the configuration. Main idea is use policy routing tables and mark packets to use one table or other. In my case I have two routing tables GUIFI and SS, and of course, the default gateway of each of those tables is the gateway indicated in the schema.

First step is take care about the routes for hosts to monitor; using GUIFI connection will be checking connectivity to 8.8.8.8 and using SS the monitored host will be 8.8.4.4.

/ip route
add dst-address=8.8.8.8 gateway=172.29.2.1 scope=10
add dst-address=8.8.4.4 gateway=172.29.1.1 scope=10

Second step is configure two routing tables, those routes will check Internet hosts availability. Routes are resolved recursively (more info), and will be active only if any host is pingable.

# routing table for GUIFI
/ip route
add distance=1 gateway=8.8.8.8 routing-mark=GUIFI check-gateway=ping
add distance=2 gateway=8.8.4.4 routing-mark=GUIFI check-gateway=ping
# routing table for SS
/ip route
add distance=1 gateway=8.8.4.4 routing-mark=SS check-gateway=ping
add distance=2 gateway=8.8.8.8 routing-mark=SS check-gateway=ping

Routing table looks like that:

routing-table

Next step will be create marking rules in the firewall:

# next rule mark all LAN traffic (10.2.0.0/26) before routing
# it'll be processed by routing table GUIFI
# it makes GUIFI the default Internet connection 
/ip firewall mangle
add action=mark-routing chain=prerouting comment="All LAN traffic" dst-address=\
    !10.0.0.0/8 new-routing-mark=GUIFI passthrough=no src-address=10.2.0.0/26

If any specific host, service or whatever want to use specific routing table, then you can create new rules with proper mark to redirect the traffic to that Internet connection. But if that path fails other Internet connection will be used.

In my case I have a more complicated scenario, internal VoIP server uses a IP Telephony service only available through GUIFI connection. The way to force that is forbidding traffic to SS connection. A simple firewall rule will help to do that:

# X.X.X.X = IP address of the IP telephony provider
/ip firewall filter
add action=reject chain=forward dst-address=X.X.X.X in-interface=\
    bridge-lan out-interface=SS-eth2

I hope previous simple notes are useful for you, they are inspired by Advanced Routing Failover without Scripting.

OpenVPN between pfSense and Mikrotik

Reading time: 3 – 5 minutes

vpn-pfsense-mikrotik-schemaAssuming previous scenario I’m going to describe the required configurations on pfSense and Mikrotik. Certifcate creation is not part of the scope of this document, if you are not familiar about how to do that it’s a good idea to use the pfSense certificate manager to do it. My last advice is take care with certificates 90% of problems that I found in my life when I was working on VPNs are because of that. Take your time to check it before spend your time playing with other configurations.

In that scenario pfSense will play the role of the VPN server and Mikrotik will be the client, so I’m going to start describing pfSense configurations.

Create OpenVPN server on proper section:

pfsense-openvpn-server


Important things to take in account when you set up the parameters are socket has to be a TCP socket in my case I decided to use port 1201:

pfsense-openvpn-server-configNext settings on the same place are about local network and tunnel IP addresses, this is required to create proper routing rules on the server and the client.

pfsense-openvpn-server-config2


Last part to configure on this sections is extremly simple, only take care to unmark everything and check “address pool” setting.

pfsense-openvpn-server-config3


Remember to open that port on Firewall rules.

pfsense-firewall-rules


A VPN user is required to authenticate the process, just go to “User Management” inside the “System” menu:

pfsense-user-manager-oriol


pfSense is configured, now it’s time to set-up the OpenVPN client on Mikrotik using Winbox. Remember to import the certificates:

certificates-mikrotik


Click on “PPP” this on the left menu:

ppp-mikrotik


Add an OVPN Client connection using the “+” button, the parameters for that connection are:

ppp-interface


Another required thing to define on “PPP” is the profile, click on the tab “Profile” and using the button with symbol “+” create a new profile like that:

ppp-profile


Everything is ready, now it’s time to check if the connection is OK. First go to the OVPN client on Mikrotik, remember this is on “PPP” menu option and inside tab “Interfaces”. Clicking on the interface you’ll see the status details. If it’s disconnect going to pfSense or Mikrotik logs you can see the negotiation details.

Remember usually the problem is with your certificates, but first of all you have to ensure that the negotiation tries to start.

Enjoy it and good luck.


Sniffing on Mikrotik and streaming in real-time to Wireshark

Reading time: 2 – 2 minutes

When you have a Mikrotik in any point of your network and you want to launch a sniffer for debugging or troubleshooting, a part from original RouterOS tools, you can stream captured traffic in real-time to Wireshark and inspect packets there.

The idea is exactly the same like I explained on the entry: Sniffing traffic in a Linux box and streaming in real-time to Wireshark on Windows.

Mikrotik configuration using the web interface is like that:

mikrotik-config

We assume 10.2.0.44 is the IP address of the Wireshark box, ensure that you don’t block UDP traffic on port 37008 because the stream from Mikrotik uses that target port. And define your own filters.

About Wireshark configuration is really simple, just set up the filter to allow only traffic from sniffing stream and select the network interface where traffic comes.

wireshark-config

Previous captures allow us to debug DNS queries to Google DNS service, this is the result when you click to the icon marked with a red circle on previous screen capture.

wireshark-traffic

Mikrotik as a PPTP server for Android

Reading time: 4 – 6 minutes

Two years ago I installed a Mikrotik Cloud Switch and lately I stoped my pfSense and I started using that switch as my network router, firewall and also as a switch. RouterOS is really powerful and allows to do a lot of things with that hardware. One of those things is set-up a VPN server based on PPTP. This is not the most secure way to create VPNs but usually the only requirement is a little bit of security on top of an IP over IP service that allows us to use local service when we’re in remote. In my case I have a lot of services in my LAN and I need some of them when I’m out of home specially I need to use them from my mobile phone.

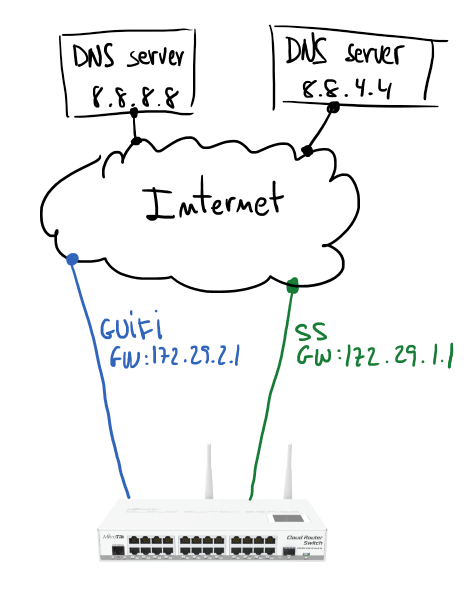
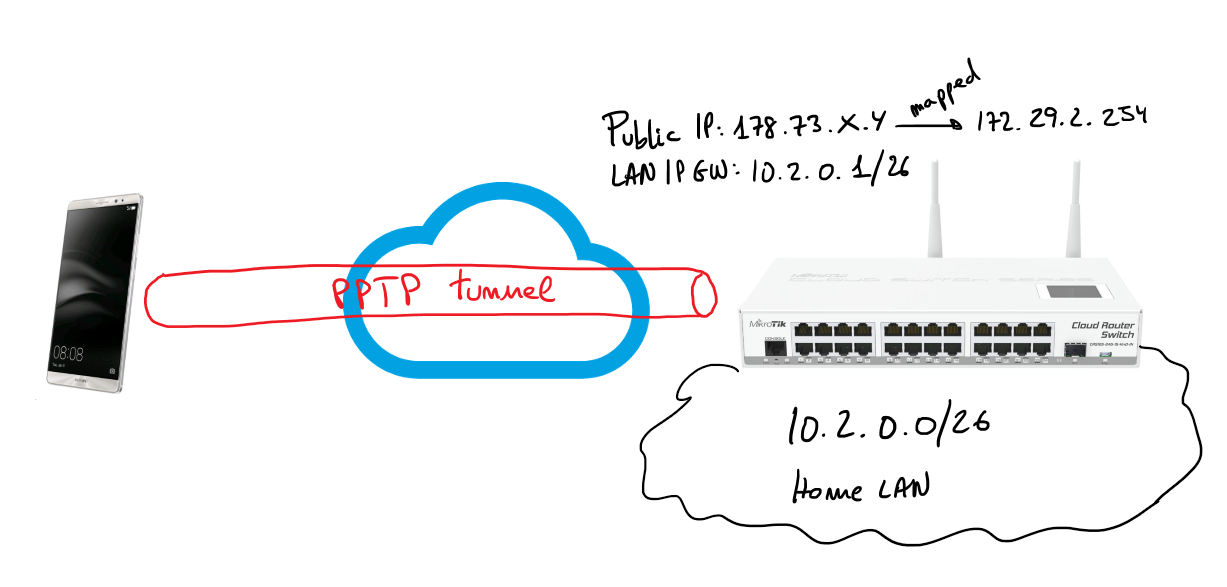
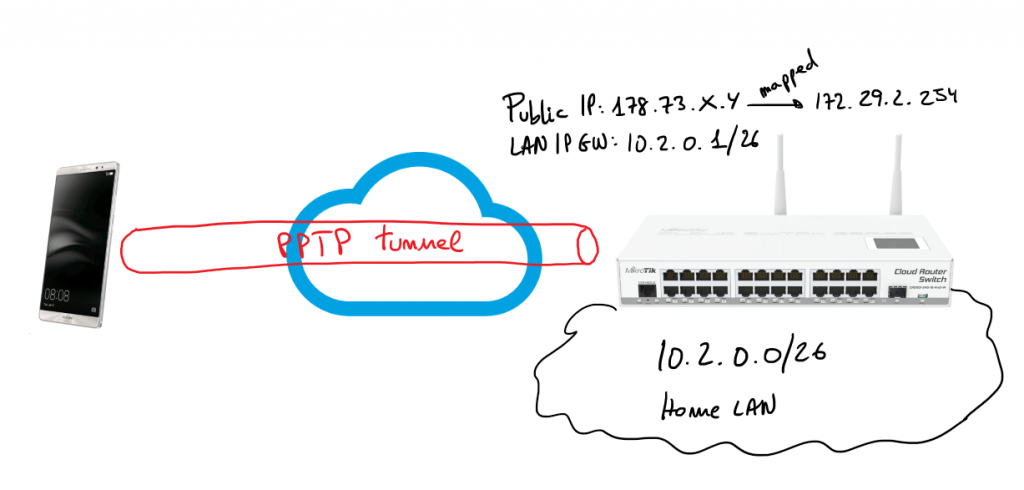
Next steps describe how I set-up a PPTP server on my Mikrotik server allowing my Android 6 device (Huawei Mate 8) to connect to my home services through the VPN. Bellow you have a simple schema representing the schenario of the solution:

architecture

I’m only going to describe steps from the web console, of course, all those steps can be done using Winbox or the command line. To be honest I’m not used to RouterOS CLI but I think it’s not difficult to figure out the CLI commands to get the same result.

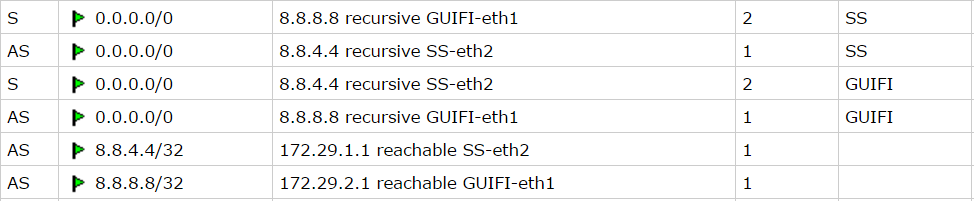
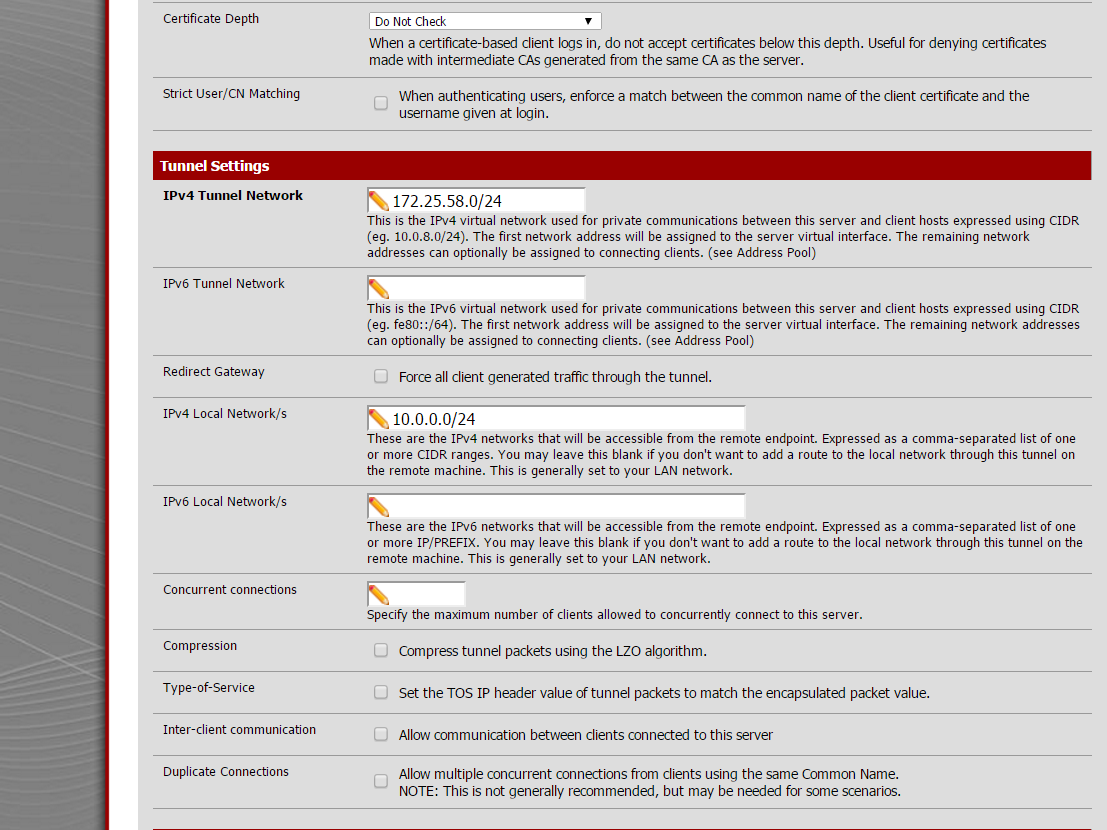
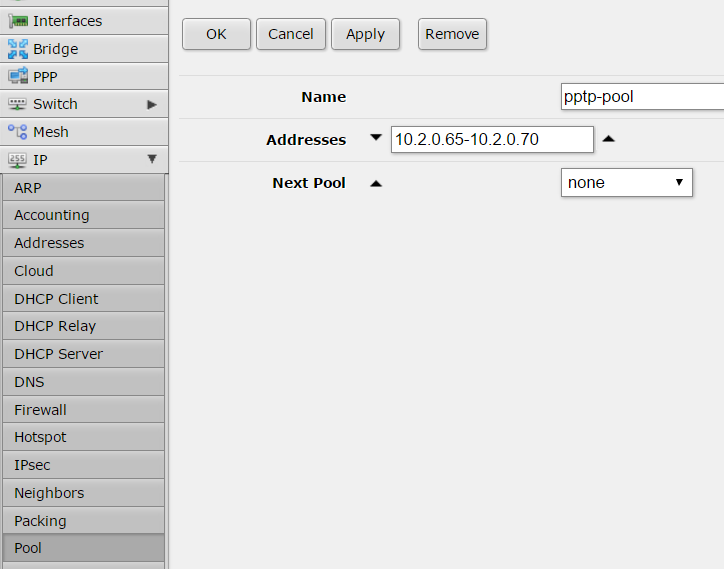
First step is set-up a pool of IP addresses to be assigned to the tunnel endpoints.

01-ip-pool

02-ip-pool

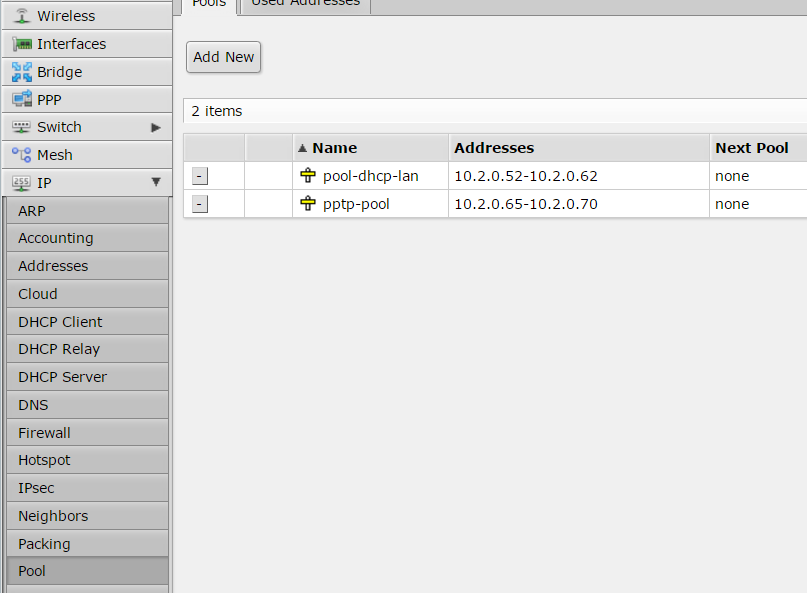
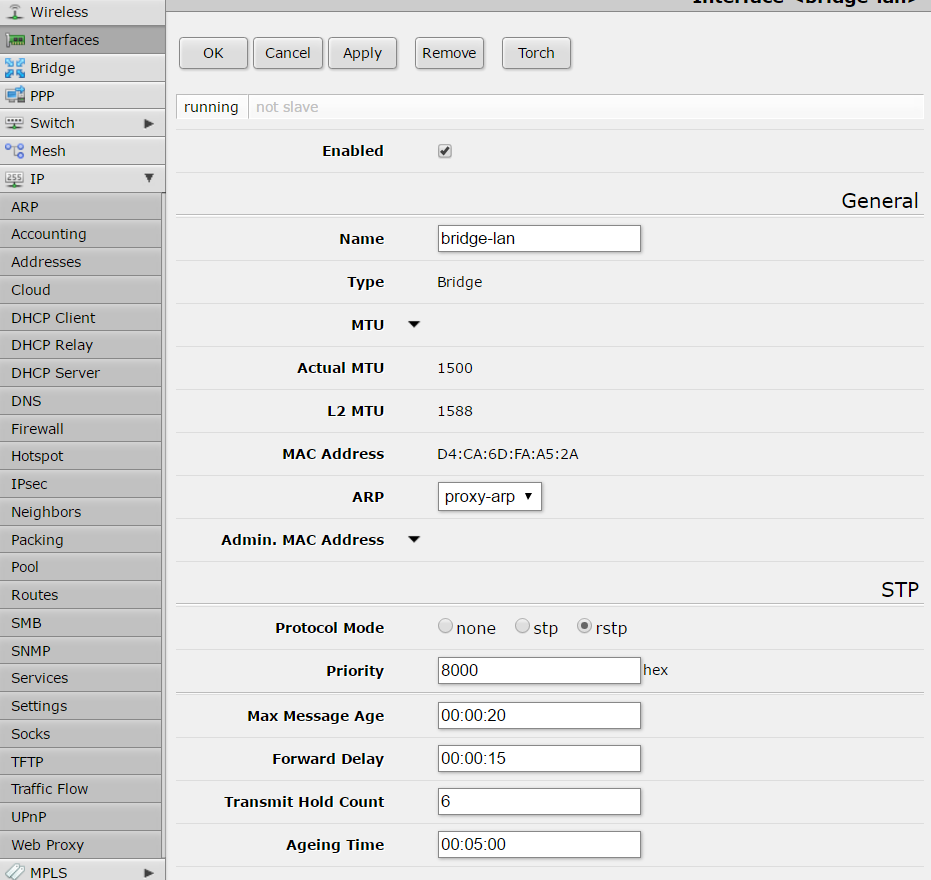
Thanks to an ARP proxy those IP addresses will be available like local IPs, this is transparent for the VPN configuration.

00-arp-proxy

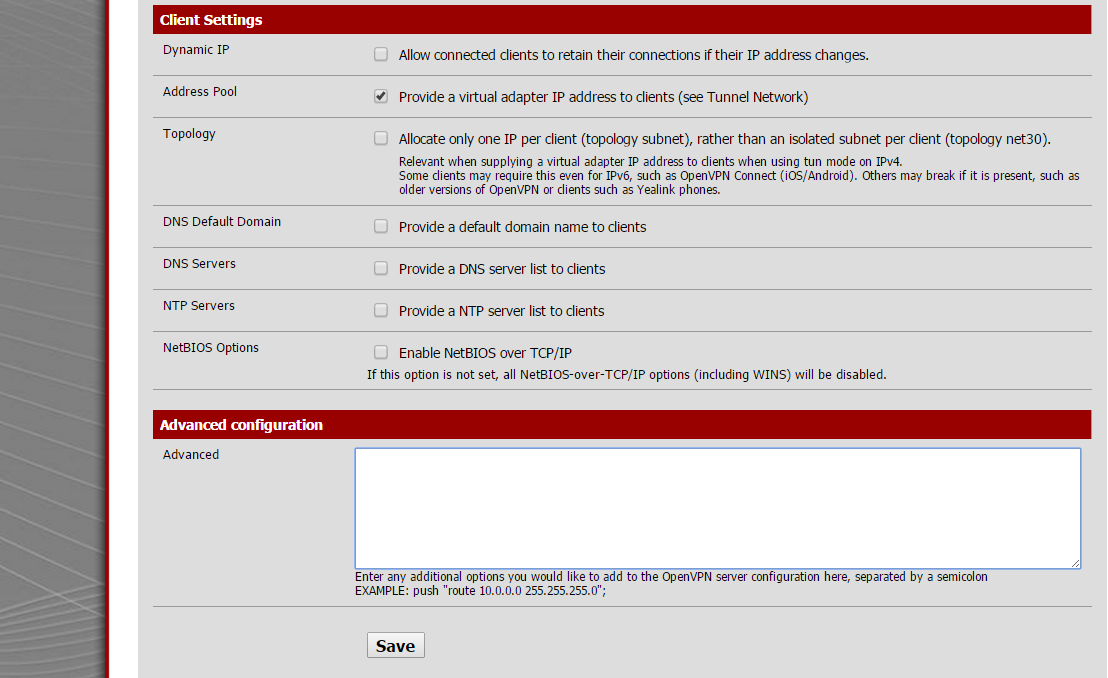
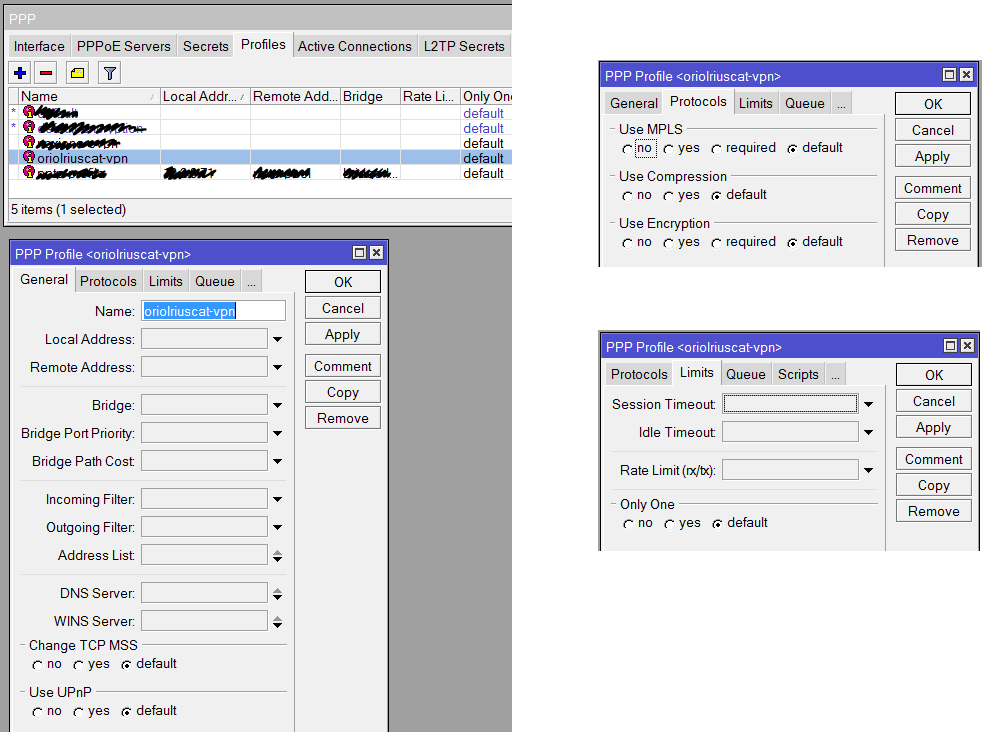
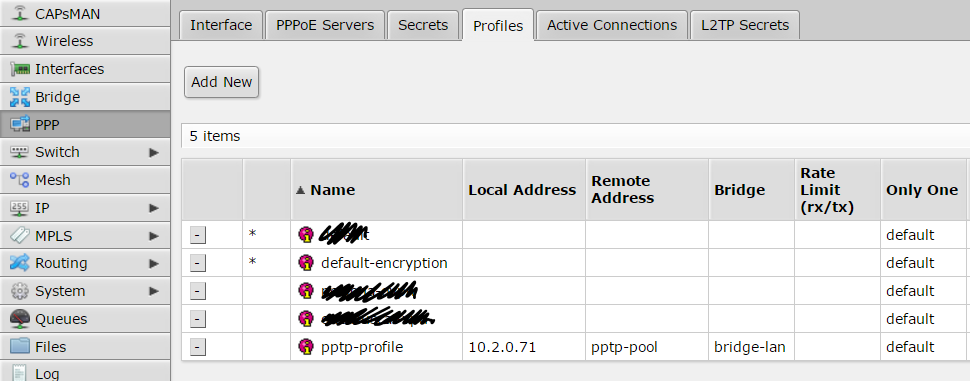
configuration of connection profile is done inside “Profiles” tab:

05-profiles

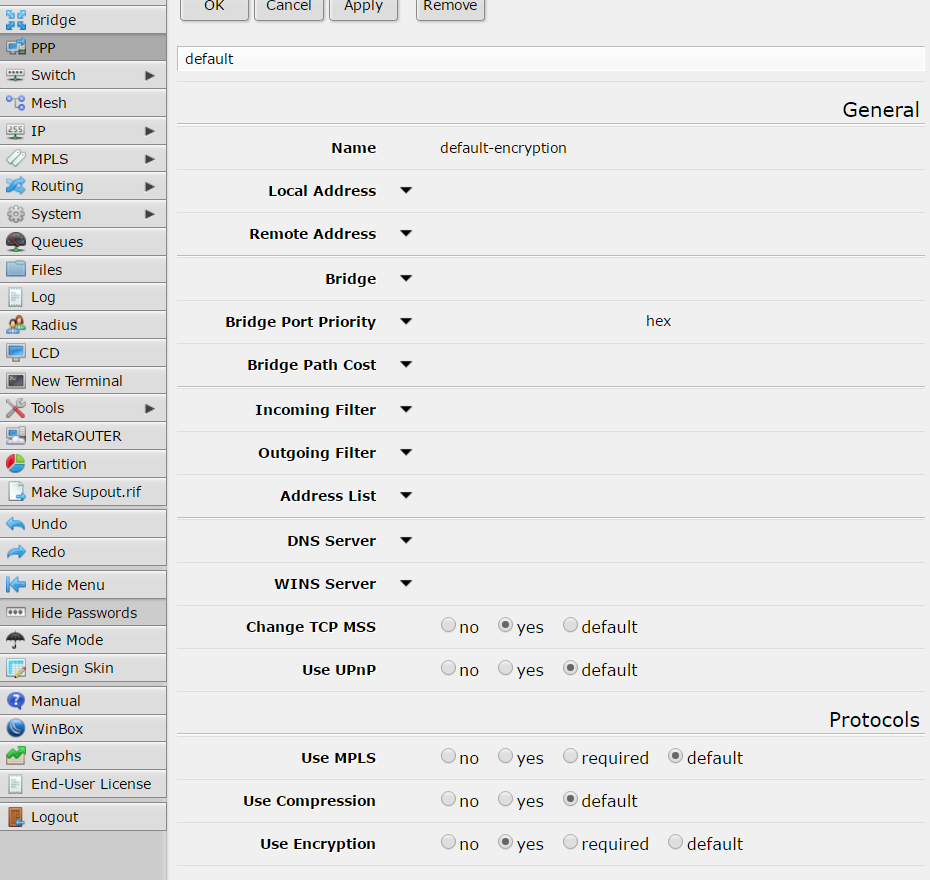
first of all create a new profile called “default-encription”:

061-profiles

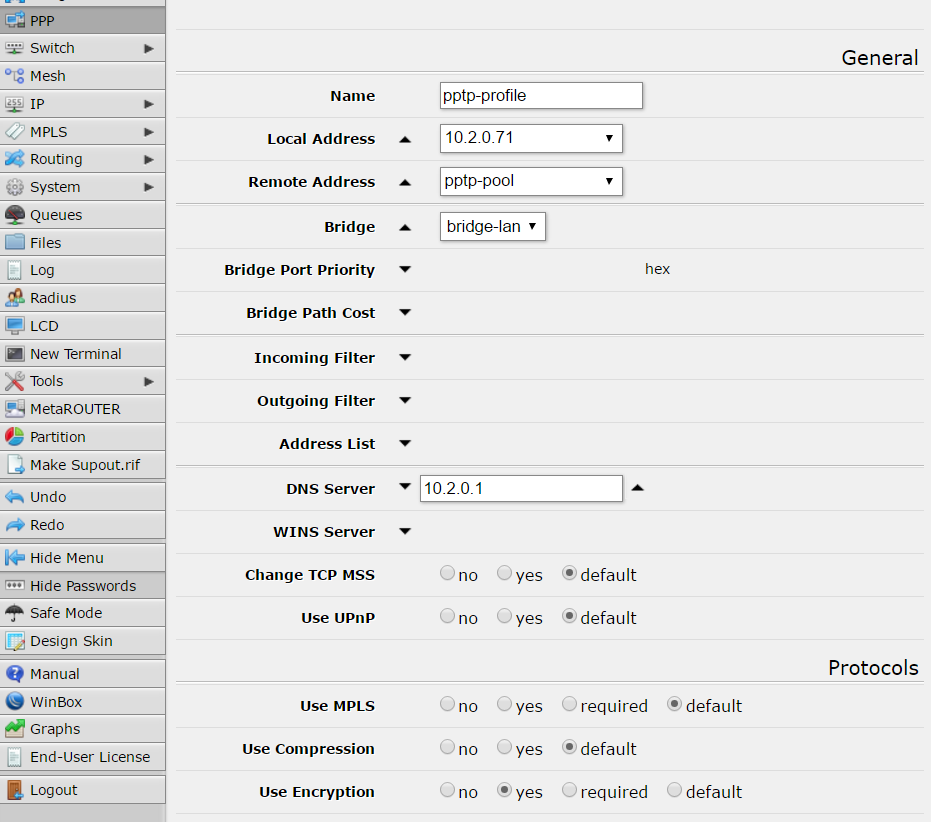
and another profile called “pptp-profile”:

06-profiles

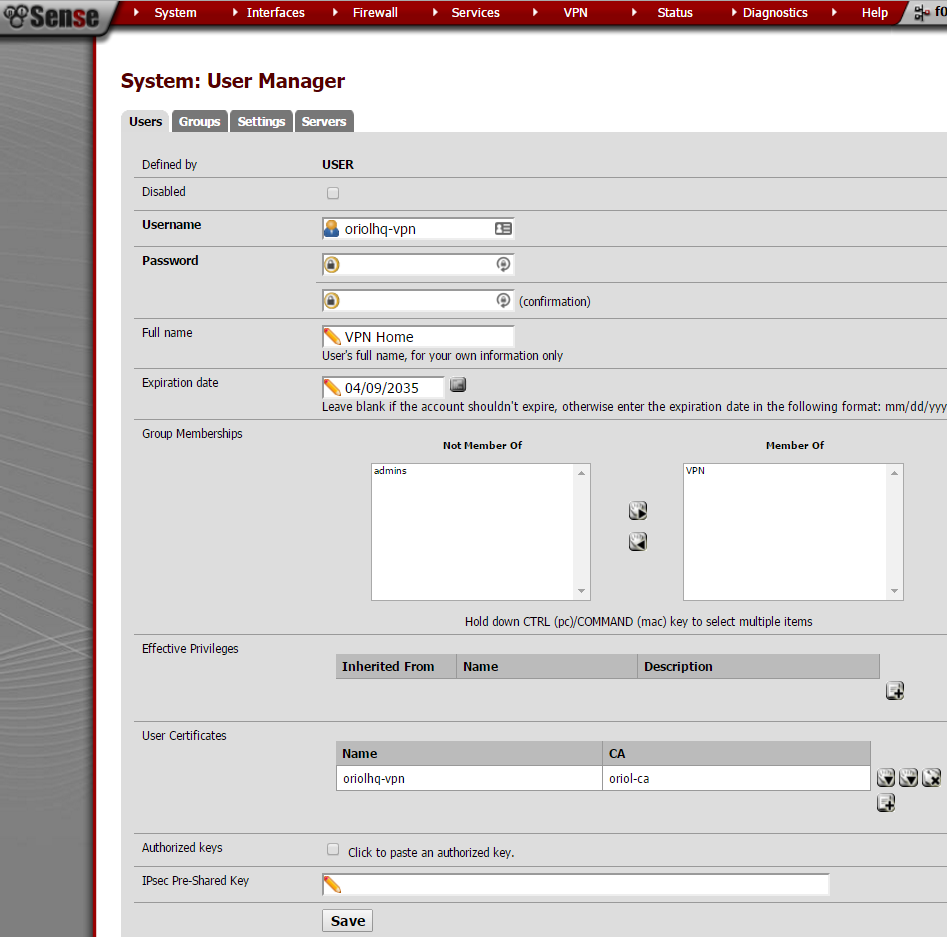
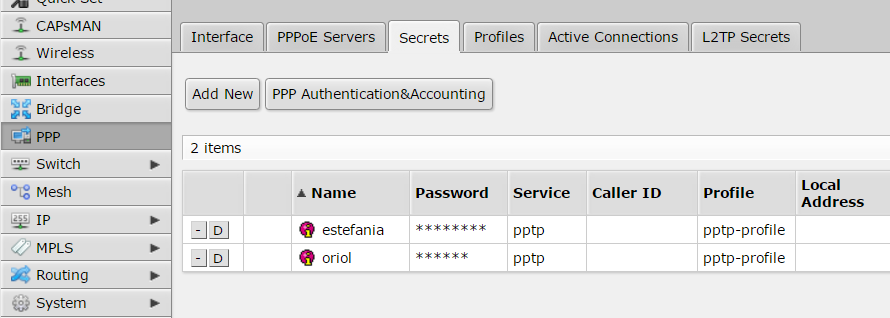
“Secrets” tab is where you have to manage users, in my case only two users are created:

07-secrets

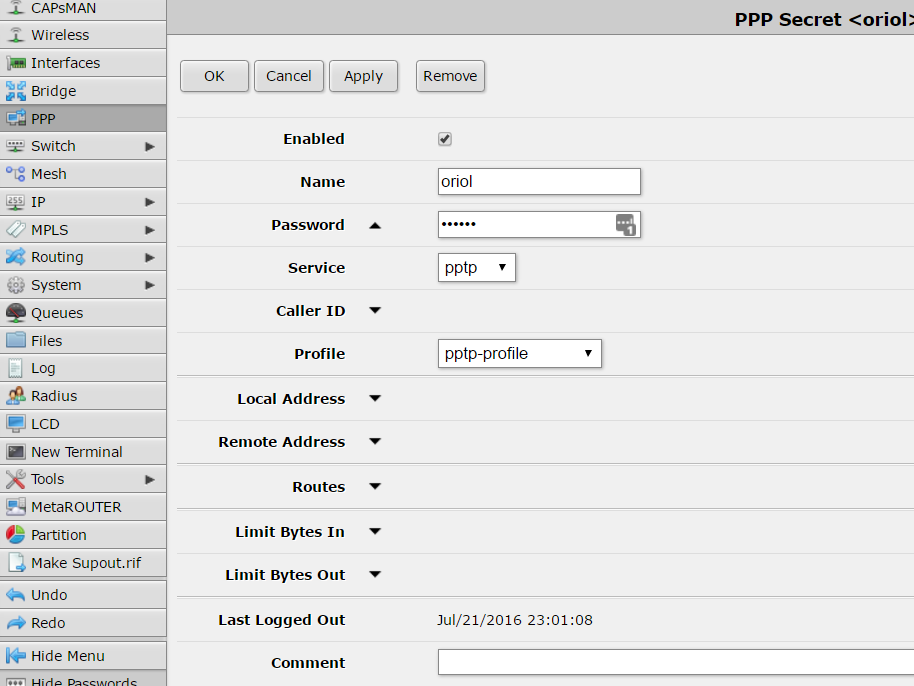
configuration details about my user are:

08-secrets

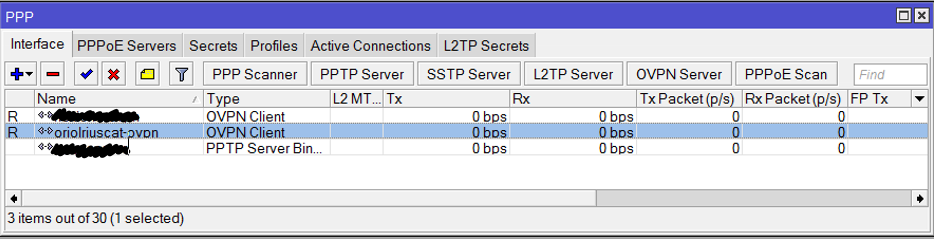
Inside PPP menu there is a button with a label “PPTP server” click there…

03-pptp-server

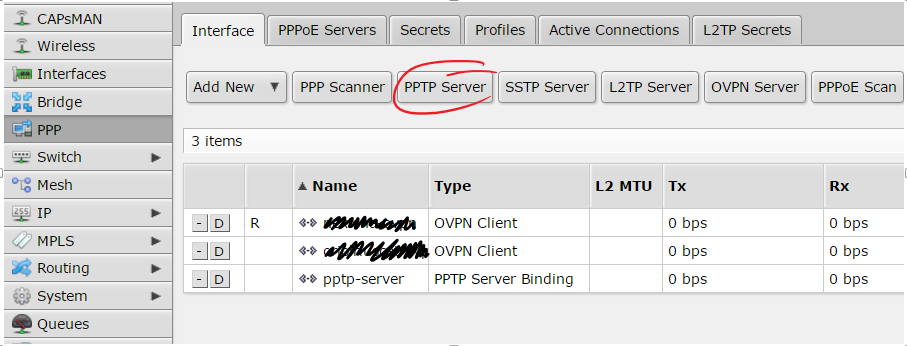
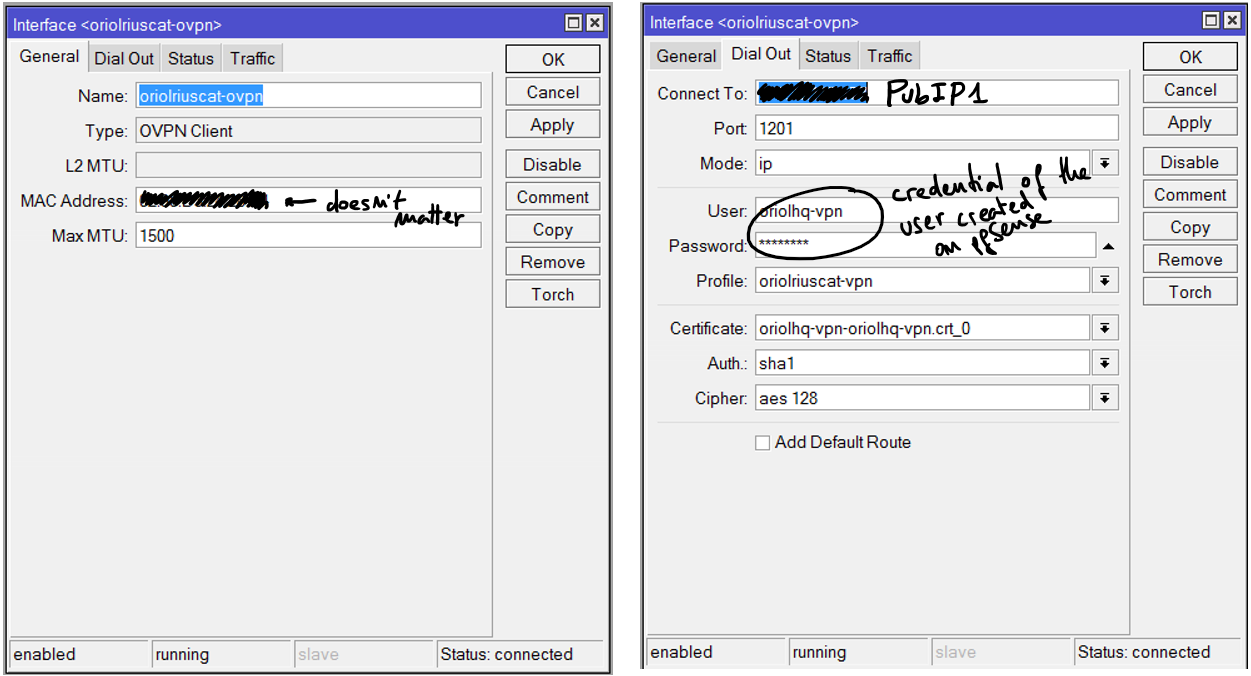
… and copy next settings:

04-pptp-server

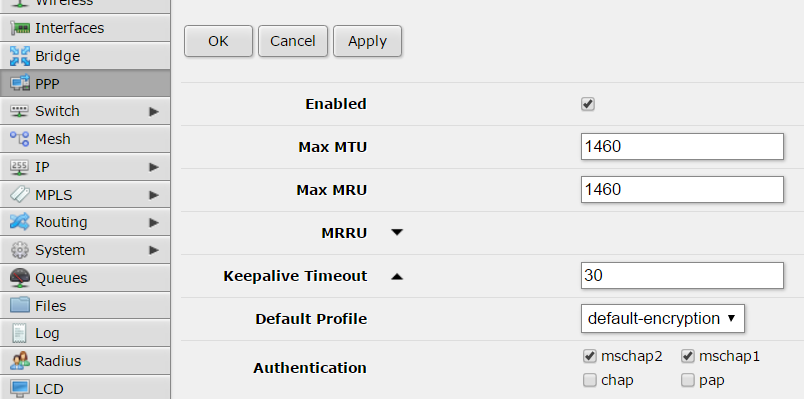
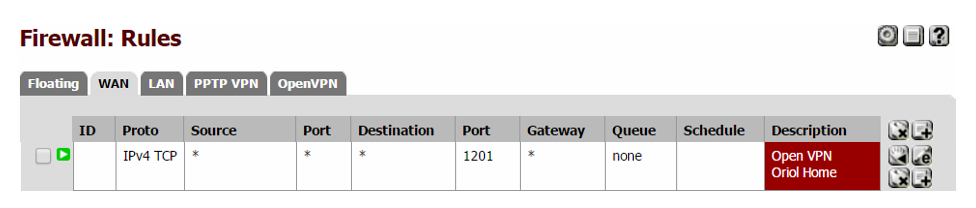
Don’t forget to check that your PPTP port is accessible from your public IP address. Remember it’s 1723/TCP.

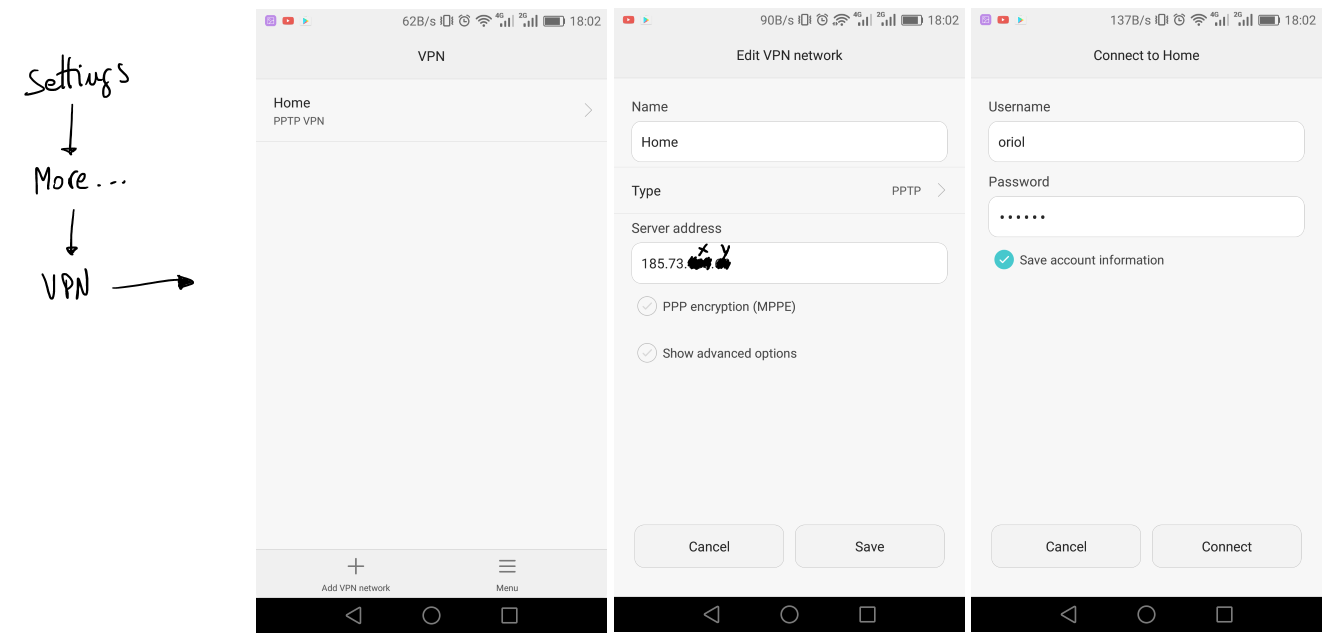
Android configuration is simple, first of all go to “settings” icon. Look for a “More” section bellow network options, and you’ll find VPN managment. Add a new connection, define a name, the type and the IP address and leave the rest by default. After that when you come back to VPN list you’ll find your new VPN in the list, click there and just set-up your PPTP credentials.

android

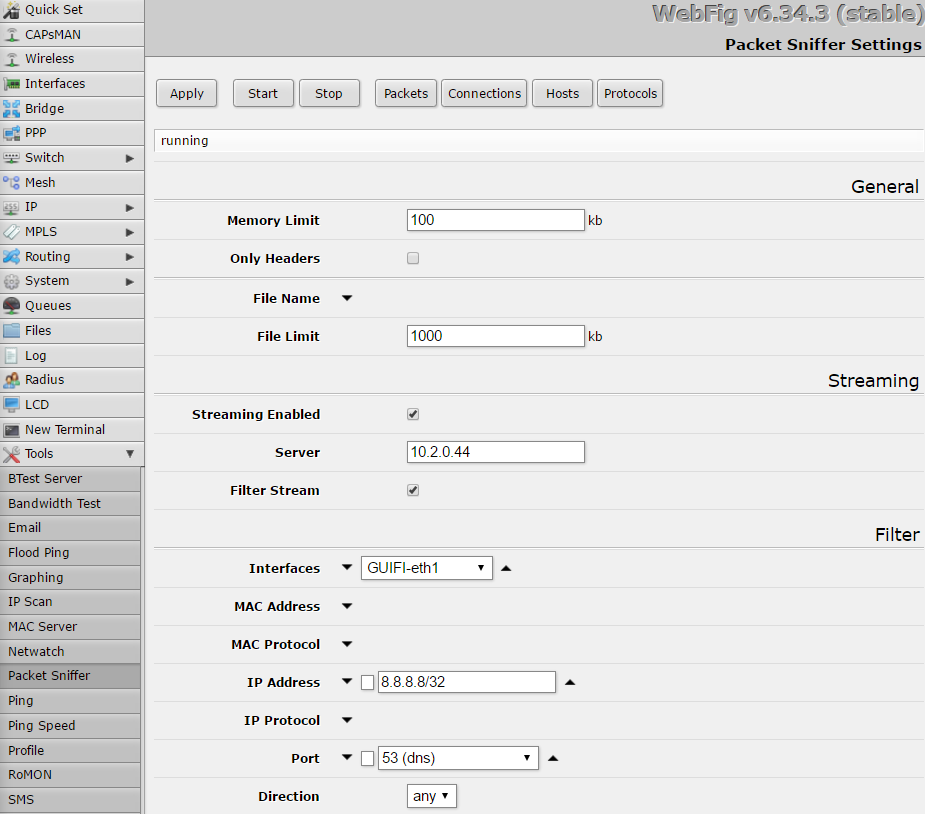
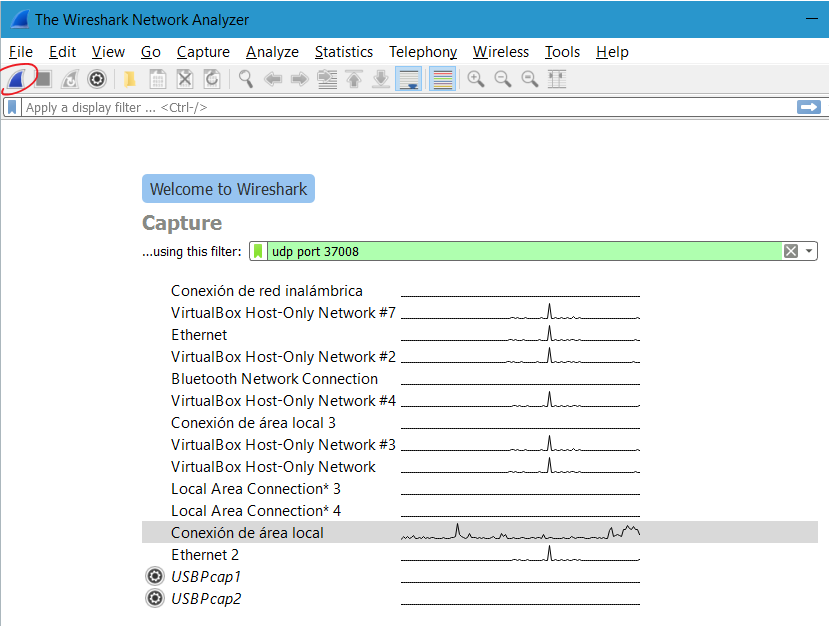
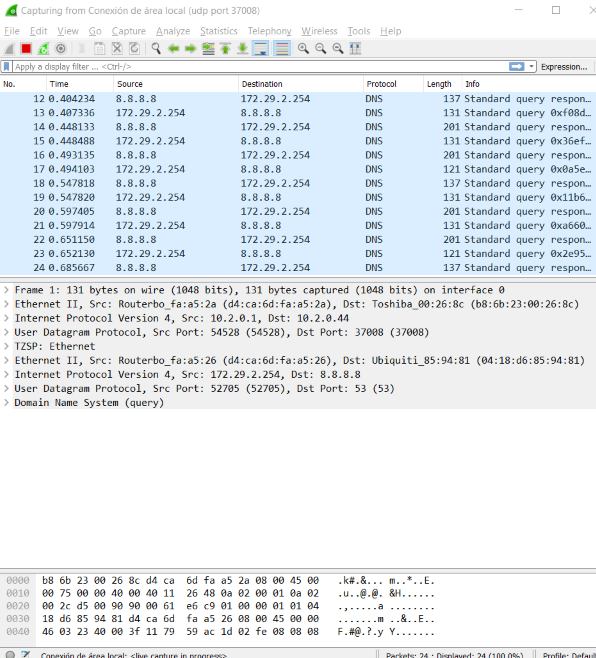
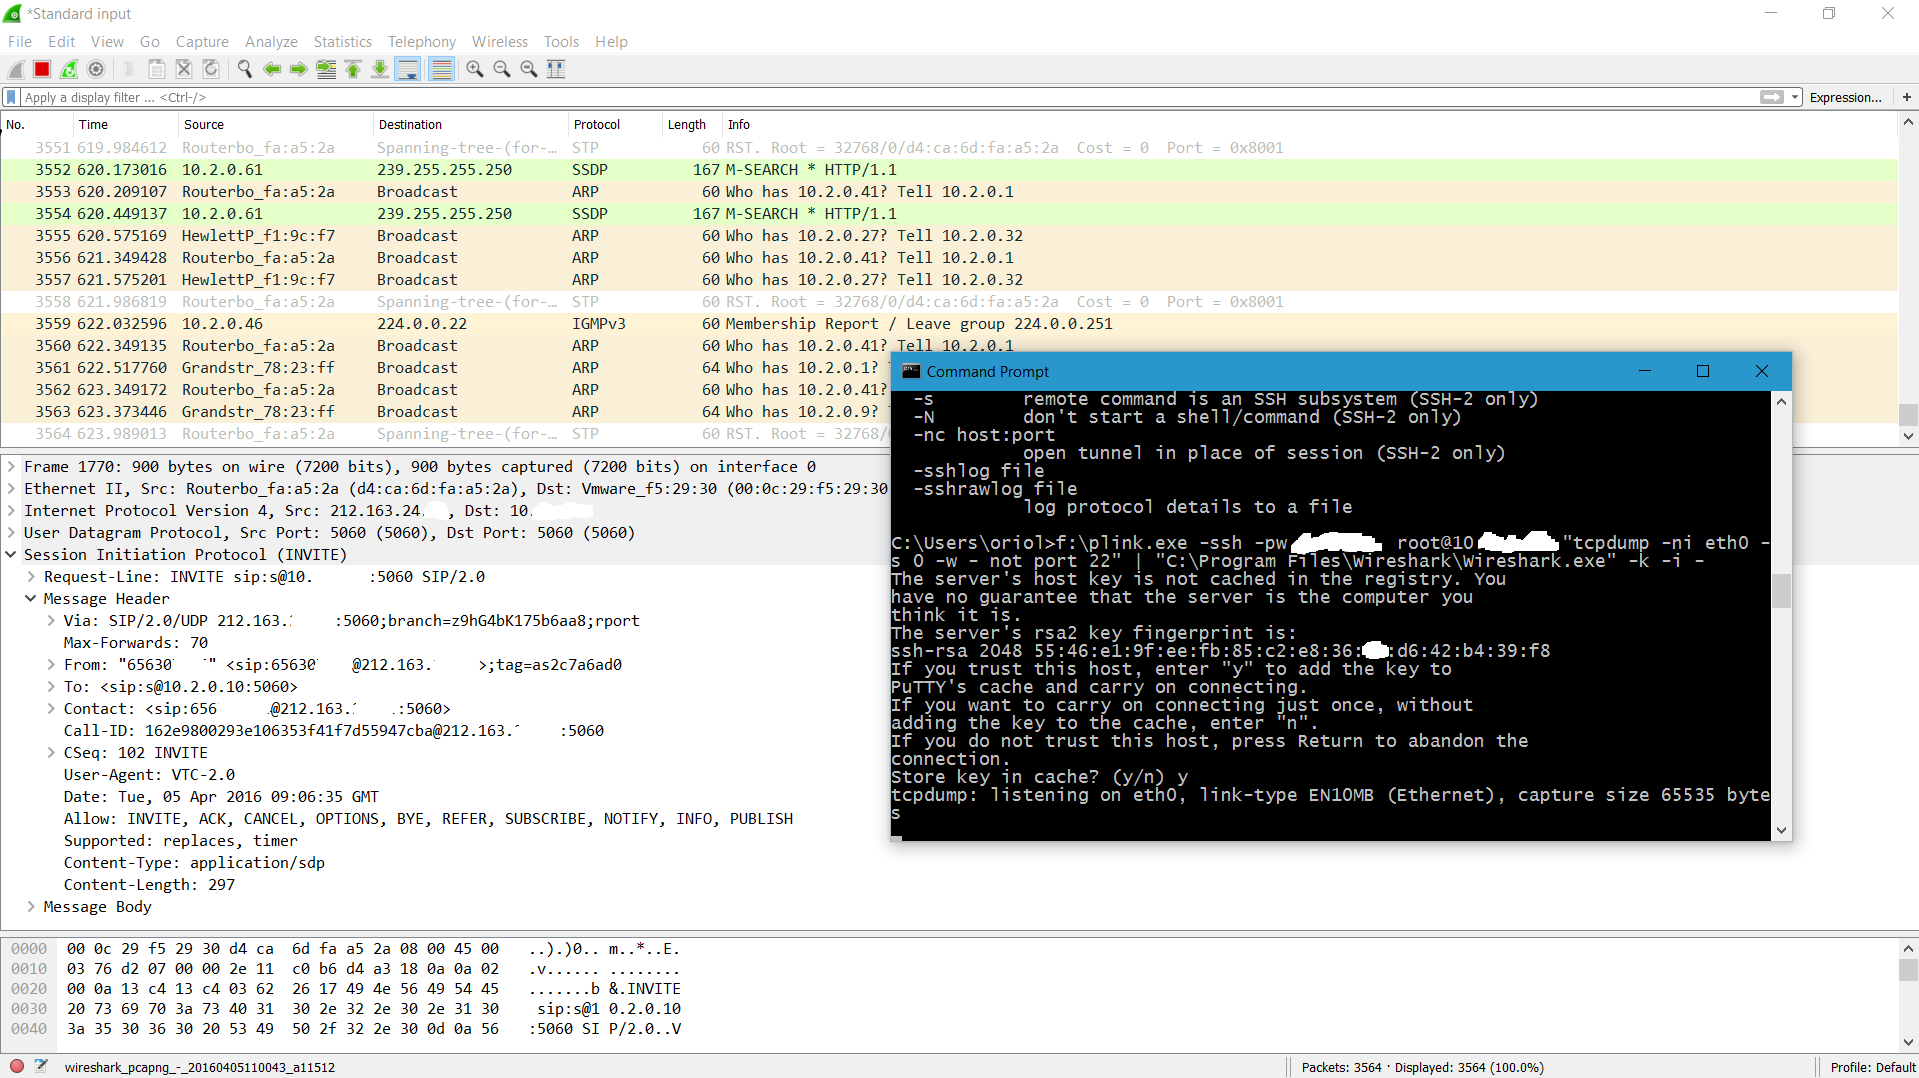
If you have some trouble the only thing that you can do is go to Mikrotik logs or start sniffing to figure out where is the problem. I had to do some tests before it was working but in the end everything was so simple like I explained here.

Good luck and enjoy it.

Thanks to next blog entries to inspire me:


Protecting your email with MXGuarddog

Reading time: 2 – 2 minutes

mxguarddogAfter using VMWare ESXi for a long time as a Hypervisor for my virtual servers I decided to stop paying OVH for that service and I migrated my virtual machines to VPS servers on OVH. At the end of the day only two VPS with a cost of 3€/month are enough and I can stop a 50€/month dedicated server.

The biggest challenge that I had to solve was migrate mail server to a new server. So far today I was using pfSense a firewall for my virtual servers. They were in a virtual network; pfSense anti-spam services and mail forwarding were enough to receive “cleaned” mail in my private mail server with Postfix and Dovecot.

New configuration is just a cheap VPS (1xCPU+2GB RAM+10GB SSD) with Ubuntu 16.04 and also with Postfix and Dovecot. But I decided to rent the anti-spam, anti-malware and anti-virus service to MX Guarddog. I discovered that service just surfing on the big G. Only 0.25 cents per account per month it’s a very good price and it does all the things that I need and much more. Configuration is really simple if you know what you are doing. They have a very good and simple control panel to manage the service. This is the perfect service to get what I need.

In the control panel you can do all that you need, manage mail accounts and domains. View quarantined mails and all required configurations and tests to validate everything is ready and also maintain white and black lists. We’ll see during next days if the service gets the quality that I expect, I hope I have found a very good and cheap resource.

Sniffing traffic in a Linux box and streaming in real-time to Wireshark on Windows

Reading time: 4 – 6 minutes

Sniffing and inspect complex protocols on “tcpdump” is usually painful. Of course, “tcpflow” is a very useful tool but is not always enough to sniff in a console. Wireshark is always a better option when it’s time to debug and troubleshooting communication problems.

But it’s not always easy to plug a Network TAP where you want to sniff. If at that point we have a Linux box with “ssh” and “tcpdump”. An interesting option is stream sniffed traffic to another box with Wireshark and dissect packet octets in their layers, fields, etc.

When Wireshark box is based on Windows you need “plink.exe“, and you can do thinks like that:

plink.exe -ssh -pw LINUX_BOX_PASSWORD root@LINUX_BOX_IP "tcpdump -n -i INTERFACE_TO_SNIFF -s 0 -w - not port 22" | "%PATH_TO_WIRESHARK\Wireshark.exe" -k -i -

Next you have a screenshot with a real life example of that:

tcpdump_streams_to_wireshark_secure

Small recap of web shell applications

Reading time: 2 – 2 minutes

Lately I found some useful web applications that publish a terminal application. This is very useful when you are traveling or you have a remote server which you want to maintain or access from anywhere. Also another interesting use of this kind of applications is as a terminal for embedded devices.

I tried to use them as my default applications but all of them have the same problem: keyboard shortcuts conflict with the browser. I’m very used to use a lot of shortcuts to manage my terminal application and remote shell and this is a problem because most of the shortcuts are redefined by your browser. May be it’s possible to disable browser shortcuts when you are using this kind of web applications but I didn’t find how.

I hope this small list is as much useful for you as it is for me:

  • Wetty = Web + tty (the best one IMHO)

wetty

ajaxterm

anyterm

gateone

Secure download URLs with expiration time

Reading time: 23 – 38 minutes

Requirements

Imagine a HTTP server with those restrictions:

  • only specific files can be downloaded
  • with a limited time (expiration date)
  • an ID allows to trace who download files
  • with minimal maintenance and dependencies (no databases, or things like that)

the base of the solution that I designed is the URL format:

http://URL_HOST/<signature>/<customer_id>/<expire_date>/<path_n_file>
  • signature: is calculated with the next formula, given a “seed”
    • seed = “This is just a random text.”
    • str = customer_id + expire_date + path_n_file
    • signature = encode_base64( hmac_sha1( seed, str))
  • customer_id: just an arbitrary identifier when you want to distinguish who use the URL
  • expire_date: when the generated URL stops working
  • path_n_file: relative path in your private repository and the file to share

Understanding the ideas explained before I think it’s enough to understand what is the goal of the solution. I developed the solution using NGINX and LUA. But the NGINX version used is not the default version is a very patched version called Openresty. This version is specially famous because some important Chinese webs works with that, for instance, Taobao.com

Expiration URL solution Architecture schema

In the above schema there is a master who wants to share a file which is in the internal private repository, but the file has a time restriction and the URL is only for that customer. Then using the command line admin creates a unique URL with desired constrains (expiration date, customer to share and file to share). Next step is send the URL to the customer’s user. When the URL is requested NGINX server evaluates the URL and returns desired file only if the user has a valid URL. It means the URL is not expired, the file already exists, the customer identification is valid and the signature is not modified.

NGINX Configuration

server {
 server_name downloads.local;

 location ~ ^/(?<signature>[^/]+)/(?<customer_id>[^/]+)/(?<expire_date>[^/]+)/(?<path_n_file>.*)$ {
 content_by_lua_file "lua/get_file.lua";
 }

 location / {
 return 403;
 }
}

This is the server part of the NGINX configuration file, the rest of the file can as you want. Understanding this file is really simple, because the “server_name” works as always. Then only locations command are relevant. First “location” is just a regular expression which identifies the relevant variables of the URL and passes them to the LUA script. All other URLs that doesn’t match with the URI pattern fall in path “/” and the response is always “Forbiden” (HTTP 403 code). Then magics happen all in LUA code.

LUA scripts

There are some LUA files required:

  • create_secure_link.lua: creates secure URLs
  • get_file.lua: evaluates URLs and serves content of the required file
  • lib.lua: module developed to reuse code between other lua files
  • sha1.lua: SHA-1 secure hash computation, and HMAC-SHA1 signature computation in Lua (get from https://github.com/kikito/sha.lua)

It’s required to configure “lib.lua” file, at the beginning of the file are three variables to set up:

lib.secret = "This is just a long string to set a seed"
lib.base_url = "http://downloads.local/"
lib.base_dir = "/tmp/downloads/"

Create secure URLs is really simple, take look of the command parameters:

$ ./create_secure_link.lua 

 ./create_secure_link.lua <customer_id> <expiration_date> <relative_path/filename>

Create URLs with expiration date.

 customer_id: any string identifying the customer who wants the URL
 expiration_date: when URL has to expire, format: YYYY-MM-DDTHH:MM
 relative_path/filename: relative path to file to transfer, base path is: /tmp/downloads/

Run example:

$ mkdir -p /tmp/downloads/dir1
$ echo hello > /tmp/downloads/dir1/example1.txt
$ ./create_secure_link.lua acme 2015-08-15T20:30 dir1/example1.txt
http://downloads.local/YjZhNDAzZDY0/acme/2015-08-15T20:30/dir1/example1.txt
$ date
Wed Aug 12 20:27:14 CEST 2015
$ curl http://downloads.local:55080/YjZhNDAzZDY0/acme/2015-08-15T20:30/dir1/example1.txt
hello
$ date
Wed Aug 12 20:31:40 CEST 2015
$ curl http://downloads.local:55080/YjZhNDAzZDY0/acme/2015-08-15T20:30/dir1/example1.txt
Link expired

Little video demostration

Resources

Disclaimer and gratefulness

Scroll to Top