Ahir al vespre vaig fer una conferència a la FIB (Facultat d’Informàtica de Barcelona) dins de la UPC (Universitat Politècnica de Catalunya). En aquesta xerra vaig estar explicant què és i en que es diferència Arduino i Raspberry PI. A més de presentar tot un conjunt de solucions alternatives i experiències en el tema.
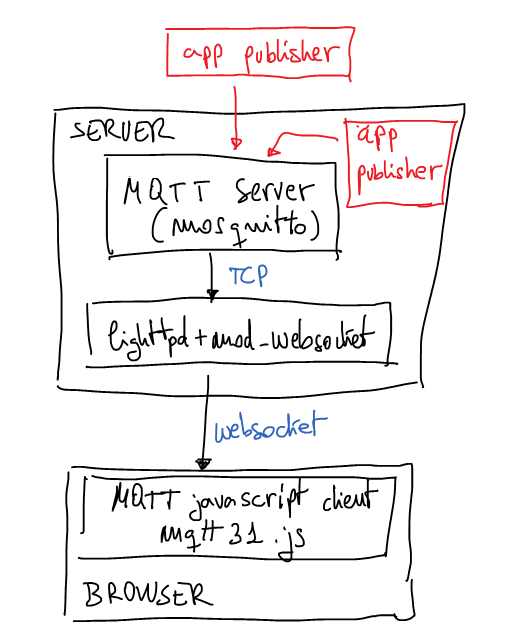
Nowadays last version of browsers support websockets and it’s a good a idea to use them to connect to server a permanent channel and receive push notifications from server. In this case I’m going to use Mosquitto (MQTT) server behind lighttpd with mod_websocket as notifications server. Mosquitto is a lightweight MQTT server programmed in C and very easy to set up. The best advantage to use MQTT is the possibility to create publish/subscriber queues and it’s very useful when you want to have more than one notification channel. As is usual in pub/sub services we can subscribe the client to a well-defined topic or we can use a pattern to subscribe to more than one topic. If you’re not familiarized with MQTT now it’s the best moment to read a little bit about because that interesting protocol. It’s not the purpose of this post to explain MQTT basics.
A few weeks ago I set up the next architecture just for testing that idea:
weboscket gateway to mosquitto mqtt server with javascrit mqtt client
The browser
Now it’s time to explain this proof of concept. HTML page will contain a simple Javascript code which calls mqttws31.js library from Paho. This Javascript code will connect to the server using secure websockets. It doesn’t have any other security measure for a while may be in next posts I’ll explain some interesting ideas to authenticate the websocket. At the end of the post you can download all source code and configuration files. But now it’s time to understand the most important parts of the client code.
Last part is very simple, the client connects to the server and links some callbacks to defined functions. Pay attention to ‘useSSL’ connect option is used to force SSL connection with the server.
There are two specially interesting functions linked to callbacks, the first one is:
function onConnect() { client.subscribe("/news/+/sport", {qos:1,onSuccess:onSubscribe,onFailure:onSubscribeFailure});}
As you can imagine this callback will be called when the connections is established, when it happens the client subscribes to all channels called ‘/news/+/sports’, for example, ‘/news/europe/sports/’ or ‘/news/usa/sports/’, etc. We can also use, something like ‘/news/#’ and it will say we want to subscribe to all channels which starts with ‘/news/’. If only want to subscribe to one channel put the full name of the channel on that parameter. Next parameter are dictionary with quality of service which is going to use and links two more callbacks.
The second interesting function to understand is:
function onMessageArrived(message) { console.log("onMessageArrived:"+message.payloadString);};
It’s called when new message is received from the server and in this example, the message is printed in console with log method.
The server
I used an Ubuntu 12.04 server with next extra repositories:
After installation it’s very easy to run mosquitto in test mode, use a console for that and write the command: mosquitto, we have to see something like this:
# mosquitto1379873664: mosquitto version 1.2.1 (build date 2013-09-19 22:18:02+0000) starting1379873664: Using default config.1379873664: Opening ipv4 listen socket on port 1883.1379873664: Opening ipv6 listen socket on port 1883.
The configuration file for lighttpd in testing is:
Remember to change ‘ssl.pemfile’ for your real certificate file and ‘server.name’ for your real server name. Then restart the lighttpd and validate SSL configuration using something like:
openssl s_client -host ns.example.tld -port 443
You have to see SSL negotiation and then you can try to send HTTP commands, for example: “GET / HTTP/1.0” or something like this. Now the server is ready.
The Test
Now you have to load the HTML test page in your browser and validate how the connections is getting the server and then how the mosquitto console says how it receives the connection. Of course, you can modify the Javascript code to print more log information and follow how the client is connected to MQTT server and how it is subscribed to the topic pattern.
If you want to publish something in MQTT server we could use the CLI, with a command mosquitto_pub:
mosquitto_pub -h ns.example.tld -t '/news/europe/sport' -m 'this is the message about european sports'
Take a look in your browser Javascript consle you have to see how the client prints the message on it. If it fails, review the steps and debug each one to solve the problem. If you need help leave me a message. Of course, you can use many different ways to publish messages, for example, you could use python code to publish messages in MQTT server. In the same way you could subscribe not only browsers to topics, for example, you could subscribe a python code:
Pay attention to server port, it isn’t the ‘https’ port (443/tcp) because now the code is using a real MQTT client. The websocket gateway isn’t needed.
The files
mqtt.tar.gz – inside this tar.gz you can find all referenced files
I just solved a very specific problem and I have to write some notes here to remember the solution. Given a RTMP source we have to stream the content to Apple devices like iPad, iPhone and iPod because RTMP couldn’t be played using Safari browser.
If we need to play streaming on Apple devices the best solution is convert it to HLS and publish generated files using HTTP server.
To solve this issue I use rtmpdump and vlc. Firstly rtmpdump gets video stream from source. Secondly the stream is sent to vlc and finally vlc transcodes de video and audio and outputs small .ts files and one .m3u8 index file.
Fast trick for linux users, do you know how to setup a VPN using PPP and SSH? of course you can setup a secure tunnel using ‘-w- or ‘-W’ ssh parameters in last versions of SSH. But in this case I want to share with you this idea:
I want to recommend to you to watch the YouTube video called RESTful API design of Brian Mulloy. In this post I make an small abstract of the most important ideas of the video, of course from my point of view:
Use concrete plural nouns when you are defining resources.
Resource URL has to be focused in access collection of elements and specific element. Example:
/clients – get all clients
/clients/23 – get the client with ID 23
Map HTTP methods to maintein elements (CRUD):
POST – CREATE
GET – READ
PUT – UPDATE
DELETE – DELETE
Workaround, if your REST client doesn’t support HTTP methods, use a parameter called ‘method’ could be a good idea. For example, when you have to use a method HTTP PUT it could be changed by method HTTP GET and the parameter ‘method=put’ in the URL.
Sweep complexity behind the ‘?’. Use URL parameters to filter or put some optional information to your request.
Workaround, if REST client doesn’t know how to capture HTTP error codes and raise up an error losing the control of the client, you can use HTTP response code 200 and put ‘response_code’ field in JSON response object. It’s a good idea use this feature as optional across URL parameter ‘supress_response_code=true’.
Versioning the API. Use a literal ‘v’ followed by an integer number before the resource reference in the URL. It could be the most simple and powerful solution in this case. Example: /v1/clients/
The selection of what information will be returned in the response can be defined in the URL parameters, like in this example: /clients/23?fields=name,address,city
Pagination of the response. Use the parameters ‘limit’ and ‘offset’, keep simple. Example: ?limit=10&offset=0
Format of the answer, in this case I’m not completely agree with Brian. I prefer to use HTTP header ‘Accept’ than his proposal. Anyway both ideas are:
Use HTTP header ‘Accept’ with proper format request in the answer, for example, ‘Accept: application/json’ when you want a JSON response.
or, use extension ‘.json’ in URL request to get the response in JSON format.
Use Javascript format for date and time information, when you are formatting JSON objects.
Sometimes APIs need to share actions. Then we can’t define an action with a noun, in this case use verb. Is common to need actions like: convert, translate, calculate, etc.
Searching, there are two cases:
Search inside a resource, in this case use parameters to apply filters.
Search across multiple resource, here is useful to create the resource ‘search’.
Count elements inside a resource, simply add ‘/count’ after the resource. Example: /clients/count
As far as you can use a single base URL for all API resources, something like this: ‘http://api.domain.tld’.
Authentication, simply use OAuth 2.0
To keep your API KISS usually it’s a good idea develop SDK in several languages, where you can put more high level features than in API.
Inside an application each resource has its own API but it’s not a good idea publish it to the world, maybe use a virtual API in a layer above it’s more secure and powerful.
Configure spamassassin is never easy to do. But when you look for information in Google usually you will be mad . The most common help method in linux is use ‘man command’ but it doesn’t work or information is not enough usually.
After a lucky search I found this command to get an extended information about how to configure spamassassin.conf file.
Reading time: < 1 minute
When your are using custom permalinks for posts in wordpress you can have problems to use permalinks in wordpress pages; because rewrite rules can't work properly for both: posts and pages.
In my case permalink editor plugin has been the definitive solution.
Next you can see new permalink configuration form in wordpress after installing permalink editor:
La nova inteficie web del Google Reader ha portat molta cua a les xarxes socials i als mitjans digitals en general. Quan ets usuario d’un servei cloud, i si aquest és gratuït encara més, has d’estar obert a tot aquest tipus de situacions. Obviament hi ha coses que es fan estrictament per millorar l’experiència d’usuari i d’altres per anar alineats amb l’estrategia de negoci de l’empresa que ofereix el servei, en aquest cas Google.
Doncs bé, en el meu cas no entraré a discutir les moltíssimes sorpreses agradables que m’ha portat la nova interficie, sinó que em centraré a solucionar un dels pocs problemes que m’ha portat la interficie. Abans disposava d’un botó ‘share’ que em generava un petit blog on es penjaben les noticies que jo compartia. A través d’aquell blog la que em seguia podia veure les notícies que anava destacant dels meus feeds i jo mateix podia subscriurem amb un programa de lectura d’RSS per la tablet o el mòbil i així podia atendra les lectures més llargues en diversos moments morts del dia.
El famós botó de ‘share’ ha estat substituit pel ‘+1’ que com molts ja sabeu s’usa en molts llocs, no només al ‘Google Reader’ sinó a moltíssims blogs als que no cal estar sindicat per fer un ‘+1’ als articles que ens agraden, a busquedes de google, etc. De fet, jo pronostico que amb el temps això del ‘+1’ s’extendrà fins a nivell insospitats. Així doncs, a priori la idea és molt bona el problema és que tot el que botem dient que ens agrada s’afegeix al nostres ‘stream’ de ‘Google Plus’ que a dia d’avui no disposa de fil RSS, amb tot el que això suposa com ja he indicat abans.
Tot llegint el blog de l’Enrique Danz resulta que ell també té aquest problema i l’han resolt amb un simple script de PHP que fa d’scraper sobre la llista de ‘+1’ que manté ‘Google Plus’. El codi és senzillíssim d’usar el col·loquem al nostre server LAMP li passem l’usuari de la nostre compte google i l’script ens treu un XML en format RSS amb tot el que hem marcat amb un ‘+1’.
Un altre juguet del que puc disfrutar des d’aquest estiu és el Motorola Xoom, el table de Google. És curió perquè m’he adonat que els no-geeks no tenen ni idea de que existeixen tables més enllà del iPad. Però el que més em sorprèn és que més enllà de l’usabilitat i la fluidesa en l’ús dels iPad no acabo de veure massa qualitats. És evident que els tablets amb Android estan encara per darrera d’aquesta fluidesa i experiència d’usuari. Però el seu entorn amb un disseny més flexible i la possibilitat d’arribar fins a un nivell de control del sistema més obert a més d’una comunitat que comparteix molts dels seus avanços em reforça la idea que el creixement que estan tenint aquest tablets acabarà per imposar-se com ja ha passat en els telèfons mòbils. La diversitat de formes, models, mides, preus, etc. crec que és evident que acabarà imposant-se a la dictadura d’Apple.
Bé doncs, a part d’aquesta petita reflexió volia comentar que també disposo d’un teclat i un llapis per interactuar amb el tablet. Ambdós accessoris he de dir que tenen una experiència d’usuari molt pobre. De fet, tan pobre que pràcticament no són ni usables per propostis professionals. Però de fet, la finalitat que perseguia era saber quin és l’estat d’aquests dispositius i poder evaludar l’API 3.0 d’Android que pel que he vist té poc a veure amb la 2.3.X.
Arribats a aquest punt suposo que els propers mesos la posaré a la venda amb l’objectiu d’aquirir alguna de les noves tables que han sortit i buscant donar-li un enfoc amb coneixement de causa a la mateixa. És a dir, aneu en compte no he dit que la tablet no valgui per res sinó que té alguns aspectes que han de madurar. Però he de dir que li he trobat un ús molt concret que pel meu perfil és idoni. És a dir, tinc un equip amb una bateria que em dura quasi una setmana amb que permet accedir a xarxes socials i a la web, a més de fer-me de magatzem multimedia amb una nota molt alta. Obviament la sortida HDMI em va genial per ensenyar fotografies de viatges a familiars, emportar-me altres continguts multimèdia arreu del món i poder-los visualitzar tan en la pantalla de la Xoom com al monitor de qualsevol TV d’hotel, amic, familiar, etc.
Així doncs, la meva opinió és que si sou amants de la tecnologia i us ho podeu permetre és un equip que esta molt bé. Això si, sota el meu punt de vista encara va una mica coix per poder tenir utilitats productives almenys en els entorns en els que jo em moc.
Aquesta setmana he tingut un expedient X’s amb el servidor d’oriolrius.cat que tinc virtualitzat en un servidor de Xen. La qüestió és que segons Xen la màquina estava corrent normal però encanvi no podia accedir ni a la consola ni enlloc. Ja que la màquina no estava a la llista de processesos del sistema. Així doncs, després de més d’1any he hagut d’aprendre alguna comanda de Xen CLI per poder solucionar el problema.
Per obtenir la llista de màquines virtuals que té el sistema:
xevm-list
amb aquesta comanda podem obtenir el uuid, aquest identificador ens serà útil per poder forçar la màquina perquè es pari. Això ho podem fer així:
Llavors podem eliminar el domini que ens causa problemes així:
/opt/xensource/debug/destroy_domain-domid1
Si la comanda no retorna error vol dir que hem pogut eliminar el domini i ja podem tornar a executar la comanda xe vm-reset-powerstate.
Gràcies a això he pogut fer-li entendre al Xen server que la màquina estava parada i des de la GUI he tornat a iniciar la màquina sense problemes. En el meu cas aquesta anomalia s’havia donat degut a que el sistema s’havia quedat sense memòria, o sigui, que entenc que hi hauria alguna part del hypervisor que tindria leaks de memòria.