Ubuntu server as wifi AP and Mikrotik as a DHCP server
Reading time: 18 – 29 minutesIt’s important to have a very clear picture about the scenario that we’re going to configure in that case because it’s a little bit particular. This is an evolution of the previous post: Ubuntu server as wifi AP and Mikrotik as a DHCP server
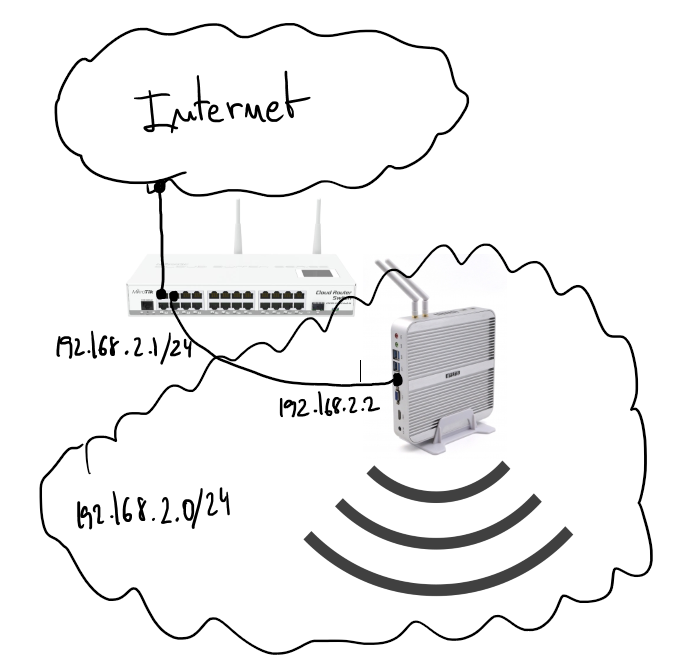
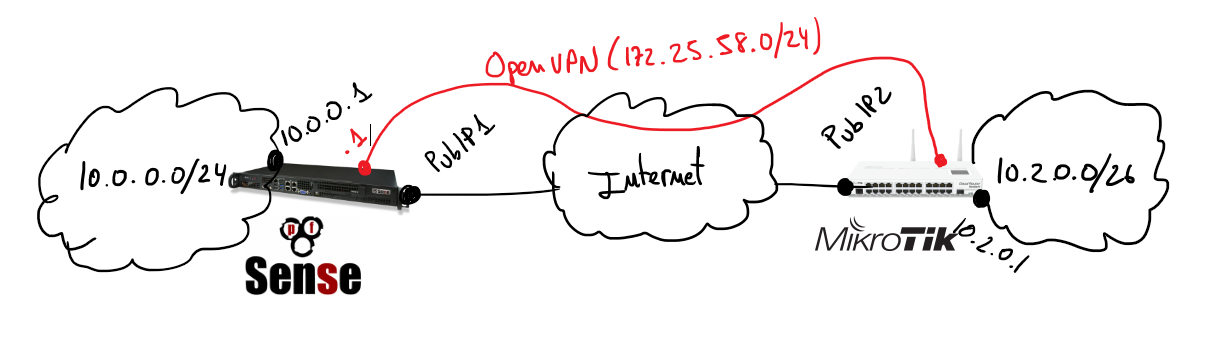
There is a server running Ubuntu 16.04 and offering wifi service as an AP. The wifi interface is in bridge mode with the ethernet port and send all traffic to the Mikrotik gateway where there is a DHCP server in charge to serve IP address to wifi clients.
Start by configuring the bridge in the Ubuntu server. File “/etc/network/interfaces”:
source /etc/network/interfaces.d/*

auto lo br0
iface lo inet loopback

#ethernet interface
allow-hotplug enp2s0
iface enp2s0 inet manual

#wifi interface
allow-hotplug wlp3s0
iface wlp3s0 inet manual

# Setup bridge
iface br0 inet static
    bridge_ports enp2s0
    address 192.168.2.2
    netmask 255.255.255.0
    network 192.168.2.0
Pay attention on “bridge_ports” the wifi interface is not added on the list, this is because until the hostapd is running it doesn’t make sense to do that. You’ll see “bridge=br0” option on hostapd.conf which will fix that misbehavior.
Wifi AP configuration, “/etc/default/hostapd”:
DAEMON_CONF="/etc/hostapd/hostapd.conf"and “/etc/hostapd/hostapd.conf”:
bridge=br0                # bridge interface
interface=wlp3s0          # wifi interface name
driver=nl80211
ssid=the_ssid_name        # name of your network
hw_mode=g
channel=1
macaddr_acl=0
auth_algs=1
ignore_broadcast_ssid=0
wpa=3
wpa_passphrase=the_secret_key   # secret key to joing with the wifi network
wpa_key_mgmt=WPA-PSK
wpa_pairwise=TKIP
rsn_pairwise=CCMP
logger_syslog=-1
logger_syslog_level=3
logger_stdout=-1
logger_stdout_level=1
DHCP server configuration on Mikrotik:
# setting the interface address, in my case ether4
/ip address
add address=192.168.2.1/24 interface=ether4 network=192.168.2.0

# setting up DHCP on interface 4 of the mikrotik device
/ip dhcp-server
add address-pool=dhcp-pool disabled=no interface=ether4 name=dhcp-pool

# network of the DHCP server
/ip dhcp-server network
add address=192.168.2.1.0/24 dns-server=8.8.8.8 domain=your_network.local gateway=192.168.2.1 netmask=24

# IP pool used by the DHCP server
/ip pool
add name=dhcp-pool ranges=192.168.2.65-192.168.2.70