Avui fa 16 anys que vaig començar a escriure el blog

Feliç de recordar l’efemèride i de malgrat no tenir un blog molt prolífic poder explicar que he aconseguir mantenir l’hàbit d’anar compartint encara que fos en petites píldores alguns dels fets i coneixements que la vida m’ha anat permetent disfrutar. Des de l’arribada del Roc més que mai he hagut de tancar el meu “pipeline” de projectes però una cosa positiva és que t’acabes centrant en l’escència i en el que et fa disfrutar més. Per desgràcia no pots atendre moltes altres coses que sovint tornen en forma de records o pensaments, això si, t’adones que les coses que has permès que seguissin al teu costat tenen el millor gust que mai havien tingut.
Només puc dir-vos que la meva intenció és seguir buscant reconets i estones per seguir compartint-vos el que hem passa pel cap, mentrestant ús envio una abraçada molt forta.
GRÀCIES PER SEGUIR-ME!
Mikrotik as a PPTP server for Android
Two years ago I installed a Mikrotik Cloud Switch and lately I stoped my pfSense and I started using that switch as my network router, firewall and also as a switch. RouterOS is really powerful and allows to do a lot of things with that hardware. One of those things is set-up a VPN server based on PPTP. This is not the most secure way to create VPNs but usually the only requirement is a little bit of security on top of an IP over IP service that allows us to use local service when we’re in remote. In my case I have a lot of services in my LAN and I need some of them when I’m out of home specially I need to use them from my mobile phone.
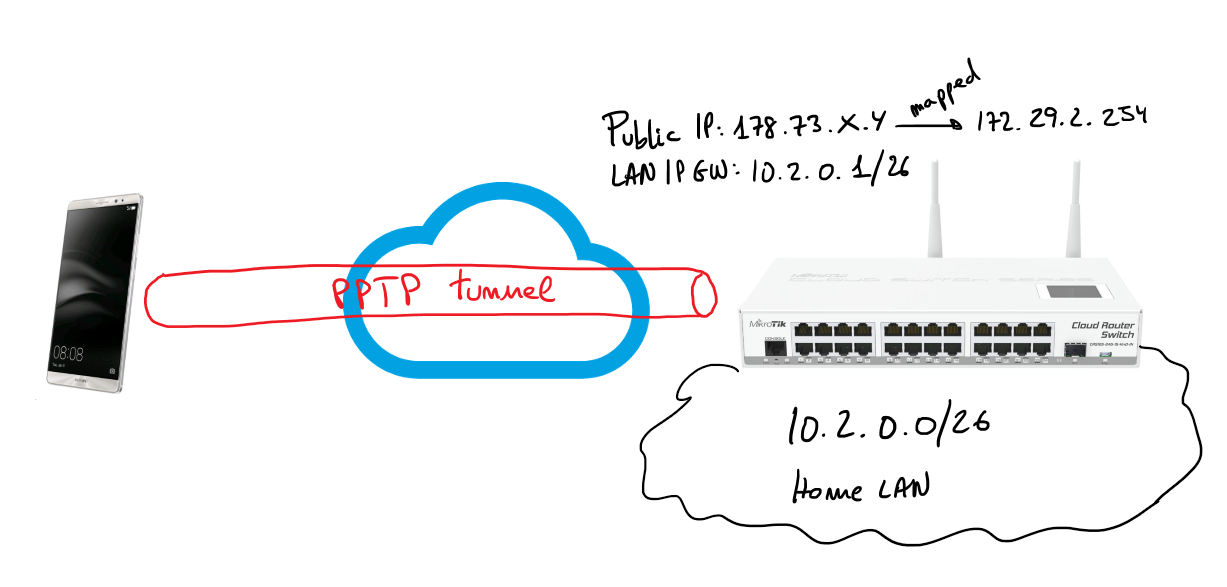
Next steps describe how I set-up a PPTP server on my Mikrotik server allowing my Android 6 device (Huawei Mate 8) to connect to my home services through the VPN. Bellow you have a simple schema representing the schenario of the solution:
I’m only going to describe steps from the web console, of course, all those steps can be done using Winbox or the command line. To be honest I’m not used to RouterOS CLI but I think it’s not difficult to figure out the CLI commands to get the same result.
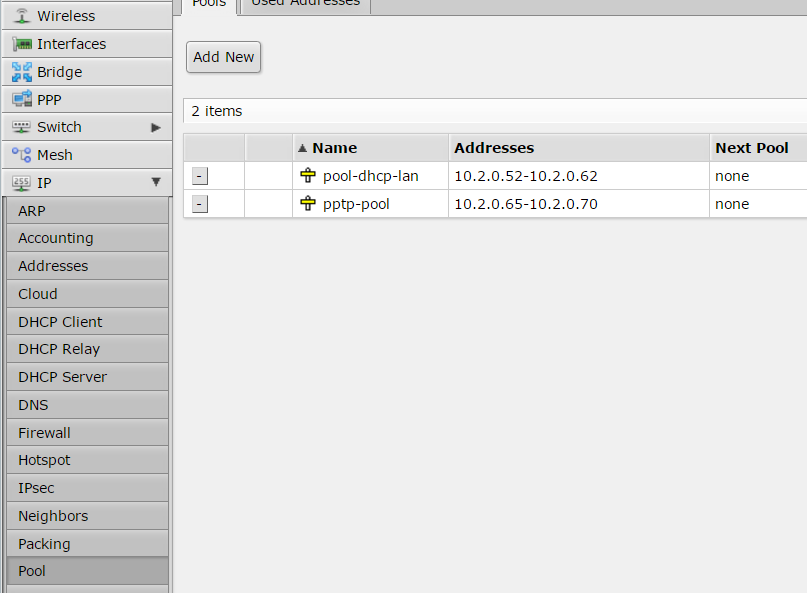
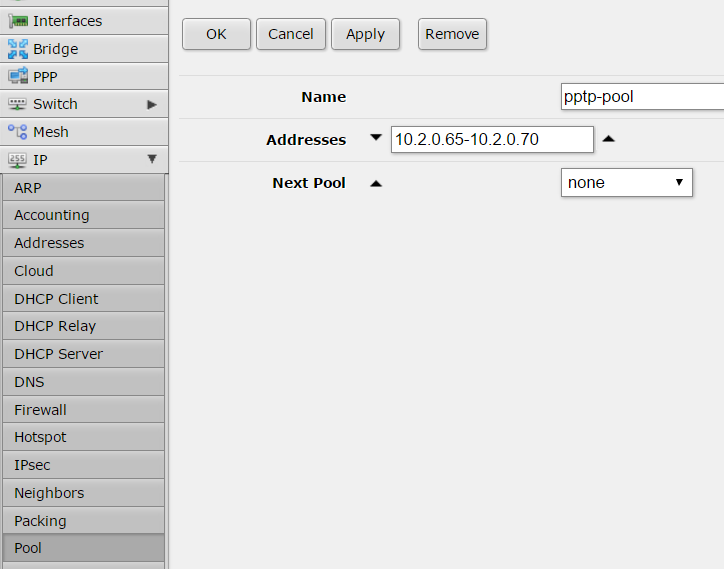
First step is set-up a pool of IP addresses to be assigned to the tunnel endpoints.
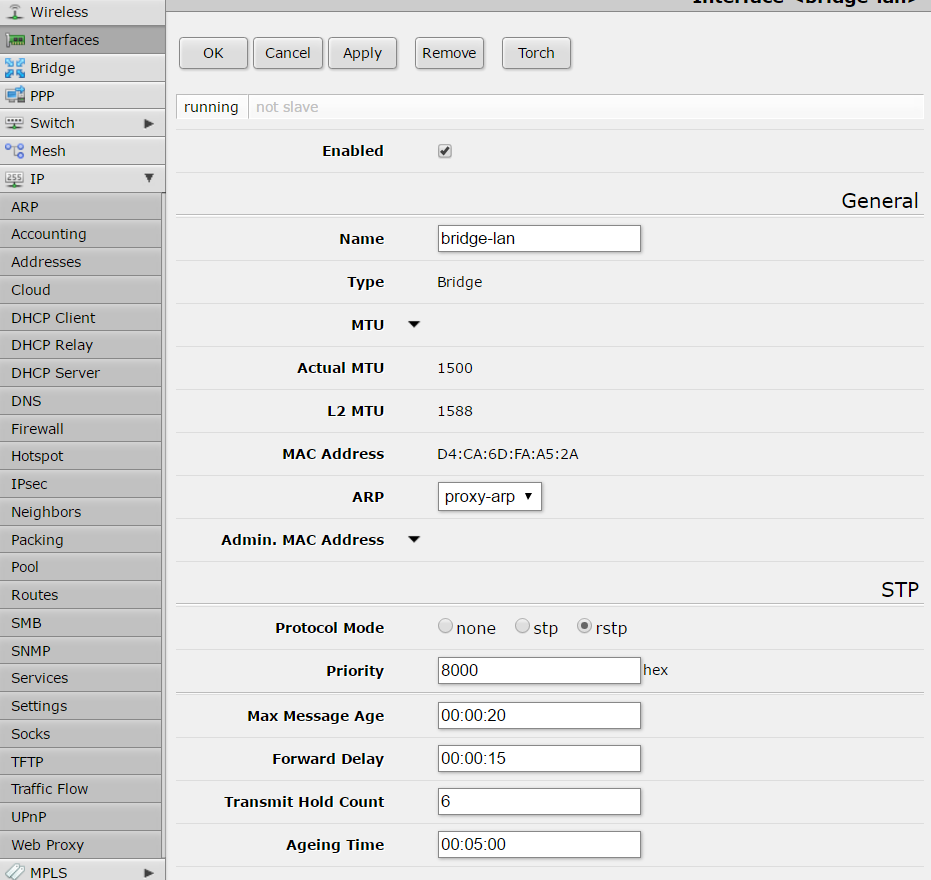
Thanks to an ARP proxy those IP addresses will be available like local IPs, this is transparent for the VPN configuration.
configuration of connection profile is done inside “Profiles” tab:
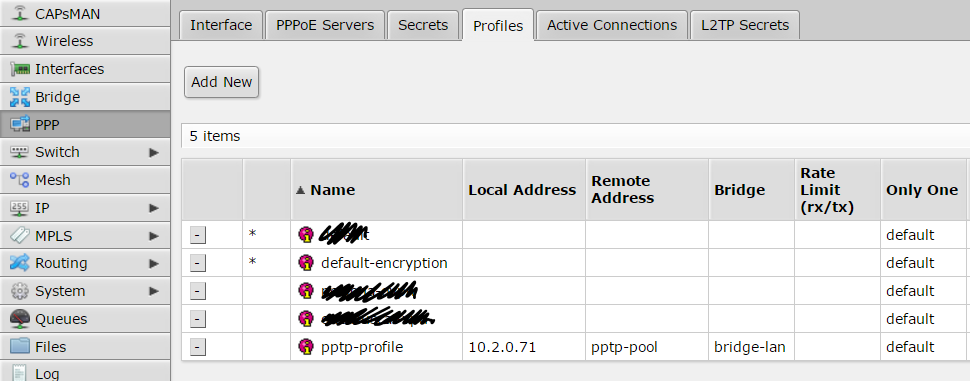
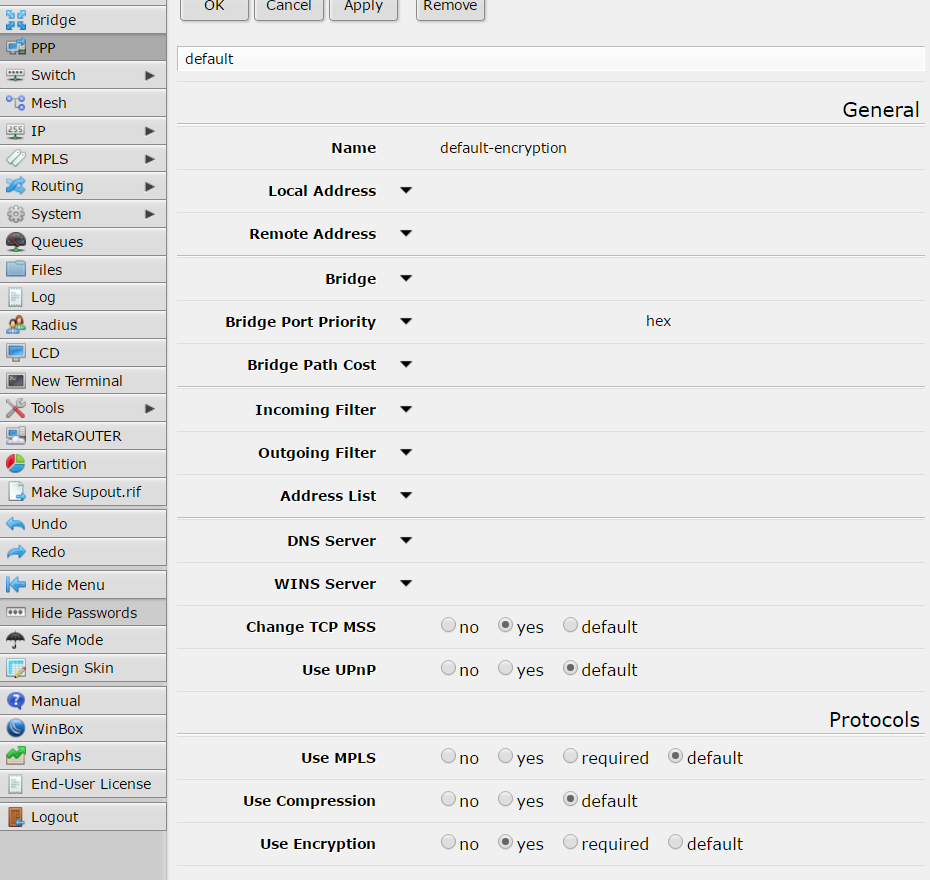
first of all create a new profile called “default-encription”:
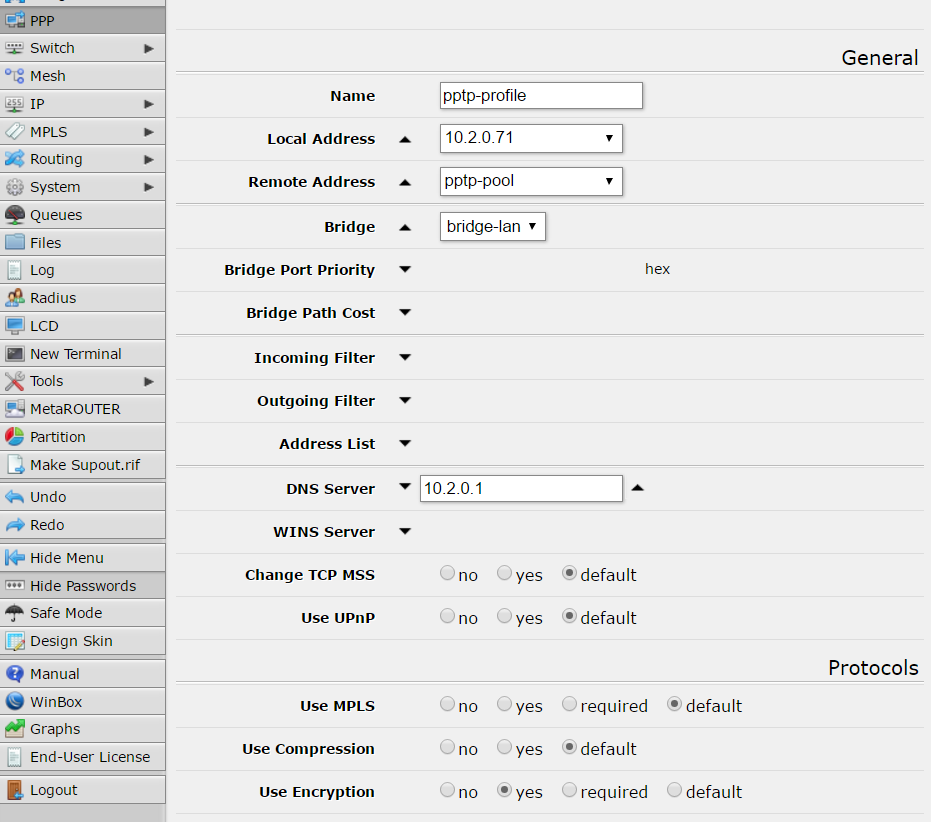
and another profile called “pptp-profile”:
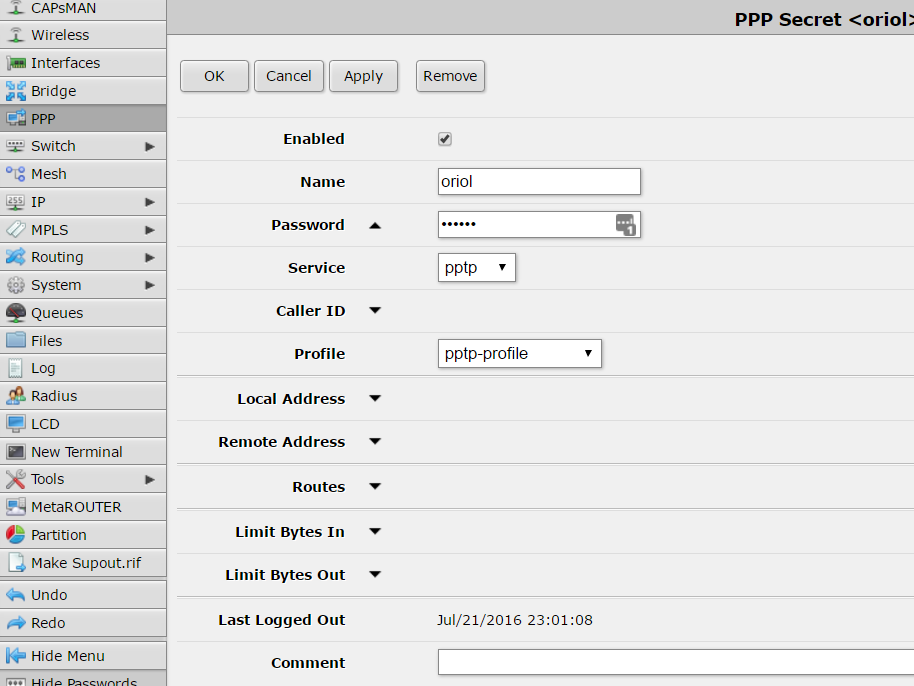
“Secrets” tab is where you have to manage users, in my case only two users are created:
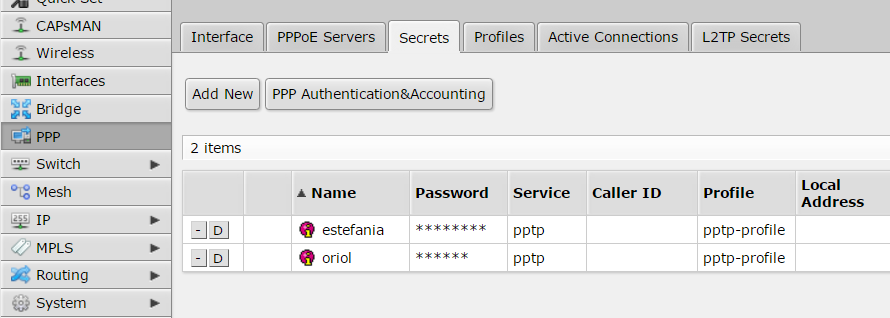
configuration details about my user are:
Inside PPP menu there is a button with a label “PPTP server” click there…
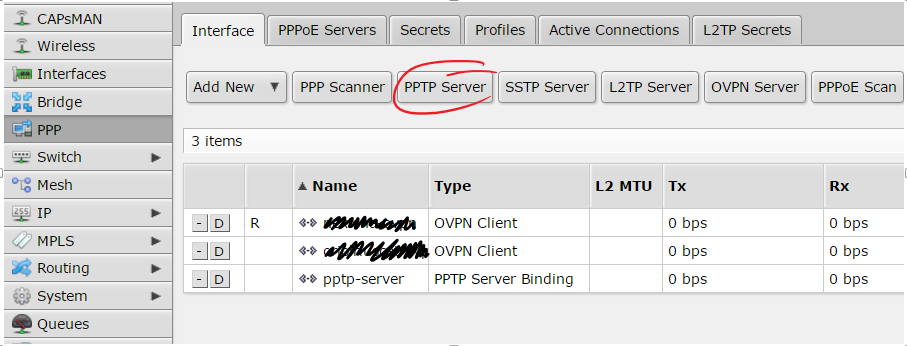
… and copy next settings:
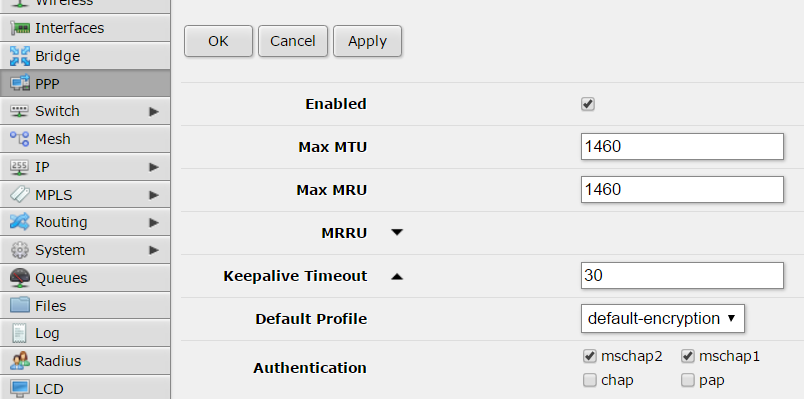
Don’t forget to check that your PPTP port is accessible from your public IP address. Remember it’s 1723/TCP.
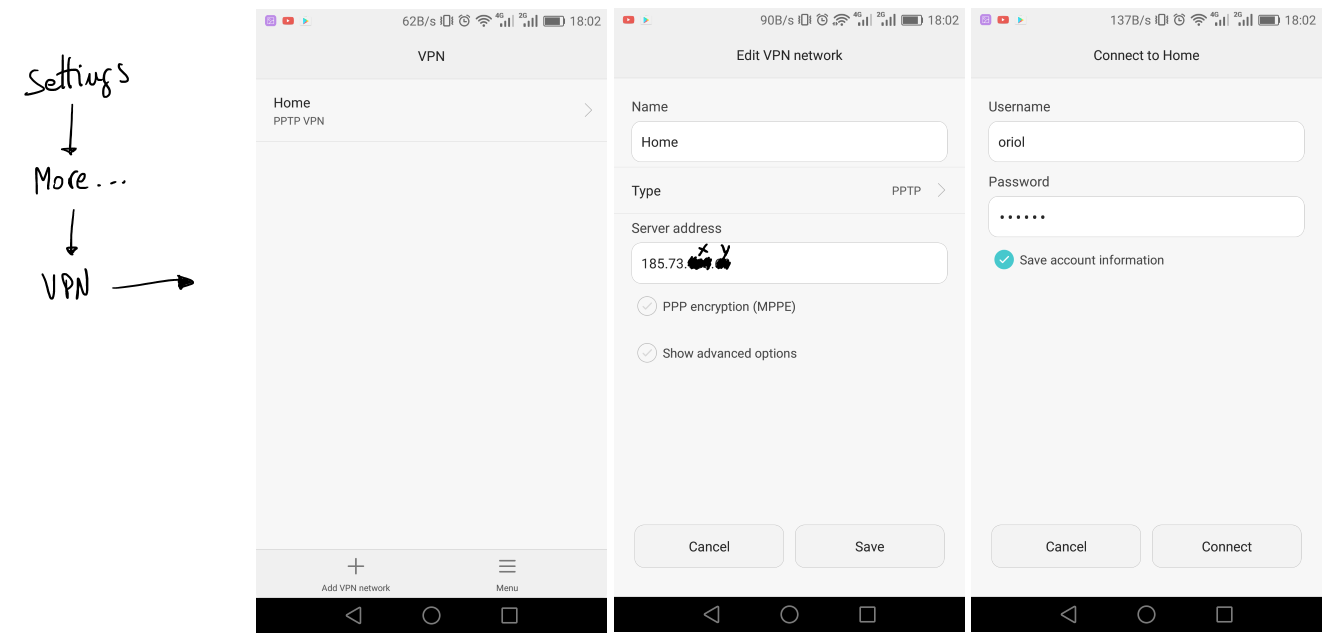
Android configuration is simple, first of all go to “settings” icon. Look for a “More” section bellow network options, and you’ll find VPN managment. Add a new connection, define a name, the type and the IP address and leave the rest by default. After that when you come back to VPN list you’ll find your new VPN in the list, click there and just set-up your PPTP credentials.
If you have some trouble the only thing that you can do is go to Mikrotik logs or start sniffing to figure out where is the problem. I had to do some tests before it was working but in the end everything was so simple like I explained here.
Good luck and enjoy it.
Thanks to next blog entries to inspire me:
- How To Set Up PPTP Server on Mikrotik
- Step by Step: How to configure a PPTP VPN Server on Mikrotik RouterOS
Remove old kernels when there is no space in /boot
The first step is get some space in the partition “/boot” because without that it’s impossible to do anything.
So go to /boot and remove some “initrd” files as they are the biggest ones. A few of them will be enough.
After that a good point is to ensure there is no partial installation pending to finish:
apt-get -f installNow it’s a good idea to purge all kernels except the running one:
dpkg -l 'linux-*' | sed '/^ii/!d;/'"$(uname -r | sed "s/\(.*\)-\([^0-9]\+\)/\1/")"'/d;s/^[^ ]* [^ ]* \([^ ]*\).*/\1/;/[0-9]/!d' | xargs sudo apt-get -y purgeTo avoid that in future before filling the partition, it’s a good idea to install and run periodically: purge-old-kernels. Installation and example of use are:
# installation
apt-get install bikeshed
# keep three old kernels:
purge-old-kernels --keep 3
# if you want to put that in the crontab use that command
purge-old-kernels --keep 3 -qy
If you’re a Grub user don’t forget to run:
update-grub2Personally I have a nightmare with that problem and Ubuntu, especially with version 12.04 which is installed in a lot of servers that I manage. I repeated the previous process a lot of times and in the end, I decided to document it because I always have to go to Google and find the proper steps to solve that problem.
Protecting your email with MXGuarddog
 After using VMWare ESXi for a long time as a Hypervisor for my virtual servers I decided to stop paying OVH for that service and I migrated my virtual machines to VPS servers on OVH. At the end of the day only two VPS with a cost of 3€/month are enough and I can stop a 50€/month dedicated server.
The biggest challenge that I had to solve was migrate mail server to a new server. So far today I was using pfSense a firewall for my virtual servers. They were in a virtual network; pfSense anti-spam services and mail forwarding were enough to receive “cleaned” mail in my private mail server with Postfix and Dovecot.
New configuration is just a cheap VPS (1xCPU+2GB RAM+10GB SSD) with Ubuntu 16.04 and also with Postfix and Dovecot. But I decided to rent the anti-spam, anti-malware and anti-virus service to MX Guarddog. I discovered that service just surfing on the big G. Only 0.25 cents per account per month it’s a very good price and it does all the things that I need and much more. Configuration is really simple if you know what you are doing. They have a very good and simple control panel to manage the service. This is the perfect service to get what I need.
In the control panel you can do all that you need, manage mail accounts and domains. View quarantined mails and all required configurations and tests to validate everything is ready and also maintain white and black lists. We’ll see during next days if the service gets the quality that I expect, I hope I have found a very good and cheap resource.
Ja en sumo 39; no ús perdeu qui m’ha felicitat aquest any
Un any més sumo una unitat a la compte i ja en van 39. Els 40 s’acosten però la veritat és que no li dono més importància del que té. La vida passa i les experiències s’acumulen. Per sort hi ha coses que realment hem fan somriure, algunes les podeu veure aquí:

d’altres aquí:
i fins hi tot podeu escoltar grans felicitacions com aquest del mateix Fidel Castro XDDD
Moltíssimes gràcies a tots els que us heu recordat de mi i als que no també, una fortíssima abraçada amb molt d’amor. GRÀCIES!
