Resumen 2024
El 2024 ha sido un año pleno de contrastes, donde las lecciones aprendidas, los retos profesionales y la alegría familiar han convivido para dar forma a una experiencia inolvidable. A lo largo de estos doce meses, he reforzado valores como la paciencia y la comunicación, y he vivido momentos que han marcado mi crecimiento tanto personal como laboral.
Aprendizajes

Este 2024 me ha reafirmado en la idea de que la paciencia y la comunicación efectiva son aliados imprescindibles en cualquier ámbito, desde la familia hasta el trabajo. He comprendido mejor la importancia de gestionar el estrés sin perder la empatía hacia quienes me rodean; he tenido que aprender a escuchar más y no lanzarme a conclusiones precipitadas. Aunque sigue siendo un reto, cada pequeño avance en estos aspectos marca una diferencia real en mi día a día.
También he valorado la simplificación de procesos y la gestión del tiempo. En ocasiones, realizar un par de pasos de menos es más productivo que desplegar una estrategia hipercompleja que termine por abrumarme. En este sentido, la reflexión sobre mis emociones me ha ayudado a diferenciar lo urgente de lo realmente importante, equilibrando mejor mis prioridades.
Otro aprendizaje inusual que he incorporado es el de saber conjugar mi dependencia de la tecnología con la necesidad de criterio propio. Interactuar a diario con mi “amigo GePeTo” (GPT) me enseñó que la IA puede aportar mucha eficiencia y creatividad, pero también que uno debe mantener un espíritu crítico y saber cuándo seguir la intuición personal. Curiosamente, volver a proyectos técnicos complejos y resolverlos con un enfoque más sencillo me hizo redescubrir el valor de la “solución mínima viable”.
Por último, me he dado cuenta de que, al igual que en la docencia, es clave dejar margen para el crecimiento autónomo de los demás. Ver a mis hijos y estudiantes encontrar sus propias respuestas, e incluso superarme en algunas soluciones, me ha recordado lo gratificante que es dar espacio a la colaboración y al aprendizaje compartido. Esto, al final, es lo que convierte la vida en un viaje continuo de descubrimiento.
Proyectos y marca pesonal
Este 2024 ha sido un año de contrastes. Por un lado, la actividad en Industry 4.0 Systems sigue en alza: mantener la regularidad en las publicaciones y profundizar en temas técnicos poco explorados se ha convertido en nuestro principal logro. Este esfuerzo continuado me enorgullece y refuerza mi pasión por la divulgación tecnológica.
Por otro lado, mi marca personal ha estado casi en pausa. El exceso de trabajo y los proyectos de gran envergadura con clientes me han absorbido por completo. Aun así, quiero romper con esta dinámica en 2025, retomar mi presencia en redes y potenciar mi visibilidad. Un primer intento para ello fue G33k.team: registré un piloto, pero la falta de compromiso del socio que encontré dejó el proyecto en standby. Confío en poder darle forma cuando encuentre el momento y el equipo adecuado.
En cuanto a formación, ha sido un año con pocas lecturas y apenas algún webinar suelto; no conseguí terminar ningún libro. La explosión de las IA ha transformado la manera en que consumo información: mi “nuevo amigo” es GePeTo (GPT), como en broma llamo a ChatGPT y sus derivadas (Gemini, Claude Sonnet, etc.). Me paso horas interactuando con estos modelos, lo que ha desplazado parte de mi tiempo de lectura tradicional.
Finalmente, mencionar a Joan Verdaguer, un profesor de secundaria retirado que me ha inspirado profundamente. Su pasión por seguir aprendiendo, su agenda repleta de eventos y la forma en que comparte conocimiento —incluso a través de papers basados en experimentos que realiza con otros colegas— son un ejemplo de energía incombustible. Ver su mente despierta, su mirada crítica y sus ganas de aportar me recuerda que nunca es tarde para seguir creciendo.
Familia y temas personales
Este año cumplí mis 47, con el recuerdo de aquel accidente de coche de hace 21 años muy presente. Un regalo que enamoró fue recibir “47 motius per estimar-te” de mi mujer, un detalle que me hizo reflexionar sobre el paso del tiempo y el valor de cada día. Gracias Meumins.
Los niños cumplieron 6 y 8 años: Nil ya va a Primero y Roc a Tercero. Me asombra lo rápido que crecen; en solo tres años, Roc tendrá que ir estudiar fuera del pueblo, algo que todavía no termino de asimilar. A la vez, poder razonar con ellos y hacer planes juntos se ha convertido en una de mis mayores alegrías. Nos quedará siempre el recuerdo de Pol, que habría cumplido 10.
Con los niños, he tenido varios motivos de orgullo: en la Wedo Party hicieron una presentación de robótica increíble, y Nil ganó el premio de dibujo de Sant Jordi. Eso sí, no han faltado sustos: Nil se rompió un diente a principios de año y más tarde se fracturó cúbito y radio en el campus de hockey de Pedro Gil. Afortunadamente, gracias a un molde 3D de la comunidad IP, la recuperación fue más llevadera.
Viajamos con la familia de Valencia a Besseit, Arnes y Vall-de-roures. Descubrimos un restaurante que es un joya en La Ràpita, te recomiendo “Celleteca Cal Bayó”. Además de descubrir que el mejor bocadillo de país lo sirven a 5km de casa, oportunidad que no dejé escapar para probarlo. Pero el gran viaje del año fue a Florida, un plan que me llevó horas de preparación y que abarcó desde el circuito de Daytona 500 hasta Key West, pasando por Cabo Cañaveral (instalaciones de la NASA), Orlando (parques de Disney), Naples, Sarasota, Everglades y Miami. Una experiencia inolvidable.

Año con grandes cambios en lo que se refiere al hockey. Tanto Roc como Nil se han movido al club de hockey de Sant Pere de Riudebitlles. Una lástima tener que dejar el pueblo pero no se puede tener todo. Esta nueva etapa esta siendo todo un placer y una oportunidad para los niños. Aunque esto haya implicado despedirnos de su entrenadora de toda la vida, Carla. Gracias de nuevo por tu gran trabajo con los niños.
De acuerdo con el análisis de un modelo de IA sobre mis notas del diario personal, la mayoría de los días se registraron con un estado de ánimo positivo y salud estable (60-70%), quedando un grupo menor con altibajos y solo unos pocos marcados por molestias considerables. En general, la sensación predominante fue de bienestar, sin quejas demasiado frecuentes a lo largo del año.
El mismo análisis sugiere que dediqué una parte relevante del tiempo al trabajo (50%), seguida de un bloque amplio dedicado a la familia (45%), mientras que el ocio personal quedó en un espacio más reducido (5%).
Charlas y escuelas de negocios
Este 2024 ha estado marcado por el cierre del Master of Science in Digital Business de ESADE, donde he continuado impartiendo Digital Technology, Digital LABs y Accelerating Innovation. Además, tuve la suerte de tutorizar dos tesis, una de las cuales obtuvo la calificación más alta de toda la universidad, centrada en el “Impact of Neobanks on Traditional Banks in the Swiss Banking Industry”. También participé como miembro de tribunal de tesis, una experiencia que me ha permitido ver de cerca el talento y la dedicación de los estudiantes en sus proyectos de investigación.
Por otro lado, he mantenido mi colaboración con la escuela de tecnología Zigurat, impartiendo tres módulos en el Master en Digital Business. En ISDI, di una masterclass para DAMM enfocada en empresas data-driven y otra sobre Internet of Things en su Master of Internet Business.
Fuera del entorno puramente académico, quiero destacar la conferencia sobre IA que ofrecí en Sallent, donde el éxito de asistencia me alegró especialmente, y la charla in-company en ISDIN, gracias a la invitación de mi viejo amigo Rod, para abordar la problemática de los silos de datos en las organizaciones. En conjunto, ha sido un año de intensa actividad formativa, con oportunidades para compartir conocimientos y aprender cada día un poco más.

Según el análisis que hizo la IA sobre mis notas, Nexiona concentró gran parte de mi tiempo, seguida por i2Cat, donde dediqué un bloque igualmente significativo a automatizaciones y despliegues. Sàbat ocupó un espacio más moderado, principalmente por el desarrollo del nuevo IoT Gateway NG. Mientras tanto, las colaboraciones en docencia (ESADE, Zigurat, ISDI) y otros proyectos complementaron la agenda con un porcentaje menor.
Proyectos profesionales
Año de extremos en mi faceta como consultor y mentor. Con Nexiona hemos superado retos técnicos importantes y logrado un proyecto internacional de gran envergadura con fábricas repartidas por todo el mundo. Aun así, he sentido la marcha de Yev y Néstor, compañeros clave que dejan un vacío tanto a nivel profesional como personal en mi día a día con el cliente.
En i2Cat, mi labor se ha centrado en la automatización de documentación y despliegues usando Ansible AWX y Ansible Forms, contribuyendo a agilizar procesos internos. Mientras tanto, en Sàbat, uno de los grandes hitos fue el desarrollo del nuevo “IoT Gateway NG”, ya implantado en casi todas sus líneas de producción y con planes de completarlo en 2025.

La nota amarga del año la pone AKO, una empresa con la que colaboraba desde hacía más de una década y que he perdido como cliente tras un cambio de responsable. Por otro lado, también he aprendido que debo gestionar mejor los picos de trabajo: este año asumí volúmenes excesivos que no deseo repetir en 2025.
Resumen Técnico
A diferencia del 2023 el 2024 mi dedicación a temas técnicos se ha incrementado notablemente, vamos a decir que por exigencias del guión. En mi opinión la gran diferencia entre este trabajo y el que había hecho en otras epocas de mi vida es la fuerte vocación de compartir y ayudar a terceros con todo este esfuerzo. Hasta me permitiría añadir la palabra inspirar. Realmente siento como una gran recompensa cuando noto que mi trabajo es la semilla de desarrollos de otras personas. Realment es una gran motivación personal a estas alturas de mi vida.
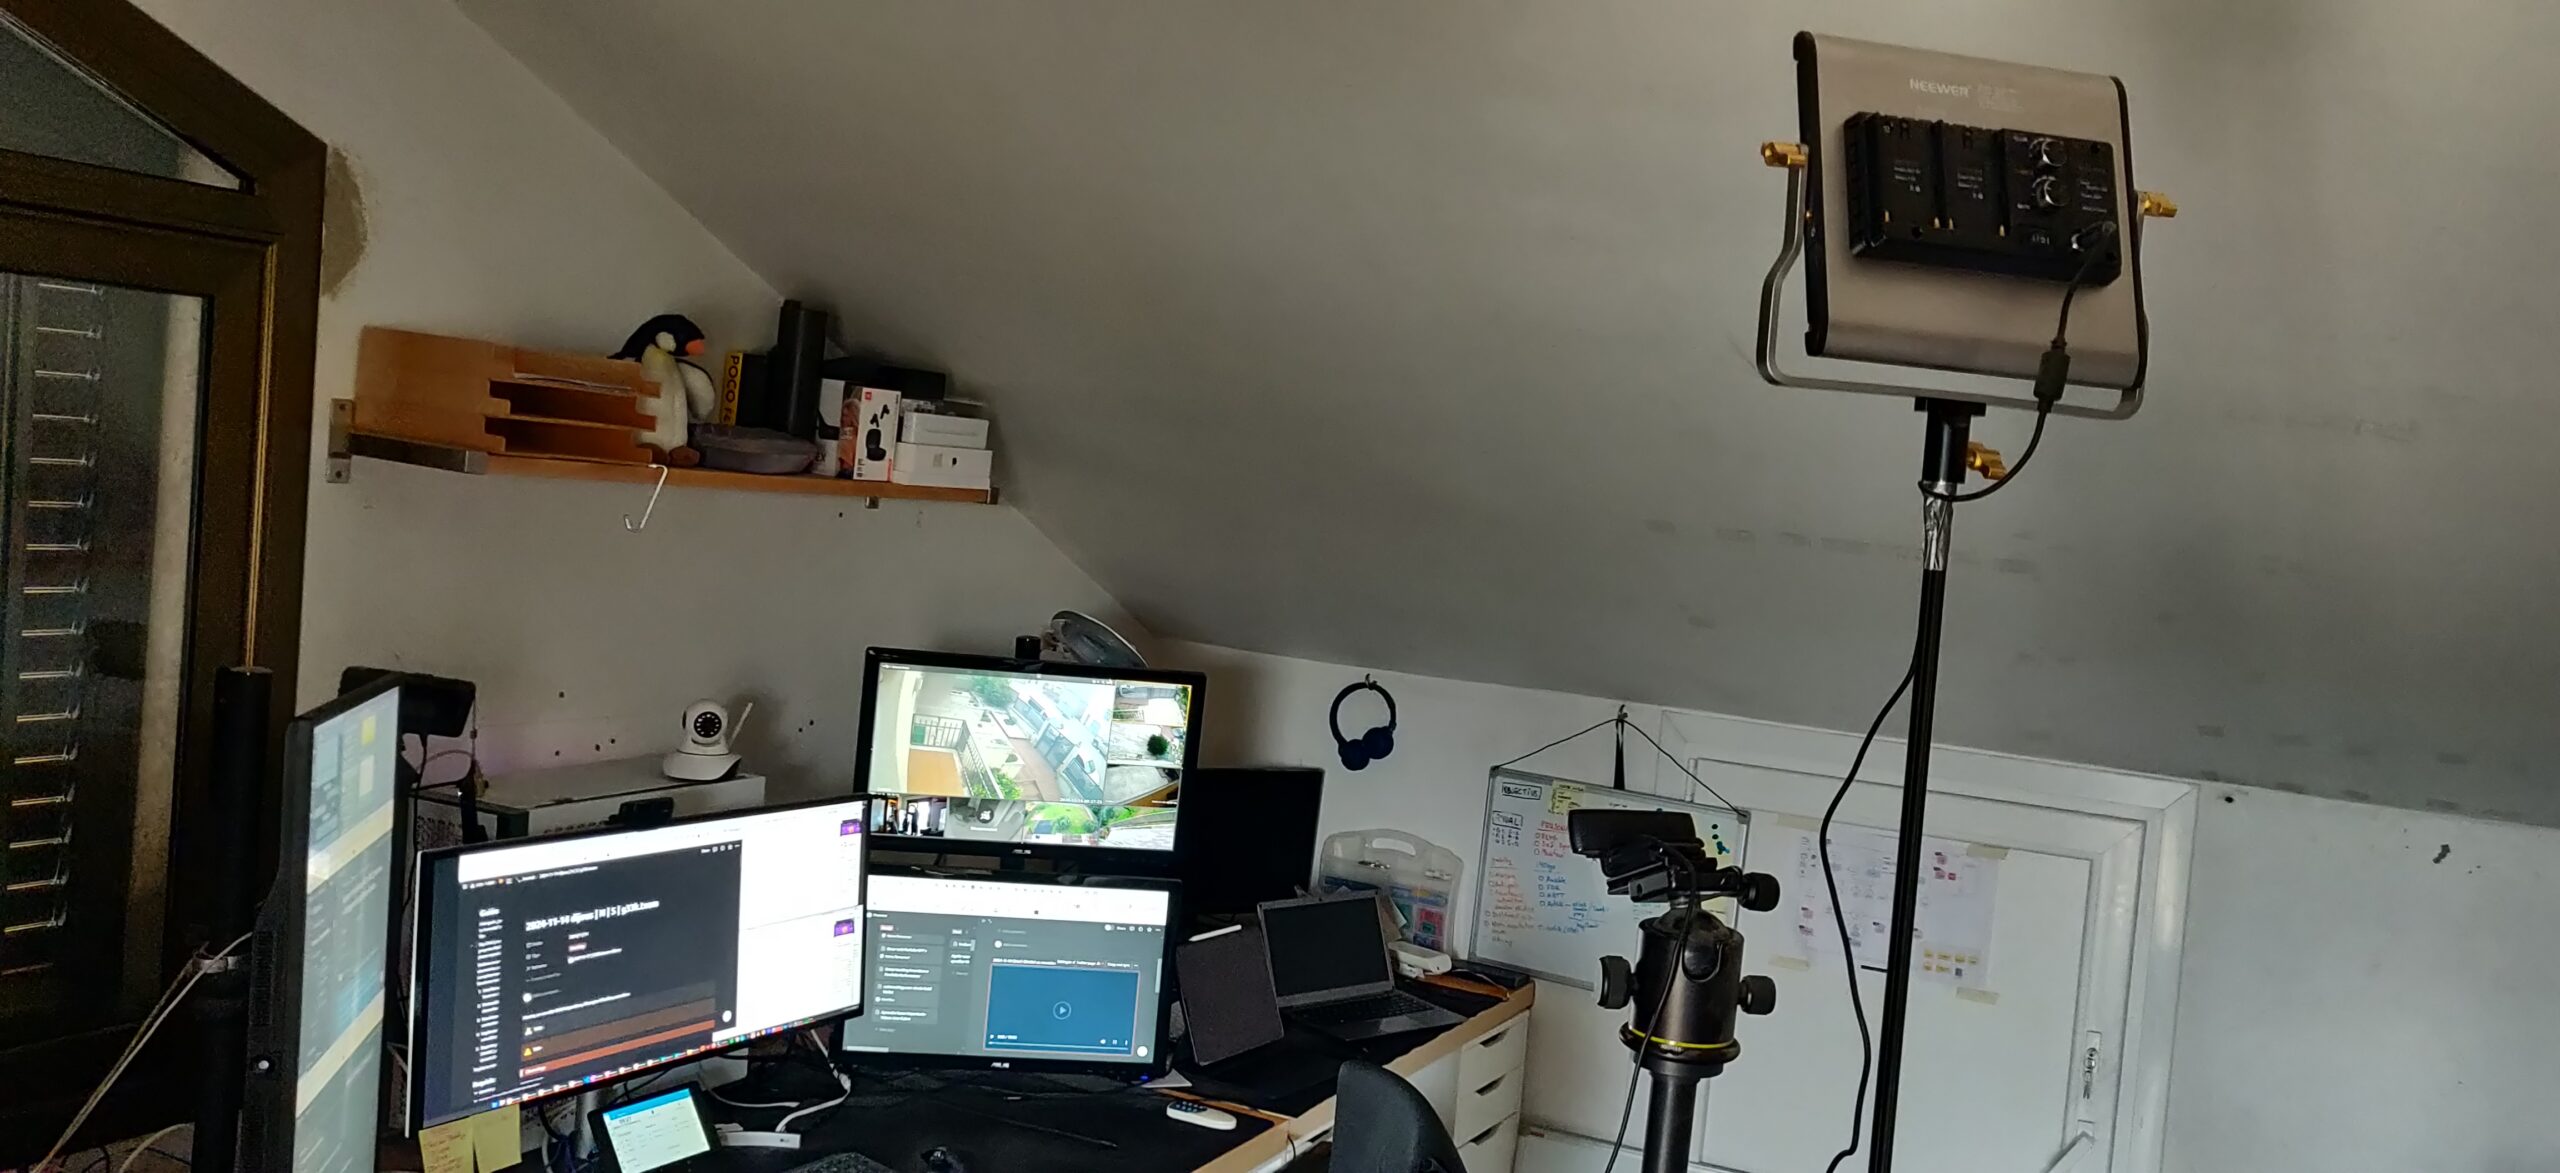
Hay que destacar también un cambio muy relevante en la arquitectura de la infraestructura doméstica. Hace unos años tomé la decisión de reducir los servidores domésticos al extremo y concentré todas mis necesidades en un NAS y un servidor de videovigilancia. Lamentablemente, las capacidades de computación del NAS con todos los servicios que requiero para el día a día lo hacían difícil y caro de mantener, sobretodo en tiempo dedicado cada vez que había que reiniciar por actualizaciones o similares. Se hacía raro no acabar invirtiendo una mañana, o una tarde enteras, para una actualización de sistema rutinaria.
Así pues, me decidí a comprar un Minisforum MS-01. Mucha potencia, poco espacio, poco ruido y buen precio.

- CPU: 14-core (6-mt/8-st) 13th Gen Intel Core i9-13900H [MST AMCP] speed (MHz): avg: 929 min/max: 400/5200:5400:4100
- Disk SSD NVMe 1TB – Kingston model: OM3PGP41024P-A0
- RAM DDR5 32GiB – 2xSODIMM Synchronous 5600 MHz (Crucial CT16G56C46S5.M8G1)
- Graphics: Intel Raptor Lake-P [Iris Xe Graphics]
- Network:
- 2x Intel Ethernet X710 for 10GbE SFP+
- 2x Intel Ethernet I226-V
- Intel Wi-Fi 6 AX210/AX211/AX411 160MHz
Toda esta potencia para correr un Proxmox que me permita gestionar los contenedores con los servicios de red y todavía más importante el Home Assistant que controla la casa.
Gracias a las herramientas de IA he podido rastrear en mis notas todas las tecnologías que he tocado este año y de las que he hablado en mi diario personal. Aquí dejo una lista por si pueden servirle a alguien.
💡 NOTA: Te recomiendo que te fijes espcialmente en los proyectos que he desarrollado que te he marcado con este icono: 👷
oriolrius.cat
Este año he tenido que tomar medidas drásticas con el Blog por qué los agujeros de seguirdad de WordPress han llegado a nivels insospechables. Había semanas que tenía más de un haqueo por semana, no daba abasto a recuperar las copias de seguridad. Por suerte este tema parece haber quedado atrás con estas medidas que comento.
Infraestructura y Virtualización
- Docker, contenedores y derivados; continuo avanzado hasta niveles de conocimiento muy profundos del funcionamiento. Cosa que me lleva a usar estas herramientas al extremo de su funcionalidad.
- Portainer para gestión de contenedores. A pesar de ser fan cada día estoy un poco más cansado de las incompatibilidades que genera y lo poco amigable que es para depurar problemas. IMHO ahora mismo lo mejor es usarlo para gestionar Docker SWARM y quizás algunos Kubernetes pequeños.
- Dockge cada día lo uso más como alternativa a Portainer si de lo que se trata es de gestionar Docker Compose.
- Traefik como proxy inverso y balanceador. Finalmente me lancé a montarlo en diferentes de las arquitecturas en las que estoy involucrado sobretodo pro su flexibilidad en la configuración en caliente. Honestamente estoy muy contento, aunque nada es perfecto, claro.
- NGINX Unit, también tiene una pinta excelente y es muy poco conocido. Lo he podido probar pero no lo suficiente para decir que lo controlo, aunque vale mucho la pena seguir invirtiendo tiempo.
- NGINX Proxy Manager (NPM), aquí si que he invertido muchísimo tiempo. Hasta llegar a tracear su código para entender como hacía múltiples funciones para poder personalizarlo hasta extremos muy interesantes.
- Crowdsec – the open-source and participative security solution offering crowdsourced protection against malicious IPs and access to the most advanced real-world CTI. Lo he montado junto a NPM y añade una capa de filtrado potente.
- Virtualización y Gestión:
- Multipass para máquinas virtuales ligeras, lo he estado usando en Windows 11. Llegué a tener en marcha más de 15 VMs con Ubuntu para mis estudiantes de ESADE, concretamente para hacer prácticas de IoT.
- Proxmox para virtualización de infraestructura combinado con ZeroTier y VLANs, este es el uso que le estoy dando dentro de mi infraestructura personal.
- Inventario
- GLPI una solución muy antigua y se nota cada vez que debemos desplegarlo. Pero a la vez que antigua también viva y en plena evolución. Se nota que esta generando negocio a su alrededor y eso también se nota al usarlo, ya que su covertura y funcionalidad de los invetarios no para de crecer. Además también destacar la capacidad de integrarse con Zabix. Seguro que poco a poco su API lo reflejará, por qué ahora es uno de los puntos más débiles que le encuentro.
Automatización y DevOps
- Ansible: hace muchos años que empecé a automatizar con Ansible y la verdad es que el producto nunca deja de sorprenderme positivamente.
- Ansible Forms, permite crear formularios para definir las variables de entrada de los Playbooks de Ansible y esto es una maravilla para usarlo como interface de gestión de procesos para usuarios con un perfil menos técnico.
- AWX; además Ansible Forms se funciona a la perfección con AWX. También quero d
- Semaphore también es la herramienta que usaba como alternativa a Ansible Forms, es una herramienta muy interesante y a tener en cuenta ya que ahora mismo no solo permite hacer automatismos con Ansible, sino también Terraform, OpenTofu, Python y mucho más.
- CI/CD y Control de Versiones:
- GitLab CI/CD workflows; incontables las horas que pasé perfeccionando procesos con este sistema. Aunque muy potente y versátil hay que reconocer que todavía muy lejos de la siguiente referencia.
- GitHub workflows, especialmete enamorado del siguiente workflow por su simplicidad y utilidad a la hora de crear mis imágenes docker cuando hago un desarrollo: .github/workflows/publish.yml
- Implementación de Docsify para documentación automatizada
Seguridad y Redes
- Autenticación y Acceso:
- Keycloak y Authelia para gestión de identidades; honestamente tenía muchas esperanzas en Authelia pero rápidamente vi que es algo muy pequeño y de recorrido muy limitado sobretodo al lado del monstruo todopoderoso que es Keycloak. Curiosamente este 2024 ha sido el año de los IAM, IDM y todo este tipo de herramientas. Llevo almenos 8 años intentado apostar per este tipo de soluciones pero hasta ahora no explotó.
- Cloudflare Zero Trust Tunnel – Cloudflare Tunnel provides you with a secure way to connect your resources to Cloudflare without a publicly routable IP address. With Tunnel, you do not send traffic to an external IP — instead, a lightweight daemon in your infrastructure (cloudflared) creates outbound-only connections to Cloudflare’s global network. Cloudflare Tunnel can connect HTTP web servers, SSH servers, remote desktops, and other protocols safely to Cloudflare. This way, your origins can serve traffic through Cloudflare without being vulnerable to attacks that bypass Cloudflare.
Relativo a este punto añadir que me he quedado con las ganas de probar la solució self-hosted que en teoría hace lo mismo: pangolin. - 👷 SSH Stealth (github repos); he creado esta simple herramienta de port knocking. Si te interesa el tema te recomiendo una herramienta mucho más sofisticada, pero todo tiene sus pros y contras.
- https://github.com/eeriedusk/knockles – eBPF Port Knocking Tool
- https://github.com/mrash/fwknop – Single Packet Authorization > Port Knocking
- Monitorización y Seguridad:
- Stack de observabilidad self-hosted: Grafana Alloy + Keycloak + Grafana Mimir + Grafana Loki + Grafana Dashboards + NPM con OAuth2-proxy. He dedicado infinidad de horas en perfeccionar la infraestrctura que se describe a continuación.
Si te interesa el tema te recomiendo muchísimo la serie de vídeos publicados al respecto en industry40.systems. 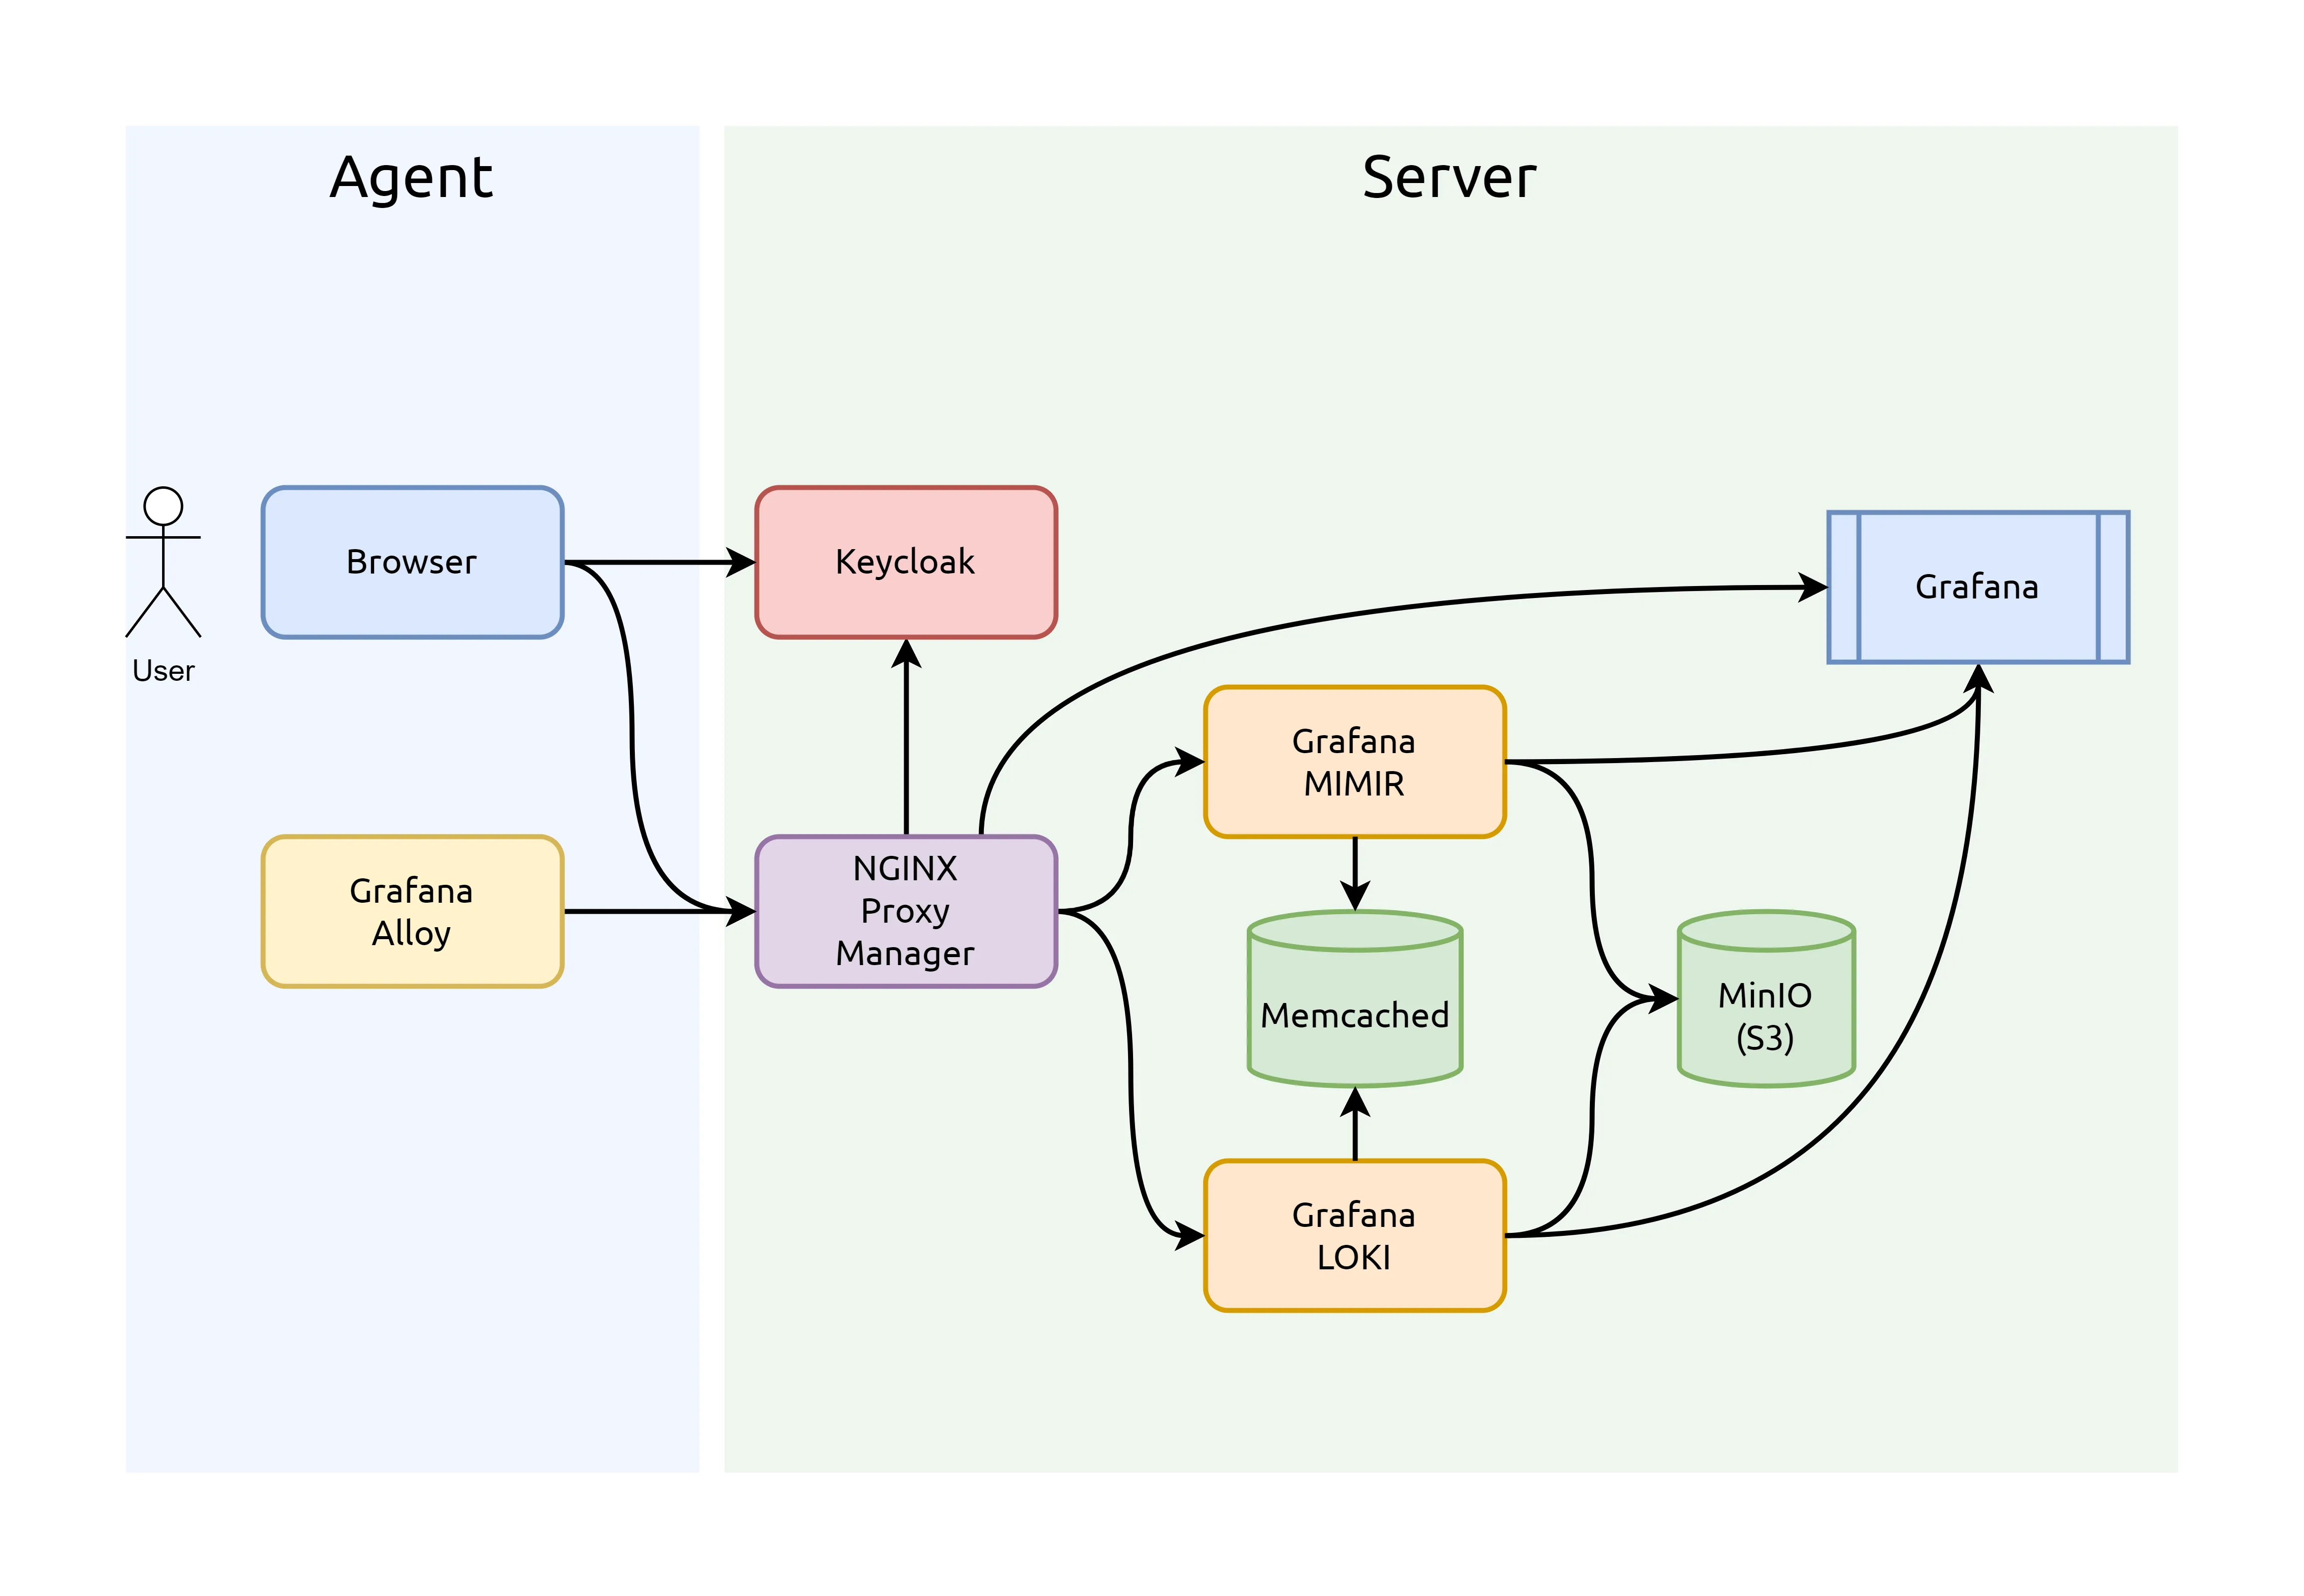
- Grafana dashboard para monitorizar Linux con Docker usando logs en Loki y métricas en Mimir; lo publiqué en abierto por si puede ayudar a alguien.
- Grafana Grizzly – una simple herramienta para la consola que vale la pena mencionar ya que es ideal para hacer provisioning de Grafana; permite interactuar con la API de forma sencilla y escalable, ideal para automatizar el despliegue de data sources, dashboards, alarmas y mucho más.
- Wazuh para seguridad – a pesar de la experiencia y sufrimientos acumulados poniéndolo en marcha no me quedé a aprender los detalles de su funcionamiento. Solo decir que es un XDR y SIEM que tienen una pinta excelente. IMHO estás herramientas siempre tienen el mismo drama que es la gestión de falsos positivos.
- Uptime Kuma para monitorización, este es uno de los grandes descubrimientos. Herramienta muy sencilla de configurar y con funciones fáciles de entender, además de ser pequeño y con un set de datos limitado. Pero con una gran función y es que las metrics generadas se exportan directamente en formato Prometheus y se pueden integrar fácilmente con Grafana Alloy.
- Autokuma, además integré este servicio que añade monitores a Uptime Kuma de forma automática al parsear las labels de contenedores que se levantan. Así pues se hace el provisionamiento de la monitorización automàticamente. De este mismo paquete también mencionar otra herramienta muy útil: kuma-cli que permite interactuar con los monitores desde línea de comandos.
- Aunque no es una herramienta en si no puedo dejar de mencionar los monitores push y los agentes que hay disponibles para monitorizar elementos personalizados, o remotos, que podamos tener en nuestra infraestructura. Realmente una herramienta muy útil.
- VPNs
- ZTNet la Web UI definitiva para gestionar los controladores de red de ZeroTier en nuestras redes privadas. Espectacular, simple y muy potente. Gran combinación.
- Wireguard, dentro de este inmenso mundo comentar que pude probar un par de herramientas interesantes y que vale la pena tener en el mapa para diferentes soluciones: netbird para accesos roadwarrior y netmaker ideal para gestionar site2site.
- Stack de observabilidad self-hosted: Grafana Alloy + Keycloak + Grafana Mimir + Grafana Loki + Grafana Dashboards + NPM con OAuth2-proxy. He dedicado infinidad de horas en perfeccionar la infraestrctura que se describe a continuación.
Desarrollo y APIs
- Python:
- FastAPI con Pydantic y asyncio, hace mucho que oigo hablar de estas tecnologías pero hasta este año no he podido empezar a flirtear con ellas. Realmente es un ecosistema interesante y muy recomendable.
- Pydantic con AVRO, para rizar el rizo en el modelado de datos y la compartición de estos modelos con otras aplicaciones propias o de terceros. Muy recomendable este artículo de Rubin Observatory: Shared Pydantic schemas as the basis for Kafka/Avro messages in SQuaRE Roundtable
- CLI development con Click, grandísimo descubrimiento esta librería de Python para programar Command Line Interfaces (CLI)
- Pyinstaller para empaquetado, escribí un post excpliando los diferentes sistemas de empaquetado autojecutable que prové para Python: Comparing Python Executable Packaging Tools: PEX, PyOxidizer, and PyInstaller
poetryhasta que descubrouvy me cambia totalmente la forma de enfocar los proyectos. No puedo dejar de recomendar efusivamente como me cambió la vida en Python desde que usouv. Es un MUST. Aprovecho para recomendar una guía buenísima de uv: uv: An In-Depth Guide to Python’s Fast and Ambitious New Package Manager
- LowCode / NoCode, los que me conocen saben que soy un gran fan de este tipo de herramientas
- Oracle APEX, gracias a mi colaboración con ESADE pude entrar a fondo a tocar este grandísimo producto enfocado a la parte más corporativa de las herramientas LowCode. Realmente espectacular.
- NodeRED y Flowfuse, sigo siendo un fiel enamorado de NodeRED y este año su complemento Flowfuse en mi opinión la ha estado petando. Dando un salto de gigante en la gestión masiva de instalaciones NodeRED, simplemente espectacular.
- Kestra.io, ha sido un descubrimiento y una promesa. No he pasado del hello world pero le tengo unas ganas tremendas a esta maravilla.
- Apache Flink se especializa en el procesamiento distribuido y en tiempo real de flujos de datos (streaming) y análisis continuo. Al empezar a usar Kafka en algunos proyectos estuve estudiando la posibilidad de ponerme con Flink a pesar de que pinta muy pontente al final me decidí por meterme más en NiFi con las necesidades que tenía. Pero Flink hay que tenerlo siempre presente.
- Apache NiFi se centra en la gestión, orquestación y enrutamiento de datos, facilitando la recolección, transformación y traslado (ETL) entre diferentes sistemas. Además viene con todo un ecosistema de herramientas que para muchas soluciones lo hacen mucho más óptimo que NodeRED. NiFi es mejor cuando necesitas manejar grandes volúmenes de datos con alta disponibilidad, seguridad y trazabilidad. Ideal para entornos empresariales y flujos complejos. Node-RED es más apropiado para proyectos IoT o prototipos donde la facilidad de uso y la rapidez de desarrollo son prioritarias, especialmente con volúmenes y complejidad de datos menores.
- Herramientas de Desarrollo:
- Migración a AutoHotkey v2, en Windows usaba AHK v1 para automatizar varias tareas repetitivas y me vi forzado a actualizar a la nueva versión. Hay que decir que a pesar de los años esta herramienta sigue siendo difícil de superar. Eso si, su desarrollo sigue siendo austero y tedioso.
- 👷 README2Notion, con la ayuda de Nestor creamos una herramienta para conversión de documentación de Markdown README a documentos en Notion. El proposito es integrarlo con un pre-hook de Git, así convierte los README.md de los proyectos en documentación de Notion centralizada. Este pre-hook esta documentado aquí.
IoT y Automatización del Hogar
- Home Assistant; a pesar de la gran necesidad que tengo de mejoras en los automatismos de casa la verdad es que le hice pocos cambios. Lo más importante es la migración a HASS y he dejado de usar la versión con docker, tener una VM con todos los procesos de backup y actualización me ahorra una de tiempo increible. Lo recomiendo muchísimo esto de usar HA con su S.O. y una VM, o en su defecto hardware dedicado.
- En casa tenemos una chimenea de pellets marca Edilkamin que la he integrado con HA, lo malo es que solo lo he hecho a través de su API Cloud no en local e independizándola de Internet.
- Integración de RTL_433, he contectado un SDR (Software Defined Radio) que monitoriza los PIR (sensores de presencia) y a través del NodeRED que lleva HA lo he integrado. Ahora me falta conectar la sirena para tener la Alarma completada.
- IoT y Comunicaciones:
- RabbitMQ, he seguido muy de certa las nuevas versiones de este producto en el que aposté hace más de 10 años para mis arquitecturas. Este año, por fin, se han puesto las pilas y han sacado nuevas versiones con mejoras relevantes y cambios estructurales que lo llevan a un nuevo nivel. Cuidado, Kafka no es su competencia aunque se solapen en algunos aspectos.
- EMQX, mientras esperaba que RabbitMQ se pusiera las pilas el gran descubrimiento en brokers de MQTT ha sido este producto Chino. Resaltar que una de las funciones a las que más partido le he sacado es a la capacidad de conectarse en modo bridge con Mosquitto y sincronizar bidireccionalmente partes del árbol del Unified Namespace. Realment espectacular lo bien y fácil que es de implementar.
👷 IoT Gateway NG, el gran desarrollo del año
Debido a mi trabajo una de las aportaciones típicas que hago en los proyectos es aportar el diseño de la arquitectura de una solución tecnológica. Pues bien, en 2024 he rematado la unión de un montón de tecnologías y funcionalidades en un producto. En Industry 4.0 Systems dediqué muchos vídeos a explicar configuraciones de muchas piezas que acostumbro a integrar en muchos proyectos. Este producto es una evolución que sube la apuesta un orden de magintud. Mi idea era montar todas estas piezas que había documentado en Industry 4.0 Systems y unas cuantas más sobre un OpenWRT, no para un equipo embedded, para un equipo con una buena potencia para desarrollar tareas importantes y simplificando su gestión gracias a la interface web de gestión del sistema operativo. Sin renunciar a la shell, claro.
Como este no es lugar para extenderme más dejo la referencia del proyecto aquí.
Conclusión y cierre
Al mirar hacia atrás, siento un profundo agradecimiento por cada oportunidad, desafío y pequeño instante que ha hecho de este año un periodo tan enriquecedor. Desde ver a mis hijos crecer, hasta colaborar en grandes proyectos y encontrar inspiración en la pasión de quienes me rodean, cada paso dado me ha acercado más a la vida que deseo construir.
Sobre todo, quiero expresar mi gratitud más sincera a la vida por permitirme disfrutar de momentos tan mágicos y transformadores. Llevo conmigo la convicción de que cada día es un regalo y, con esta energía, me preparo para seguir aprendiendo, creando y compartiendo en el camino que me depare el futuro. ¡Gracias, 2024, por todo lo que me has enseñado!
Grafana Alloy, parsing syslog RFC5424
Parsing syslog fields in a Grafana Alloy configuration file (config.alloy):
  stage.regex {
      expression = "^<(?P<priority>\\d|\\d{2}|1[1-8]\\d|19[01])>(?P<version>\\d{1,2})\\s(?P<timestamp>-|(?P<fullyear>[12]\\d{3})-(?P<month>0\\d|1[0-2])-(?P<mday>[0-2]\\d|3[01])T(?P<hour>[01]\\d|2[0-3]):(?P<minute>[0-5]\\d):(?P<second>[0-5]\\d|60)(?:\\.(?P<secfrac>\\d{1,6}))?(?P<numoffset>Z|[+-]\\d{2}:\\d{2}))\\s(?P<hostname>\\S{1,255})\\s(?P<appname>\\S{1,48})\\s(?P<procid>\\S{1,128})\\s(?P<msgid>\\S{1,32})\\s(?P<structureddata>-|\\[(?:[^\\[\\]]|\\\\.)*\\]) (?:\\s(?P<msg>.+))?$"
  }

  stage.labels  {
    values = {
      application = "appname",
      pid = "procid",
      msgid = "msgid",
      structureddata = "structureddata",
    }
  }
If Grafana Alloy logs are also parsed using this endpoint, it’s good to add next:
  stage.regex {
    expression = "^<(?P<priority>\\d|\\d{2}|1[1-8]\\d|19[01])>(?P<version>\\d{1,2})\\s(?P<timestamp>-|(?P<fullyear>[12]\\d{3})-(?P<month>0\\d|1[0-2])-(?P<mday>[0-2]\\d|3[01])T(?P<hour>[01]\\d|2[0-3]):(?P<minute>[0-5]\\d):(?P<second>[0-5]\\d|60)(?:\\.(?P<secfrac>\\d{1,6}))?(?P<numoffset>Z|[+-]\\d{2}:\\d{2}))\\s(?P<hostname>\\S{1,255})\\s(?P<appname>\\S{1,48})\\s(?P<procid>\\S{1,128})\\s(?P<msg>.*)$"
  }

  stage.output  {
    source = "msg"
  }

  stage.replace {
    expression = "(ts=\\S+\\s+level=\\S+\\s+)"
    source = "msg"
    replace = ""
  }

  stage.output {
    source = "msg"
  }
Accessing Zerotier’s REST API
Zerotier offers a powerful REST API that allows for seamless integration and management of your network. By default, the API is accessible on TCP port 9993. To securely interact with this API, an authentication token is required.
The authentication token is stored in the following file:
/var/lib/zerotier-one/authtoken.secretTo check if the Zerotier service is running correctly, you can use the curl command with the necessary authentication header. Here’s how to do it:
curl -Lv -H "X-ZT1-Auth: $(cat /var/lib/zerotier-one/authtoken.secret)" http://localhost:9993/status 2>&1|lessBreaking Down the Command:
curl -Lv-L: Follows any redirects the server might issue.-v: Enables verbose mode, providing detailed information about the request and response.
-H "X-ZT1-Auth: $(cat /var/lib/zerotier-one/authtoken.secret)"- Adds a custom header
X-ZT1-Authwith the value of your authentication token. This is essential for authorized access to the API.
- Adds a custom header
http://localhost:9993/status- The endpoint to check the current status of the Zerotier service.
2>&1 | less- Redirects both standard output and standard error to
lessfor easy reading and navigation of the output.
- Redirects both standard output and standard error to
I hope you found this guide helpful in navigating Zerotier’s REST API.
Docker Container Status as Prometheus Exporter Metrics
Tracking Docker container status in real time is a common challenge in DevOps. Popular tools like cAdvisor and the default Docker exporter for Prometheus often lack direct metrics for container states, meaning key insights—such as the number of containers that are running, stopped, or inactive—require complex workarounds. This limitation can complicate monitoring and lead to unreliable data.
Before creating docker_container_exporter, I relied on complex Prometheus queries to retrieve container statuses. This often involved calculations based on the last time a container was seen as active, but this approach had a major flaw: if the query time range didn’t match the last activity timestamp precisely, the data could be inaccurate or incomplete. Monitoring container states shouldn’t be this difficult.
With docker_container_exporter, this problem is solved. My tool captures real-time Docker container statuses, providing data on the number of running, stopped, and other container states, all in a Prometheus-compatible format. You can collect these metrics through a standard Prometheus polling process, or use agents like Grafana Alloy to push the data to Prometheus storage or compatible DB servers like Grafana Mimir or Thanos.
You can find my project in this GitHub repository: docker_container_exporter
In the README file, you’ll find details on how to use it, as well as instructions for integrating it with Grafana Alloy.
How to Keep Your Notion Docs Synced with Your Repositories Using readme2notion
Tired of updating documentation across multiple platforms? If your projects rely on Notion for planning and GitHub for collaboration, you might find yourself constantly re-copying information from your repository to your Notion pages.
Here’s a simpler solution: readme2notion.
This handy command-line tool allows you to sync your Markdown files directly to Notion, saving time and keeping everything in one place.
Why Syncing Docs with Notion Matters
Many businesses, freelancers, and creators rely on Notion for organizing their workflows and GitHub for managing code and documentation. But each time your repository changes, your Notion page can easily fall out of date, creating a disconnect between your development work and your project documentation. readme2notion bridges this gap by automatically updating your Notion pages with the latest content from your repositories. You get an always-up-to-date Notion page that syncs with your codebase, so everyone on your team has the latest info in real time.
What is readme2notion?
At its core, readme2notion is a command-line tool that takes a Markdown file, converts it into Notion blocks, and uploads the content to a specified Notion page. This tool is versatile, finding the appropriate Notion page by name or creating one if it doesn’t exist. Once set up, it can transform your Markdown files into well-organized Notion pages with just one command.
How readme2notion Works
- Markdown Conversion: The tool reads your Markdown file and converts it into Notion-friendly blocks.
- Upload and Sync: It then uploads the converted content to a Notion page, either updating an existing page or creating a new one based on the settings you choose.
- Automated Updates: With a pre-push hook,
readme2notioncan automate the process, so every time you push a new change to your repository, your Notion page stays updated without any extra effort.
Key Features of readme2notion
- Simple Conversion: Easily converts Markdown text into Notion’s block-based format.
- Automatic Page Updates: Finds or creates the appropriate Notion page in the database you specify, meaning your docs are always up-to-date.
- Pre-Push Hook: This feature allows for completely automated updates to Notion. With every push, your Notion page gets a fresh update, making it perfect for remote teams or anyone who needs a reliable source of truth for documentation.
Why You Should Try readme2notion
Updating Notion pages by hand can be tedious, especially if you’re a developer or creator juggling multiple projects. This tool eliminates the hassle by letting you write documentation once in your repository’s README file and automatically reflecting those changes in Notion. Plus, readme2notion works seamlessly within your existing Git workflows, allowing your team to focus on what matters—building and creating—while staying informed and organized.
If your documentation process could use an upgrade, give readme2notion a try. It’s the easiest way to ensure your Notion workspace always reflects the latest state of your codebase.
Comparing Python Executable Packaging Tools: PEX, PyOxidizer, and PyInstaller
Packaging Python applications into standalone executables can simplify deployment and distribution, especially when dealing with users who may not have Python installed or when aiming for a seamless installation experience. Three prominent tools in this space are PEX, PyOxidizer, and PyInstaller. In this post, we’ll explore each of these tools, highlighting their features, how they work, and their pros and cons to help you decide which one suits your needs.
Table of Contents
PEX (Python EXecutable)
- Website: docs.pex-tool.org
- GitHub: github.com/pex-tool/pex
Overview
PEX stands for Python EXecutable. It creates self-contained executable Python environments that are runnable on other machines without requiring a Python interpreter or additional dependencies.
Features
- Self-contained Executables: Packages all dependencies into a single file.
- Virtual Environment Management: Manages dependencies in an isolated environment.
- Support for Multiple Python Versions: Can target different Python versions.
- Reproducible Builds: Ensures consistent builds across different environments.
How It Works
PEX files are ZIP files with a special header that makes them executable. When you run a PEX file, it sets up an isolated environment and executes your application within it. Dependencies are resolved and bundled at build time, ensuring that the executable has everything it needs to run.
Pros and Cons
Pros:
- Ease of Use: Straightforward command-line interface.
- Isolation: Avoids conflicts with system-installed packages.
- Flexible Configuration: Supports complex dependency management.
Cons:
- Platform Dependency: The generated PEX file is platform-specific. (OS and Python version)
- Size Overhead: Can result in large executable files due to included dependencies.
PyOxidizer
- Website: gregoryszorc.com
- GitHub: github.com/indygreg/PyOxidizer
Overview
PyOxidizer is a tool that produces distributable binaries from Python applications. It embeds the Python interpreter and your application into a single executable file.
Features
- Single Executable Output: Creates a single binary without external dependencies.
- Embedded Python Interpreter: Bundles a Rust-based Python interpreter.
- Cross-Compilation: Supports building executables for different platforms.
- Performance Optimization: Optimizes startup time and reduces runtime overhead.
How It Works
PyOxidizer uses Rust to compile your Python application into a binary. It embeds the Python interpreter and compiles your Python code into bytecode, which is then included in the binary. This approach results in a single executable that can be distributed without requiring a separate Python installation.
Pros and Cons
Pros:
- No Runtime Dependencies: Users don’t need Python installed.
- Cross-Platform Support: Can build executables for Windows, macOS, and Linux.
- Optimized Performance: Faster startup times compared to other tools.
Cons:
- Complex Configuration: Requires understanding of Rust and PyOxidizer’s configuration.
- Relatively New Tool: May have less community support and fewer resources.
PyInstaller
- Website: pyinstaller.org
- GitHub: github.com/pyinstaller/pyinstaller
Overview
PyInstaller bundles a Python application and all its dependencies into a single package, which can be a directory or a standalone executable.
Features
- Multi-Platform Support: Works on Windows, macOS, and Linux.
- Customizable Builds: Allows inclusion or exclusion of files and dependencies.
- Support for Various Libraries: Handles complex dependencies like NumPy, PyQt, etc.
- One-Folder and One-File Modes: Choose between a directory of files or a single executable.
How It Works
PyInstaller analyzes your Python script to discover every other module and library your script needs to run. It then collects copies of all those files—including the active Python interpreter—and packs them into a single executable or a folder.
Pros and Cons
Pros:
- Ease of Use: Simple command-line usage.
- Wide Compatibility: Supports many third-party packages.
- Flexible Output Options: Choose between single-file or directory output.
Cons:
- Executable Size: Can produce large files.
- Hidden Imports: May miss some dependencies, requiring manual specification.
Comparison
| Feature | PEX | PyOxidizer | PyInstaller |
|---|---|---|---|
| Single Executable | Yes (but requires Python) | Yes | Yes |
| No Python Required | No | Yes | Yes |
| Cross-Platform | Yes (build on target OS) | Yes (cross-compilation) | Yes (build on target OS) |
| Ease of Use | Moderate | Complex | Easy |
| Executable Size | Large | Smaller | Large |
| Configuration | Flexible | Requires Rust knowledge | Simple |
| Community Support | Active | Growing | Extensive |
| GitHub Activity | Actively maintained | Unmaintained | Actively maintained |
Conclusion
Choosing the right tool depends on your specific needs and the assurance of ongoing support:
- Use PEX if you need a self-contained environment for systems where Python is available. Its active maintenance ensures that you can rely on timely updates and community support.
- Use PyOxidizer if you prefer a single executable without runtime dependencies and are comfortable with Rust. Its growing GitHub activity signifies a promising future and dedicated maintenance.
- Use PyInstaller if you value simplicity and extensive community support. Its active maintenance status means you can expect regular updates and a wealth of community resources.
References: