Recording linux desktop and audio
I have two full-HD displays as a desktop and I want to record the second one of them while I record mic too. The output format of the record has to be MKV with h264 as video codec and AAC as audio codec.
After some tests with VLC and FFMPEG finally I get the solution with this command:
ffmpeg -f alsa -ac 2 -i default -f x11grab -r 15 -s 1920x1080+0+0 -i :0.0+1920,0 \
       -acodec pcm_s16le -vcodec libx264  -preset ultrafast  -threads 0 -y Test.mkv
when I finish recording the clip I have to convert the audio channel because if I try to convert the audio format while I’m recording the audio channel I have delays or sync problems with video channel.
ffmpeg -i Test.mkv -map 0:0 -map 0:1 \
       -c:v copy \
       -c:a:1 libfdk_aac -profile:a aac_he_v2 -b:a:1 96k \
       output.mkv
Hello World using ‘kombu’ library and python
Some times schemas and snippets don’t need large descriptions. If you think this is not enough in this case tell me and I’m going to add explanations.
Using a python library called kombu as an abstraction to talk with AMQP broker we are going to develop different message routes setting each type of Exchange. As a backend I used RabbitMQ with default configuration.
AMQP schema using an exchange of type direct
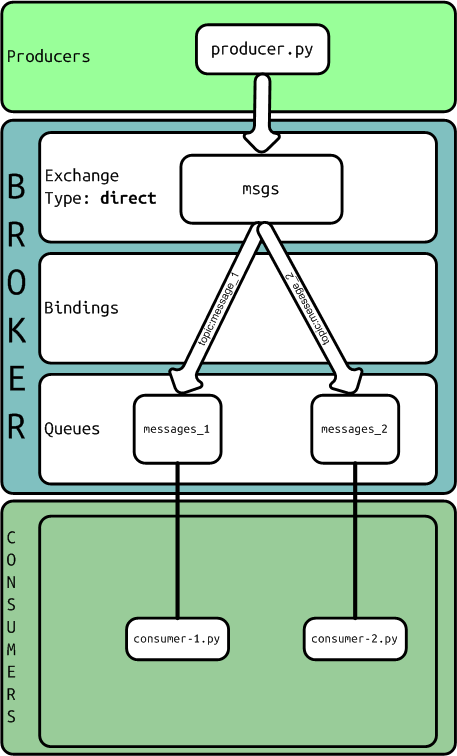
Queue definition:
from kombu import Exchange, Queue

task_exchange = Exchange("msgs", type="direct")
queue_msg_1 = Queue("messages_1", task_exchange, routing_key = 'message_1')
queue_msg_2 = Queue("messages_2", task_exchange, routing_key = 'message_2')
The producer:
from __future__ import with_statement
from queues import task_exchange

from kombu.common import maybe_declare
from kombu.pools import producers


if __name__ == "__main__":
    from kombu import BrokerConnection

    connection = BrokerConnection("amqp://guest:guest@localhost:5672//")

    with producers[connection].acquire(block=True) as producer:
        maybe_declare(task_exchange, producer.channel)

        payload = {"type": "handshake", "content": "hello #1"}
        producer.publish(payload, exchange = 'msgs', serializer="pickle", routing_key = 'message_1')

        payload = {"type": "handshake", "content": "hello #2"}
        producer.publish(payload, exchange = 'msgs', serializer="pickle", routing_key = 'message_2')
One consumer:
from queues import queue_msg_1
from kombu.mixins import ConsumerMixin

class C(ConsumerMixin):
    def __init__(self, connection):
        self.connection = connection
        return

    def get_consumers(self, Consumer, channel):
        return [Consumer( queue_msg_1, callbacks = [ self.on_message ])]

    def on_message(self, body, message):
        print ("RECEIVED MSG - body: %r" % (body,))
        print ("RECEIVED MSG - message: %r" % (message,))
        message.ack()
        return


if __name__ == "__main__":
    from kombu import BrokerConnection
    from kombu.utils.debug import setup_logging

    setup_logging(loglevel="DEBUG")

    with BrokerConnection("amqp://guest:guest@localhost:5672//") as connection:
        try:
            C(connection).run()
        except KeyboardInterrupt:
            print("bye bye")
AMQP schema using an exchange of type fanout
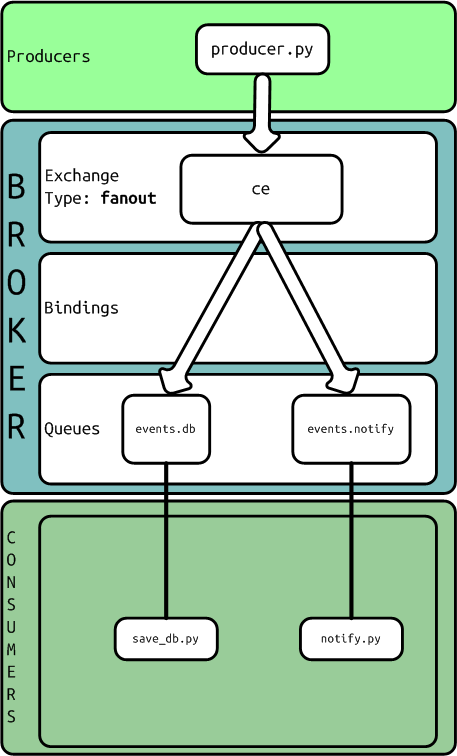
Queue definition:
from kombu import Exchange, Queue

task_exchange = Exchange("ce", type="fanout")
queue_events_db = Queue("events.db", task_exchange)
queue_events_notify = Queue("events.notify", task_exchange)
The producer:
from __future__ import with_statement
from queues import task_exchange

from kombu.common import maybe_declare
from kombu.pools import producers


if __name__ == "__main__":
    from kombu import BrokerConnection

    connection = BrokerConnection("amqp://guest:guest@localhost:5672//")

    with producers[connection].acquire(block=True) as producer:
        maybe_declare(task_exchange, producer.channel)

        payload = {"operation": "create", "content": "the object"}
        producer.publish(payload, exchange = 'ce', serializer="pickle", routing_key = 'user.write')

        payload = {"operation": "update", "content": "updated fields", "id": "id of the object"}
        producer.publish(payload, exchange = 'ce', serializer="pickle", routing_key = 'user.write')
One consumer:
from queues import queue_events_db
from kombu.mixins import ConsumerMixin

class C(ConsumerMixin):
    def __init__(self, connection):
        self.connection = connection
        return

    def get_consumers(self, Consumer, channel):
        return [Consumer( queue_events_db, callbacks = [self.on_message])]

    def on_message(self, body, message):
        print ("save_db: RECEIVED MSG - body: %r" % (body,))
        print ("save_db: RECEIVED MSG - message: %r" % (message,))
        message.ack()
        return


if __name__ == "__main__":
    from kombu import BrokerConnection
    from kombu.utils.debug import setup_logging

    setup_logging(loglevel="DEBUG")

    with BrokerConnection("amqp://guest:guest@localhost:5672//") as connection:
        try:
            C(connection).run()
        except KeyboardInterrupt:
            print("bye bye")
AMQP schema using an exchange of type topic
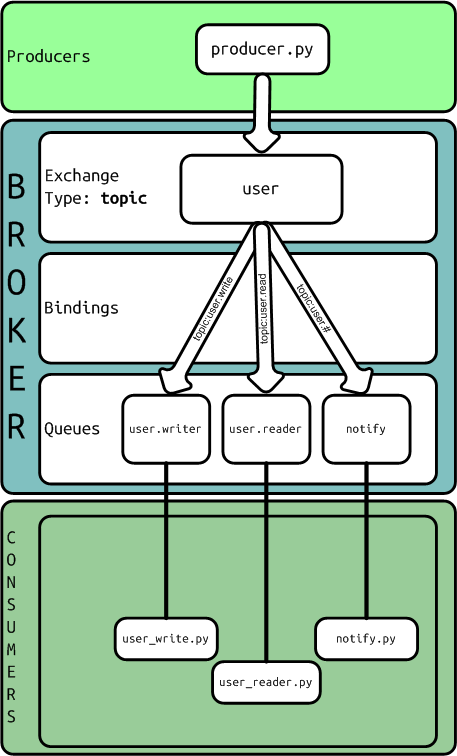
Queue definition:
from kombu import Exchange, Queue

task_exchange = Exchange("user", type="topic")
queue_user_write = Queue("user.write", task_exchange, routing_key = 'user.write')
queue_user_read = Queue("user.read", task_exchange, routing_key = 'user.read')
queue_notify = Queue("notify", task_exchange, routing_key = 'user.#')
The producer:
from __future__ import with_statement
from queues import task_exchange

from kombu.common import maybe_declare
from kombu.pools import producers


if __name__ == "__main__":
    from kombu import BrokerConnection

    connection = BrokerConnection("amqp://guest:guest@localhost:5672//")

    with producers[connection].acquire(block=True) as producer:
        maybe_declare(task_exchange, producer.channel)

        payload = {"operation": "create", "content": "the object"}
        producer.publish(payload, exchange = 'user', serializer="pickle", routing_key = 'user.write')

        payload = {"operation": "update", "content": "updated fields", "id": "id of the object"}
        producer.publish(payload, exchange = 'user', serializer="pickle", routing_key = 'user.write')

        payload = {"operation": "delete", "id": "id of the object"}
        producer.publish(payload, exchange = 'user', serializer="pickle", routing_key = 'user.write')

        payload = {"operation": "read", "id": "id of the object"}
        producer.publish(payload, exchange = 'user', serializer="pickle", routing_key = 'user.read')
One consumer:
from queues import queue_events_db
from kombu.mixins import ConsumerMixin

class C(ConsumerMixin):
    def __init__(self, connection):
        self.connection = connection
        return

    def get_consumers(self, Consumer, channel):
        return [Consumer( queue_events_db, callbacks = [self.on_message])]

    def on_message(self, body, message):
        print ("save_db: RECEIVED MSG - body: %r" % (body,))
        print ("save_db: RECEIVED MSG - message: %r" % (message,))
        message.ack()
        return


if __name__ == "__main__":
    from kombu import BrokerConnection
    from kombu.utils.debug import setup_logging

    setup_logging(loglevel="DEBUG")

    with BrokerConnection("amqp://guest:guest@localhost:5672//") as connection:
        try:
            C(connection).run()
        except KeyboardInterrupt:
            print("bye bye")
Simple queues
Kombu implements SimpleQueue and SimpleBuffer as simple solution for queues with exchange of type ‘direct’, with the same exchange name, routing key and queue name.
Pusher:
from kombu import BrokerConnection

connection = BrokerConnection("amqp://guest:guest@localhost:5672//")
queue = connection.SimpleQueue("logs")

payload = { "severity":"info", "message":"this is just a log", "ts":"2013/09/30T15:10:23" }
queue.put(payload, serializer='pickle')

queue.close()
Getter:
from kombu import BrokerConnection
from Queue import  Empty

connection = BrokerConnection("amqp://guest:guest@localhost:5672//")

queue = connection.SimpleQueue("logs")

while 1:
    try:
        message = queue.get(block=True, timeout=1)
        print message.payload
        message.ack()
    except Empty:
        pass
    except KeyboardInterrupt:
        break
    print message

queue.close()
The files
Download all example files: kombu-tests.tar.gz
Server send push notifications to client browser without polling
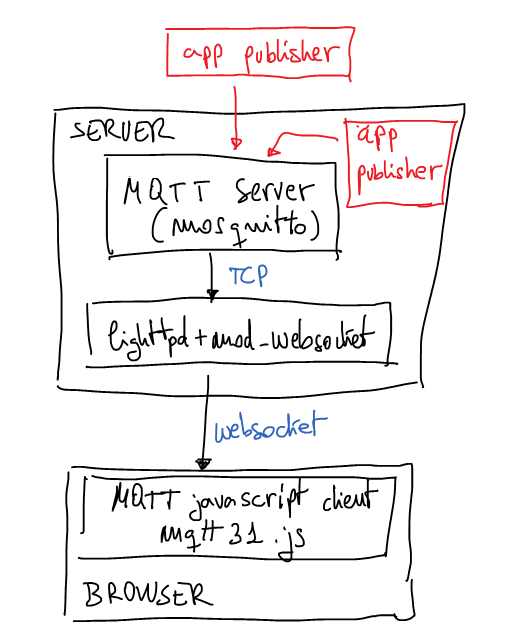
Nowadays last version of browsers support websockets and it’s a good a idea to use them to connect to server a permanent channel and receive push notifications from server. In this case I’m going to use Mosquitto (MQTT) server behind lighttpd with mod_websocket as notifications server. Mosquitto is a lightweight MQTT server programmed in C and very easy to set up. The best advantage to use MQTT is the possibility to create publish/subscriber queues and it’s very useful when you want to have more than one notification channel. As is usual in pub/sub services we can subscribe the client to a well-defined topic or we can use a pattern to subscribe to more than one topic. If you’re not familiarized with MQTT now it’s the best moment to read a little bit about because that interesting protocol. It’s not the purpose of this post to explain MQTT basics.
A few weeks ago I set up the next architecture just for testing that idea:
The browser
Now it’s time to explain this proof of concept. HTML page will contain a simple Javascript code which calls mqttws31.js library from Paho. This Javascript code will connect to the server using secure websockets. It doesn’t have any other security measure for a while may be in next posts I’ll explain some interesting ideas to authenticate the websocket. At the end of the post you can download all source code and configuration files. But now it’s time to understand the most important parts of the client code.
client = new Messaging.Client("ns.example.tld", 443, "unique_client_id");
client.onConnectionLost = onConnectionLost;
client.onMessageArrived = onMessageArrived;
client.connect({onSuccess:onConnect, onFailure:onFailure, useSSL:true});
Last part is very simple, the client connects to the server and links some callbacks to defined functions. Pay attention to ‘useSSL’ connect option is used to force SSL connection with the server.
There are two specially interesting functions linked to callbacks, the first one is:
function onConnect() {
  client.subscribe("/news/+/sport", {qos:1,onSuccess:onSubscribe,onFailure:onSubscribeFailure});
}
As you can imagine this callback will be called when the connections is established, when it happens the client subscribes to all channels called ‘/news/+/sports’, for example, ‘/news/europe/sports/’ or ‘/news/usa/sports/’, etc. We can also use, something like ‘/news/#’ and it will say we want to subscribe to all channels which starts with ‘/news/’. If only want to subscribe to one channel put the full name of the channel on that parameter. Next parameter are dictionary with quality of service which is going to use and links two more callbacks.
The second interesting function to understand is:
function onMessageArrived(message) {
  console.log("onMessageArrived:"+message.payloadString);
};
It’s called when new message is received from the server and in this example, the message is printed in console with log method.
The server
I used an Ubuntu 12.04 server with next extra repositories:
# lighttpd + mod_webserver
deb http://ppa.launchpad.net/roger.light/ppa/ubuntu precise main
deb-src http://ppa.launchpad.net/roger.light/ppa/ubuntu precise main

# mosquitto
deb http://ppa.launchpad.net/mosquitto-dev/mosquitto-ppa/ubuntu precise main
deb-src http://ppa.launchpad.net/mosquitto-dev/mosquitto-ppa/ubuntu precise main
With these new repositories you can install required packages:
apt-get install lighttpd lighttpd-mod-websocket mosquitto mosquitto-clientsAfter installation it’s very easy to run mosquitto in test mode, use a console for that and write the command: mosquitto, we have to see something like this:
# mosquitto
1379873664: mosquitto version 1.2.1 (build date 2013-09-19 22:18:02+0000) starting
1379873664: Using default config.
1379873664: Opening ipv4 listen socket on port 1883.
1379873664: Opening ipv6 listen socket on port 1883.
The configuration file for lighttpd in testing is:
server.modules = (
        "mod_websocket",
)

websocket.server = (
        "/mqtt" => (
                "host" => "127.0.0.1",
                "port" => "1883",
                "type" => "bin",
                "subproto" => "mqttv3.1"
        ),
)

server.document-root        = "/var/www"
server.upload-dirs          = ( "/var/cache/lighttpd/uploads" )
server.errorlog             = "/var/log/lighttpd/error.log"
server.pid-file             = "/var/run/lighttpd.pid"
server.username             = "www-data"
server.groupname            = "www-data"
server.port                 = 80

$SERVER["socket"] == ":443" {
    ssl.engine = "enable"
    ssl.pemfile = "/etc/lighttpd/certs/sample-certificate.pem"
    server.name = "ns.example.tld"
}
Remember to change ‘ssl.pemfile’ for your real certificate file and ‘server.name’ for your real server name. Then restart the lighttpd and validate SSL configuration using something like:
openssl s_client -host ns.example.tld -port 443You have to see SSL negotiation and then you can try to send HTTP commands, for example: “GET / HTTP/1.0” or something like this. Now the server is ready.
The Test
Now you have to load the HTML test page in your browser and validate how the connections is getting the server and then how the mosquitto console says how it receives the connection. Of course, you can modify the Javascript code to print more log information and follow how the client is connected to MQTT server and how it is subscribed to the topic pattern.
If you want to publish something in MQTT server we could use the CLI, with a command mosquitto_pub:
mosquitto_pub -h ns.example.tld -t '/news/europe/sport' -m 'this is the message about european sports'Take a look in your browser Javascript consle you have to see how the client prints the message on it. If it fails, review the steps and debug each one to solve the problem. If you need help leave me a message. Of course, you can use many different ways to publish messages, for example, you could use python code to publish messages in MQTT server. In the same way you could subscribe not only browsers to topics, for example, you could subscribe a python code:
import mosquitto

def on_connect(mosq, obj, rc):
    print("rc: "+str(rc))

def on_message(mosq, obj, msg):
    print(msg.topic+" "+str(msg.qos)+" "+str(msg.payload))

def on_publish(mosq, obj, mid):
    print("mid: "+str(mid))

def on_subscribe(mosq, obj, mid, granted_qos):
    print("Subscribed: "+str(mid)+" "+str(granted_qos))

def on_log(mosq, obj, level, string):
    print(string)

mqttc = mosquitto.Mosquitto("the_client_id")
mqttc.on_message = on_message
mqttc.on_connect = on_connect
mqttc.on_publish = on_publish
mqttc.on_subscribe = on_subscribe

mqttc.connect("ns.example.tld", 1883, 60)
mqttc.subscribe("/news/+/sport", 0)

rc = 0
while rc == 0:
    rc = mqttc.loop()
Pay attention to server port, it isn’t the ‘https’ port (443/tcp) because now the code is using a real MQTT client. The websocket gateway isn’t needed.
The files
- mqtt.tar.gz – inside this tar.gz you can find all referenced files
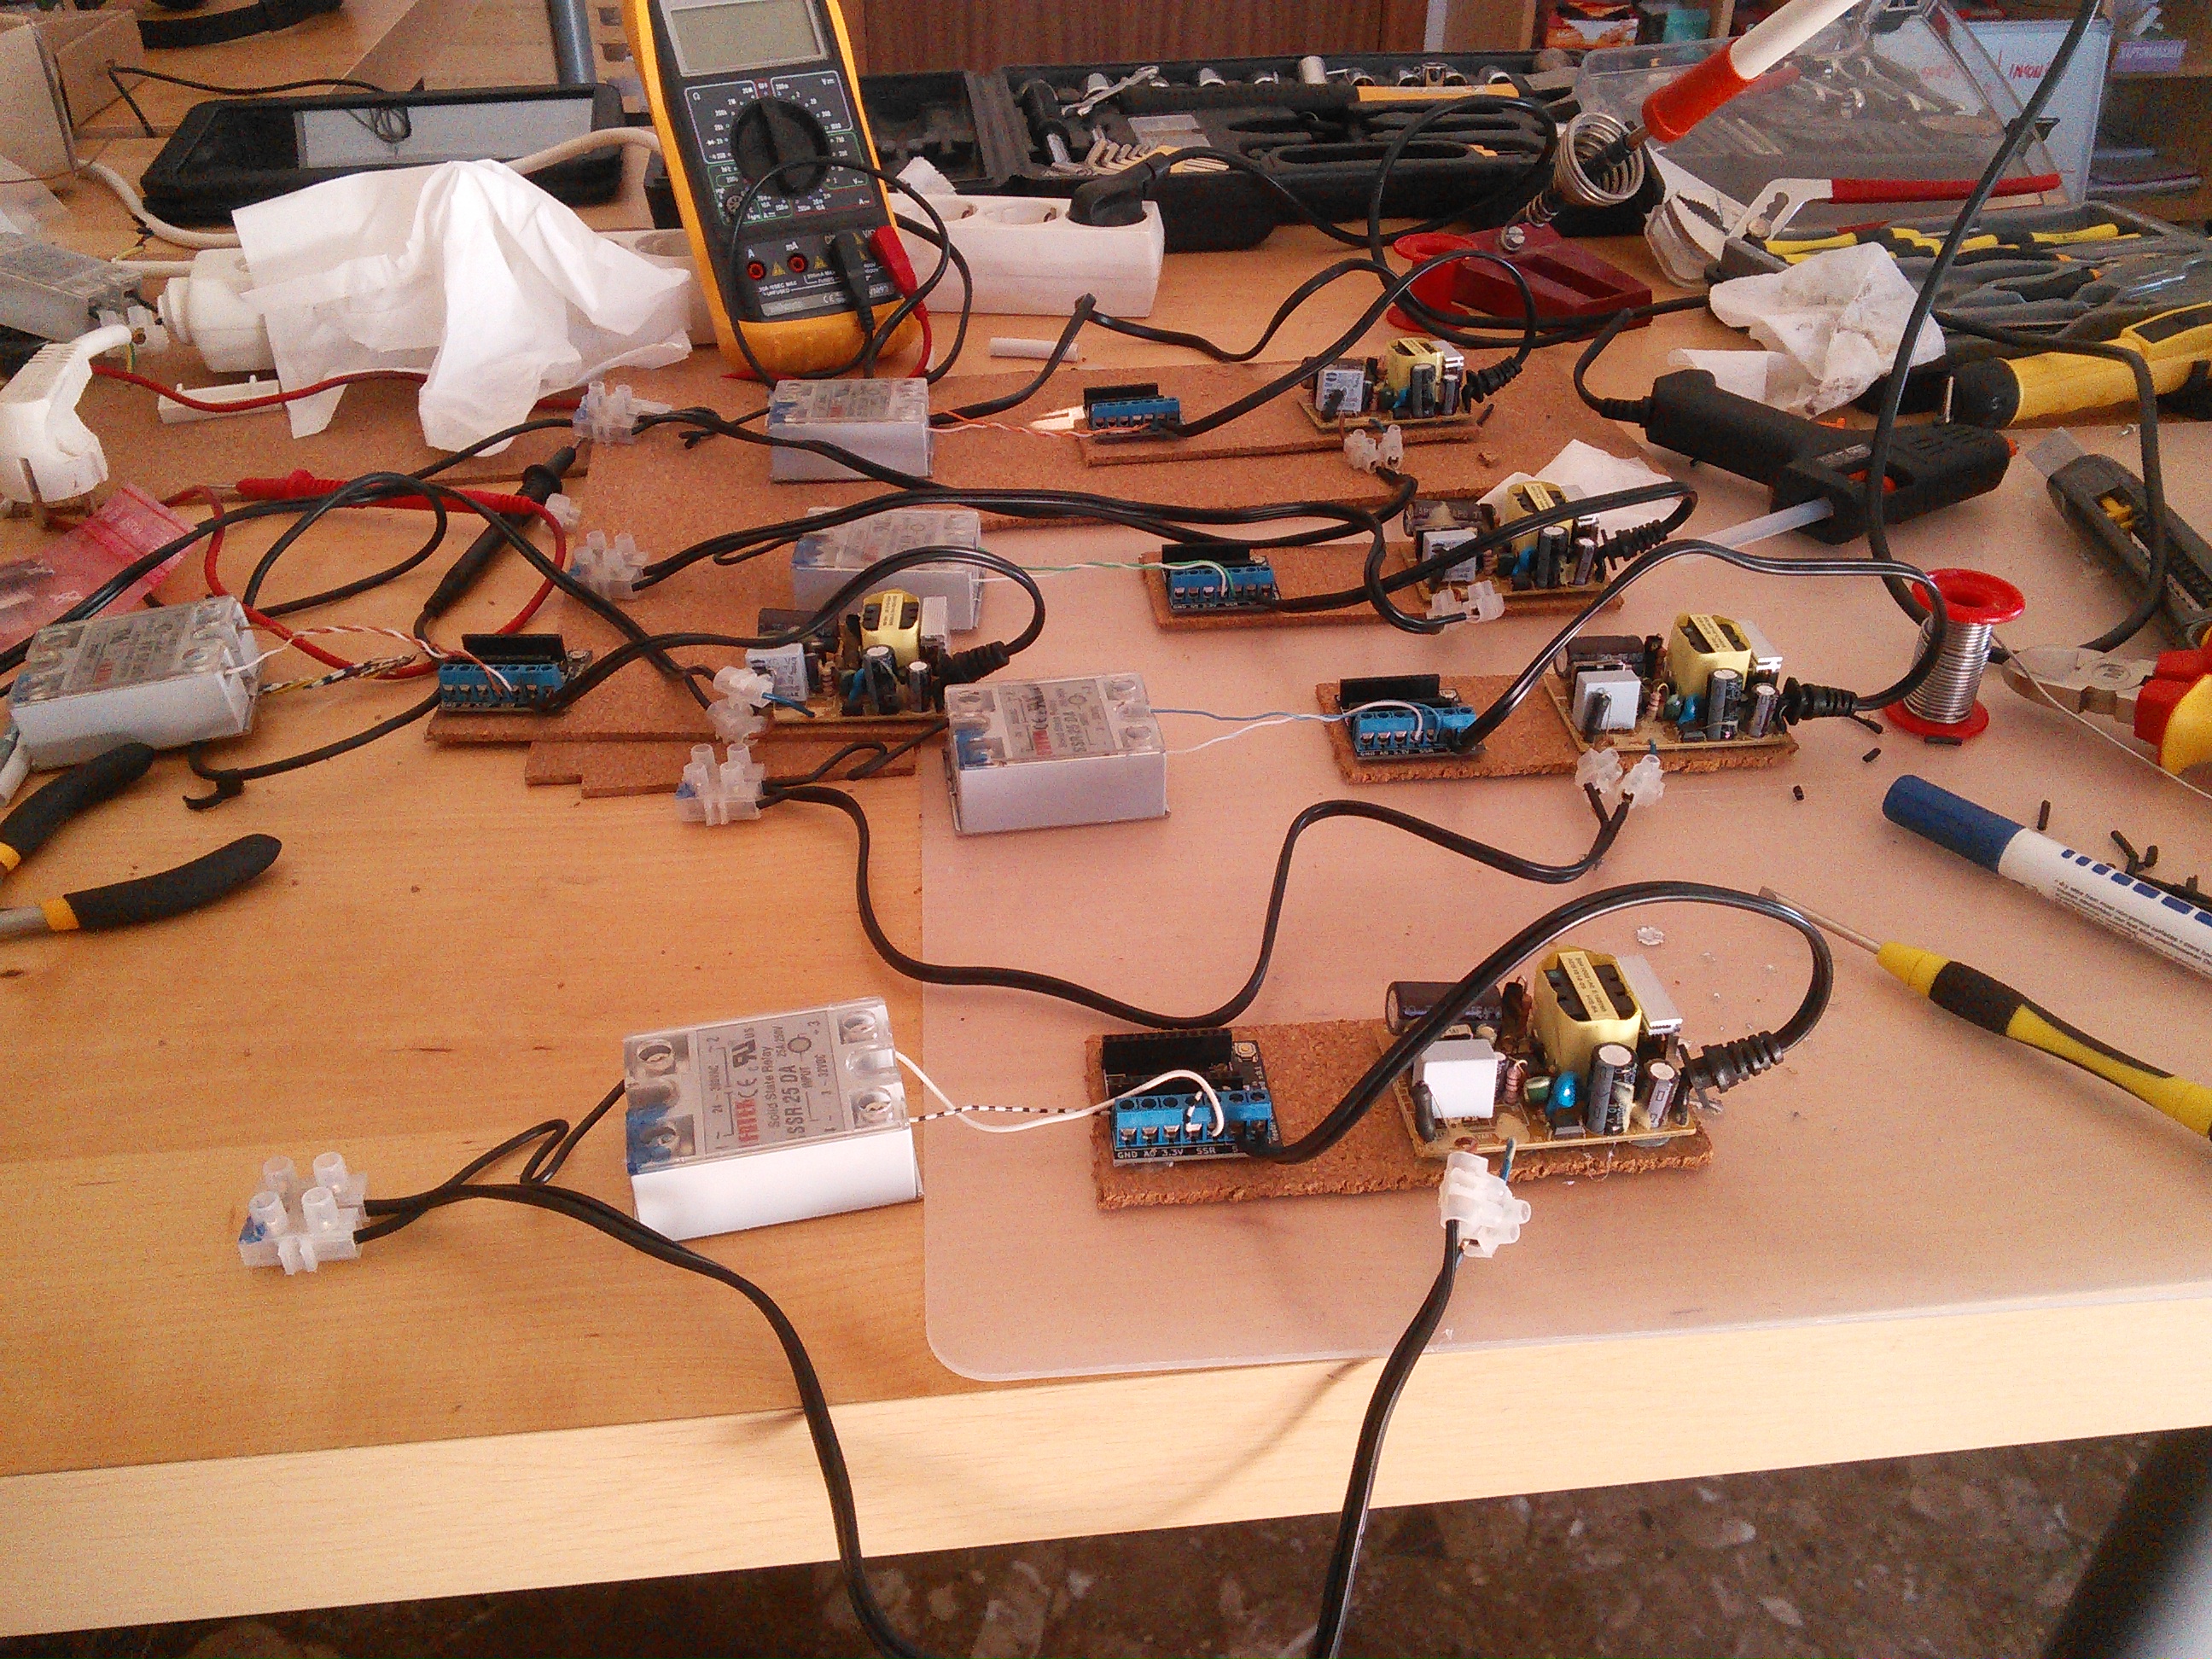
Home heating using Panstamp (Arduino + TI C1101) and SSR
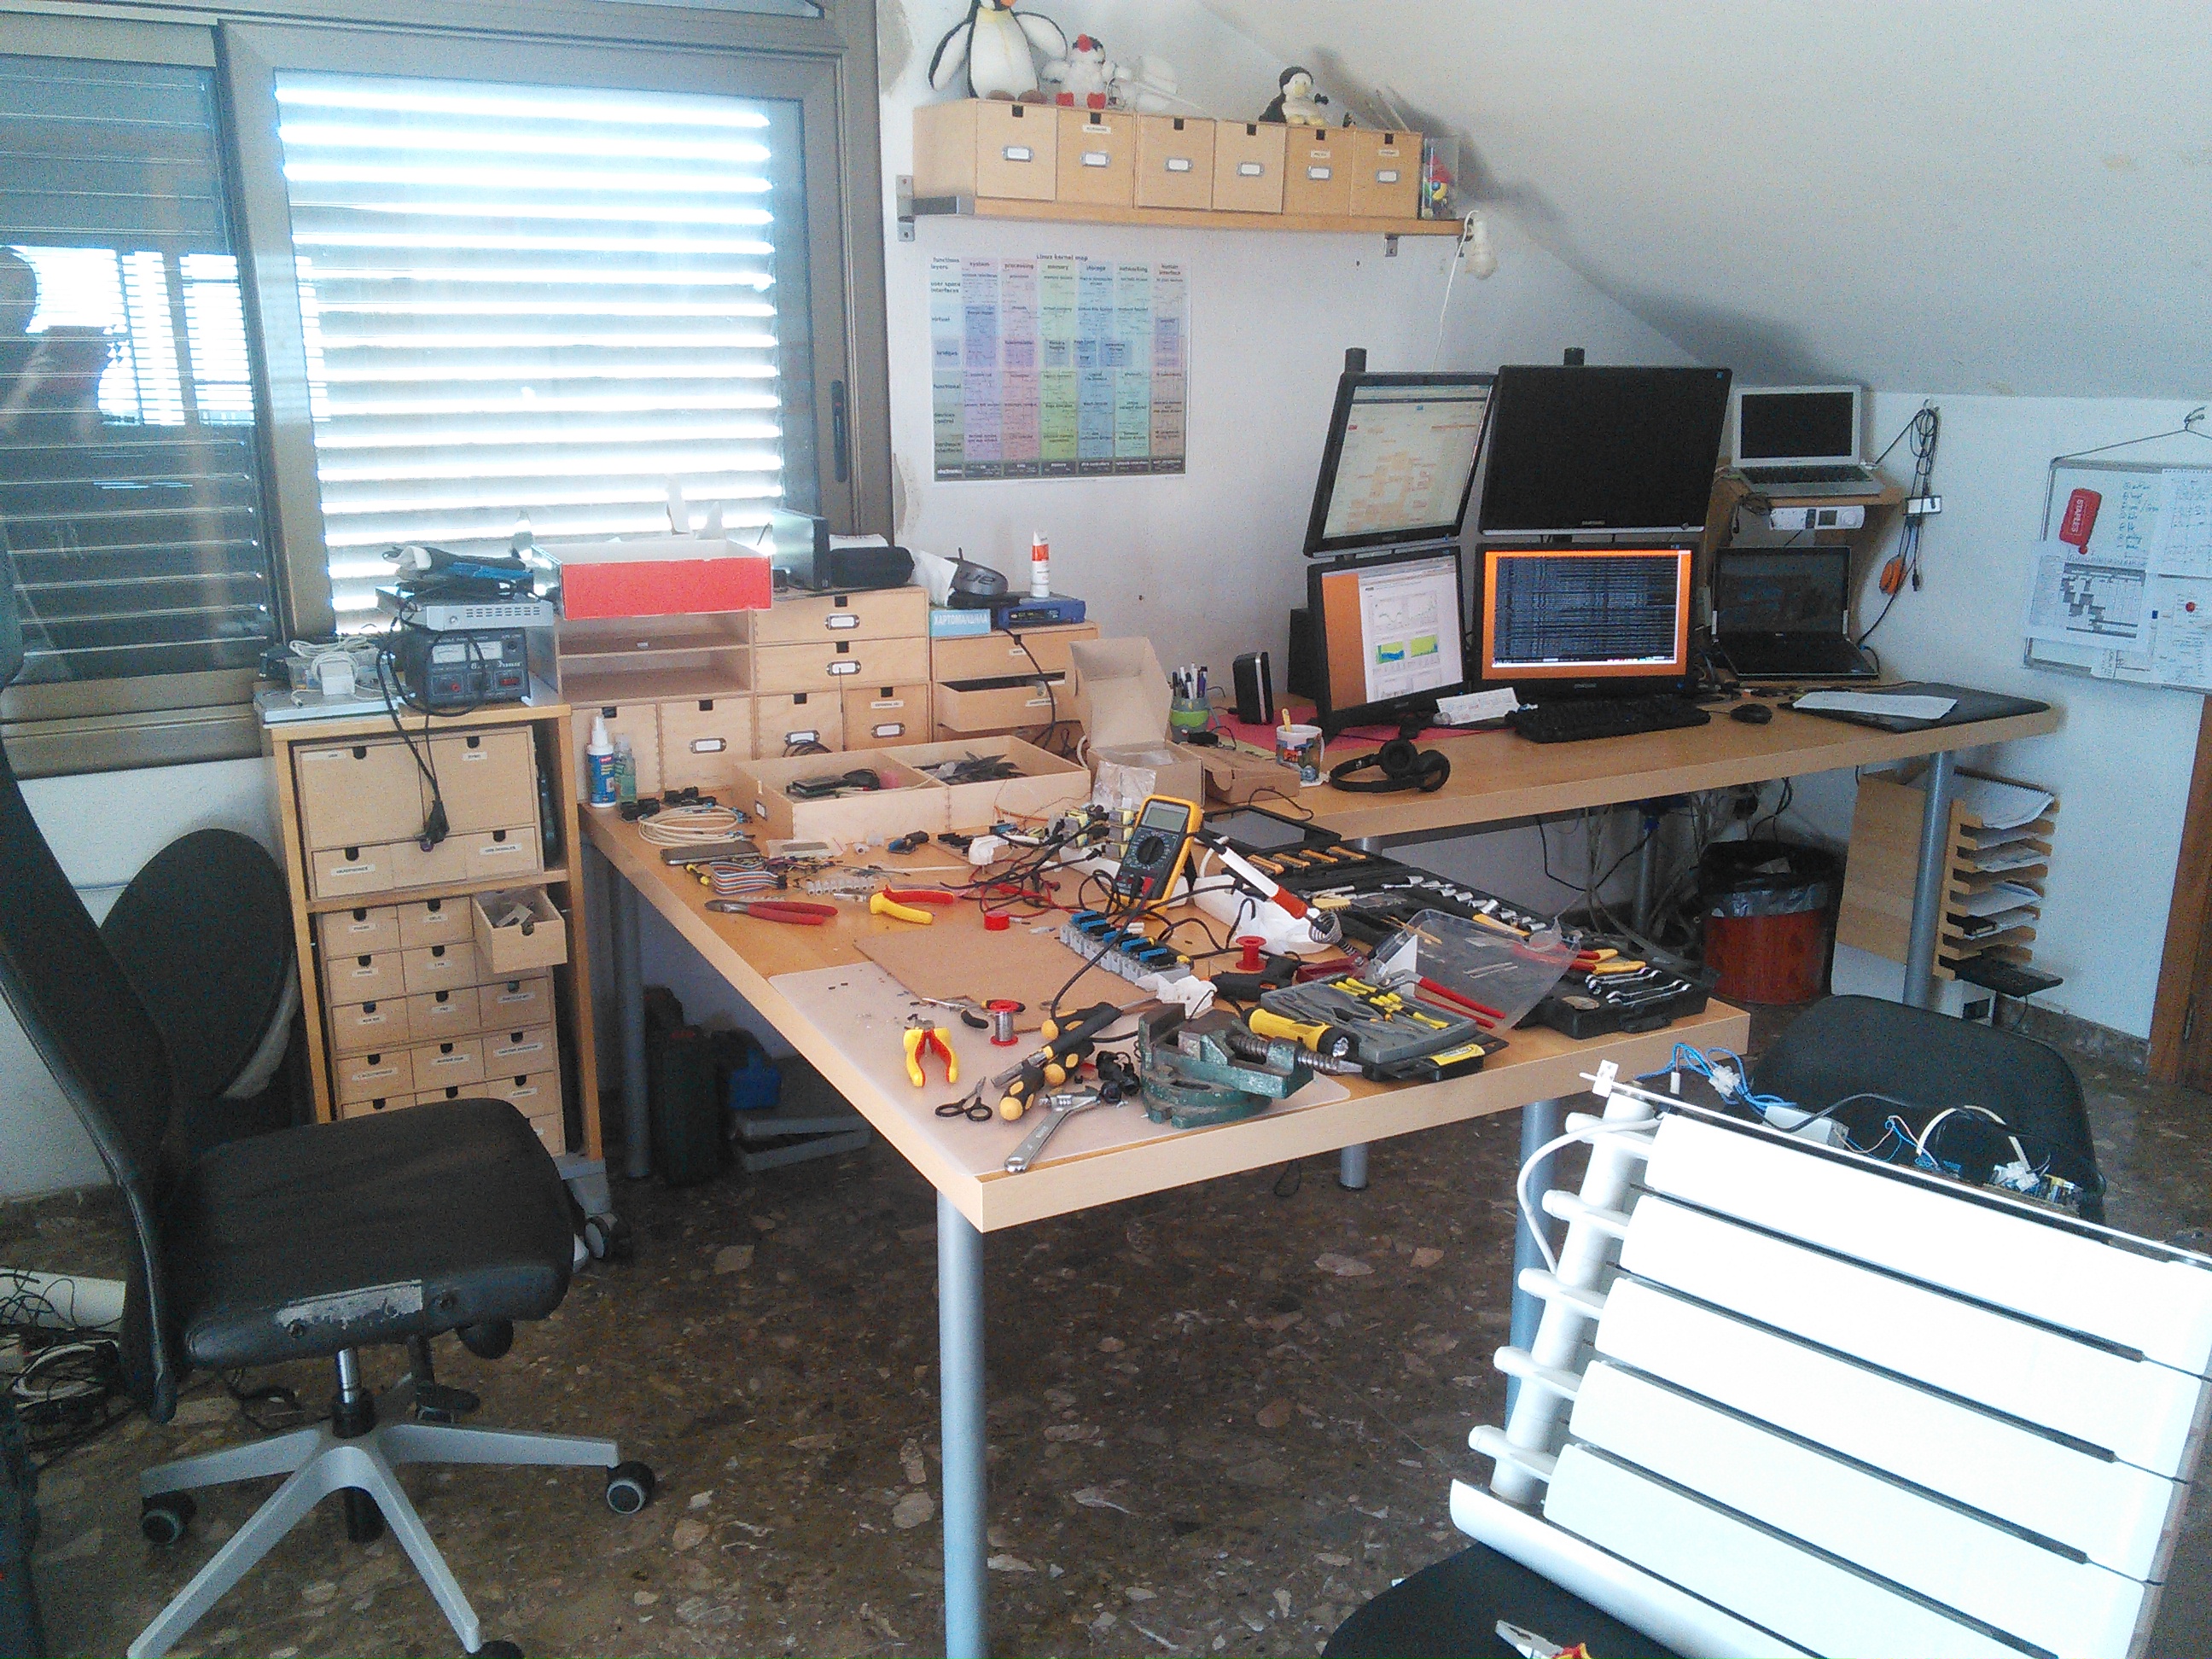
Last weekend I worked on setting up home heaters using Panstamp. Panstamp is an Arduino board with Texas Instruments radio. Next winter we’re going to control our home heater using connected internet devices like the laptop, tablet o mobile phones. In this post I only want to share some pictures about the process to install the electronics inside the heaters changing the old electronic boards with new custom ones.
The parts:
- AC/DC transformer, outputs 5V. It’s really cheap, in this case free because I have more than 20 of them from old projects.

- A small custom PCB designed and made by Daniel Berenguer, the owner of Panstamp. Thanks again Daniel. I bought the PCBs and parts for around 10€ each one.

- TMP36 temperature sensor. It costs about 1,5€ each one.
- Solid state relay (SSR) bought in Alied Express web site for less than 5€.

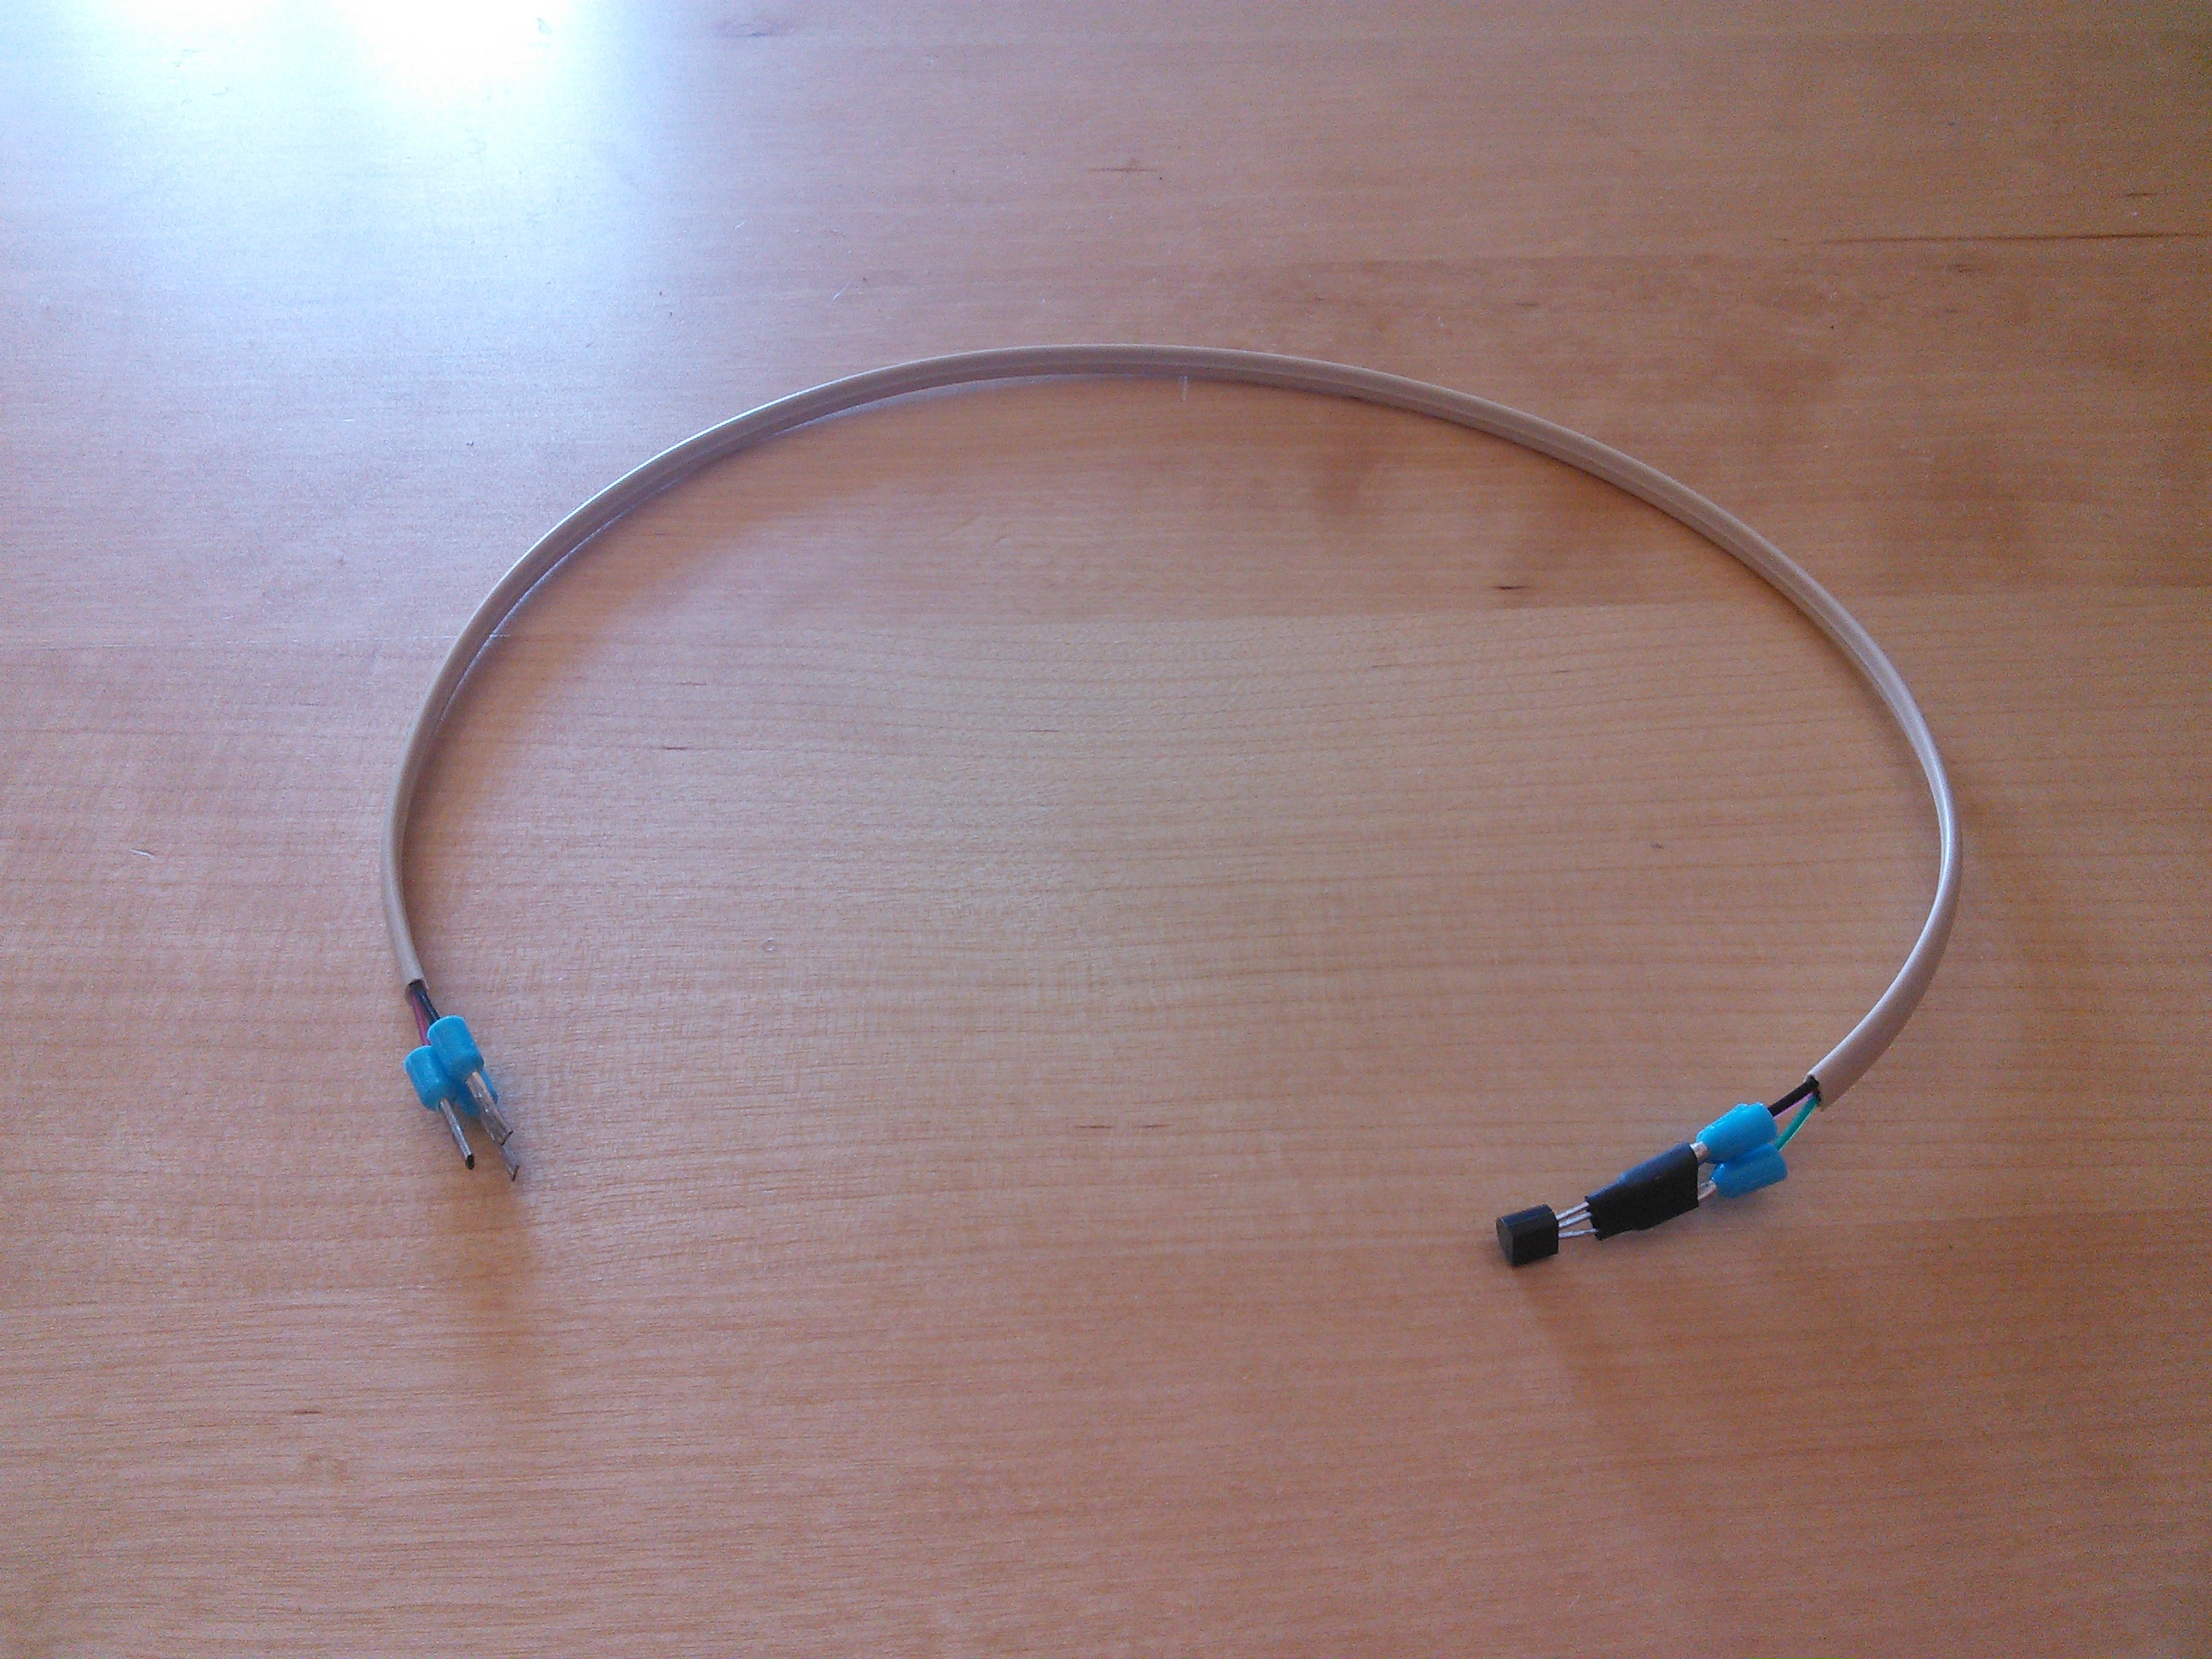
The process:
I used a lot of tools, because DIY aren’t my strong hability.
Double-head tape and hot-blue gun are need…

because I want to use a cork base under the PSU and PCB
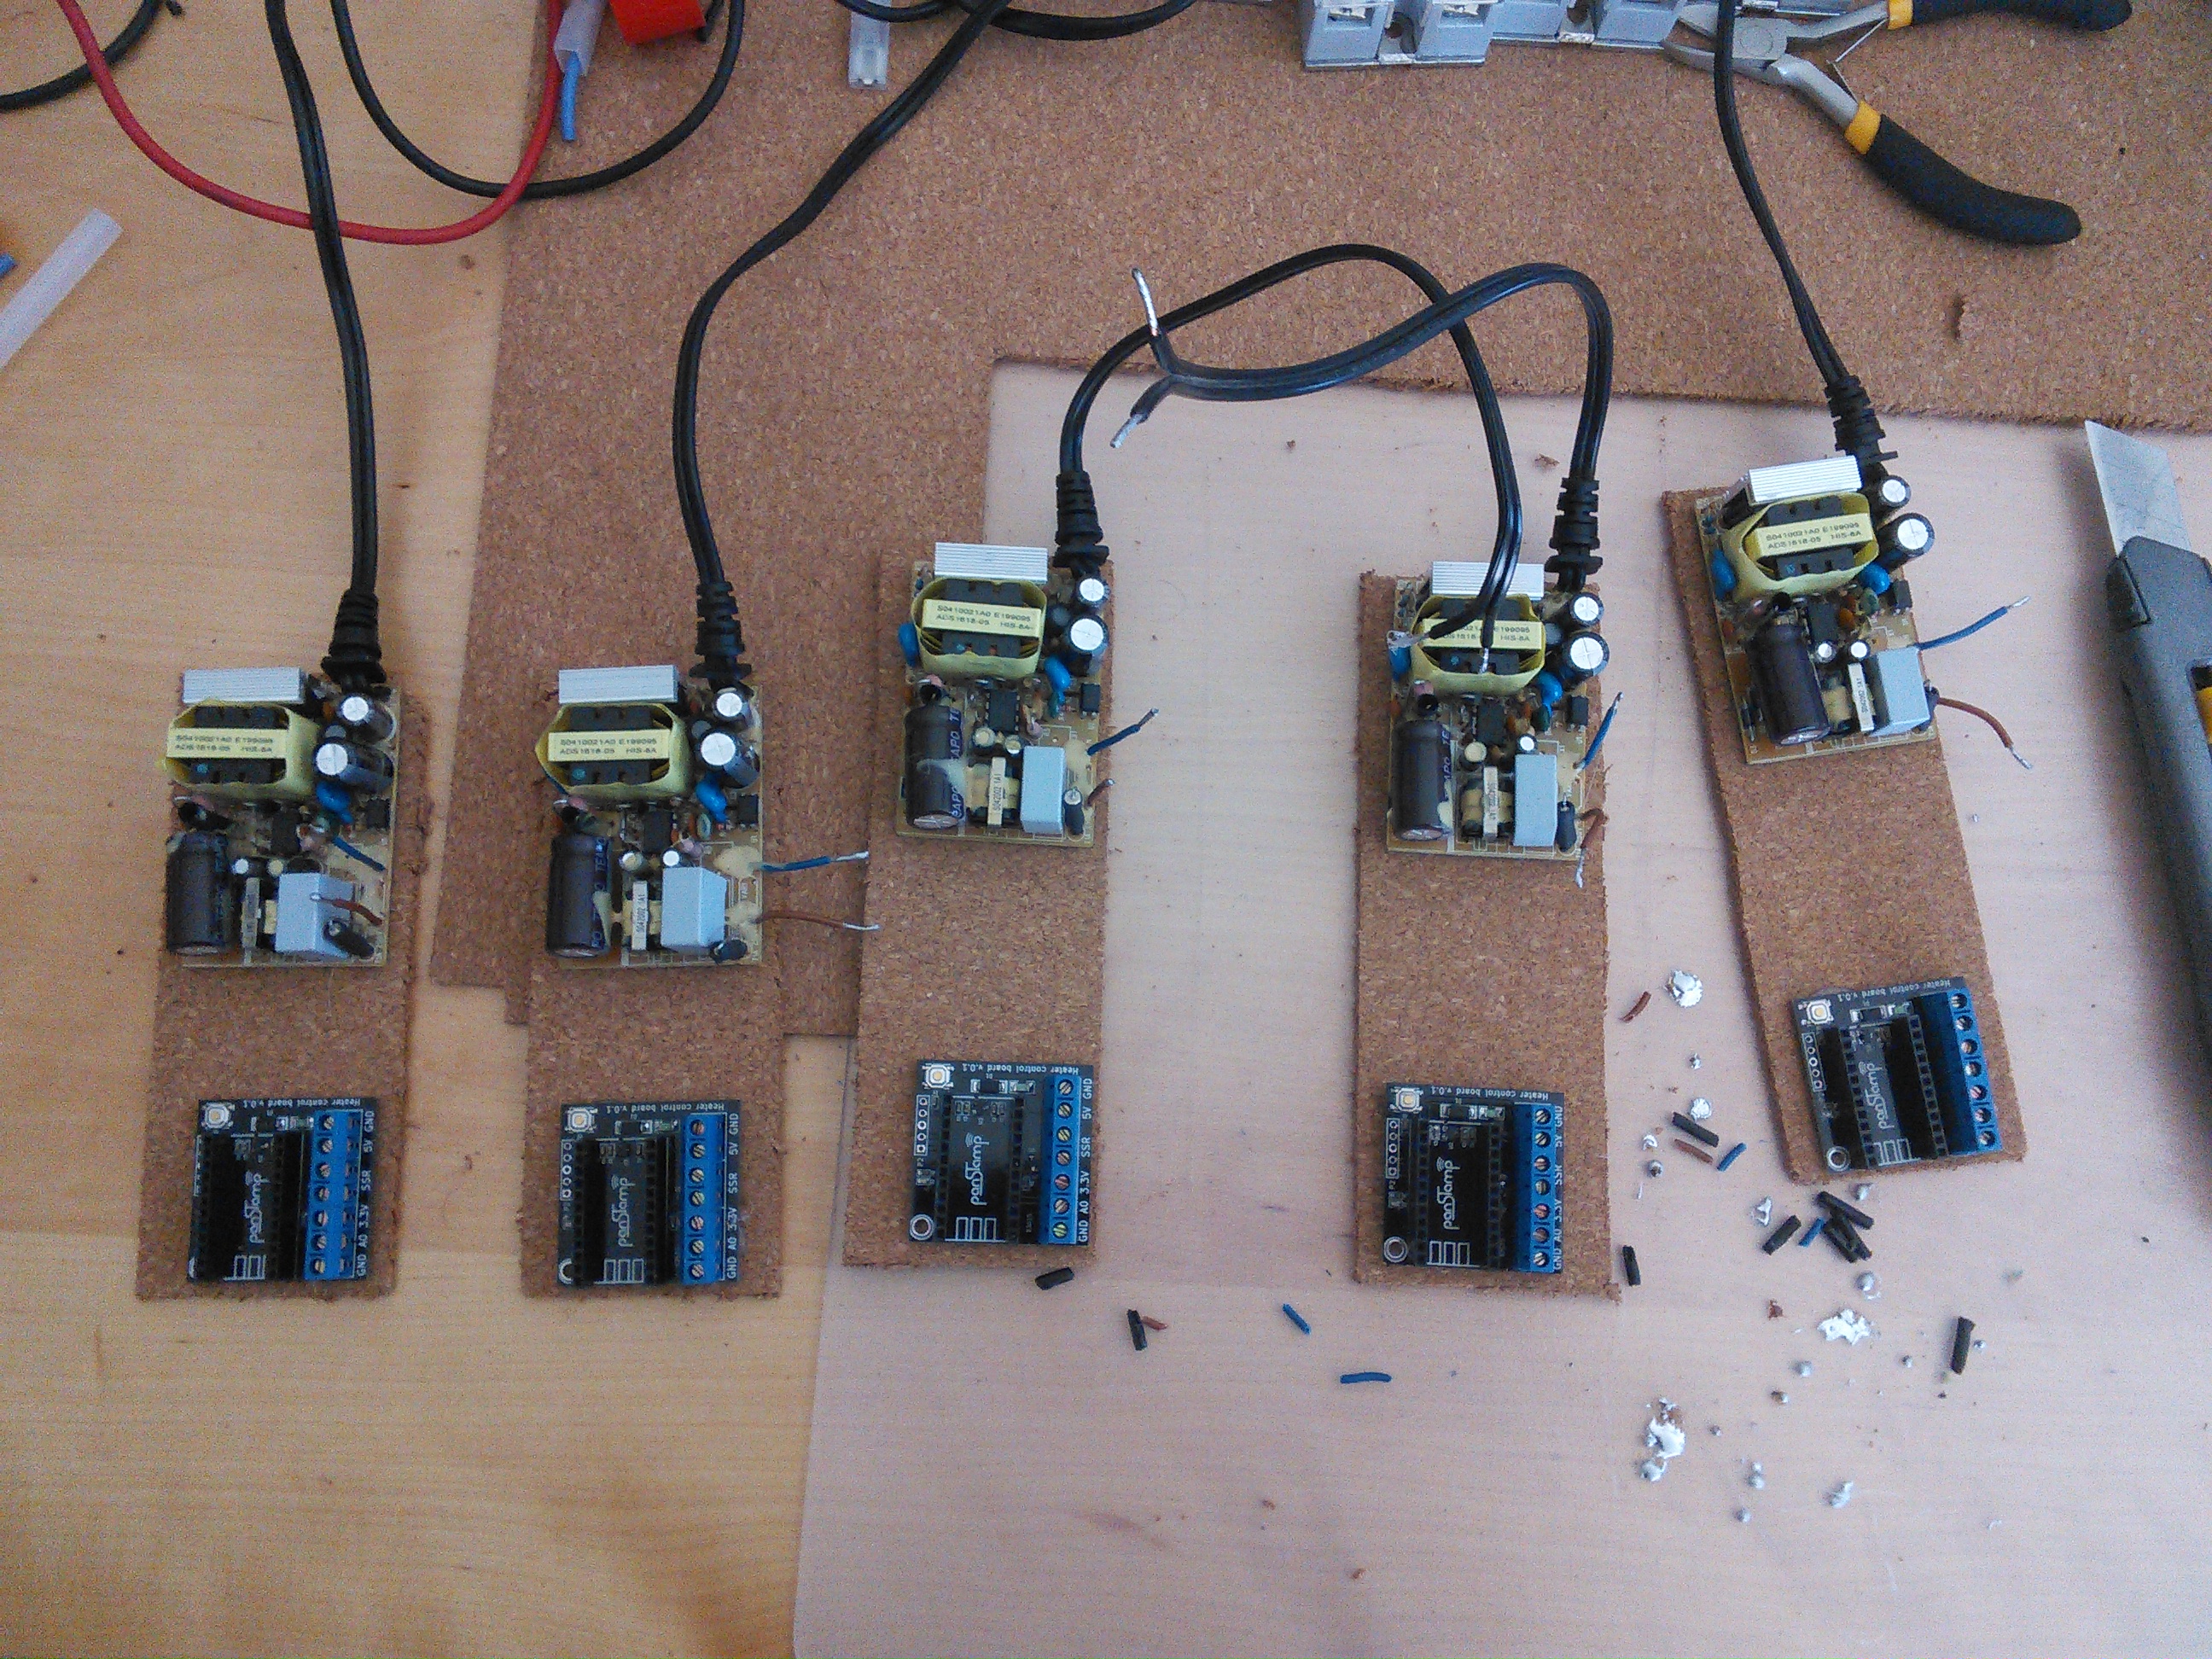
 Parallelization of the last process
 Using a cutter I got the units
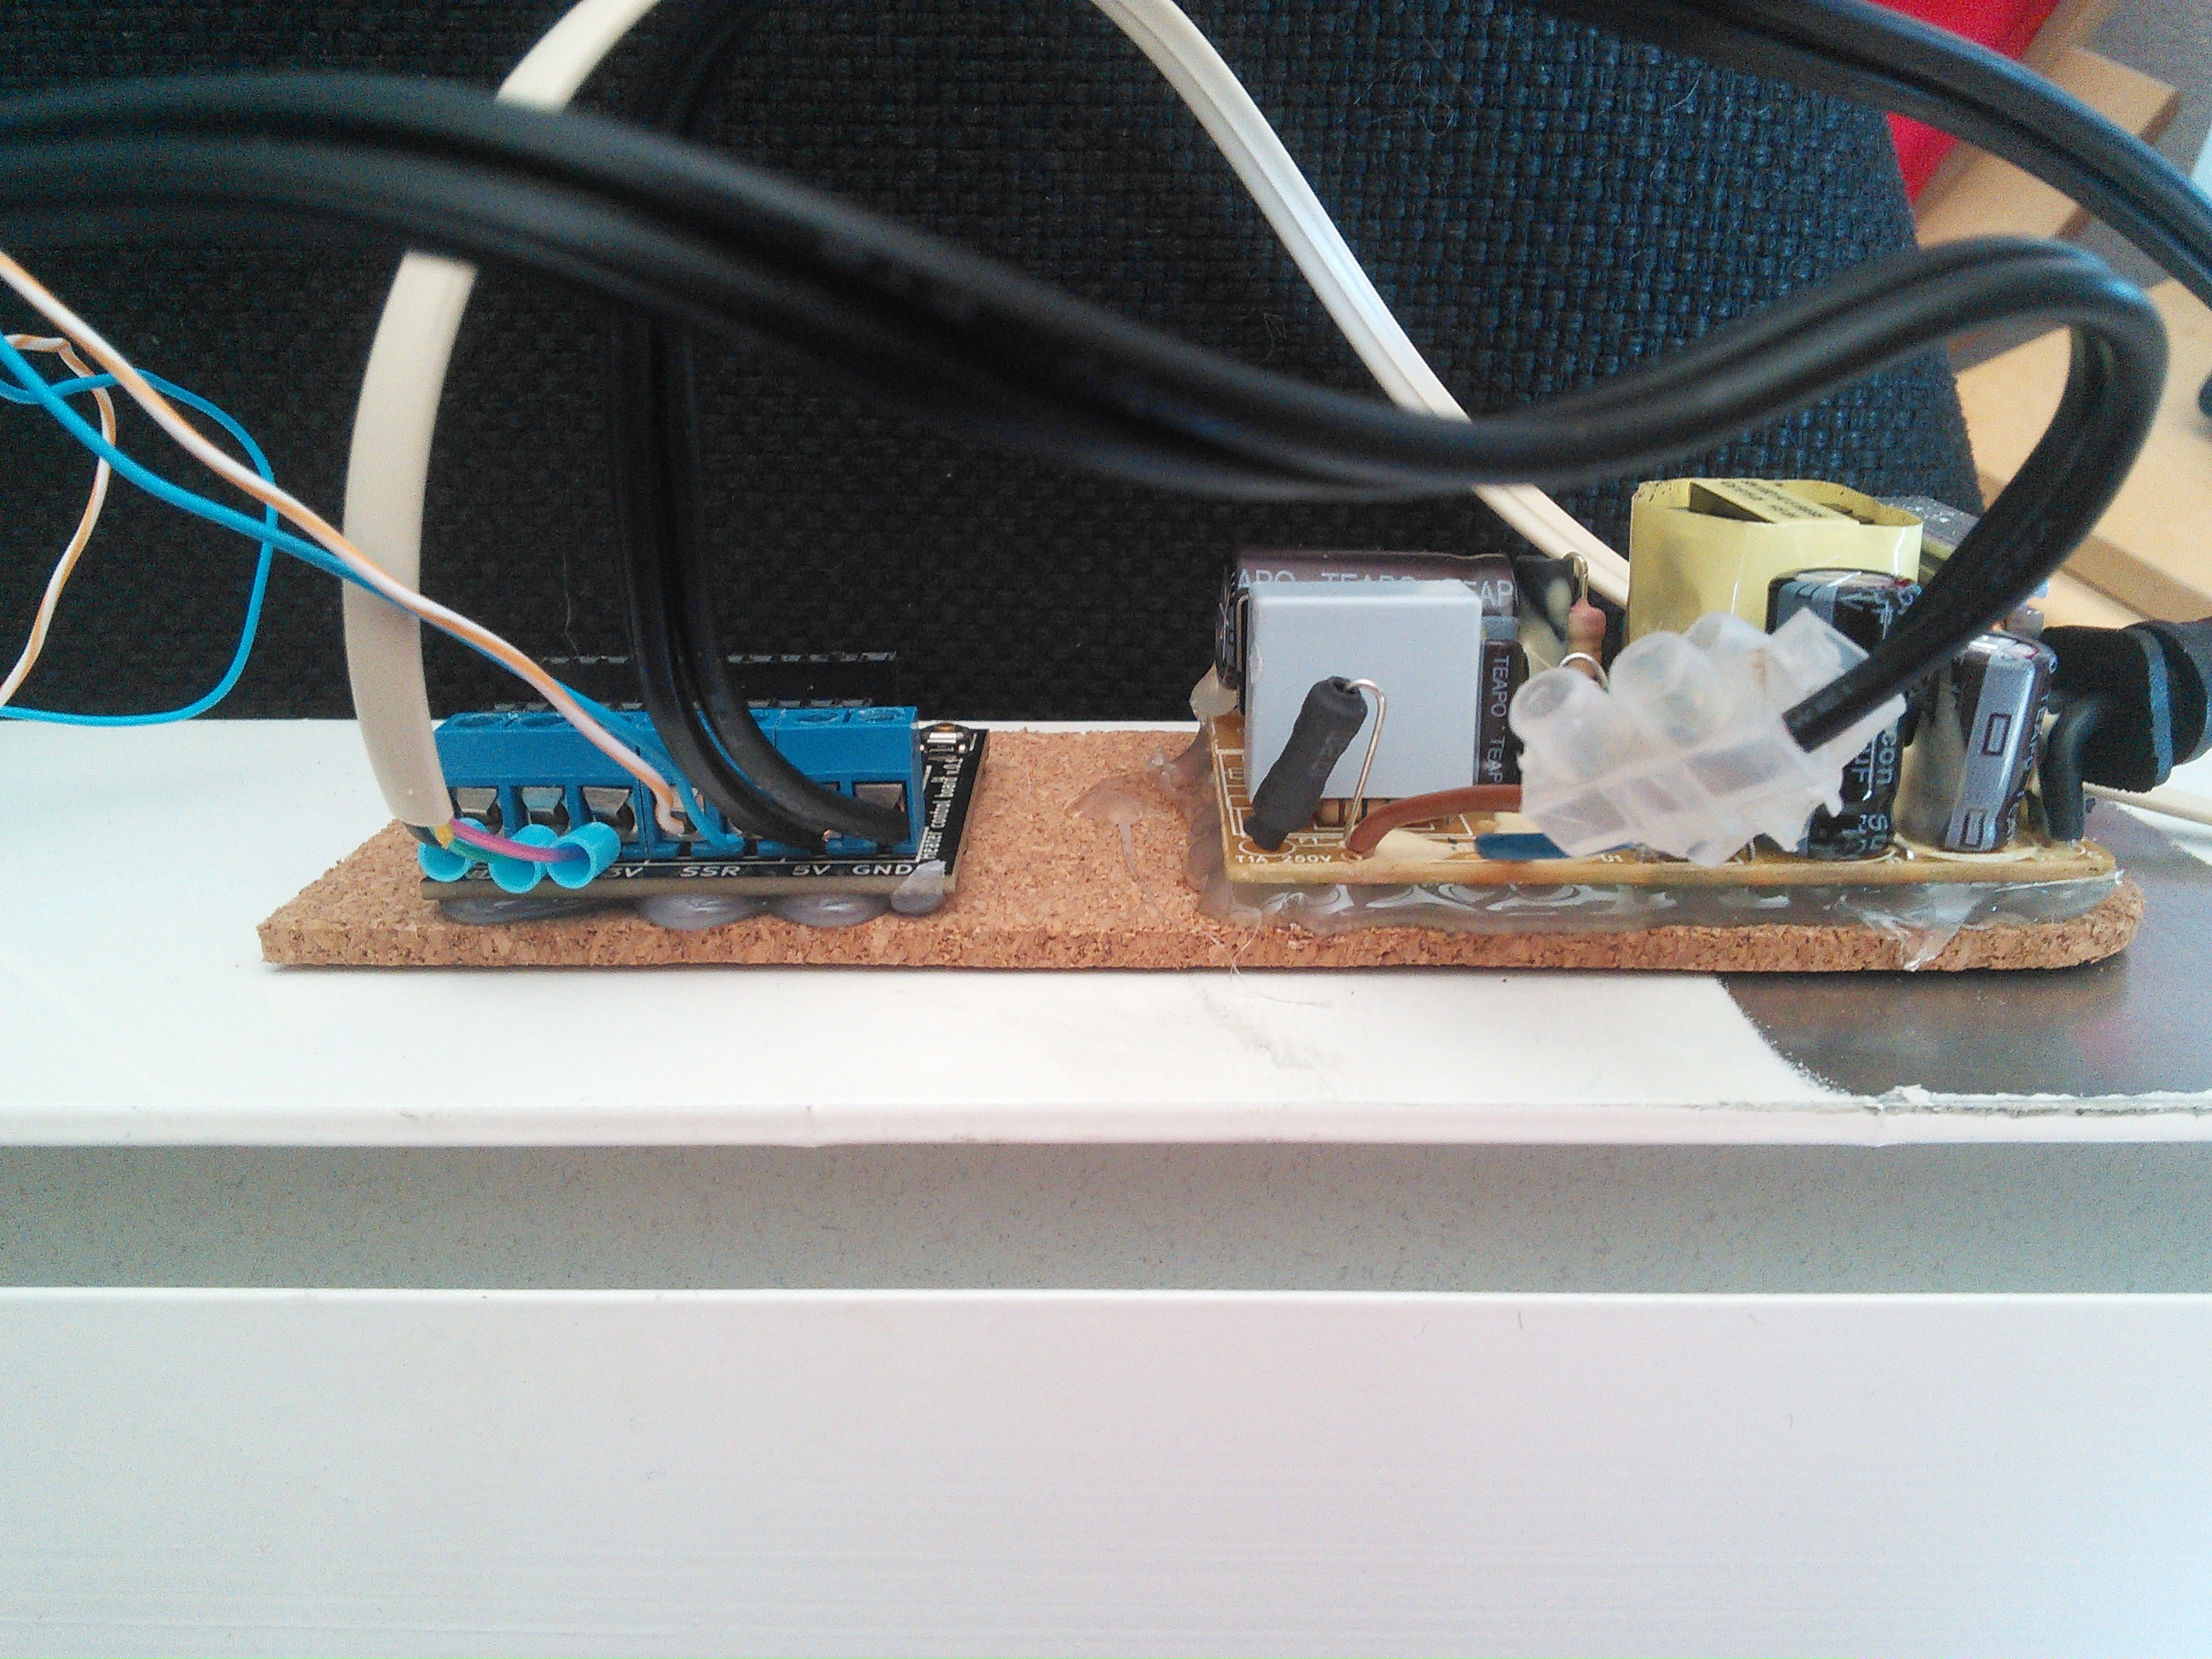
 SSR setup
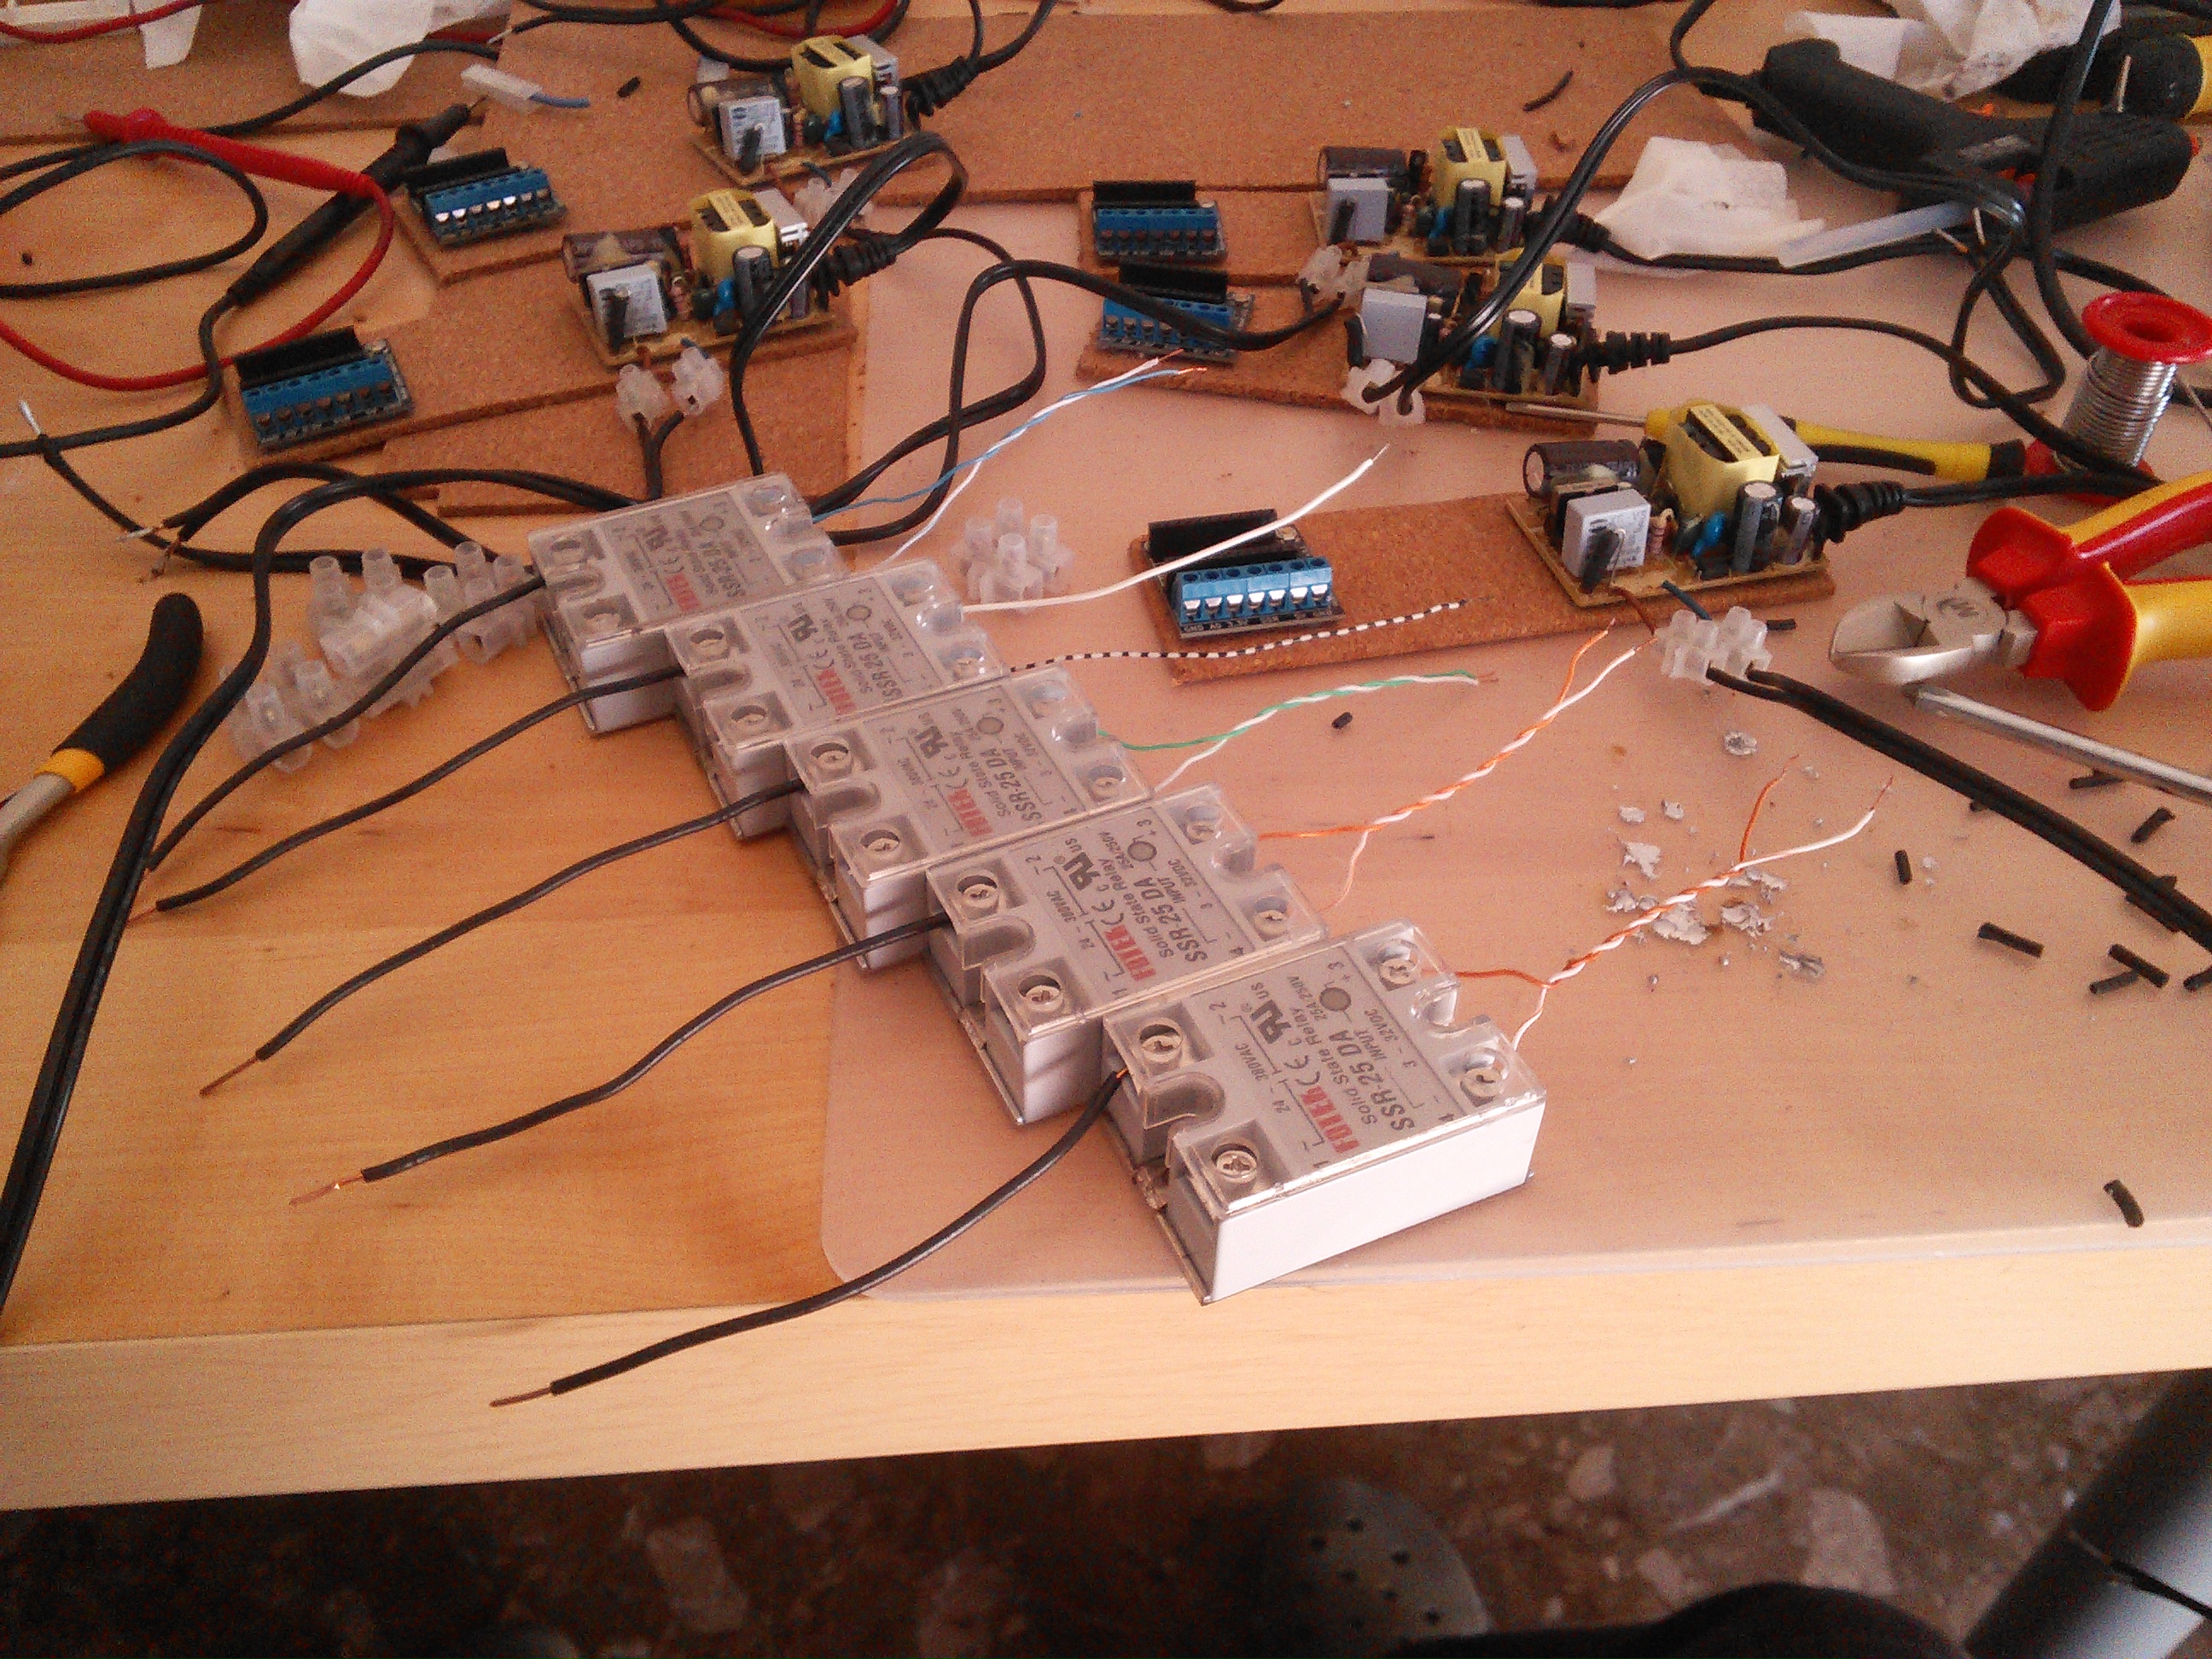 connecting SSR, PCB and PSU
 assembling everything on heater side panel
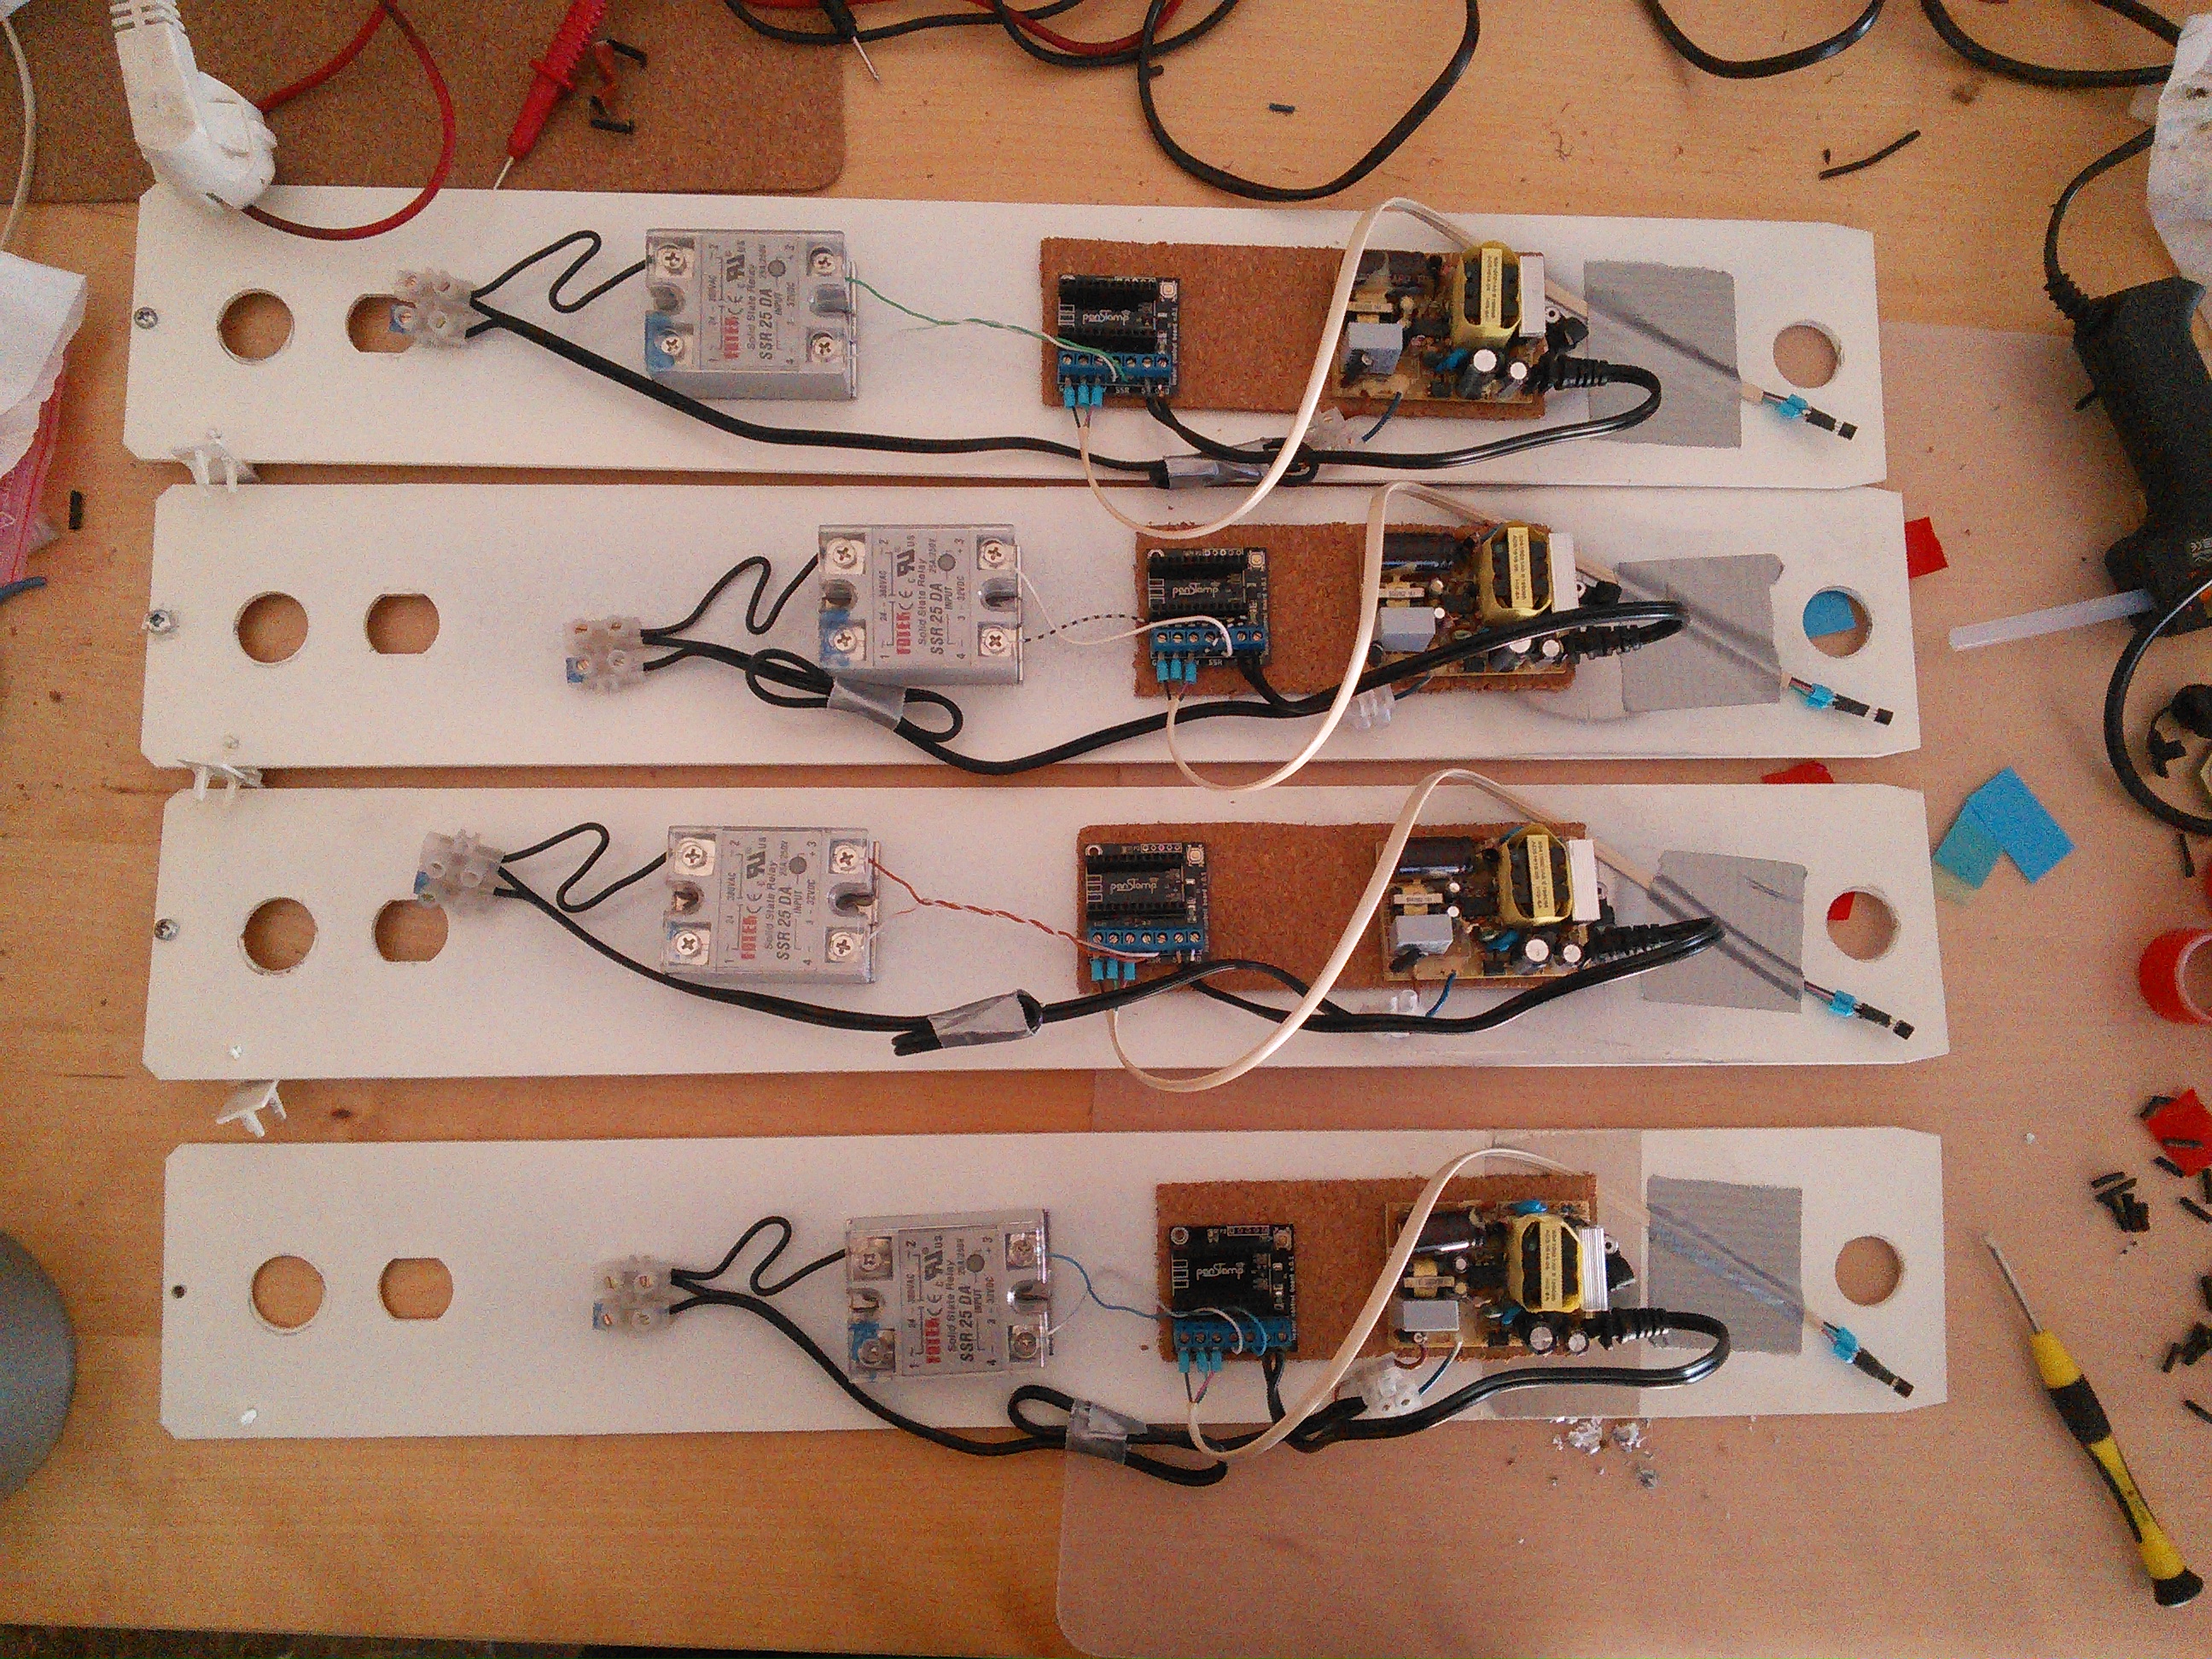 finally, mounting side panel on the heater

Next weeks, I’ll come back with this subject to talk about the software part.
How to get MP3 file from a WebM video
Another title for this post could be: “Getting audio from video clips”. Because you could do it with MP4 (Mpeg4), WebM, Mov, FLV, etc. We are going to use ffmpeg to that:
ffmpeg -i input_file.webm -ab 128k -ar 44100 out_file.mp3
The meaning of the parameters:
- ab: the audio bitrate in bps
- ar: the audio sample rate in hz
And if you have a directory with a lot of files to convert you could use:
find . -name "*.webm" -print0 |while read -dPay attention to “find” and “while read” commands combinations because we want to support files with spaces.
I hope this is as useful for you as for me.
\0' file; do ffmpeg -i "$file" -ab 128k -ar 44100 -y "${file%.webm}.mp3";done
Pay attention to “find” and “while read” commands combinations because we want to support files with spaces.
I hope this is as useful for you as for me.
RTMP source to HLS (HTTP Live Streaming) Apple
I just solved a very specific problem and I have to write some notes here to remember the solution. Given a RTMP source we have to stream the content to Apple devices like iPad, iPhone and iPod because RTMP couldn’t be played using Safari browser.
If we need to play streaming on Apple devices the best solution is convert it to HLS and publish generated files using HTTP server.
To solve this issue I use rtmpdump and vlc. Firstly rtmpdump gets video stream from source. Secondly the stream is sent to vlc and finally vlc transcodes de video and audio and outputs small .ts files and one .m3u8 index file.
The command is something like this:
rtmpdump -v -r "$RTMP" | sudo -u xymon vlc -I dummy fd://0 vlc://quit --sout="#transcode{width=320,height=240,fps=25,vcodec=h264,vb=256,venc=x264{aud,profile=baseline,level=30,keyint=30,ref=1,nocabac},acodec=mp3,ab=96,audio-sync,deinterlace,channels=2,samplerate=44100}:std{access=livehttp{seglen=10,delsegs=true,numsegs=5,index=$M3U8,index-url=$TS_URL},mux=ts{use-key-frames},dst=$TSF}"
Variables descriptions are:
RTMP=rtmp://example.tld/path/stream_id
WD=/local_path
TS=live-####.ts
TSF=$WD/$TS
TS_URL=http://example.tld/path/$TS
M3U8=$WD/live.m3u8
Then create an HTML file, for example live.html, with a reference to .m3u8 file, the relevant code of the HTML file is like this:
<video width="320" height="240"><source src="http://example.tld/path/live.m3u8" /></video>A simple code to public files via HTTP:
python -c "import SimpleHTTPServer;SimpleHTTPServer.test()"
Then we only need to open Safary browser in Apple device and set the proper URL, in our case:
http://example.tld/path/live.html
IMPORTANT NOTE: the audio output have to be with two channels and a sample rate of 44KHz in other cases the audio fails.