oriolrius.cat

Des del 2000 compartiendo sobre…

Tag: internet

Enhancing SSH Security with StealthSSHAccess

Reading time: 4 – 7 minutes

In today’s interconnected world, maintaining the security of your server infrastructure is paramount. One critical point of vulnerability is the SSH (Secure Shell) service, which allows remote administration of servers. Despite using a non-default port, many administrators still find their servers bombarded with brute-force and denial-of-service attacks. To address this challenge, I’ve developed a solution called StealthSSHAccess.

The Problem

Attackers often employ brute force attacks to gain unauthorized access to servers via SSH. Even if you’ve changed the default SSH port, determined attackers can still discover the new port and target it. These attacks can lead to service disruption, unauthorized data access, and potential breaches of sensitive information.

The Solution: StealthSSHAccess

StealthSSHAccess is an innovative approach to managing remote SSH access while mitigating the risks associated with brute-force attacks. Let’s delve into how it works and why it’s an effective solution:

Dynamic Access Control

StealthSSHAccess takes a dynamic and personalized approach to SSH access control. It operates as a smart gateway between potential attackers and your SSH service. Here’s a simplified breakdown of how it functions:

  1. Monitoring for Intent: Instead of directly exposing the SSH port, StealthSSHAccess monitors a non-SSH TCP port for connection attempts. Attackers, unaware of this, can’t target the SSH port directly.
  2. Capture and Response: When an attempt is made on the monitored port, StealthSSHAccess captures the IP address of the requester. This initial connection attempt fails, serving as a signal of intent to access SSH.
  3. Secure Access Window: Based on this signal, StealthSSHAccess temporarily opens the SSH port exclusively for the captured IP address. This allows for a secure connection from that specific source.
  4. Time-Bound Access: Access is granted for a predetermined duration. If SSH access isn’t established within this timeframe, the port is automatically closed for that specific IP. This tightens the window of exposure and bolsters security.
  5. Automatic Closure: If the port remains unused during the allowed time, StealthSSHAccess automatically revokes access and closes the port. A continuous monitoring mechanism controls this process.

Benefits and Features

1. Enhanced Security: By hiding the SSH port from attackers, StealthSSHAccess reduces the attack surface and minimizes exposure to potential threats.

2. Selective Accessibility: With StealthSSHAccess, you control who gains access by simply attempting a connection to a specific port. This provides an additional layer of security.

3. Minimal Configuration: Implementing StealthSSHAccess is easy thanks to its Docker-based deployment. This means you can integrate it seamlessly into your existing system.

4. Persistence Across Restarts: StealthSSHAccess ensures continuity by persisting IP timer information across service interruptions or restarts. This keeps the system aware of pending access requests.

Getting Started with StealthSSHAccess

To deploy StealthSSHAccess, follow these steps:

  1. Requirements: Ensure you have Docker and Docker Compose installed.
  2. Configuration: Set up environment variables using the provided .env file. Customize parameters like LOGLEVEL, IFACE, PORT_TO_MONITOR, and more to match your environment.
  3. Building and Running: Build the images using docker-compose build, and then launch the services with docker-compose up -d.
  4. Data Persistence: IP timer data is stored in the ./data directory, so make sure it’s writable by the Docker user.
  5. Security Note: Be aware that these services run with privileged access due to their interaction with the system’s network configuration. Understand the security implications before deployment.

Conclusion

In the ongoing battle against cybersecurity threats, StealthSSHAccess stands as a beacon of innovative protection for your servers. By intelligently managing SSH access and responding dynamically to legitimate requests, this solution offers heightened security without sacrificing convenience. Whether you’re an administrator or a security-conscious user, consider integrating StealthSSHAccess into your infrastructure to safeguard your servers from the persistent threats of the digital landscape.

To explore the project, access the source code, and learn more about its implementation, visit the StealthSSHAccess GitHub repository. Remember, security is a journey, and with StealthSSHAccess, you’re taking a proactive step toward a more resilient and secure server environment.
Get the IP addresses of local Docker containers

Reading time: < 1 minute

We have docker running and the containers have their own private network, thanks to this command we’re going to get the private IP address of all of them:

$ sudo docker inspect $(docker ps -q ) \
--format='{{ printf "%-50s" .Name}} {{range .NetworkSettings.Networks}}{{.IPAddress}} {{end}}'
/zerotier
/ntp                                               10.3.10.8
/nodered                                           10.3.10.11
/n8n                                               10.3.10.4
/ssh                                               10.3.10.9
/code                                              10.3.10.7
/semaphore                                         10.3.10.6
/rproxy                                            10.3.10.2
/homer                                             10.3.10.10
/pihole                                            10.3.10.27
/pihole_googledns                                  10.3.10.24
/pihole_opendns                                    10.3.10.23

OpenSSH public key fingerprint

Reading time: < 1 minute

Quick and easy, how to get the fingerprint of your SSH RSA key.

# syntax:
openssl pkey -in PATH/PRIVATE_RSA_KEY -pubout -outform DER | openssl md5 -c

# example:
$ openssl pkey -in ~/.ssh/id_rsa -pubout -outform DER | openssl md5 -c
MD5(stdin)= a6:26:23:d9:c1:d3:d5:e5:c0:38:ab:3c:c1:6a:3f:ea

socat: publish a port only available in localhost

Reading time: 1 – 2 minutes

Assume that we have a service only available in localhost (127.0.0.1/8) and we want to expose this port temporarily. Of course, you can use iptables for redirecting the port. But take care, this is not a simple DNAT because packets will not be evaluated by PREROUTING (-t nat) rules.

Another option is using an old-powerful Swiss knife tool: socat (github).

# binds public port to any local interface
socat TCP-LISTEN:<public_port>,fork TCP:127.0.0.1:<internal_port>
# binds only to an IP address
SOCAT_SOCKADDR=<interface_IP> socat TCP-LISTEN:<public_port>,fork TCP:127.0.0.1:<internal_port>

# examples:

# binds to all interfaces:
socat TCP-LISTEN:1880,fork TCP:127.0.0.1:1880
# just for an IP address of one interface:
SOCAT_SOCKADDR=10.2.0.110 socat TCP-LISTEN:1880,fork TCP:127.0.0.1:1880

Network traffic sniffing: tcpdump on Linux + Wireshark on Windows

Reading time: 2 – 2 minutes

From the Windows box using the CLI console (cmd):

ssh USER@HOST "tcpdump -s 0 -U -n -w - -i NETIF FILTER" | "c:\Program Files\Wireshark\Wireshark.exe" -k -i -

# USER - remote user of the linux box
# HOST - host address of the remote linux box
# NETIF - network interface to snif in the remote linux box
# FILTER - (optional) rules for filtering traffic to capture

Use case:

C:\Windows\System32\OpenSSH>ssh root@192.168.4.74 "tcpdump -s 0 -U -n -w - -i eno2 udp and not port 53" | "c:\Program Files\Wireshark\Wireshark.exe" -k -i -

Let me present a rare use case of this useful trick. I use a QNAP NAS as a gateway in my home network, where I have 5 NICs. So it’s really useful to snif traffic remotly but I have no tcpdump packet in the system. What I did is use tcpdump as Docker container and finally the commands is like that.

# sniffing SIP traffic (port 5060) on interface eth0
# remote linux host (QNAP NAS) use SSH port 55222
# docker container is created and when work is done is removed
C:\Windows\System32\OpenSSH>ssh -p 55222 admin@10.2.0.1 "cd /share/Container/tcpdump && docker run --rm --net=host corfr/tcpdump -s 0 -U -n -w - -i eth0 not port 22 and port 5060" | "c:\Program Files\Wireshark\Wireshark.exe" -k -i -

URL shortener service: https://url.joor.net (pygmy)

Reading time: 2 – 2 minutes

Lately, I started running my own URL shortener service because of Google URL shortener service is going to shut down. Below there is a short video showing how the service runs and also there is a Google Chrome extension which I created for integrating the service with the browser.

For quick access and reference the URLs are:

Final notes:

  • Base URL is not the shortest one, but for my personal requirements, it’s more than enough.
  • Service is in early stages, especially the extension. Expect errors, bugs, and unavailabilities.
  • Service is open and free for everyone. But remember, the main purpose is my personal use.
  • I know that pygmy has more features than I publish but I don’t need them and I don’t want to maintain those parts of the applications.
  • I appreciate the effort of Amit for so good application.

A history of connectivity in Torrelavit: from 1.200bps using packet radio to 1Gbps on fiber optics

Reading time: 6 – 9 minutes

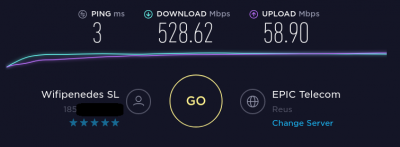
This is a chronology of my history using the Internet, and no-Internet, connections. I never thought this is going to be possible; currently, my Internet connection is faster than my local network. The best speed test that I’ve got so far is the one that you have in the attached screenshot using an old Dell Studio XPS with Linux Mint. The paradox is that more modern computers get the worst performance than this one and all of them synchronize the network card to 1Gbps with the Mikrotik CloudSwitch which acts like a gateway applying NAT rules before the fiber optic bridge.

By the way, that news at home makes me spend some time remembering all the Internet connections I had at home since 1992. During Barcelona Olimpic games I was on Netherland with a holidays’ family trip in that trip we met a guy who told me how to connect two computers using a ham radio station, this technique is called packet radio. I was 15 and my life changed at that instant. The idea was using a radio station of 145MHz, or 433MHz (there were more frequencies, but they are unusual) connect the speaker and mic of the radio station using an audio jack to a TNC (Terminal Node Control), or a Baycom, which are at the end of the day like a modem that converts analog audio signals to digital serial port signals. Using the serial port connected to the computer a terminal application was run for user interfacing with the network. Protocol used for the WAN network was AX.25 a variant of X.25, used in the past on most ATM networks, the packet radio network had not only client stations, also BBS (Bulletin Board Systems), Weather Stations, email, FTP, nodes (repeaters), and gateways to other WANs like Fidonet, and Internet. How to get those resources without a searcher like Google, it’s another story.

Exchange data was a nightmare because communication was at a bandwidth of 1.200bps on a shared media, the air, using a simplex (half-duplex)  communication. In plain words, this means to send a 10 KB pictures could take an afternoon and usually, terminals weren’t multi-task so you had the computer busy doing that all the time. The first time that I run a browser was for Gopher service which inspired Web service at some point, I had two use two computers one of them running as TCP/IP to AX.25 gateway and the other with Windows 3.1 running Mosaic and using IP over parallel port (PLIP) for exchanging data with those two computers. Mosaic was the first graphical browser of the story as far as I know. Finally, I remember that I developed a small implementation of TCP/IP stack over AX.25 on an EPROM for a TNC, it was very basic but good enough for mapping ham radio IDs and TCP/IP addresses. BTW, my ham radio ID was EB3EWH.

This part of the story lasted about 5 years, I remember the late 90s when good enough plain old telephone line (POTS) was installed at home and a super modern 9600bps telephonic modem which evolved very fast to different speeds up to 56K was the only option for connecting to the Internet. We used Infovía and Infovía plus a Telefonica service for getting data network instead of regular calls to the ISPs, really painful part of the story. Slow speeds also and expensive services for what we get. Maybe the most fun thing about this part of the history was when someone at home pick up the phone and data connection was interrupted. Other roughly 5 years with this connectivity pattern.

In the early 2000s, I installed an ISDN line at home with two 64kbps at home, on those was permanently connected to the Internet and the other one was available for voice calls. ISDN was an exciting and very stable technology I’m out of the market currently but I think it’s still possible to buy links using so old technology.  This part of the history was shorter than the previous ones and the funniest story was a thunderstorm and lighting day when the TR1 exploited in front of me I scared a lot.

At the end of 2002 a 256Kbps ADSL was installed on top of a new POTS line installed again at home. It was like a dream, finally, I was navigating with broad bandwidth. ADSL speed up to 2Mbps it was impossible to improve the speed to higher speeds than that because I’m too far from any ADSL distribution point. I remember in 2012 I was paying for 6Mbps internet connection which was the smallest possible to hire and my maximum speed was 1.9Mbps measured with the proper equipment for quality lines test. 

At the end of 2013 I installed a Wi-Fi link with a guy who re-sell fiber optics connection in Sant Sadurní d’Anoia using a link to the Ordal which is a mountain that I can view from home, about 10 km link using 5GHz frequency. Speed was 6Mbps/300kbps. This link was active until two days ago, but since August 2014 the main Internet connection was using another Wi-Fi link with a company called XTA (Xarxa de Telecomunicacions Alternatives), a.k.a. WifiPenedes which is part of the Guifi.net project. This is the same company which installed fiber optics at home the day before yesterday at home. The Wi-Fi link that I had with WifiPenedes was 20Mbps/1Mbps and currently, with the fiber optics I have 1Gbps/300Mbps and there is no backup link with any other technology. BTW, I have a 4G subscription which can be used for emergencies.

At the end of 2013 I installed a Wi-Fi link with a guy who re-sell fiber optics connection in Sant Sadurní d’Anoia using a link to the Ordal which is a mountain that I can view from home, about 10 km link using 5GHz frequency. Speed was 6Mbps/300kbps. This link was active until two days ago, but since August 2014 the main Internet connection was using another Wi-Fi link with a company called XTA (Xarxa de Telecomunicacions Alternatives), a.k.a. WifiPenedes which is part of the Guifi.net project. This is the same company which installed fiber optics at home the day before yesterday at home. The Wi-Fi link that I had with WifiPenedes was 20Mbps/1Mbps and currently, with the fiber optics I have 1Gbps/300Mbps and there is no backup link with any other technology. BTW, I have a 4G subscription which can be used for emergencies.

Of course will be nice to go deeper with each of those points, finding anecdotes I lived with those 26 years of history connecting to wide area networks (WAN) maybe one day I’ll find the priority for sharing so amazing moments and people that I met thanks to those networks. I have to admit that networking changed my life, it enables access to broad knowledge. Thank everyone and every company which makes this possible, it has been a pleasure to enjoy this fantastic processes. I finish accepting the challenge to improve my LAN for getting the best from my new Internet connection.

PDF and DOCX version.

HTTPie – command line HTTP client

Reading time: 1 – 2 minutes

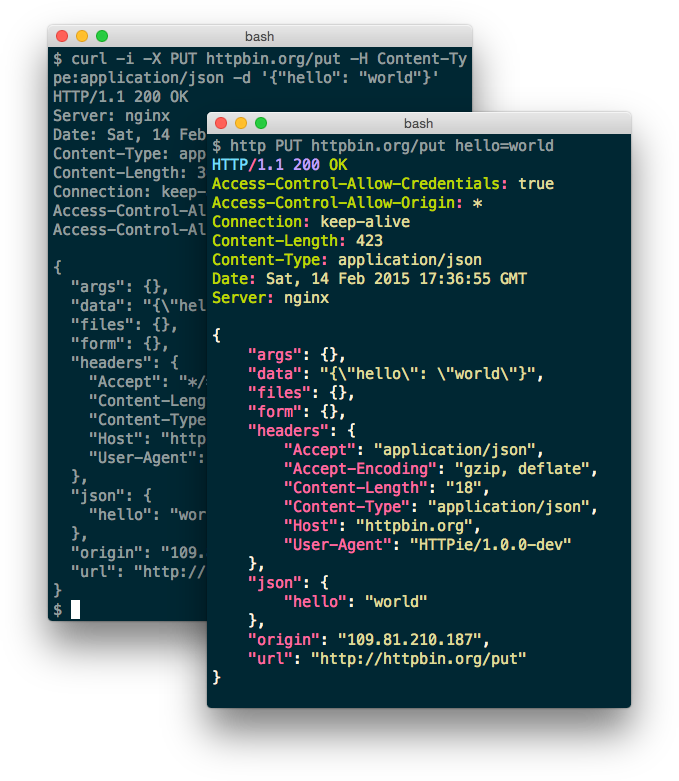
I imagine you are used to using curl for many command line scripts, tests, and much more things. I did the same but some weeks ago I discovered HTTPie which is the best substitute that I’ve ever found for curl. Of course, it’s also available for a lot of Linux distributions, Windows, and Mac. But I used it with docker which is much more transparent for the operative system and easy to update. To be more precise I use next alias trick for using this tool:

alias http='sudo docker run -it --rm --net=host clue/httpie'

Official website: httpie.org

Let me paste some highlights about HTTPie:

  • Sensible defaults
  • Expressive and intuitive command syntax
  • Colorized and formatted terminal output
  • Built-in JSON support
  • Persistent sessions
  • Forms and file uploads
  • HTTPS, proxies, and authentication support
  • Support for arbitrary request data and headers
  • Wget-like downloads
  • Extensions
  • Linux, macOS, and Windows support

From the tool webpage a nice comparison about how HTTPie looks like versus curl.

socat tip: VPN without cyphering

Reading time: < 1 minute

Fast reminder and tip for socat, it can work on two devices or more:

# SERVER:
socat TCP-LISTEN:4443 TUN:192.168.255.2/24,up

# CLIENT:
socat TCP:SERVER_IP:4443 TUN:192.168.255.1/24,up

Internet fail over connection with Mikrotik

Reading time: 2 – 4 minutes

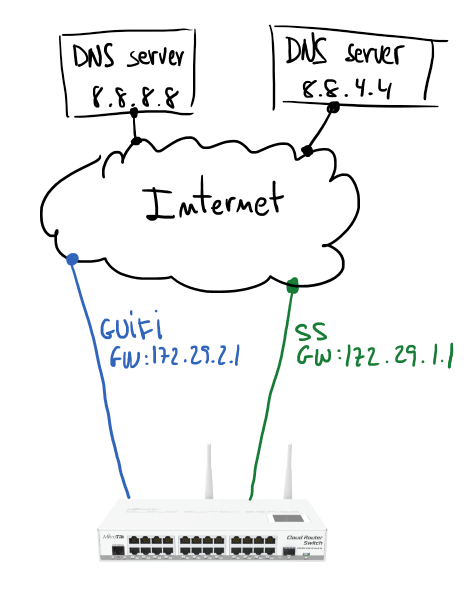
Based on my home configuration I’m going to describe how to set up a Mikrotik to manage fail over Internet connection. Next schema describes a Mikrotik gateway with two internet connections (GUIFI and SS). Assuming GUIFI as a default Internet connection periodic checks on Google DNSes (8.8.8.8 and 8.8.4.4) will allow to know when it’s good to change the default route.
internet-failover


If you have some Linux routing background it will be easier to understand the configuration. Main idea is use policy routing tables and mark packets to use one table or other. In my case I have two routing tables GUIFI and SS, and of course, the default gateway of each of those tables is the gateway indicated in the schema.

First step is take care about the routes for hosts to monitor; using GUIFI connection will be checking connectivity to 8.8.8.8 and using SS the monitored host will be 8.8.4.4.

/ip route
add dst-address=8.8.8.8 gateway=172.29.2.1 scope=10
add dst-address=8.8.4.4 gateway=172.29.1.1 scope=10

Second step is configure two routing tables, those routes will check Internet hosts availability. Routes are resolved recursively (more info), and will be active only if any host is pingable.

# routing table for GUIFI
/ip route
add distance=1 gateway=8.8.8.8 routing-mark=GUIFI check-gateway=ping
add distance=2 gateway=8.8.4.4 routing-mark=GUIFI check-gateway=ping
# routing table for SS
/ip route
add distance=1 gateway=8.8.4.4 routing-mark=SS check-gateway=ping
add distance=2 gateway=8.8.8.8 routing-mark=SS check-gateway=ping

Routing table looks like that:

routing-table

Next step will be create marking rules in the firewall:

# next rule mark all LAN traffic (10.2.0.0/26) before routing
# it'll be processed by routing table GUIFI
# it makes GUIFI the default Internet connection 
/ip firewall mangle
add action=mark-routing chain=prerouting comment="All LAN traffic" dst-address=\
    !10.0.0.0/8 new-routing-mark=GUIFI passthrough=no src-address=10.2.0.0/26

If any specific host, service or whatever want to use specific routing table, then you can create new rules with proper mark to redirect the traffic to that Internet connection. But if that path fails other Internet connection will be used.

In my case I have a more complicated scenario, internal VoIP server uses a IP Telephony service only available through GUIFI connection. The way to force that is forbidding traffic to SS connection. A simple firewall rule will help to do that:

# X.X.X.X = IP address of the IP telephony provider
/ip firewall filter
add action=reject chain=forward dst-address=X.X.X.X in-interface=\
    bridge-lan out-interface=SS-eth2

I hope previous simple notes are useful for you, they are inspired by Advanced Routing Failover without Scripting.