oriolrius.cat

Des del 2000 compartiendo sobre…

Tag: mikrotik

Ubuntu server as wifi AP and Mikrotik as a DHCP server

Reading time: 2 – 3 minutes

It’s important to have a very clear picture about the scenario that we’re going to configure in that case because it’s a little bit particular. This is an evolution of the previous post: Ubuntu server as wifi AP and Mikrotik as a DHCP server

schema

There is a server running Ubuntu 16.04 and offering wifi service as an AP. The wifi interface is in bridge mode with the ethernet port and send all traffic to the Mikrotik gateway where there is a DHCP server in charge to serve IP address to wifi clients.

Start by configuring the bridge in the Ubuntu server. File “/etc/network/interfaces”:

source /etc/network/interfaces.d/*

auto lo br0
iface lo inet loopback

#ethernet interface
allow-hotplug enp2s0
iface enp2s0 inet manual

#wifi interface
allow-hotplug wlp3s0
iface wlp3s0 inet manual

# Setup bridge
iface br0 inet static
    bridge_ports enp2s0 
    address 192.168.2.2
    netmask 255.255.255.0
    network 192.168.2.0

Pay attention on “bridge_ports” the wifi interface is not added on the list, this is because until the hostapd is running it doesn’t make sense to do that. You’ll see “bridge=br0” option on hostapd.conf which will fix that misbehavior.

Wifi AP configuration, “/etc/default/hostapd”:

DAEMON_CONF="/etc/hostapd/hostapd.conf"

and “/etc/hostapd/hostapd.conf”:

bridge=br0                # bridge interface
interface=wlp3s0          # wifi interface name
driver=nl80211
ssid=the_ssid_name        # name of your network
hw_mode=g
channel=1
macaddr_acl=0
auth_algs=1
ignore_broadcast_ssid=0
wpa=3
wpa_passphrase=the_secret_key   # secret key to joing with the wifi network
wpa_key_mgmt=WPA-PSK
wpa_pairwise=TKIP
rsn_pairwise=CCMP
logger_syslog=-1
logger_syslog_level=3
logger_stdout=-1
logger_stdout_level=1

DHCP server configuration on Mikrotik:

# setting the interface address, in my case ether4
/ip address
add address=192.168.2.1/24 interface=ether4 network=192.168.2.0

# setting up DHCP on interface 4 of the mikrotik device
/ip dhcp-server
add address-pool=dhcp-pool disabled=no interface=ether4 name=dhcp-pool

# network of the DHCP server
/ip dhcp-server network
add address=192.168.2.1.0/24 dns-server=8.8.8.8 domain=your_network.local gateway=192.168.2.1 netmask=24

# IP pool used by the DHCP server
/ip pool
add name=dhcp-pool ranges=192.168.2.65-192.168.2.70

Internet fail over connection with Mikrotik

Reading time: 2 – 4 minutes

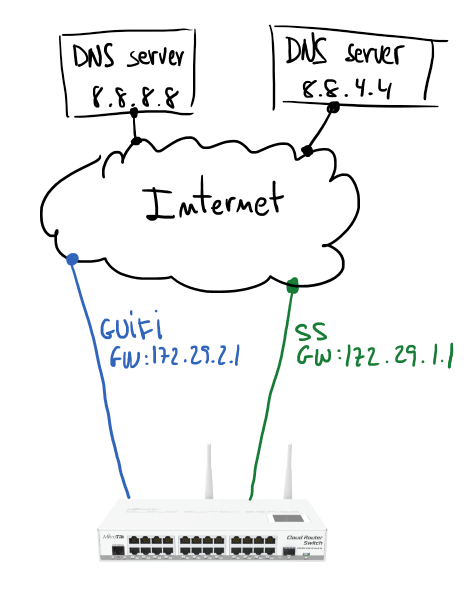
Based on my home configuration I’m going to describe how to set up a Mikrotik to manage fail over Internet connection. Next schema describes a Mikrotik gateway with two internet connections (GUIFI and SS). Assuming GUIFI as a default Internet connection periodic checks on Google DNSes (8.8.8.8 and 8.8.4.4) will allow to know when it’s good to change the default route.
internet-failover


If you have some Linux routing background it will be easier to understand the configuration. Main idea is use policy routing tables and mark packets to use one table or other. In my case I have two routing tables GUIFI and SS, and of course, the default gateway of each of those tables is the gateway indicated in the schema.

First step is take care about the routes for hosts to monitor; using GUIFI connection will be checking connectivity to 8.8.8.8 and using SS the monitored host will be 8.8.4.4.

/ip route
add dst-address=8.8.8.8 gateway=172.29.2.1 scope=10
add dst-address=8.8.4.4 gateway=172.29.1.1 scope=10

Second step is configure two routing tables, those routes will check Internet hosts availability. Routes are resolved recursively (more info), and will be active only if any host is pingable.

# routing table for GUIFI
/ip route
add distance=1 gateway=8.8.8.8 routing-mark=GUIFI check-gateway=ping
add distance=2 gateway=8.8.4.4 routing-mark=GUIFI check-gateway=ping
# routing table for SS
/ip route
add distance=1 gateway=8.8.4.4 routing-mark=SS check-gateway=ping
add distance=2 gateway=8.8.8.8 routing-mark=SS check-gateway=ping

Routing table looks like that:

routing-table

Next step will be create marking rules in the firewall:

# next rule mark all LAN traffic (10.2.0.0/26) before routing
# it'll be processed by routing table GUIFI
# it makes GUIFI the default Internet connection 
/ip firewall mangle
add action=mark-routing chain=prerouting comment="All LAN traffic" dst-address=\
    !10.0.0.0/8 new-routing-mark=GUIFI passthrough=no src-address=10.2.0.0/26

If any specific host, service or whatever want to use specific routing table, then you can create new rules with proper mark to redirect the traffic to that Internet connection. But if that path fails other Internet connection will be used.

In my case I have a more complicated scenario, internal VoIP server uses a IP Telephony service only available through GUIFI connection. The way to force that is forbidding traffic to SS connection. A simple firewall rule will help to do that:

# X.X.X.X = IP address of the IP telephony provider
/ip firewall filter
add action=reject chain=forward dst-address=X.X.X.X in-interface=\
    bridge-lan out-interface=SS-eth2

I hope previous simple notes are useful for you, they are inspired by Advanced Routing Failover without Scripting.

OpenVPN between pfSense and Mikrotik

Reading time: 3 – 5 minutes

vpn-pfsense-mikrotik-schemaAssuming previous scenario I’m going to describe the required configurations on pfSense and Mikrotik. Certifcate creation is not part of the scope of this document, if you are not familiar about how to do that it’s a good idea to use the pfSense certificate manager to do it. My last advice is take care with certificates 90% of problems that I found in my life when I was working on VPNs are because of that. Take your time to check it before spend your time playing with other configurations.

In that scenario pfSense will play the role of the VPN server and Mikrotik will be the client, so I’m going to start describing pfSense configurations.

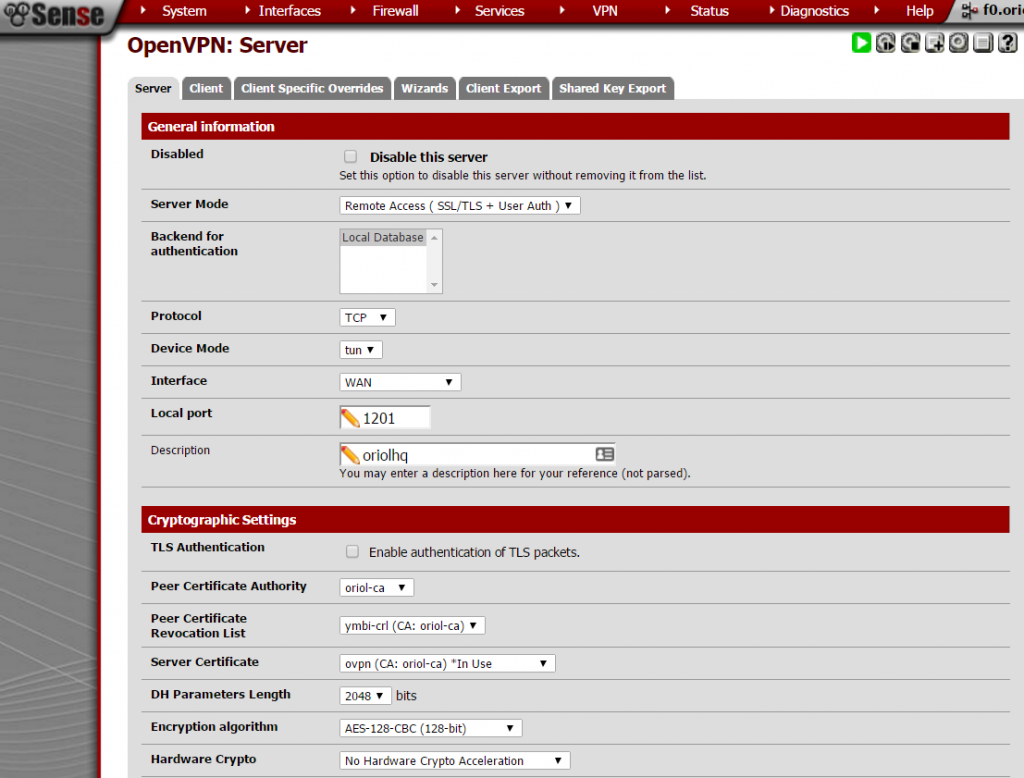
Create OpenVPN server on proper section:

pfsense-openvpn-server


Important things to take in account when you set up the parameters are socket has to be a TCP socket in my case I decided to use port 1201:

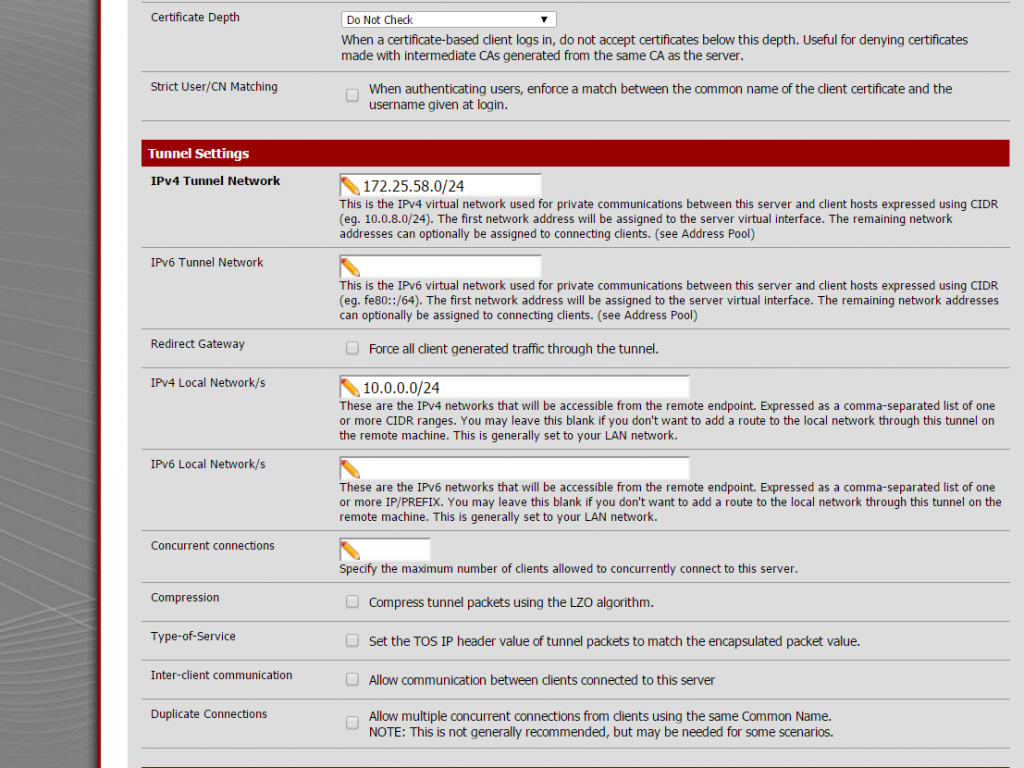
pfsense-openvpn-server-configNext settings on the same place are about local network and tunnel IP addresses, this is required to create proper routing rules on the server and the client.

pfsense-openvpn-server-config2


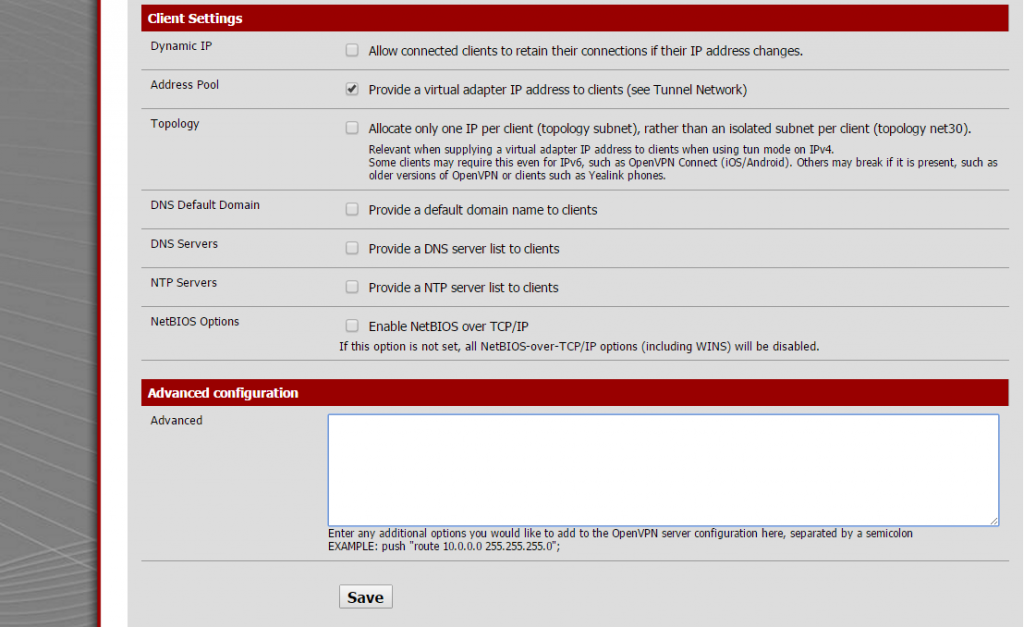
Last part to configure on this sections is extremly simple, only take care to unmark everything and check “address pool” setting.

pfsense-openvpn-server-config3


Remember to open that port on Firewall rules.

pfsense-firewall-rules


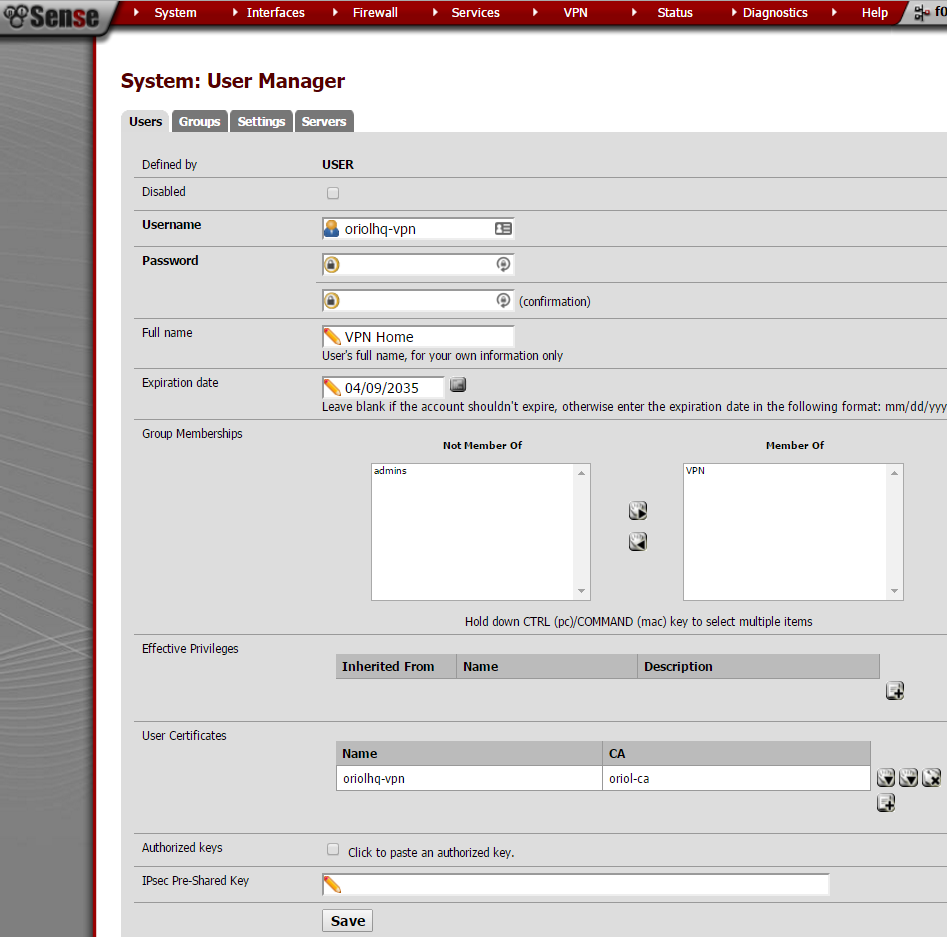
A VPN user is required to authenticate the process, just go to “User Management” inside the “System” menu:

pfsense-user-manager-oriol


pfSense is configured, now it’s time to set-up the OpenVPN client on Mikrotik using Winbox. Remember to import the certificates:

certificates-mikrotik


Click on “PPP” this on the left menu:

ppp-mikrotik


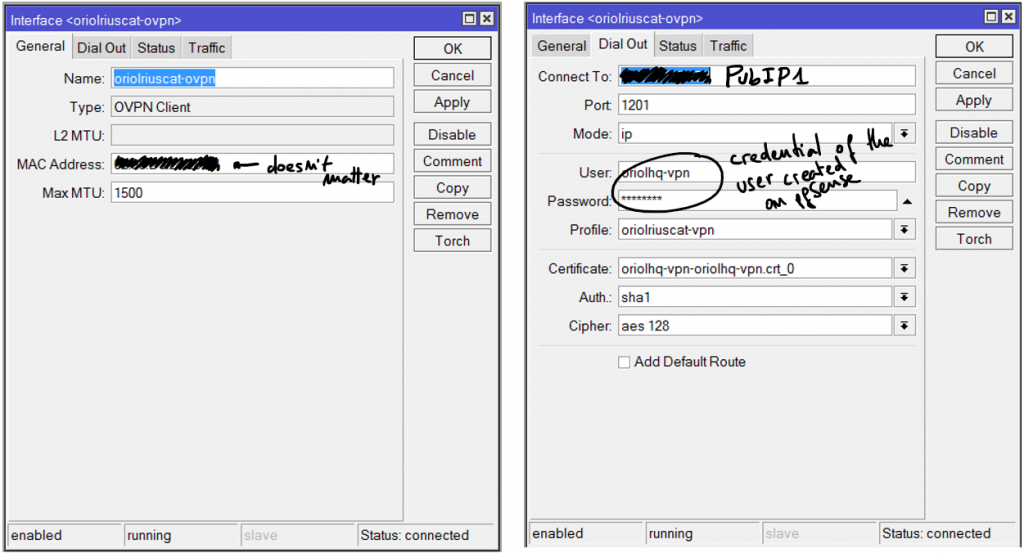
Add an OVPN Client connection using the “+” button, the parameters for that connection are:

ppp-interface


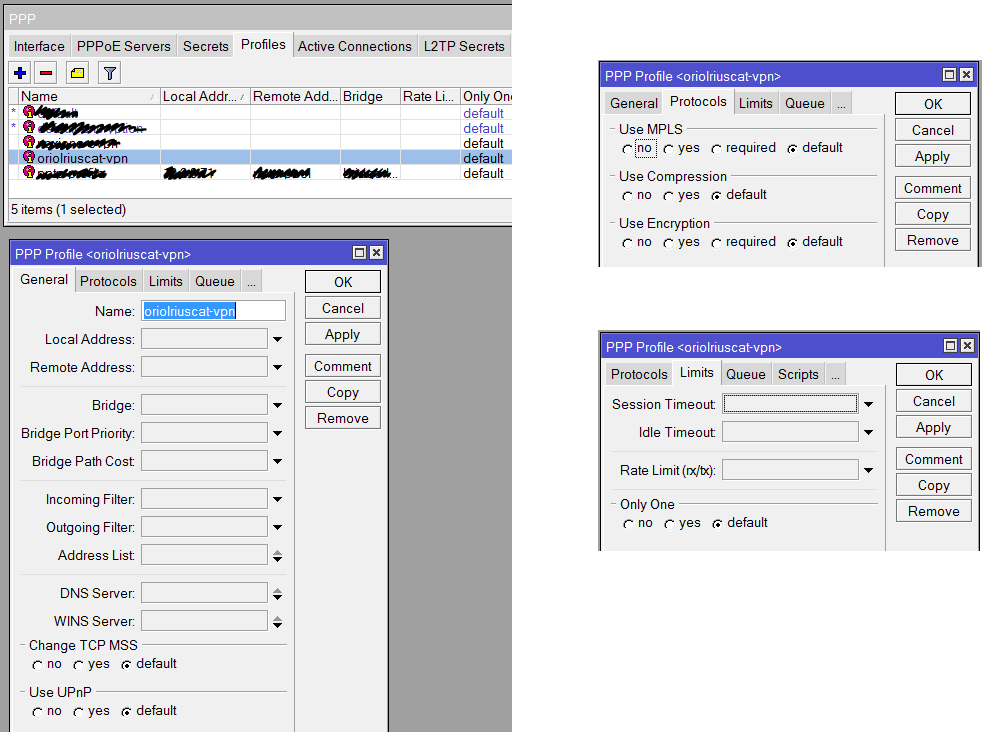
Another required thing to define on “PPP” is the profile, click on the tab “Profile” and using the button with symbol “+” create a new profile like that:

ppp-profile


Everything is ready, now it’s time to check if the connection is OK. First go to the OVPN client on Mikrotik, remember this is on “PPP” menu option and inside tab “Interfaces”. Clicking on the interface you’ll see the status details. If it’s disconnect going to pfSense or Mikrotik logs you can see the negotiation details.

Remember usually the problem is with your certificates, but first of all you have to ensure that the negotiation tries to start.

Enjoy it and good luck.


Sniffing on Mikrotik and streaming in real-time to Wireshark

Reading time: 2 – 2 minutes

When you have a Mikrotik in any point of your network and you want to launch a sniffer for debugging or troubleshooting, a part from original RouterOS tools, you can stream captured traffic in real-time to Wireshark and inspect packets there.

The idea is exactly the same like I explained on the entry: Sniffing traffic in a Linux box and streaming in real-time to Wireshark on Windows.

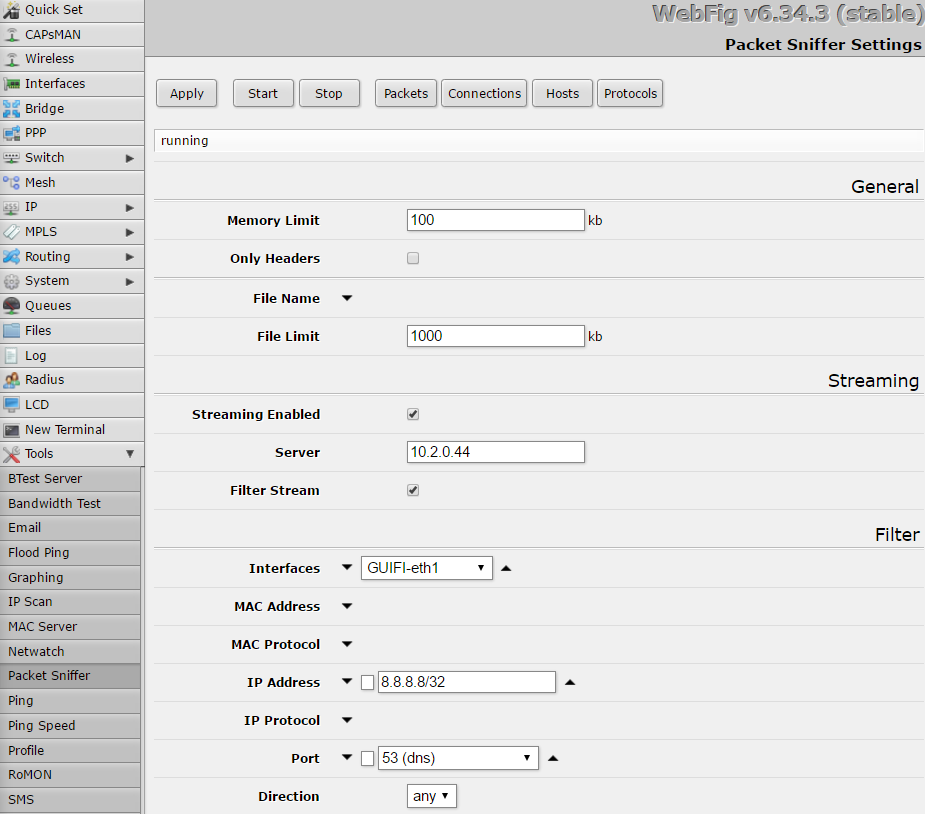
Mikrotik configuration using the web interface is like that:

mikrotik-config

We assume 10.2.0.44 is the IP address of the Wireshark box, ensure that you don’t block UDP traffic on port 37008 because the stream from Mikrotik uses that target port. And define your own filters.

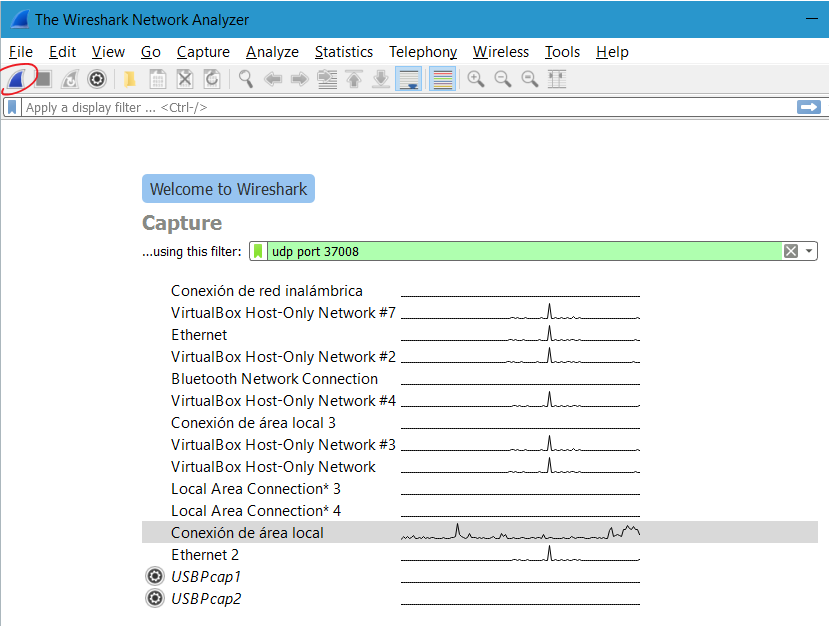
About Wireshark configuration is really simple, just set up the filter to allow only traffic from sniffing stream and select the network interface where traffic comes.

wireshark-config

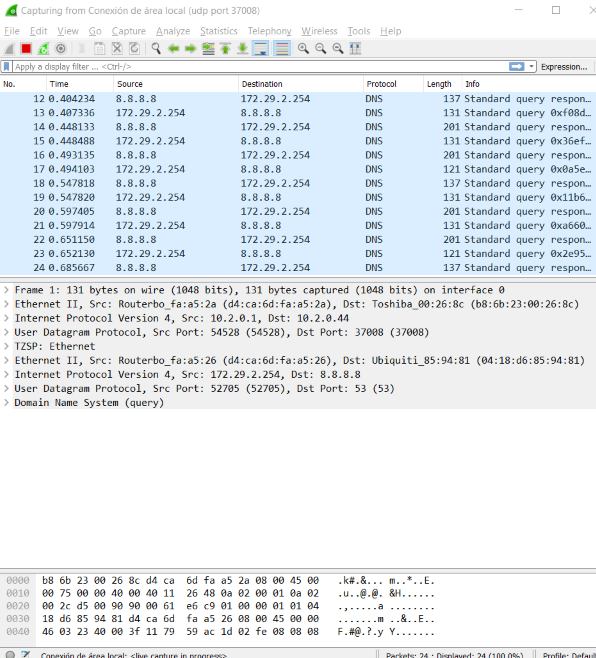
Previous captures allow us to debug DNS queries to Google DNS service, this is the result when you click to the icon marked with a red circle on previous screen capture.

wireshark-traffic

Mikrotik as a PPTP server for Android

Reading time: 4 – 6 minutes

Two years ago I installed a Mikrotik Cloud Switch and lately I stoped my pfSense and I started using that switch as my network router, firewall and also as a switch. RouterOS is really powerful and allows to do a lot of things with that hardware. One of those things is set-up a VPN server based on PPTP. This is not the most secure way to create VPNs but usually the only requirement is a little bit of security on top of an IP over IP service that allows us to use local service when we’re in remote. In my case I have a lot of services in my LAN and I need some of them when I’m out of home specially I need to use them from my mobile phone.

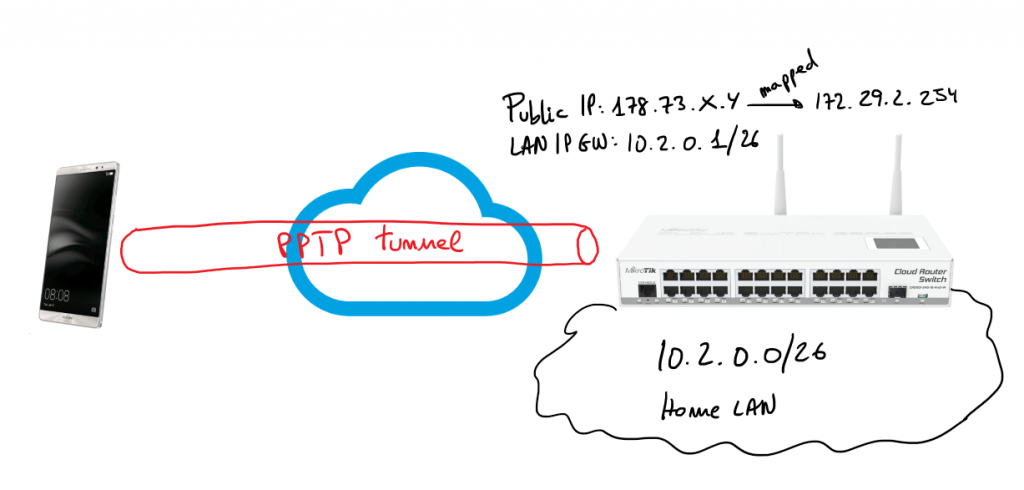
Next steps describe how I set-up a PPTP server on my Mikrotik server allowing my Android 6 device (Huawei Mate 8) to connect to my home services through the VPN. Bellow you have a simple schema representing the schenario of the solution:

architecture

I’m only going to describe steps from the web console, of course, all those steps can be done using Winbox or the command line. To be honest I’m not used to RouterOS CLI but I think it’s not difficult to figure out the CLI commands to get the same result.

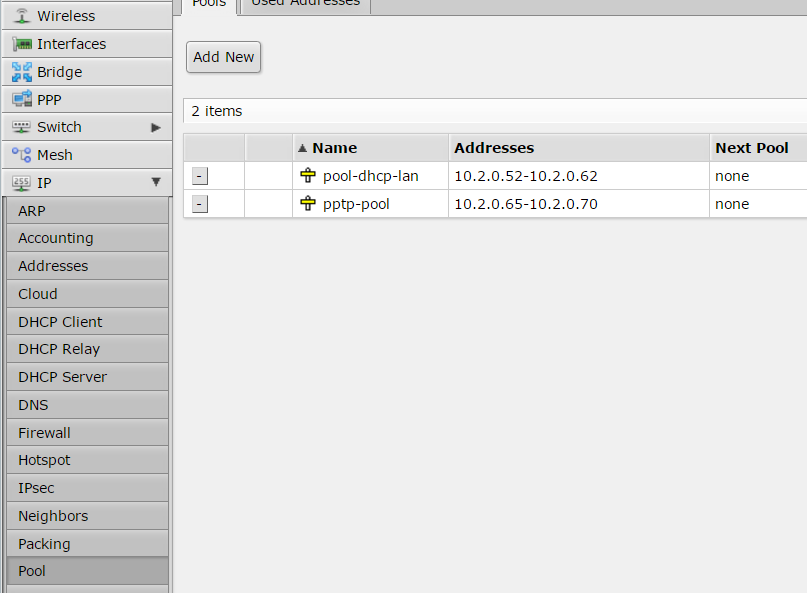
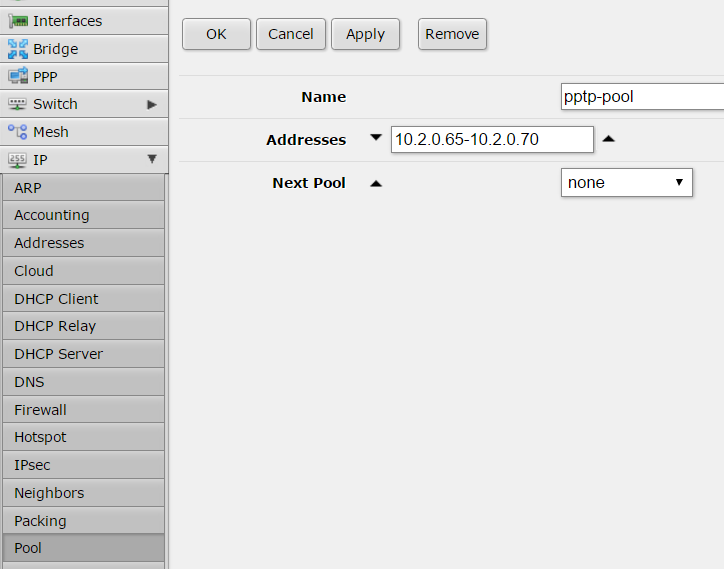
First step is set-up a pool of IP addresses to be assigned to the tunnel endpoints.

01-ip-pool

02-ip-pool

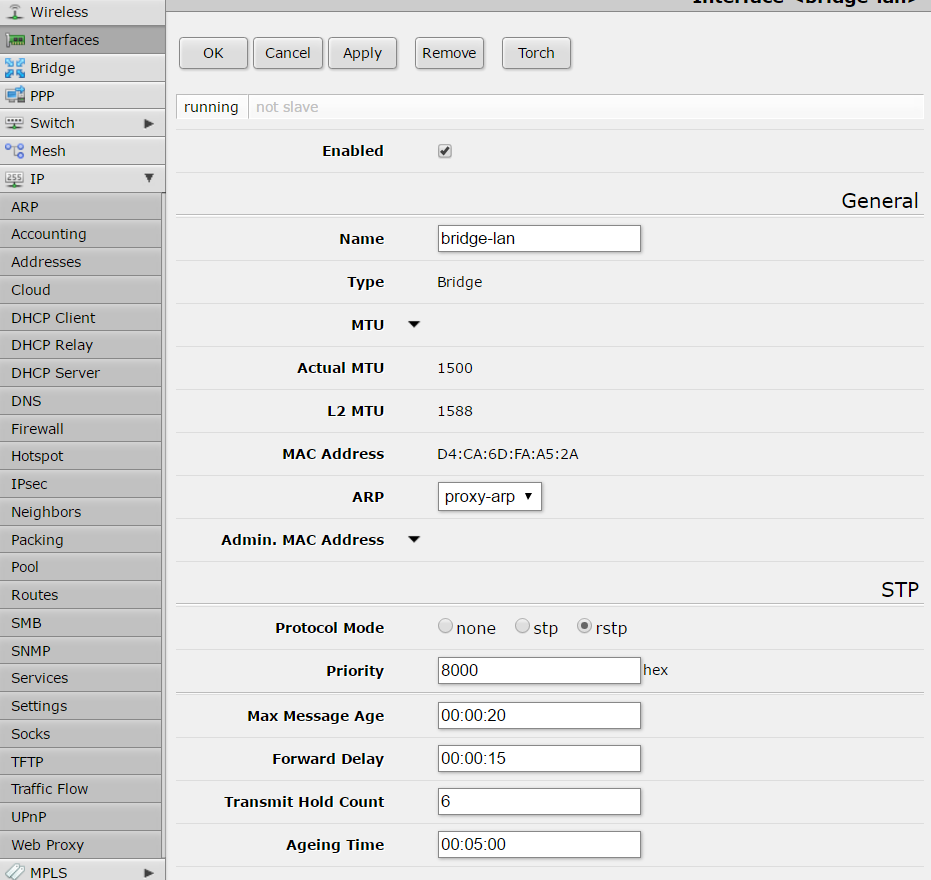
Thanks to an ARP proxy those IP addresses will be available like local IPs, this is transparent for the VPN configuration.

00-arp-proxy

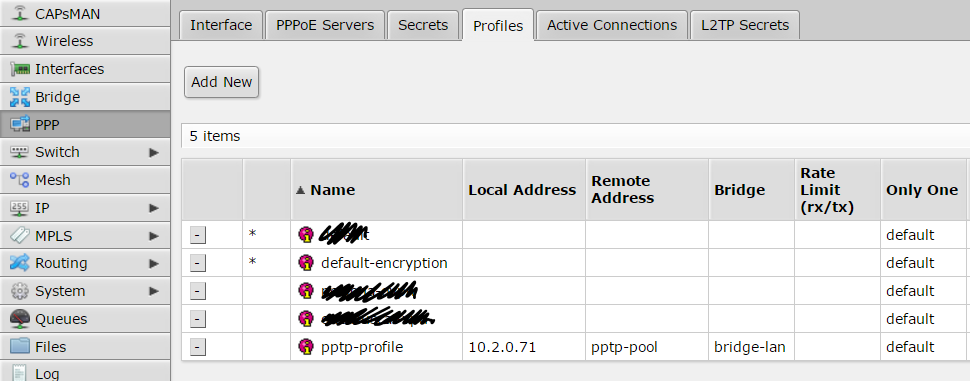
configuration of connection profile is done inside “Profiles” tab:

05-profiles

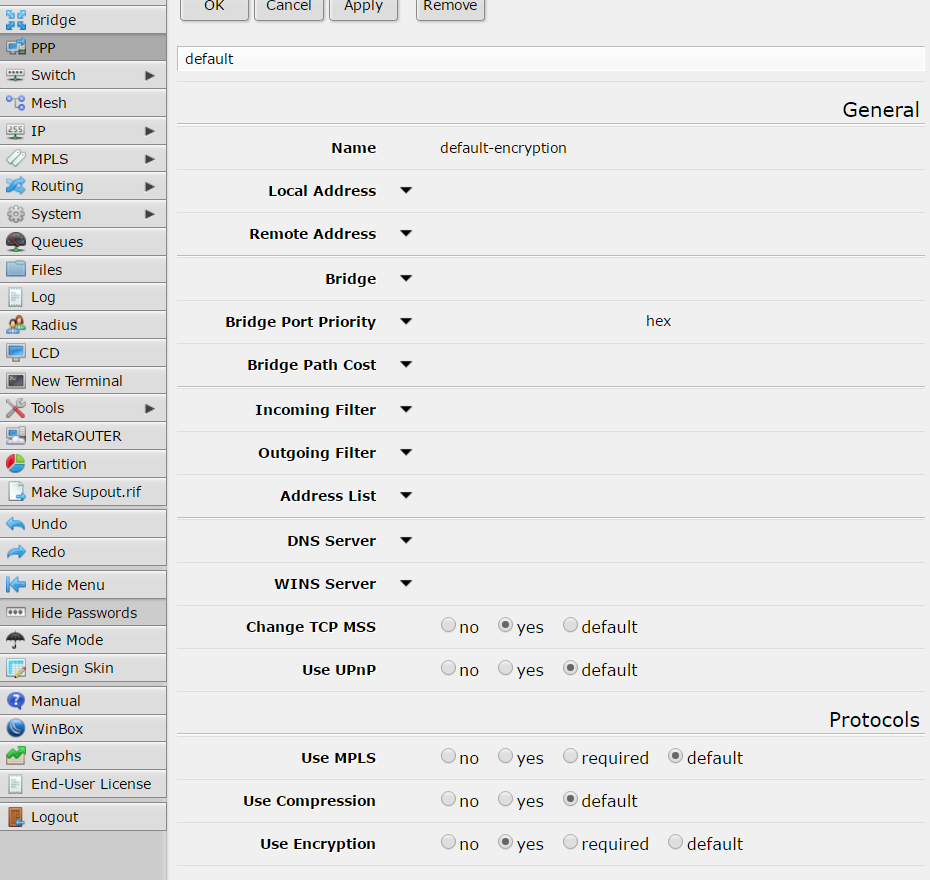
first of all create a new profile called “default-encription”:

061-profiles

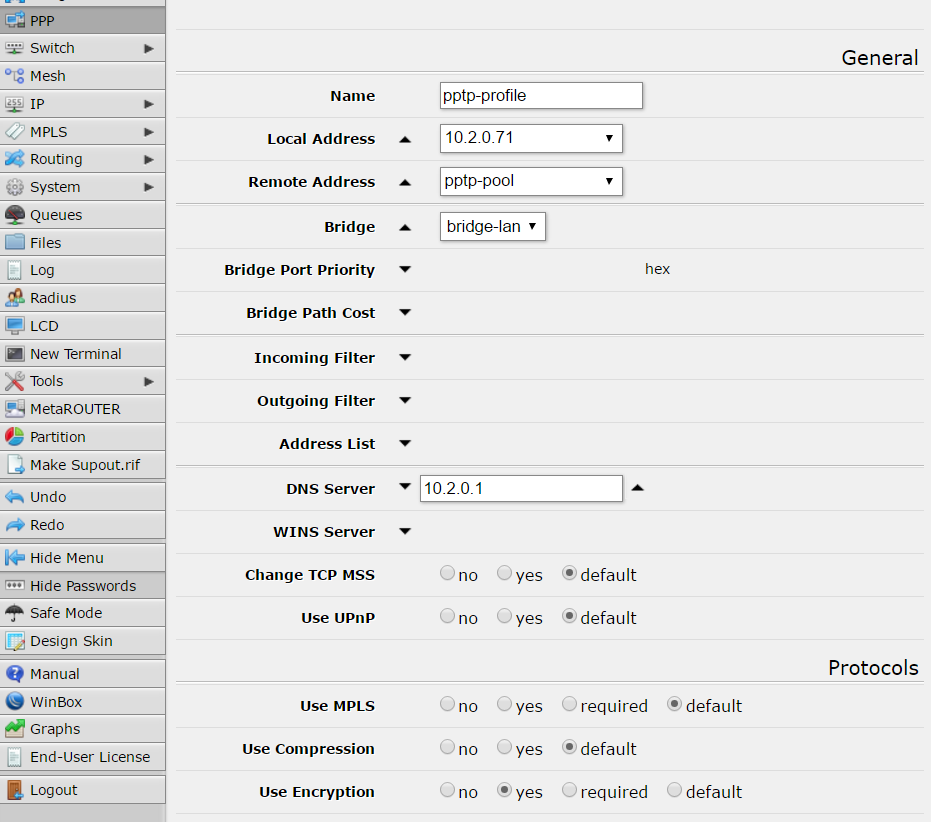
and another profile called “pptp-profile”:

06-profiles

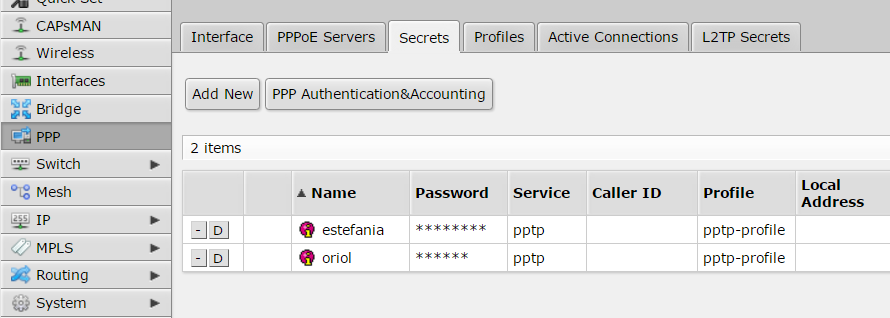
“Secrets” tab is where you have to manage users, in my case only two users are created:

07-secrets

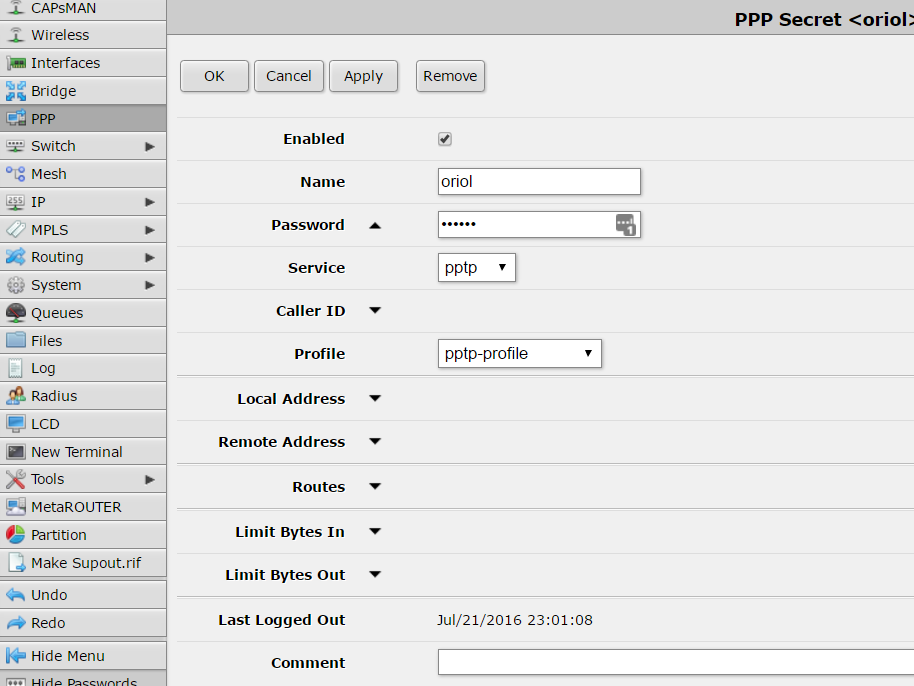
configuration details about my user are:

08-secrets

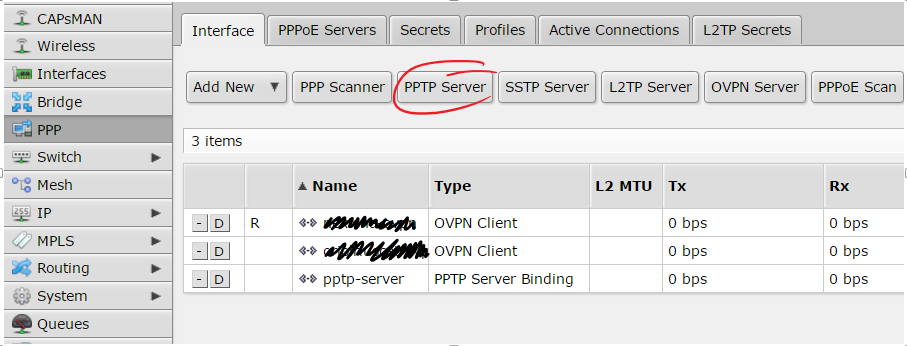
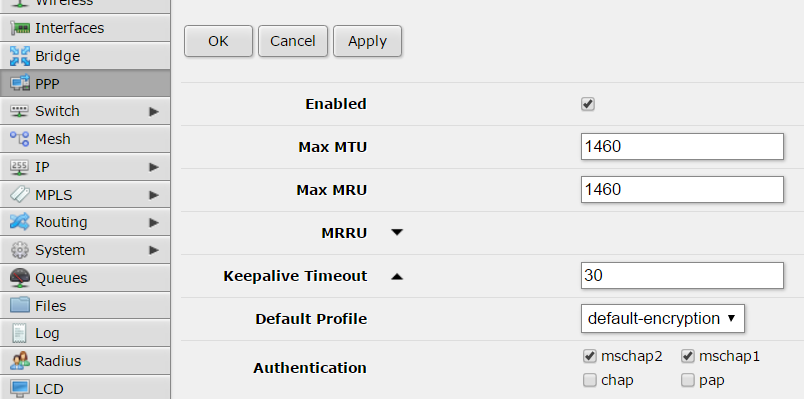
Inside PPP menu there is a button with a label “PPTP server” click there…

03-pptp-server

… and copy next settings:

04-pptp-server

Don’t forget to check that your PPTP port is accessible from your public IP address. Remember it’s 1723/TCP.

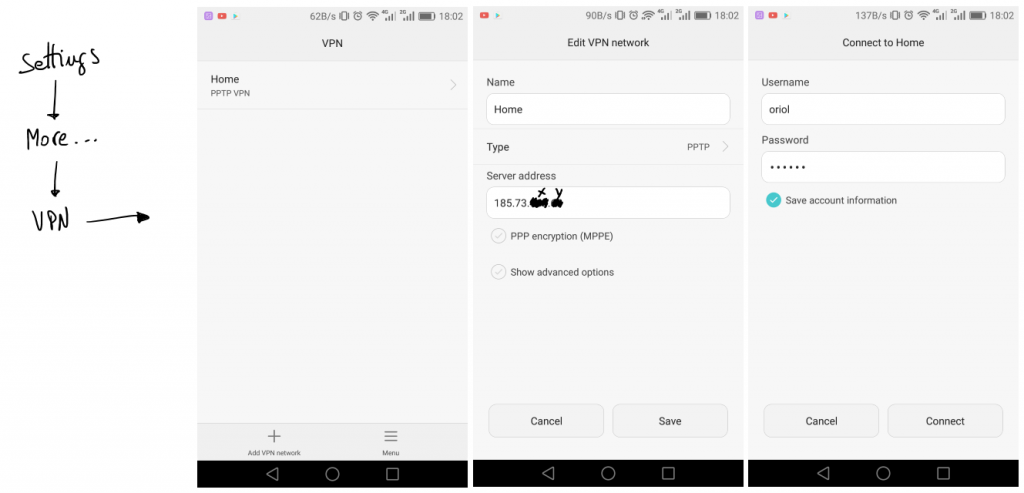
Android configuration is simple, first of all go to “settings” icon. Look for a “More” section bellow network options, and you’ll find VPN managment. Add a new connection, define a name, the type and the IP address and leave the rest by default. After that when you come back to VPN list you’ll find your new VPN in the list, click there and just set-up your PPTP credentials.

android

If you have some trouble the only thing that you can do is go to Mikrotik logs or start sniffing to figure out where is the problem. I had to do some tests before it was working but in the end everything was so simple like I explained here.

Good luck and enjoy it.

Thanks to next blog entries to inspire me:


Conferència Summer Camp Garrotxa 2015: SmartHome usant Arduino, Raspberry PI i més

Reading time: 1 – 2 minutes

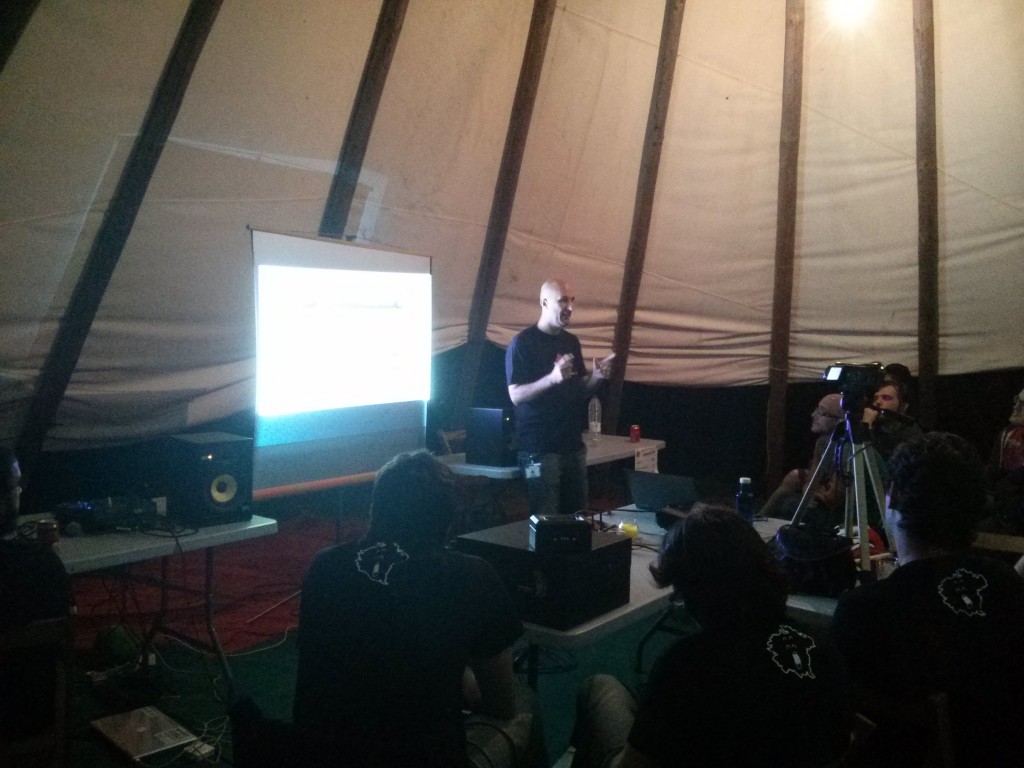
Aquest cap de setmana vaig tornar a donar la meva conferència sobre “SmartHome” en aquesta ocasió vaig introduïr la novetat del sistema de feedback basat en “Tasker + Auto-notification”, a més de l’execusió de tasques basades en “crontab”. També he inclòs un petit avanç sobre el nou projecte en el que estic treballant per tal d’integrar les dades del descalcificador dins del OpenHAB usant una webcam i OpenCV per processar les imatges optingudes.

Agraïr al Xavi, Gerardo i la Laura per haver-me donat aquesta oportunitat. Tant el SCG15 com el SAX2015 són events molt familiars a més l’entorn és espectacular. Tot un descobriment del que malgrat tenir referències no havia pogut disfrutar en primera persona.

scg2015

Free dynamic DNS service

Reading time: < 1 minute A long time ago there were several free dynamic DNS services but nowadays it's difficult to find one of them. And when you find the service usually you have some important restrictions like: number of updates per day or only few subdomains per account. But in the end I found a good free service of that, it's part of the project guifi.net and is called: Qui; you only need a guifi.net account to use the service and it’s really simple and clear. From my part the compatibility with “ddclient” and the “mikrotik” script are really useful and I want tu highlight this functionality.

Conference: SmartHome using Arduino, Raspberry PI and more

Reading time: 1 – 2 minutes

I did this conference twice but this time it’s in English as I said before in Catalan, this is how I’m getting real a childhood dream. Thanks to open hardware like Arduino and Raspberry PI and open source software like OpenHab I have a smarthome with several automations. Last Thursday I spoke in “IoT Barcelona meetup” sharing my personal experience automating my house.

If you lost it and you want to watch the presentation video is here:

and the presentations slides are here:

Conferència: SmartHome usant Arduino, Raspberry PI i més

Reading time: 1 – 2 minutes

El dia 12 de febrer al vespre vaig fer una conferència a la FIB (Facultat d’Informàtica de Barcelona) dins de la UPC (Universitat Politècnica de Catalunya). En aquesta xerra vaig estar explicant com vaig convertint en realitat un somni que vaig tenir quan era petit, estic parlant de domotitzar la casa. Gràcies a enginys com l’Arduino i la Raspberry PI a més d’aplicacions com l’OpenHab podem fer assequible allò que si anem a grans marques comercials es fa caríssim pel meu pressupost.

En aquest enllaç podeu trobar les transparències de:  SmartHome usant Arduino Raspberry i més i el video el teniu disponible al servidor de la FIB.

Ara també teniu disponible el video a youtube:

i podeu veure les transparències des d’aquest mateix post:

Espero els vostres feedbacks als comentaris, desitjo que ús sigui útil.

Conferència al Tecnocampus: Internet of Things (IoT) low cost

Reading time: 1 – 2 minutes

Després d’arribar corrent de Cardiff on era aquest dilluns el dimarts vaig arribar a temps per fer la presentació “Internet of Things low cost” als companys del Tecnocampus de Mataró; per cert, unes intal·lacions brutals res a veure amb la EUPMT on vaig estudiar jo fa una colla d’anys. Jo encara diria més, molt millor que no pas la gran Universitat de Cardiff on vaig ser el dilluns.

Pel que fa a la xerrada agraïr a tothom que hi va assistir, a continuació adjunto les transparències pels que vareu ser-hi i pels que no.

Properament pujaré el video, o la part, del video que es va poder gravar. El problema és que són diversos gigues i he de deixar l’ordinador renderitzant cosa que encara no he pogut fer.

El video no conté tota la presentació però té una part important del contingut, així que desitjo que ús sigui útil:

Per cert, una gran part de la presentació esta reciclada de la conferència: Conferència: La revolució dels mini-PC: Raspberry PI, Arduino i més