Packaging Python applications into standalone executables can simplify deployment and distribution, especially when dealing with users who may not have Python installed or when aiming for a seamless installation experience. Three prominent tools in this space are PEX, PyOxidizer, and PyInstaller. In this post, we’ll explore each of these tools, highlighting their features, how they work, and their pros and cons to help you decide which one suits your needs.
PEX stands for Python EXecutable. It creates self-contained executable Python environments that are runnable on other machines without requiring a Python interpreter or additional dependencies.
Features
Self-contained Executables: Packages all dependencies into a single file.
Virtual Environment Management: Manages dependencies in an isolated environment.
Support for Multiple Python Versions: Can target different Python versions.
Reproducible Builds: Ensures consistent builds across different environments.
How It Works
PEX files are ZIP files with a special header that makes them executable. When you run a PEX file, it sets up an isolated environment and executes your application within it. Dependencies are resolved and bundled at build time, ensuring that the executable has everything it needs to run.
Pros and Cons
Pros:
Ease of Use: Straightforward command-line interface.
Isolation: Avoids conflicts with system-installed packages.
PyOxidizer is a tool that produces distributable binaries from Python applications. It embeds the Python interpreter and your application into a single executable file.
Features
Single Executable Output: Creates a single binary without external dependencies.
Embedded Python Interpreter: Bundles a Rust-based Python interpreter.
Cross-Compilation: Supports building executables for different platforms.
Performance Optimization: Optimizes startup time and reduces runtime overhead.
How It Works
PyOxidizer uses Rust to compile your Python application into a binary. It embeds the Python interpreter and compiles your Python code into bytecode, which is then included in the binary. This approach results in a single executable that can be distributed without requiring a separate Python installation.
Pros and Cons
Pros:
No Runtime Dependencies: Users don’t need Python installed.
Cross-Platform Support: Can build executables for Windows, macOS, and Linux.
Optimized Performance: Faster startup times compared to other tools.
Cons:
Complex Configuration: Requires understanding of Rust and PyOxidizer’s configuration.
Relatively New Tool: May have less community support and fewer resources.
PyInstaller bundles a Python application and all its dependencies into a single package, which can be a directory or a standalone executable.
Features
Multi-Platform Support: Works on Windows, macOS, and Linux.
Customizable Builds: Allows inclusion or exclusion of files and dependencies.
Support for Various Libraries: Handles complex dependencies like NumPy, PyQt, etc.
One-Folder and One-File Modes: Choose between a directory of files or a single executable.
How It Works
PyInstaller analyzes your Python script to discover every other module and library your script needs to run. It then collects copies of all those files—including the active Python interpreter—and packs them into a single executable or a folder.
Pros and Cons
Pros:
Ease of Use: Simple command-line usage.
Wide Compatibility: Supports many third-party packages.
Flexible Output Options: Choose between single-file or directory output.
Cons:
Executable Size: Can produce large files.
Hidden Imports: May miss some dependencies, requiring manual specification.
Comparison
Feature
PEX
PyOxidizer
PyInstaller
Single Executable
Yes (but requires Python)
Yes
Yes
No Python Required
No
Yes
Yes
Cross-Platform
Yes (build on target OS)
Yes (cross-compilation)
Yes (build on target OS)
Ease of Use
Moderate
Complex
Easy
Executable Size
Large
Smaller
Large
Configuration
Flexible
Requires Rust knowledge
Simple
Community Support
Active
Growing
Extensive
GitHub Activity
Actively maintained
Unmaintained
Actively maintained
Conclusion
Choosing the right tool depends on your specific needs and the assurance of ongoing support:
Use PEX if you need a self-contained environment for systems where Python is available. Its active maintenance ensures that you can rely on timely updates and community support.
Use PyOxidizer if you prefer a single executable without runtime dependencies and are comfortable with Rust. Its growing GitHub activity signifies a promising future and dedicated maintenance.
Use PyInstaller if you value simplicity and extensive community support. Its active maintenance status means you can expect regular updates and a wealth of community resources.
In this blog post, we’ll explore how to use Docker and the lightweight HTTP server, Darkhttpd, to serve static files. This setup is particularly useful when you need a simple web server for sharing files or hosting a static website. We’ll also discuss how to use a reverse proxy like Traefik to route external traffic to the Darkhttpd service.
Docker Compose Configuration
Below is the docker-compose.yml file that defines the Darkhttpd service:
The image field specifies the Docker image to use for the service.
The container_name field sets the name of the container.
The restart field configures the restart policy for the container.
The volumes field defines the volume mounts for the service.
The entrypoint field overrides the default entrypoint of the image.
The networks field specifies the networks that the service is connected to.
Setting Up the Service
Create a directory named site in the same directory as the docker-compose.yml file. Place the static files you want to serve in this directory.
Replace your_network, your_ipv4_address, and your_network_name in the docker-compose.yml file with the appropriate values for your setup.
Run the following command to start the Darkhttpd service:
docker-compose up -d
Access the static files by navigating to the IP address specified in the docker-compose.yml file.
Using a Reverse Proxy
To route external traffic to the Darkhttpd service, you can use a reverse proxy like Traefik. Configure the reverse proxy to forward requests to the IP address specified in the docker-compose.yml file.
Conclusion
Using Docker and Darkhttpd to serve static files is a simple and efficient solution for sharing files or hosting a static website. By adding a reverse proxy, you can easily route external traffic to the Darkhttpd service. This setup is ideal for scenarios where you need a lightweight web server without the overhead of a full-fledged web server like Apache or Nginx.
Reading time: < 1 minute
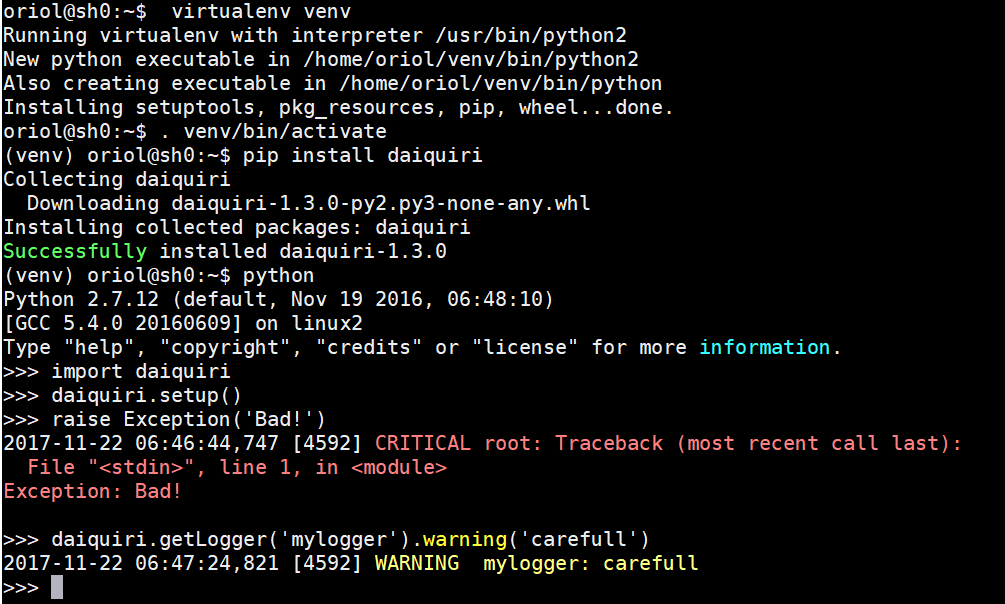
Python logging library is really flexible and powerful but usually, you need some time for setting up the basics or just for logging in a simple script, some commands and settings have to be done. Daiquiri is a library which wrapper python logging library and offers a simple interface for start enjoying logging features in python. Next, there is a hello world example extracted from Daiquiri documentation which shows how easy it gets nice output from the console when you're programming simple scripts.
Reading time: < 1 minute
The steps that explain how to install Homie libraries and its dependencies on the official documentation are a little bit tricky and some of you asked me about how I did it. So I decided to record a clip explaining the steps:
Please tell if it was useful for you, and thanks for your interest.
Firstly let me introduce a Windows service called: “Windows Remote Manager” or “WinRM”. This is the Windows feature that allows remote control of Windows machines and many other remote functionalities. In my case I have a Windows 7 laptop with SP1 and PowerShell v3 installed.
Secondly don’t forget that Ansible is developed using Python then a Python library have to manage the WinRM protocol. I’m talking about “pywinrm“. Using this library it’s easy to create simple scripts like that:
In the end it’s time to talk about how to create an Ansible Playbook to deploy anything in a Windows machine. As always the first thing that we need is a hosts file. In the next example there are several ansible variables needed to run Ansible Windows modules on WinRM, all of them are self-explanatory:
[all]10.2.0.42
[all:vars]
ansible_ssh_user=the_username
ansible_ssh_pass=the_password
ansible_ssh_port=5985 #winrm (non-ssl) port
ansible_connection=winrm
The first basic example could be a simple playbook that runs the ‘ipconfig’ command and registers the output in an Ansible variable to be showed later like a debug information:
- name: test raw module
  hosts: all
  tasks:
    - name: run ipconfig
      raw: ipconfig
      register: ipconfig
    - debug: var=ipconfig
As always Ansible have several modules, not only the ‘raw’ module. I committed two examples in my Github account using a module to download URLs and another one that runs Powershell scripts.
My examples are done using Ansible 1.8.2 installed in a Fedora 20. But main problems I’ve found are configuring Windows 7 to accept WinRM connections. Next I attach some references that helped me a lot:
Ansible is a very powerful tool. Using playbooks, something like a cookbook, is very easy to automate maintenance tasks of systems. I used Puppet and other tools like that but IMHO Ansible is the best one.
In some cases you need to manage dynamic systems and take into advantage of Ansible like a Python library is a very good complement for your scripts. This is my last requirement and because of that I decided to share some simple Python snippets that help you to understand how to use Ansible as a Python library.
Firstly an example about how to call an Ansible module with just one host in the inventory (test_modules.py):
#!/usr/bin/python import ansible.runnerimport ansible.playbookimport ansible.inventoryfrom ansible import callbacksfrom ansible import utilsimport json# the fastest way to set up the inventory# hosts listhosts = ["10.11.12.66"]# set up the inventory, if no group is defined then 'all' group is used by defaultexample_inventory = ansible.inventory.Inventory(hosts)pm = ansible.runner.Runner( module_name = 'command', module_args = 'uname -a', timeout = 5, inventory = example_inventory, subset = 'all' # name of the hosts group )out = pm.run()print json.dumps(out, sort_keys=True, indent=4, separators=(',', ': '))
As a second example, we’re going to use a simple Ansible Playbook with that code (test.yml):
- hosts: sample_group_name
  tasks:
    - name: just an uname
      command: uname -a
The Python code which uses that playbook is (test_playbook.py):
#!/usr/bin/python import ansible.runnerimport ansible.playbookimport ansible.inventoryfrom ansible import callbacksfrom ansible import utilsimport json### setting up the inventory## first of all, set up a host (or more)example_host = ansible.inventory.host.Host( name = '10.11.12.66', port = 22 )# with its variables to modify the playbookexample_host.set_variable( 'var', 'foo')## secondly set up the group where the host(s) has to be addedexample_group = ansible.inventory.group.Group( name = 'sample_group_name' )example_group.add_host(example_host)## the last step is set up the invetory itselfexample_inventory = ansible.inventory.Inventory()example_inventory.add_group(example_group)example_inventory.subset('sample_group_name')# setting callbacksstats = callbacks.AggregateStats()playbook_cb = callbacks.PlaybookCallbacks(verbose=utils.VERBOSITY)runner_cb = callbacks.PlaybookRunnerCallbacks(stats, verbose=utils.VERBOSITY)# creating the playbook instance to run, based on "test.yml" filepb = ansible.playbook.PlayBook( playbook = "test.yml", stats = stats, callbacks = playbook_cb, runner_callbacks = runner_cb, inventory = example_inventory, check=True )# running the playbookpr = pb.run() # print the summary of results for each hostprint json.dumps(pr, sort_keys=True, indent=4, separators=(',', ': '))
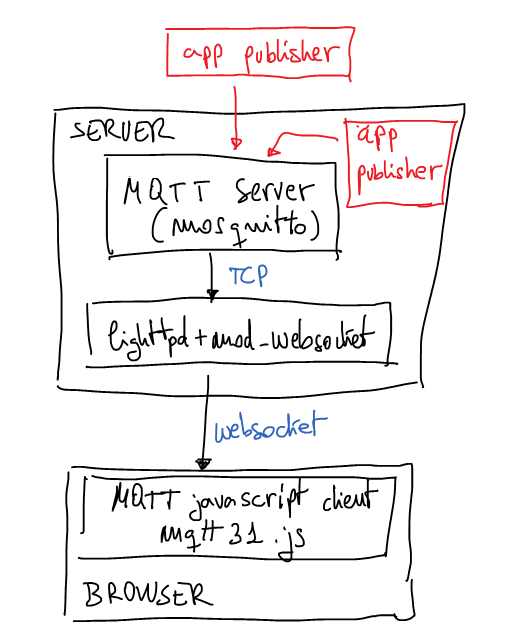
Nowadays last version of browsers support websockets and it’s a good a idea to use them to connect to server a permanent channel and receive push notifications from server. In this case I’m going to use Mosquitto (MQTT) server behind lighttpd with mod_websocket as notifications server. Mosquitto is a lightweight MQTT server programmed in C and very easy to set up. The best advantage to use MQTT is the possibility to create publish/subscriber queues and it’s very useful when you want to have more than one notification channel. As is usual in pub/sub services we can subscribe the client to a well-defined topic or we can use a pattern to subscribe to more than one topic. If you’re not familiarized with MQTT now it’s the best moment to read a little bit about because that interesting protocol. It’s not the purpose of this post to explain MQTT basics.
A few weeks ago I set up the next architecture just for testing that idea:
weboscket gateway to mosquitto mqtt server with javascrit mqtt client
The browser
Now it’s time to explain this proof of concept. HTML page will contain a simple Javascript code which calls mqttws31.js library from Paho. This Javascript code will connect to the server using secure websockets. It doesn’t have any other security measure for a while may be in next posts I’ll explain some interesting ideas to authenticate the websocket. At the end of the post you can download all source code and configuration files. But now it’s time to understand the most important parts of the client code.
Last part is very simple, the client connects to the server and links some callbacks to defined functions. Pay attention to ‘useSSL’ connect option is used to force SSL connection with the server.
There are two specially interesting functions linked to callbacks, the first one is:
function onConnect() { client.subscribe("/news/+/sport", {qos:1,onSuccess:onSubscribe,onFailure:onSubscribeFailure});}
As you can imagine this callback will be called when the connections is established, when it happens the client subscribes to all channels called ‘/news/+/sports’, for example, ‘/news/europe/sports/’ or ‘/news/usa/sports/’, etc. We can also use, something like ‘/news/#’ and it will say we want to subscribe to all channels which starts with ‘/news/’. If only want to subscribe to one channel put the full name of the channel on that parameter. Next parameter are dictionary with quality of service which is going to use and links two more callbacks.
The second interesting function to understand is:
function onMessageArrived(message) { console.log("onMessageArrived:"+message.payloadString);};
It’s called when new message is received from the server and in this example, the message is printed in console with log method.
The server
I used an Ubuntu 12.04 server with next extra repositories:
After installation it’s very easy to run mosquitto in test mode, use a console for that and write the command: mosquitto, we have to see something like this:
# mosquitto1379873664: mosquitto version 1.2.1 (build date 2013-09-19 22:18:02+0000) starting1379873664: Using default config.1379873664: Opening ipv4 listen socket on port 1883.1379873664: Opening ipv6 listen socket on port 1883.
The configuration file for lighttpd in testing is:
Remember to change ‘ssl.pemfile’ for your real certificate file and ‘server.name’ for your real server name. Then restart the lighttpd and validate SSL configuration using something like:
openssl s_client -host ns.example.tld -port 443
You have to see SSL negotiation and then you can try to send HTTP commands, for example: “GET / HTTP/1.0” or something like this. Now the server is ready.
The Test
Now you have to load the HTML test page in your browser and validate how the connections is getting the server and then how the mosquitto console says how it receives the connection. Of course, you can modify the Javascript code to print more log information and follow how the client is connected to MQTT server and how it is subscribed to the topic pattern.
If you want to publish something in MQTT server we could use the CLI, with a command mosquitto_pub:
mosquitto_pub -h ns.example.tld -t '/news/europe/sport' -m 'this is the message about european sports'
Take a look in your browser Javascript consle you have to see how the client prints the message on it. If it fails, review the steps and debug each one to solve the problem. If you need help leave me a message. Of course, you can use many different ways to publish messages, for example, you could use python code to publish messages in MQTT server. In the same way you could subscribe not only browsers to topics, for example, you could subscribe a python code:
Pay attention to server port, it isn’t the ‘https’ port (443/tcp) because now the code is using a real MQTT client. The websocket gateway isn’t needed.
The files
mqtt.tar.gz – inside this tar.gz you can find all referenced files
Celery logs are colorized by default, the first big idea is disable color logs. It’s as easy as setting ‘CELERYD_LOG_COLOR’ to ‘False’ in ‘celery.conf’. The code could be something like this:
celery.conf.update('CELERYD_LOG_COLOR' = False)
Secondly we need a function where we set up a new handler and other settings to celery logging system. For example, the code could be:
from __future__ import absolute_importfrom logging import BASIC_FORMAT, Formatterfrom logging.handlers import SysLogHandlerfrom celery.log import redirect_stdouts_to_loggerdef setup_log(**args): # redirect stdout and stderr to logger redirect_stdouts_to_logger(args['logger']) # logs to local syslog hl = SysLogHandler('/dev/log') # setting log level hl.setLevel(args['loglevel']) # setting log format formatter = Formatter(BASIC_FORMAT) hl.setFormatter(formatter) # add new handler to logger args['logger'].addHandler(hl)
Pay attention to ‘redirect_stdouts_to_logger’ it’s used to send all outputs like print’s or something else to syslog.
Thirdly we want to use those settings in our celery tasks, then we have to connect ‘setup_log’ code to some celery signals. Those signals are launched when ‘task_logger’ and ‘logger’ are configured. To connect signals:
from celery.signals import after_setup_task_logger, after_setup_loggerafter_setup_logger.connect(setup_log)after_setup_task_logger.connect(setup_log)
Fourthly we have to get the ‘logger’, we can have more than one if we are interested in records with task context or without it. For example:
Finally we only have to use those loggers with common methods DEBUG, INFO, WARN, ERROR and CRITICAL:
@celery.taskdef the_task(): logger.info('this is a message without task context') logger_with_task_context.debug('this record will have the prefix "name_of_the_task_to_be_recorded_in_logs" in syslog')