Tag: security

OpenVPN between pfSense and Mikrotik

Reading time: 3 – 5 minutes

vpn-pfsense-mikrotik-schemaAssuming previous scenario I’m going to describe the required configurations on pfSense and Mikrotik. Certifcate creation is not part of the scope of this document, if you are not familiar about how to do that it’s a good idea to use the pfSense certificate manager to do it. My last advice is take care with certificates 90% of problems that I found in my life when I was working on VPNs are because of that. Take your time to check it before spend your time playing with other configurations.

In that scenario pfSense will play the role of the VPN server and Mikrotik will be the client, so I’m going to start describing pfSense configurations.

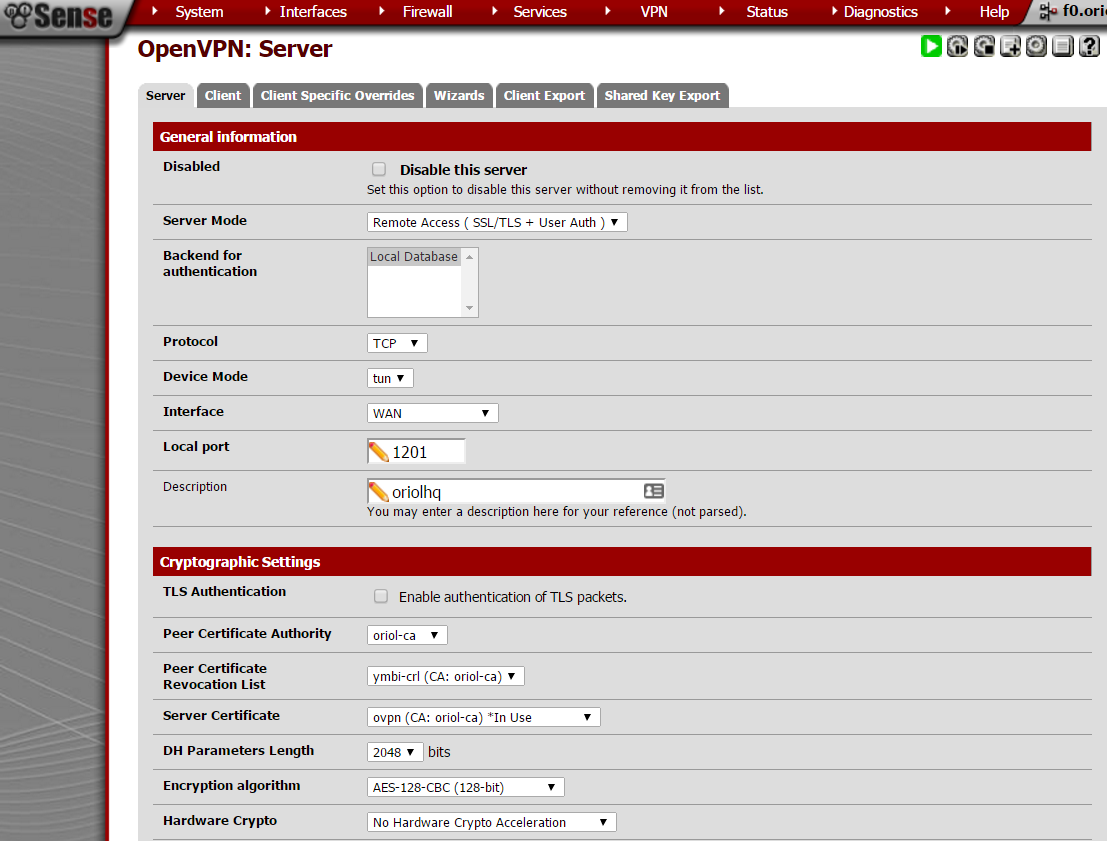
Create OpenVPN server on proper section:

pfsense-openvpn-server


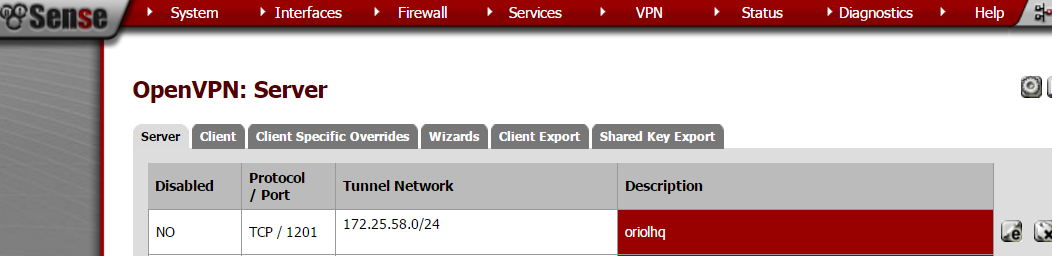
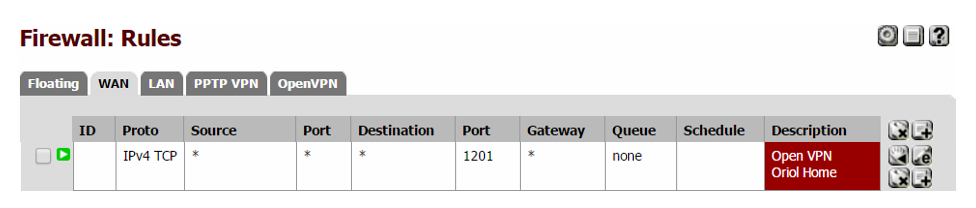
Important things to take in account when you set up the parameters are socket has to be a TCP socket in my case I decided to use port 1201:

pfsense-openvpn-server-config
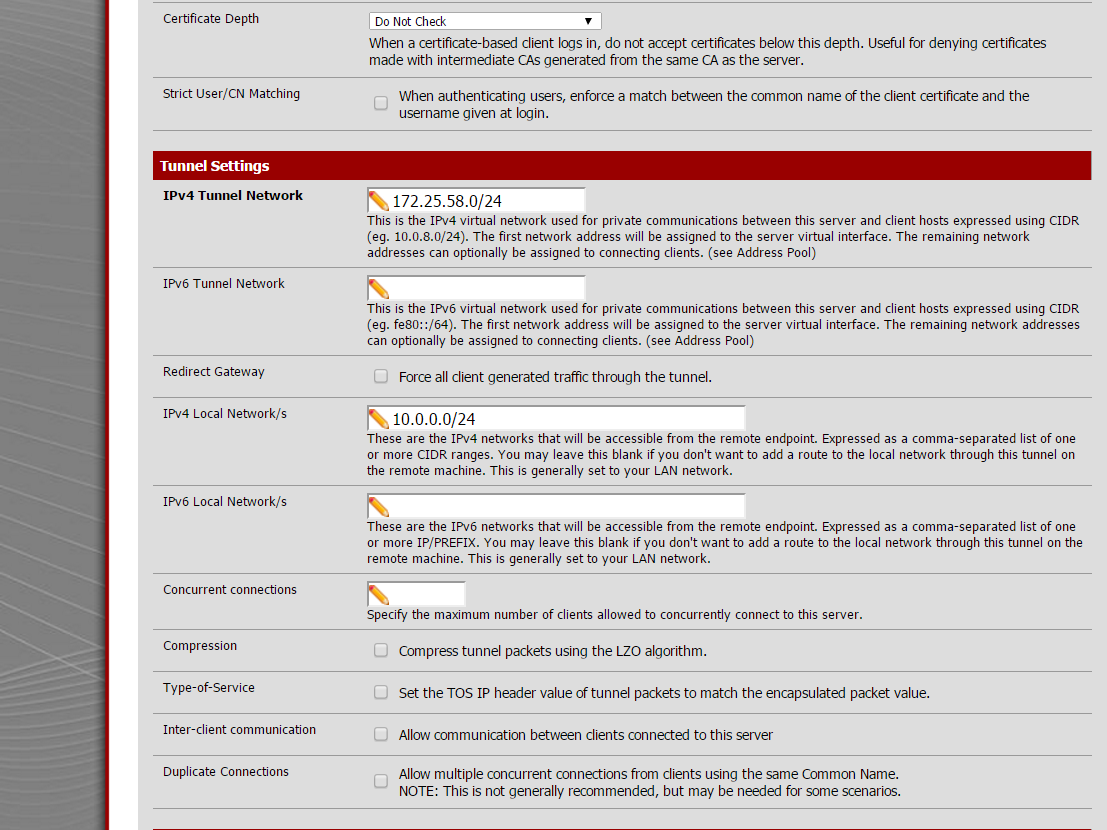
Next settings on the same place are about local network and tunnel IP addresses, this is required to create proper routing rules on the server and the client.

pfsense-openvpn-server-config2


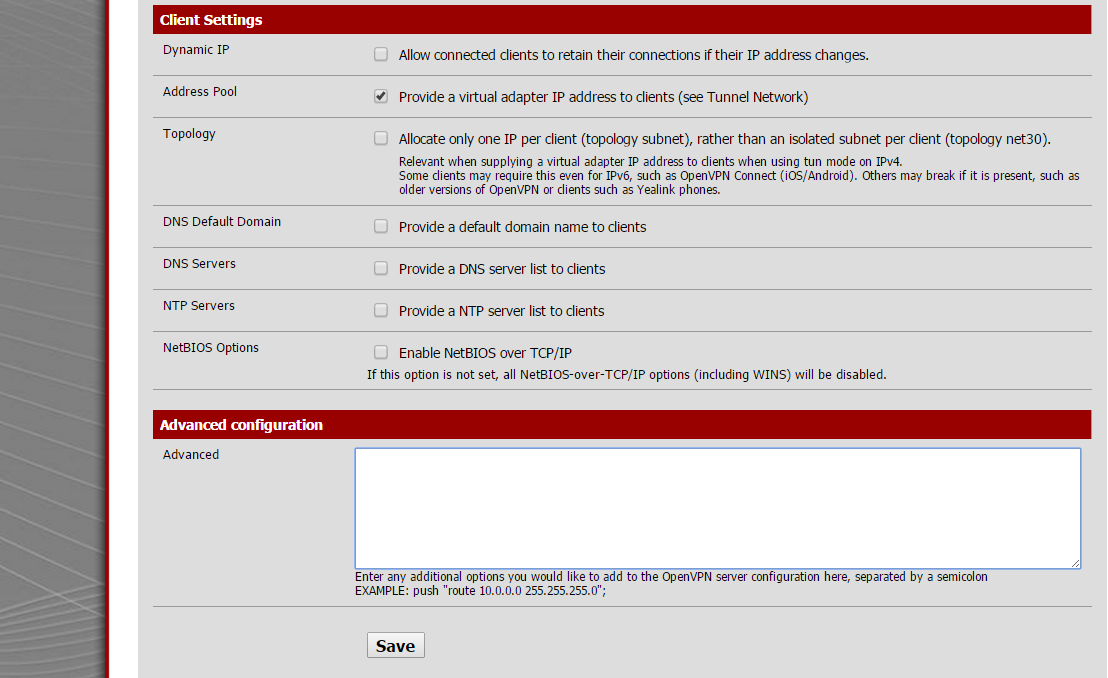
Last part to configure on this sections is extremly simple, only take care to unmark everything and check “address pool” setting.

pfsense-openvpn-server-config3


Remember to open that port on Firewall rules.

pfsense-firewall-rules


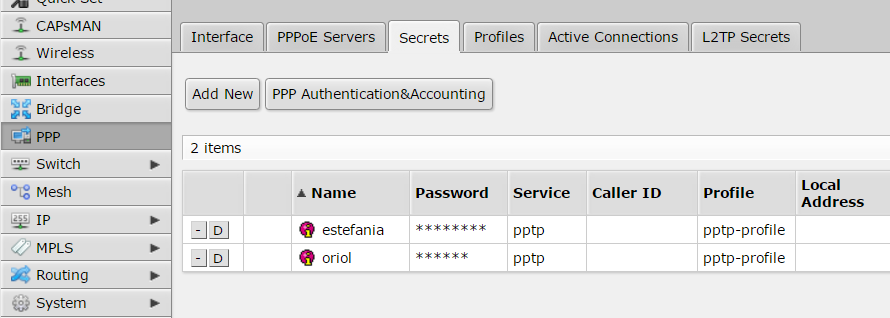
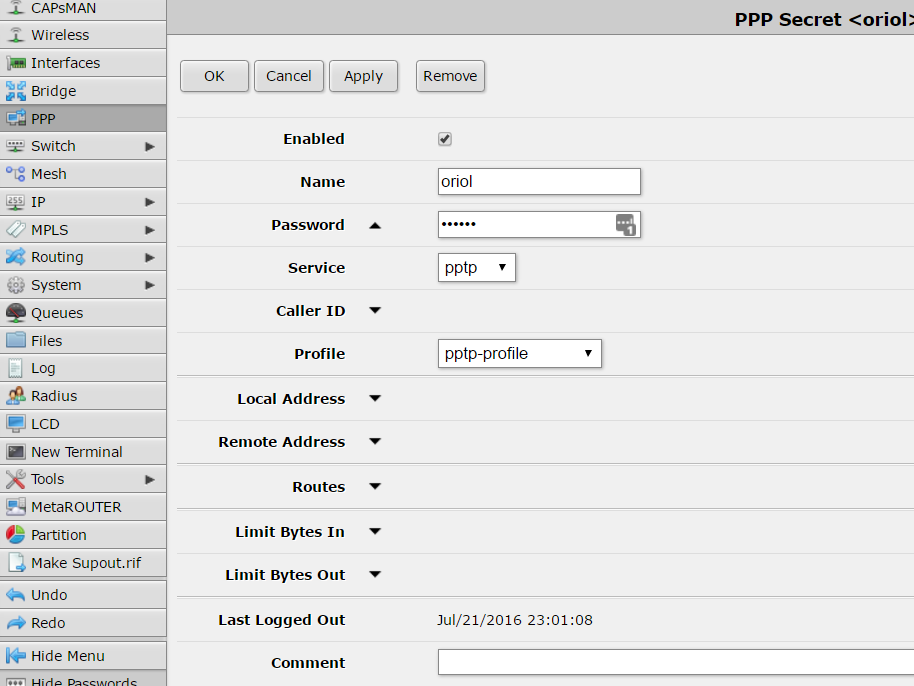
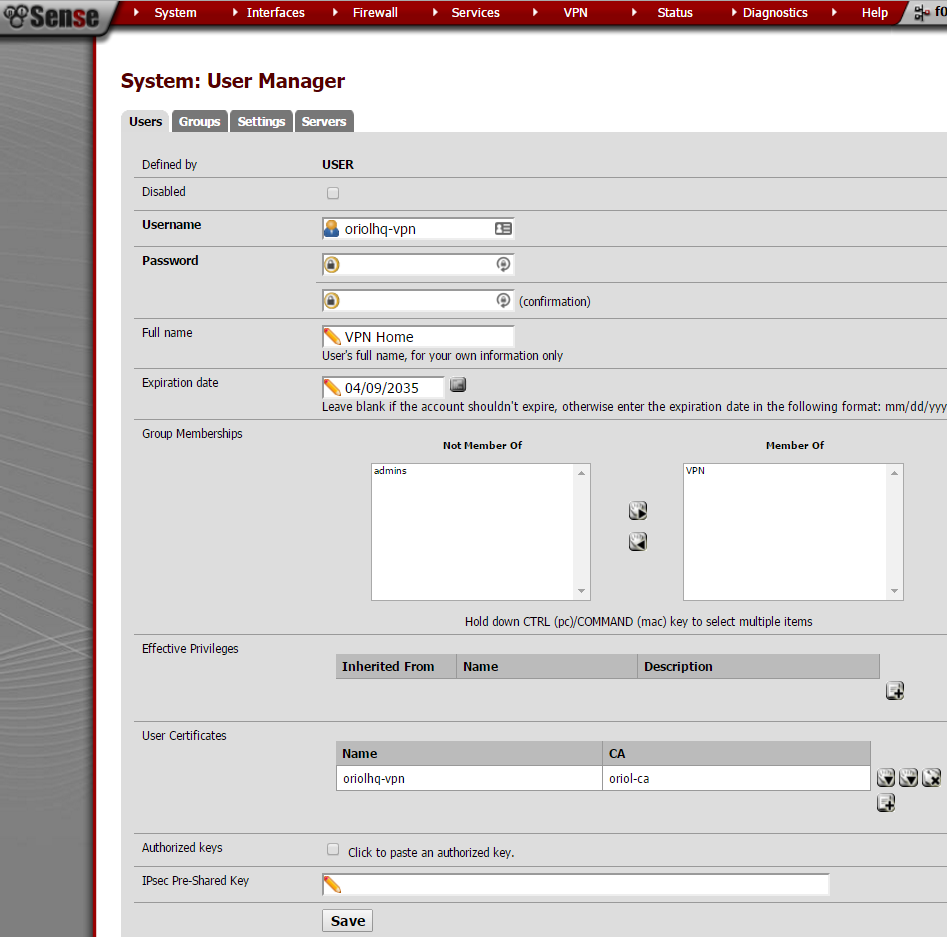
A VPN user is required to authenticate the process, just go to “User Management” inside the “System” menu:

pfsense-user-manager-oriol


pfSense is configured, now it’s time to set-up the OpenVPN client on Mikrotik using Winbox. Remember to import the certificates:

certificates-mikrotik


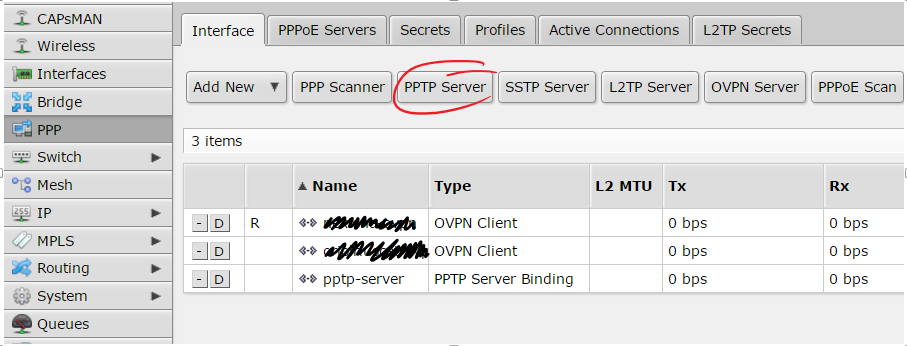
Click on “PPP” this on the left menu:

ppp-mikrotik


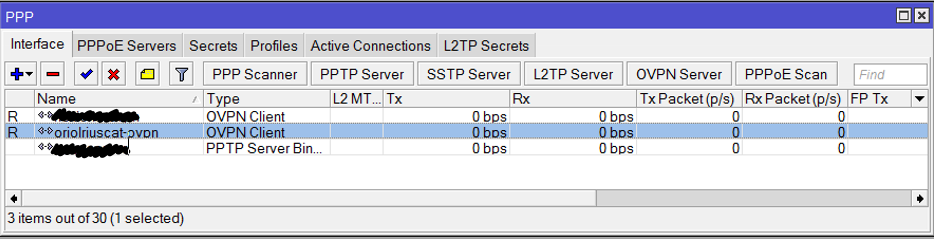
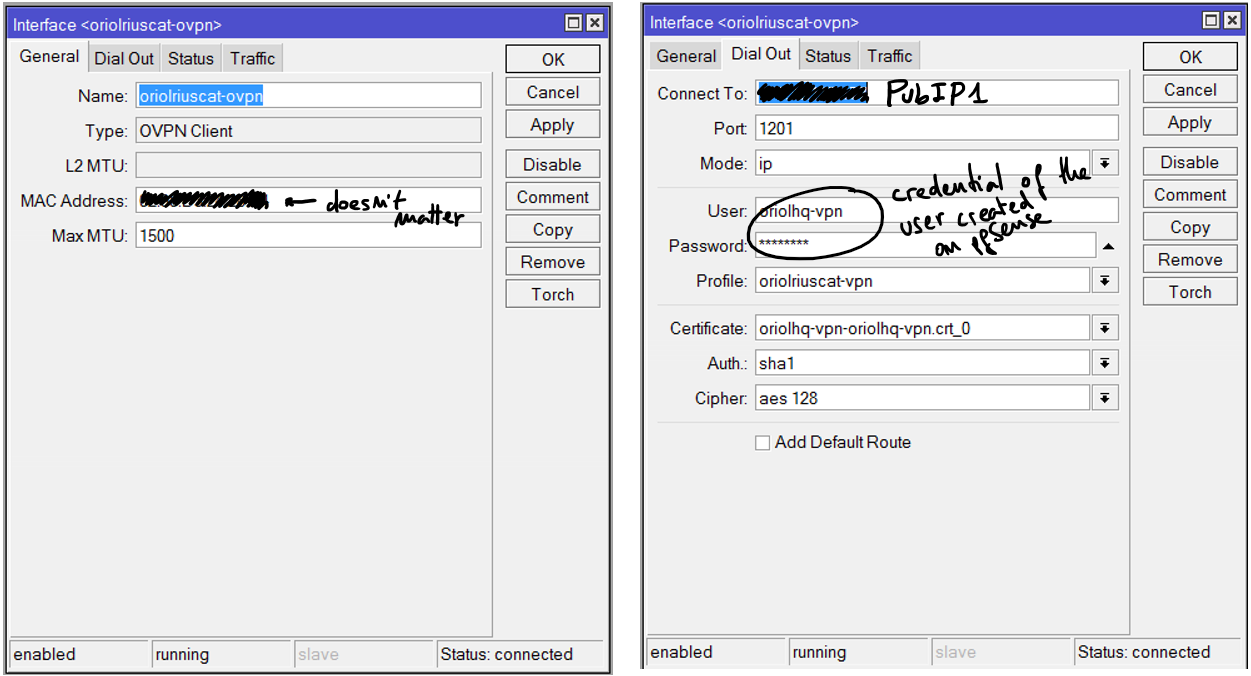
Add an OVPN Client connection using the “+” button, the parameters for that connection are:

ppp-interface


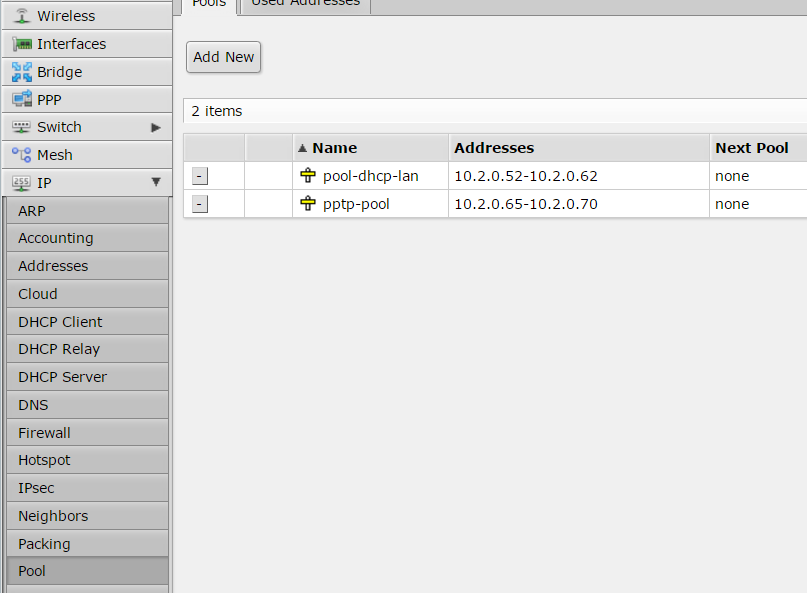
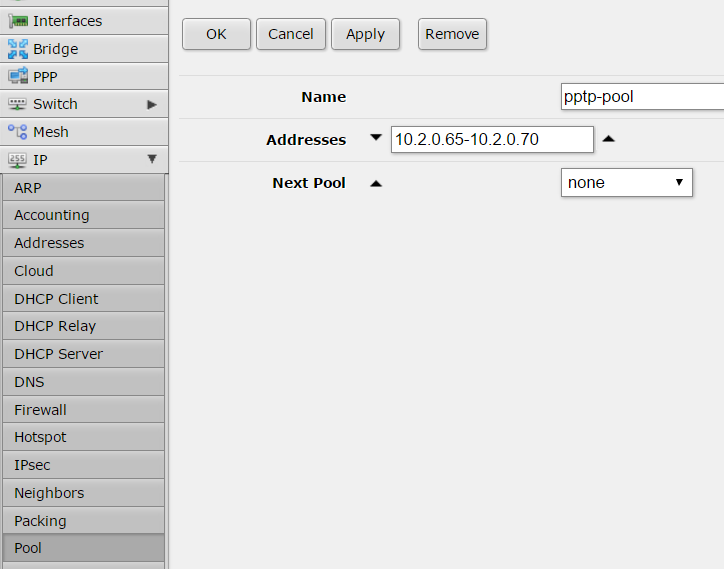
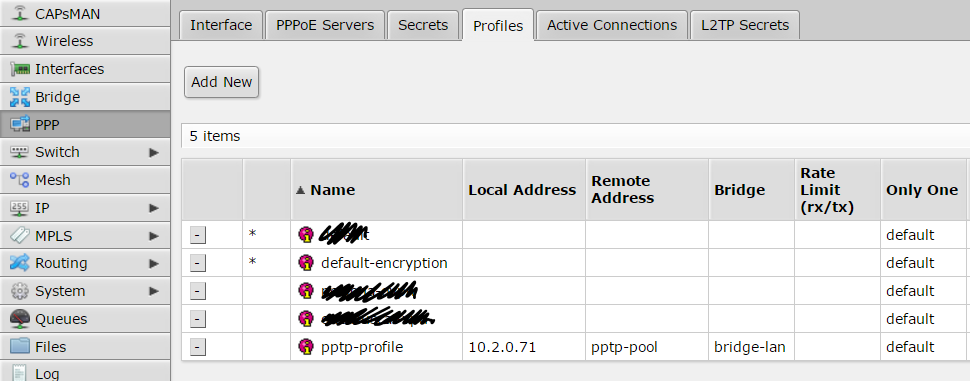
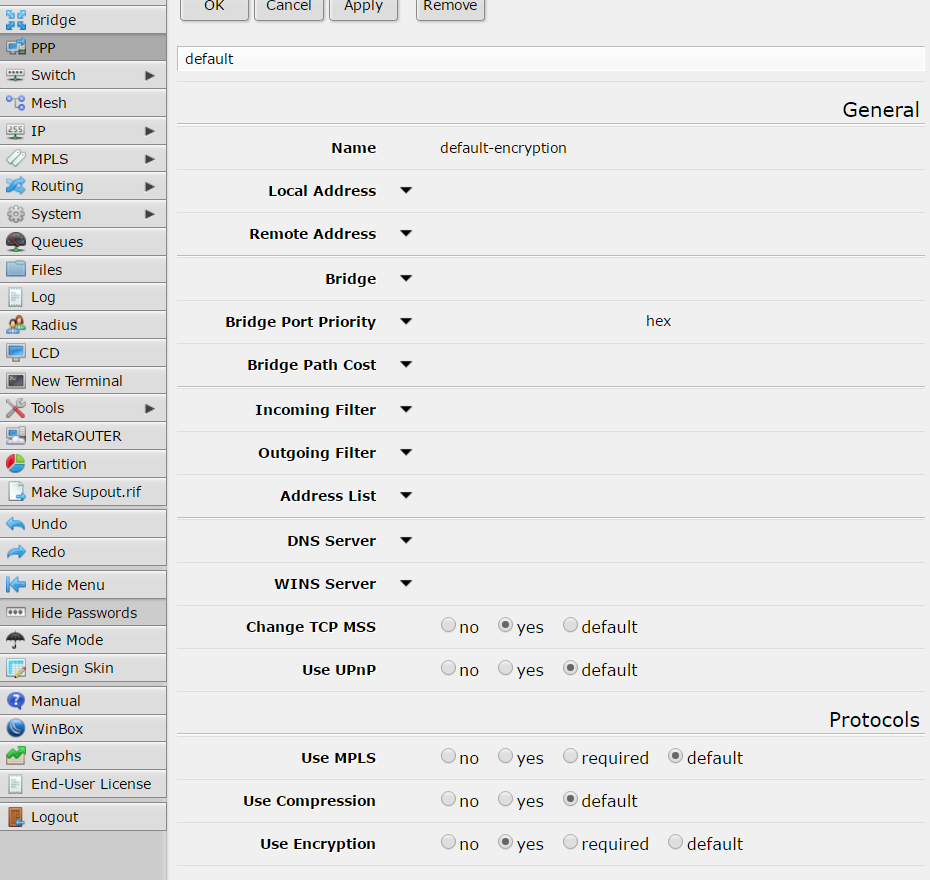
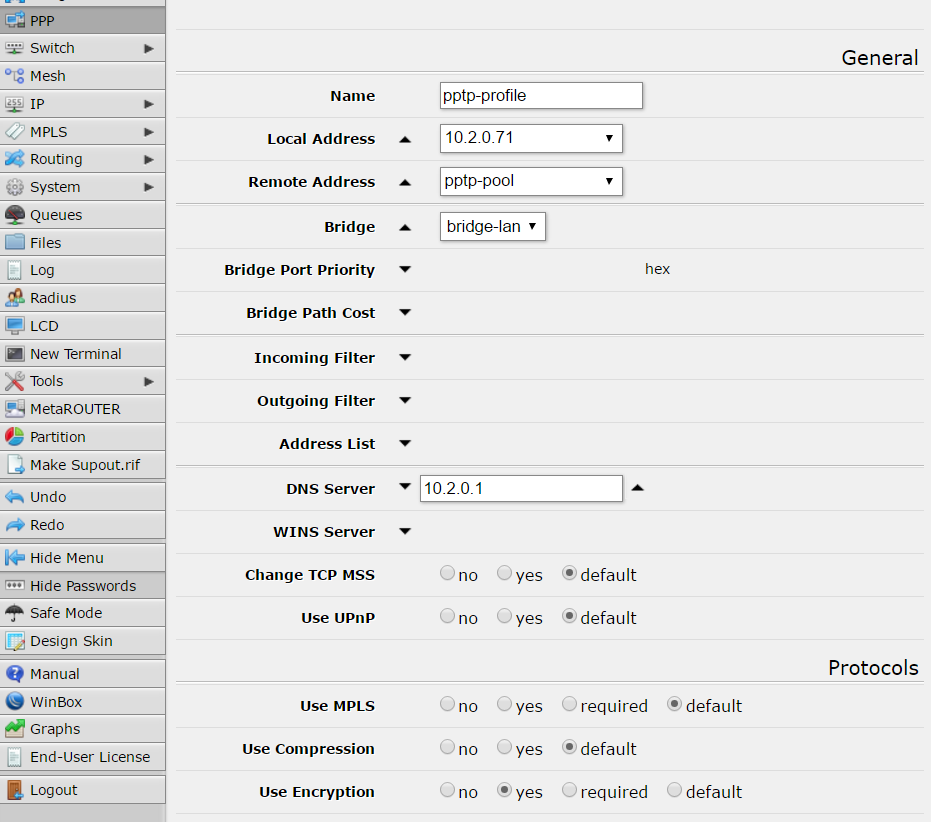
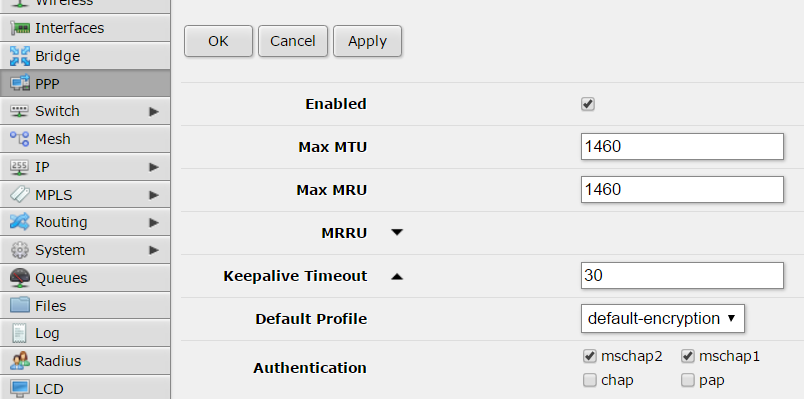
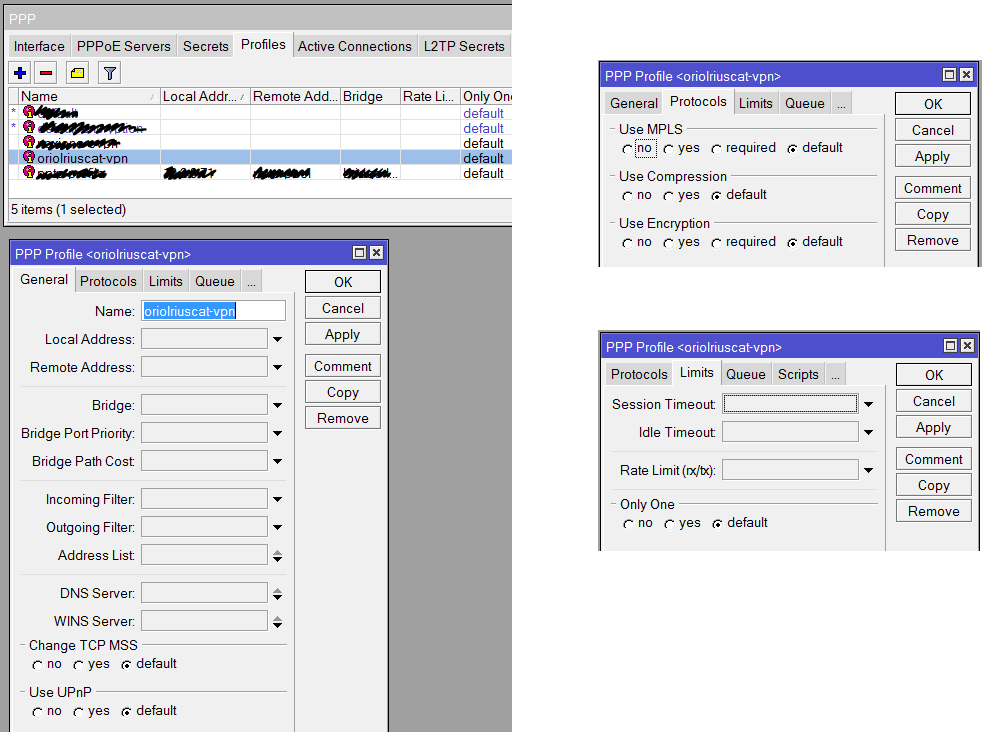
Another required thing to define on “PPP” is the profile, click on the tab “Profile” and using the button with symbol “+” create a new profile like that:

ppp-profile


Everything is ready, now it’s time to check if the connection is OK. First go to the OVPN client on Mikrotik, remember this is on “PPP” menu option and inside tab “Interfaces”. Clicking on the interface you’ll see the status details. If it’s disconnect going to pfSense or Mikrotik logs you can see the negotiation details.

Remember usually the problem is with your certificates, but first of all you have to ensure that the negotiation tries to start.

Enjoy it and good luck.


Sniffing on Mikrotik and streaming in real-time to Wireshark

Reading time: 2 – 2 minutes

When you have a Mikrotik in any point of your network and you want to launch a sniffer for debugging or troubleshooting, a part from original RouterOS tools, you can stream captured traffic in real-time to Wireshark and inspect packets there.

The idea is exactly the same like I explained on the entry: Sniffing traffic in a Linux box and streaming in real-time to Wireshark on Windows.

Mikrotik configuration using the web interface is like that:

mikrotik-config

We assume 10.2.0.44 is the IP address of the Wireshark box, ensure that you don’t block UDP traffic on port 37008 because the stream from Mikrotik uses that target port. And define your own filters.

About Wireshark configuration is really simple, just set up the filter to allow only traffic from sniffing stream and select the network interface where traffic comes.

wireshark-config

Previous captures allow us to debug DNS queries to Google DNS service, this is the result when you click to the icon marked with a red circle on previous screen capture.

wireshark-traffic

Extracting private and public keys from a p12 file

Reading time: 6 – 9 minutes

PKCS#12 is a container for storing many cryptography objects as a single file. It is commonly used to bundle a private key with its X.509 certificate or to bundle all the members of a chain of trust. This is a fast and simple summary about how to extract your keys from those kind of files:

#Private key:
openssl pkcs12 -in file_name.p12 -nocerts -out private.key
#Certificates:
openssl pkcs12 -in file_name.p12 -clcerts -nokeys -out public.crt

Recurrently I have to access to a usuful guide about those kind of openssl parameters, let me refer that guide:

The Most Common OpenSSL Commands (local copy)

Update 2016/09/19
Usefull links for SSL:

Mikrotik as a PPTP server for Android

Reading time: 4 – 6 minutes

Two years ago I installed a Mikrotik Cloud Switch and lately I stoped my pfSense and I started using that switch as my network router, firewall and also as a switch. RouterOS is really powerful and allows to do a lot of things with that hardware. One of those things is set-up a VPN server based on PPTP. This is not the most secure way to create VPNs but usually the only requirement is a little bit of security on top of an IP over IP service that allows us to use local service when we’re in remote. In my case I have a lot of services in my LAN and I need some of them when I’m out of home specially I need to use them from my mobile phone.

Next steps describe how I set-up a PPTP server on my Mikrotik server allowing my Android 6 device (Huawei Mate 8) to connect to my home services through the VPN. Bellow you have a simple schema representing the schenario of the solution:

architecture

I’m only going to describe steps from the web console, of course, all those steps can be done using Winbox or the command line. To be honest I’m not used to RouterOS CLI but I think it’s not difficult to figure out the CLI commands to get the same result.

First step is set-up a pool of IP addresses to be assigned to the tunnel endpoints.

01-ip-pool

02-ip-pool

Thanks to an ARP proxy those IP addresses will be available like local IPs, this is transparent for the VPN configuration.

00-arp-proxy

configuration of connection profile is done inside “Profiles” tab:

05-profiles

first of all create a new profile called “default-encription”:

061-profiles

and another profile called “pptp-profile”:

06-profiles

“Secrets” tab is where you have to manage users, in my case only two users are created:

07-secrets

configuration details about my user are:

08-secrets

Inside PPP menu there is a button with a label “PPTP server” click there…

03-pptp-server

… and copy next settings:

04-pptp-server

Don’t forget to check that your PPTP port is accessible from your public IP address. Remember it’s 1723/TCP.

Android configuration is simple, first of all go to “settings” icon. Look for a “More” section bellow network options, and you’ll find VPN managment. Add a new connection, define a name, the type and the IP address and leave the rest by default. After that when you come back to VPN list you’ll find your new VPN in the list, click there and just set-up your PPTP credentials.

android

If you have some trouble the only thing that you can do is go to Mikrotik logs or start sniffing to figure out where is the problem. I had to do some tests before it was working but in the end everything was so simple like I explained here.

Good luck and enjoy it.

Thanks to next blog entries to inspire me:


Secure download URLs with expiration time

Reading time: 23 – 38 minutes

Requirements

Imagine a HTTP server with those restrictions:

  • only specific files can be downloaded
  • with a limited time (expiration date)
  • an ID allows to trace who download files
  • with minimal maintenance and dependencies (no databases, or things like that)

the base of the solution that I designed is the URL format:

http://URL_HOST/<signature>/<customer_id>/<expire_date>/<path_n_file>
  • signature: is calculated with the next formula, given a “seed”
    • seed = “This is just a random text.”
    • str = customer_id + expire_date + path_n_file
    • signature = encode_base64( hmac_sha1( seed, str))
  • customer_id: just an arbitrary identifier when you want to distinguish who use the URL
  • expire_date: when the generated URL stops working
  • path_n_file: relative path in your private repository and the file to share

Understanding the ideas explained before I think it’s enough to understand what is the goal of the solution. I developed the solution using NGINX and LUA. But the NGINX version used is not the default version is a very patched version called Openresty. This version is specially famous because some important Chinese webs works with that, for instance, Taobao.com

Expiration URL solution Architecture schema

In the above schema there is a master who wants to share a file which is in the internal private repository, but the file has a time restriction and the URL is only for that customer. Then using the command line admin creates a unique URL with desired constrains (expiration date, customer to share and file to share). Next step is send the URL to the customer’s user. When the URL is requested NGINX server evaluates the URL and returns desired file only if the user has a valid URL. It means the URL is not expired, the file already exists, the customer identification is valid and the signature is not modified.

NGINX Configuration

server {
 server_name downloads.local;

 location ~ ^/(?<signature>[^/]+)/(?<customer_id>[^/]+)/(?<expire_date>[^/]+)/(?<path_n_file>.*)$ {
 content_by_lua_file "lua/get_file.lua";
 }

 location / {
 return 403;
 }
}

This is the server part of the NGINX configuration file, the rest of the file can as you want. Understanding this file is really simple, because the “server_name” works as always. Then only locations command are relevant. First “location” is just a regular expression which identifies the relevant variables of the URL and passes them to the LUA script. All other URLs that doesn’t match with the URI pattern fall in path “/” and the response is always “Forbiden” (HTTP 403 code). Then magics happen all in LUA code.

LUA scripts

There are some LUA files required:

  • create_secure_link.lua: creates secure URLs
  • get_file.lua: evaluates URLs and serves content of the required file
  • lib.lua: module developed to reuse code between other lua files
  • sha1.lua: SHA-1 secure hash computation, and HMAC-SHA1 signature computation in Lua (get from https://github.com/kikito/sha.lua)

It’s required to configure “lib.lua” file, at the beginning of the file are three variables to set up:

lib.secret = "This is just a long string to set a seed"
lib.base_url = "http://downloads.local/"
lib.base_dir = "/tmp/downloads/"

Create secure URLs is really simple, take look of the command parameters:

$ ./create_secure_link.lua 

 ./create_secure_link.lua <customer_id> <expiration_date> <relative_path/filename>

Create URLs with expiration date.

 customer_id: any string identifying the customer who wants the URL
 expiration_date: when URL has to expire, format: YYYY-MM-DDTHH:MM
 relative_path/filename: relative path to file to transfer, base path is: /tmp/downloads/

Run example:

$ mkdir -p /tmp/downloads/dir1
$ echo hello > /tmp/downloads/dir1/example1.txt
$ ./create_secure_link.lua acme 2015-08-15T20:30 dir1/example1.txt
http://downloads.local/YjZhNDAzZDY0/acme/2015-08-15T20:30/dir1/example1.txt
$ date
Wed Aug 12 20:27:14 CEST 2015
$ curl http://downloads.local:55080/YjZhNDAzZDY0/acme/2015-08-15T20:30/dir1/example1.txt
hello
$ date
Wed Aug 12 20:31:40 CEST 2015
$ curl http://downloads.local:55080/YjZhNDAzZDY0/acme/2015-08-15T20:30/dir1/example1.txt
Link expired

Little video demostration

Resources

Disclaimer and gratefulness

pfSense: unlock SSH

Reading time: 2 – 3 minutes

After several tries without success to pfSense’s SSH server the port is blocked by a service called “sshlockout”. If you need to unblock the SSH service run the command from shell:

pfctl -t sshlockout -T flush

In the end that command only removes the rules in table “sshlockout” in firewall entries.

OpenAM: some ssoadm commands for reference

Reading time: 18 – 29 minutes

OpenAM is as much powerful as complicated sometimes. In this case I spent a lot of time understanding how to set simple settings because of that I decide to take note about that in this blog entry.

First of all don’t forget to set the environment variables and go to ssoadm path:

export JAVA_HOME="/usr/lib/jvm/java-6-openjdk-amd64/jre"
export CLASSPATH="/var/lib/tomcat7/webapps/openam/WEB-INF/lib/policy-plugins.jar::/var/lib/tomcat7/webapps/openam/WEB-INF/lib/openam-core-11.0.0.jar"

cd /opt/openam/ssoadmin/openam/bin

Getting the list of user identities:

./ssoadm list-identities -u amadmin -f /tmp/oam.pwd -e / -t User -x "*"

anonymous (id=anonymous,ou=user,dc=openam)
demo (id=demo,ou=user,dc=openam)
serviceusername (id=serviceusername,ou=user,dc=openam)
amAdmin (id=amAdmin,ou=user,dc=openam)
Search of Identities of type User in realm, / succeeded.

another useful query would be:

./ssoadm list-identities -u amadmin -f /tmp/oam.pwd -e / -t Role -x "*"

No plug-ins configured for this operation

But as you can see it doesn’t work and I don’t know how to solve it.

Taking a look to GUI get to identities list with: Access Control > / (Top Level Realm) > Privileges

In this webpage you have a list of role identities, in my case I have only this: “All Authenticated Users”. Inside this identity I can set different privileges:

  • REST calls for Policy Evaluation (EntitlementRestAccess)
  • Read and write access to all log files (LogAdmin)
  • REST calls for searching entitlements (PrivilegeRestReadAccess)
  • Read access to all log files (LogRead)
  • Read and write access to all federation metadata configurations (FederationAdmin)
  • Read and write access only for policy properties (PolicyAdmin)
  • Read and write access to all configured Agents (AgentAdmin)
  • Read and write access to all realm and policy properties (RealmAdmin)
  • REST calls for managing entitlements (PrivilegeRestAccess)
  • Write access to all log files (LogWrite)

If we want to remove a privilege:

root@vm:/opt/openam/ssoadmin/openam/bin# ./ssoadm remove-privileges -u amAdmin -f /tmp/oam.pwd -e / -g EntitlementRestAccess -i "All Authenticated Users" -t role

Privileges were removed from identity, All Authenticated Users of type, role in realm, /.

or adding a privilege:

root@vm:/opt/openam/ssoadmin/openam/bin# ./ssoadm add-privileges -u amAdmin -f /tmp/oam.pwd -e / -g EntitlementRestAccess -i "All Authenticated Users" -t role

Talking about policies, exporting:

./ssoadm list-policies -u amadmin -f /tmp/oam.pwd -e / -o /tmp/policies.xml

and if we want to import the policies:

./ssoadm create-policies -u amAdmin -f /tmp/oam.pwd -e / --xmlfile /tmp/policies.xml

creating a user:

./ssoadm create-identity -u amadmin -f /tmp/oam.pwd  -e / -i serviceusername -t User --attributevalues "userpassword=servicepassword"

Useful references:

sslsnoop – hacking OpenSSH

Reading time: 3 – 5 minutes

Using sslsnoop you can dump SSH keys used in a session and decode ciphered traffic. Supported algorithms are: aes128-ctr, aes192-ctr, aes256-ctr, blowfish-cbc, cast128-cbc.

Basic sslsnoop information:

 $ sudo sslsnoop # try ssh, sshd and ssh-agent... for various things
 $ sudo sslsnoop-openssh live `pgrep ssh` # dumps SSH decrypted traffic in outputs/
 $ sudo sslsnoop-openssh offline --help # dumps SSH decrypted traffic in outputs/ from a pcap file
 $ sudo sslsnoop-openssl `pgrep ssh-agent` # dumps RSA and DSA keys

Take a look into the project in sslsnoop github page.

Routerboard CRS125-24G-1S-2HnD-IN (Mikrotik) Cloud Switch

Reading time: 1 – 2 minutes

I bought this product a few weeks ago and finally I can enjoy it at home. With this product you have a firewall, gateway, switch and wireless box with:

  • 25x Gigabit Ethernet ports
  • 1x Fiber channel
  • 3G, 4G or any optional USB modem
  • With RouterOS inside you can manage: gateway, firewall, VPN and ad-hoc switching and routing configurations
  • 1000mW high power 2.4GHz 11n wireless AP

CRS125-24G-1S-2HnD-IN

The official product page is here where you can find brochure in PDF and other useful information.

If you are looking for a powerful product for your SOHO network this is the solution as I like to say ‘this is one of the best communications servers’. It will be very difficult to find some feature or functionality that you can not get from this product. The product is robust and stable with the flexibility of RouterOS.

Screencast 0x01 – Com funciona OAuth?

Reading time: 1 – 2 minutes

Després de la primera prova pilot amb el tema dels screencast presento aquesta altre entrega en la mateixa línia de la primera però amb un tema una mica més interessant i difícil d’explicar. Per si no ús sona de res OAuth, comentar que és un sistema d’autorització d’accés a una API per part d’aplicaicons i d’aplicacions web. Compte, en si mateix OAuth no és un sistema d’autenticació sinó d’autorització, si no teniu clars aquests conceptes: wikipedia: authentication vs authorization.

Bé ja em comentareu si algú ha pogut entendre algo, he de dir que m’hi he esforçat força en simplificar el tema i no ha estat fàcil fer-ho.

Scroll to Top