oriolrius.cat

Des del 2000 compartiendo sobre…

Tag: sysadmin

Convert JSON file to YAML file using CLI

Reading time: < 1 minute

Just a cookbook about how to get a YAML file when you have a JSON one.

python -c 'import sys, yaml, json; yaml.safe_dump(json.load(sys.stdin), sys.stdout, default_flow_style=False)' < file.json > file.yaml

Nested byobu, re-assigning shortcuts

Reading time: 2 – 2 minutes

I’m a byobu user for a long time, I love it for many reasons. But this is just a quick tip for extreme users like me. I mean people who use byobu for local consoles with remote byobu sessions running on top of SSH, for instance.

When prefix key combinations has to be sent to the remote host we have to press “Control + a + a” and finally the command that we want to send to the remote systems. This is not comfortable many times. So, I modified my configuration file for changing the prefix when I want to send remote commands to the nested byobu.

This is going to work this way:

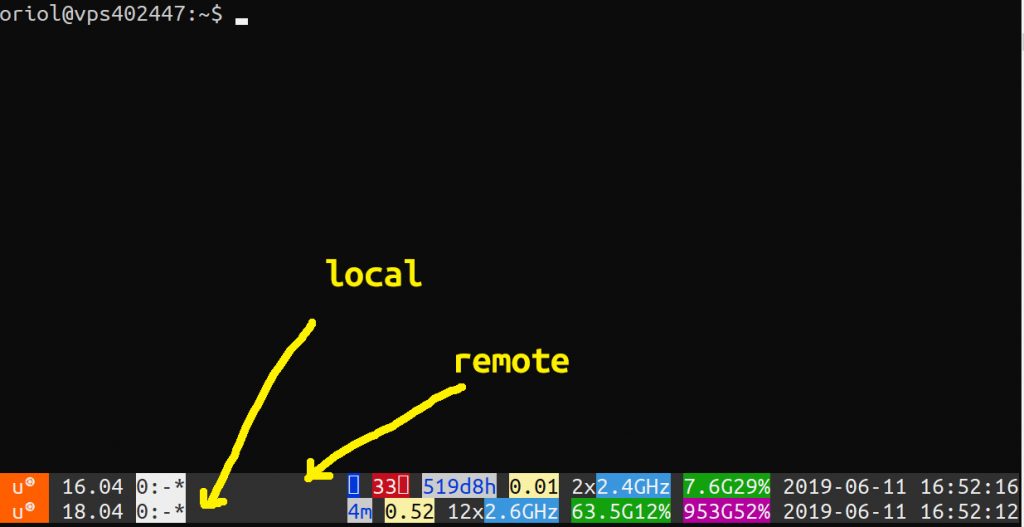
Control + a

    • as a prefix for local byobu session.

Control + b

    as a prefix for remote byobu session

Take a look on this screen capture where you can see byobu status bars stacked.

If you find useful the configuration that I described the only thing that you have to do is modify the configuration file: ~/.byobu/keybindings.tmux

unbind-key -n C-a 
set -g prefix C-a
set -g prefix2 F12
unbind-key -n C-b 
bind-key -n C-b send-prefix

I hope this is useful as it is for me.

Portable FTP server for Windows

Reading time: 2 – 2 minutes

Usually, simple things are the best, in the case I want to recommend an FTP server for Windows. This is a really simple but super useful FTP server for Windows. I’m using in Windows 10 and it works perfectly. Configuration is done in less than 10″ and installation is not required, I love that. Super portable.

Don’t expect sophisticated options but the most useful and advanced ones are there. If you need something like that my recommendation is:

Quick’n Easy FTP Server Lite by Pablo Software Solutions

Just a summary and extracted from the product webpage this is a summary of features:

  • Simple, intuitive and cool looking user interface, with several pages for managing the users, configuration and security.
  • Easy to setup using the build-in FTP Server Setup Wizard. 
  • Add new user accounts with the User Account Wizard.
  • Support for systems that are a part of a network with a router and/or firewall.
  • Configuration is saved in XML format.
  • Realtime server trace, which displays every command and it’s reply on the screen.
  • Everything can also be logged to a file.

Screenshots are always lovely, some of them are:

[ngg_images source=”galleries” container_ids=”2″ display_type=”photocrati-nextgen_basic_thumbnails” override_thumbnail_settings=”0″ thumbnail_width=”200″ thumbnail_height=”150″ thumbnail_crop=”1″ images_per_page=”0″ number_of_columns=”0″ ajax_pagination=”0″ show_all_in_lightbox=”0″ use_imagebrowser_effect=”0″ show_slideshow_link=”0″ slideshow_link_text=”[Show as slideshow]” order_by=”filename” order_direction=”ASC” returns=”included” maximum_entity_count=”500″]

Finally just say THANKS Pablo for such good job and so useful stuff.

HTTPie – command line HTTP client

Reading time: 1 – 2 minutes

I imagine you are used to using curl for many command line scripts, tests, and much more things. I did the same but some weeks ago I discovered HTTPie which is the best substitute that I’ve ever found for curl. Of course, it’s also available for a lot of Linux distributions, Windows, and Mac. But I used it with docker which is much more transparent for the operative system and easy to update. To be more precise I use next alias trick for using this tool:

alias http='sudo docker run -it --rm --net=host clue/httpie'

Official website: httpie.org

Let me paste some highlights about HTTPie:

  • Sensible defaults
  • Expressive and intuitive command syntax
  • Colorized and formatted terminal output
  • Built-in JSON support
  • Persistent sessions
  • Forms and file uploads
  • HTTPS, proxies, and authentication support
  • Support for arbitrary request data and headers
  • Wget-like downloads
  • Extensions
  • Linux, macOS, and Windows support

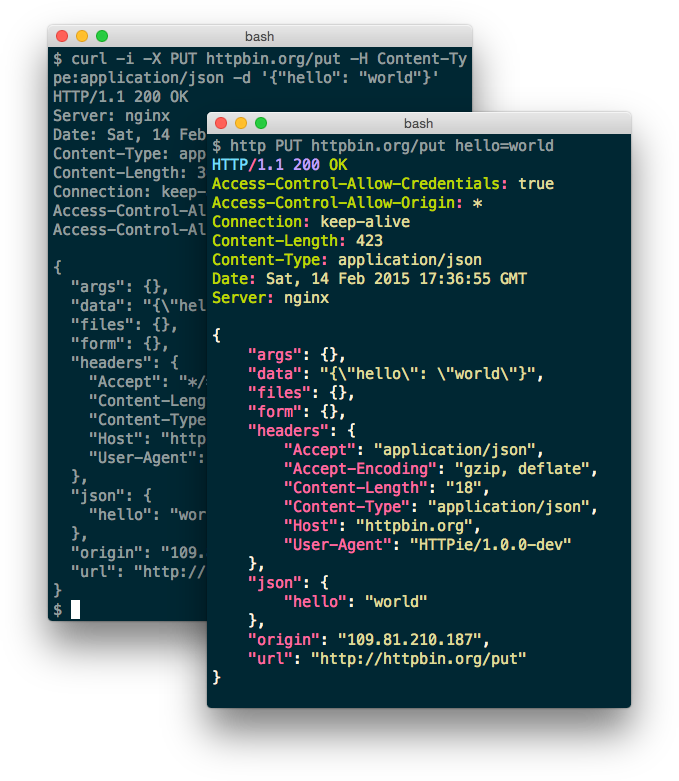
From the tool webpage a nice comparison about how HTTPie looks like versus curl.

Linux: Mounting file as a partition

Reading time: 1 – 2 minutes

When we have a file with a ‘dd’ of a full disk and we want to mount a partition of that disk, we have to use an offset for jumping to the beginning of the partition that we want to mount.
Using ‘fdisk’ command we can find the partitions of that disk copied inside a file.

fdisk -l FILE_WITH_DISK_INSIDE

Once partition table is shown there is a column called ‘Start’ using the corresponding number in this column for the partition that we want we can obtain the offset required for our mounting point. Reasoning behind that is multiply start sector per number of bytes per sector.

# OFFSET = START * 512
mount -o ro,loop,offset=OFFSET FILE_WITH_DISK_INSIDE /mnt

I hope thanks to this technical note next time that I forget how to get the offset I find it fastly.

UPDATE 2018/08/29:

If you don’t want to do that manually, there is a small tool called losetup which maps the partitions of a disk image on a file.


# example, attaching partitions to loopback devices
losetup -P /dev/loop0 DISK_IMAGE
# just mount the devices now, they are /dev/loop0pX where X is the number of the partition
# dettach this assignament:
losetup -d /dev/loop0
ngrok – service which solve services behind NAT issues

Reading time: < 1 minute This is another short entry, in this case for recommending a service which we solve typical problem solved using a DNAT. Once we have a service on our laptop, or on a private server and we have to expose that service on the internet for some time or permanently usually we have to go the firewall, or router and create a NAT rule forwarding a port. This is a simple and powerful service which is going to solve that for you. There is a free account for understanding and testing the service, other plans are available and especially affordable for professional requirements.

ngrock.com

I was frogetting to say it’s compatible with Linux, Windows and Mac.

Spark Post: Mail relay host for mailings

Reading time: 1 – 2 minutes

This is going to be a very short post entry, I just want to refer a very interesting mail relay (smart host) which define itself like:

Email delivery services built for developers, by developers
Combined with your language of choice, using the power of our robust cloud API couldn’t be easier.

Open a SparkPost account today and send up to 100.000 emails per month for free. The best is you can do using SMTP or using a REST API; really nice easy to use an powerful control dashboard simplify externally keys management, statistics, templates for mailings, and many more features.

Personally I love the service because is extremely useful to be configured on SSMTP service of Linux as a default relay host, for personal and professional use. Another use could be to check end-to-end mail services.

Personally I love the service, and if you want to send really big mailings theirs costs are very competitive. 

Upgrading Redmine in a nutshell

Reading time: 1 – 2 minutes

I use Redmine to track my personal projects, and every time that I have to update I have to re-read the full upgrading page which is long and full of exceptions. So I decided to write my own reduced cookbook to solve that. FYI I’m using Ubuntu 16.04, Apache2, MySQL and Passenger for running Redmine. 

Being root user run:

  • backup MySQL database
  • download new redmine package and unpack in /var/www
  • change ‘redmine’ soft link to new folder
  • copy old files and directories overwriting the new ones:
    config/database.yml
    config/configuration.yml
    files/
    plugins/
  • locating work directory on new redmine folder, run:
    bundle install --without development test
    bundle exec rake generate_secret_token
    bundle exec rake db:migrate RAILS_ENV=production
    bundle exec rake redmine:plugins:migrate RAILS_ENV=production
    bundle exec rake tmp:cache:clear tmp:sessions:clear RAILS_ENV=production
  • restart apache server

ncdu: Analyze disk usage in Linux

Reading time: < 1 minute Some time ago I found a ncurses based tool very small easy and useful to get a very fast and easy way to analyze disk usage in linux. This entry is just to remember the name of that tool because I always forget its name.

Ncdu is a disk usage analyzer with an ncurses interface. It is designed to find space hogs on a remote server where you don’t have an entire graphical setup available, but it is a useful tool even on regular desktop systems. Ncdu aims to be fast, simple and easy to use, and should be able to run in any minimal POSIX-like environment with ncurses installed.

A screenshot is always useful:

Internet fail over connection with Mikrotik

Reading time: 2 – 4 minutes

Based on my home configuration I’m going to describe how to set up a Mikrotik to manage fail over Internet connection. Next schema describes a Mikrotik gateway with two internet connections (GUIFI and SS). Assuming GUIFI as a default Internet connection periodic checks on Google DNSes (8.8.8.8 and 8.8.4.4) will allow to know when it’s good to change the default route.
internet-failover


If you have some Linux routing background it will be easier to understand the configuration. Main idea is use policy routing tables and mark packets to use one table or other. In my case I have two routing tables GUIFI and SS, and of course, the default gateway of each of those tables is the gateway indicated in the schema.

First step is take care about the routes for hosts to monitor; using GUIFI connection will be checking connectivity to 8.8.8.8 and using SS the monitored host will be 8.8.4.4.

/ip route
add dst-address=8.8.8.8 gateway=172.29.2.1 scope=10
add dst-address=8.8.4.4 gateway=172.29.1.1 scope=10

Second step is configure two routing tables, those routes will check Internet hosts availability. Routes are resolved recursively (more info), and will be active only if any host is pingable.

# routing table for GUIFI
/ip route
add distance=1 gateway=8.8.8.8 routing-mark=GUIFI check-gateway=ping
add distance=2 gateway=8.8.4.4 routing-mark=GUIFI check-gateway=ping
# routing table for SS
/ip route
add distance=1 gateway=8.8.4.4 routing-mark=SS check-gateway=ping
add distance=2 gateway=8.8.8.8 routing-mark=SS check-gateway=ping

Routing table looks like that:

routing-table

Next step will be create marking rules in the firewall:

# next rule mark all LAN traffic (10.2.0.0/26) before routing
# it'll be processed by routing table GUIFI
# it makes GUIFI the default Internet connection 
/ip firewall mangle
add action=mark-routing chain=prerouting comment="All LAN traffic" dst-address=\
    !10.0.0.0/8 new-routing-mark=GUIFI passthrough=no src-address=10.2.0.0/26

If any specific host, service or whatever want to use specific routing table, then you can create new rules with proper mark to redirect the traffic to that Internet connection. But if that path fails other Internet connection will be used.

In my case I have a more complicated scenario, internal VoIP server uses a IP Telephony service only available through GUIFI connection. The way to force that is forbidding traffic to SS connection. A simple firewall rule will help to do that:

# X.X.X.X = IP address of the IP telephony provider
/ip firewall filter
add action=reject chain=forward dst-address=X.X.X.X in-interface=\
    bridge-lan out-interface=SS-eth2

I hope previous simple notes are useful for you, they are inspired by Advanced Routing Failover without Scripting.