Assuming we’re running a Windows shell with administrator privileges, using next commands is possible to enable, or disable, Hyper-V. In my case this is needed because when Hyper-V is running Virtualbox only can run 32bit virtual machines. I require Microsoft VM manager Hyper-V because I also run Docker for Windows and it’s a requirement.
The second episode of ESP8266 programming series. In the next video I describe how to code a firmware for ESP8266 using Arduino IDE. The purpose of that firmware is create a temperature sensor and publish the reading in a MQTT broker.
Schema of the system:
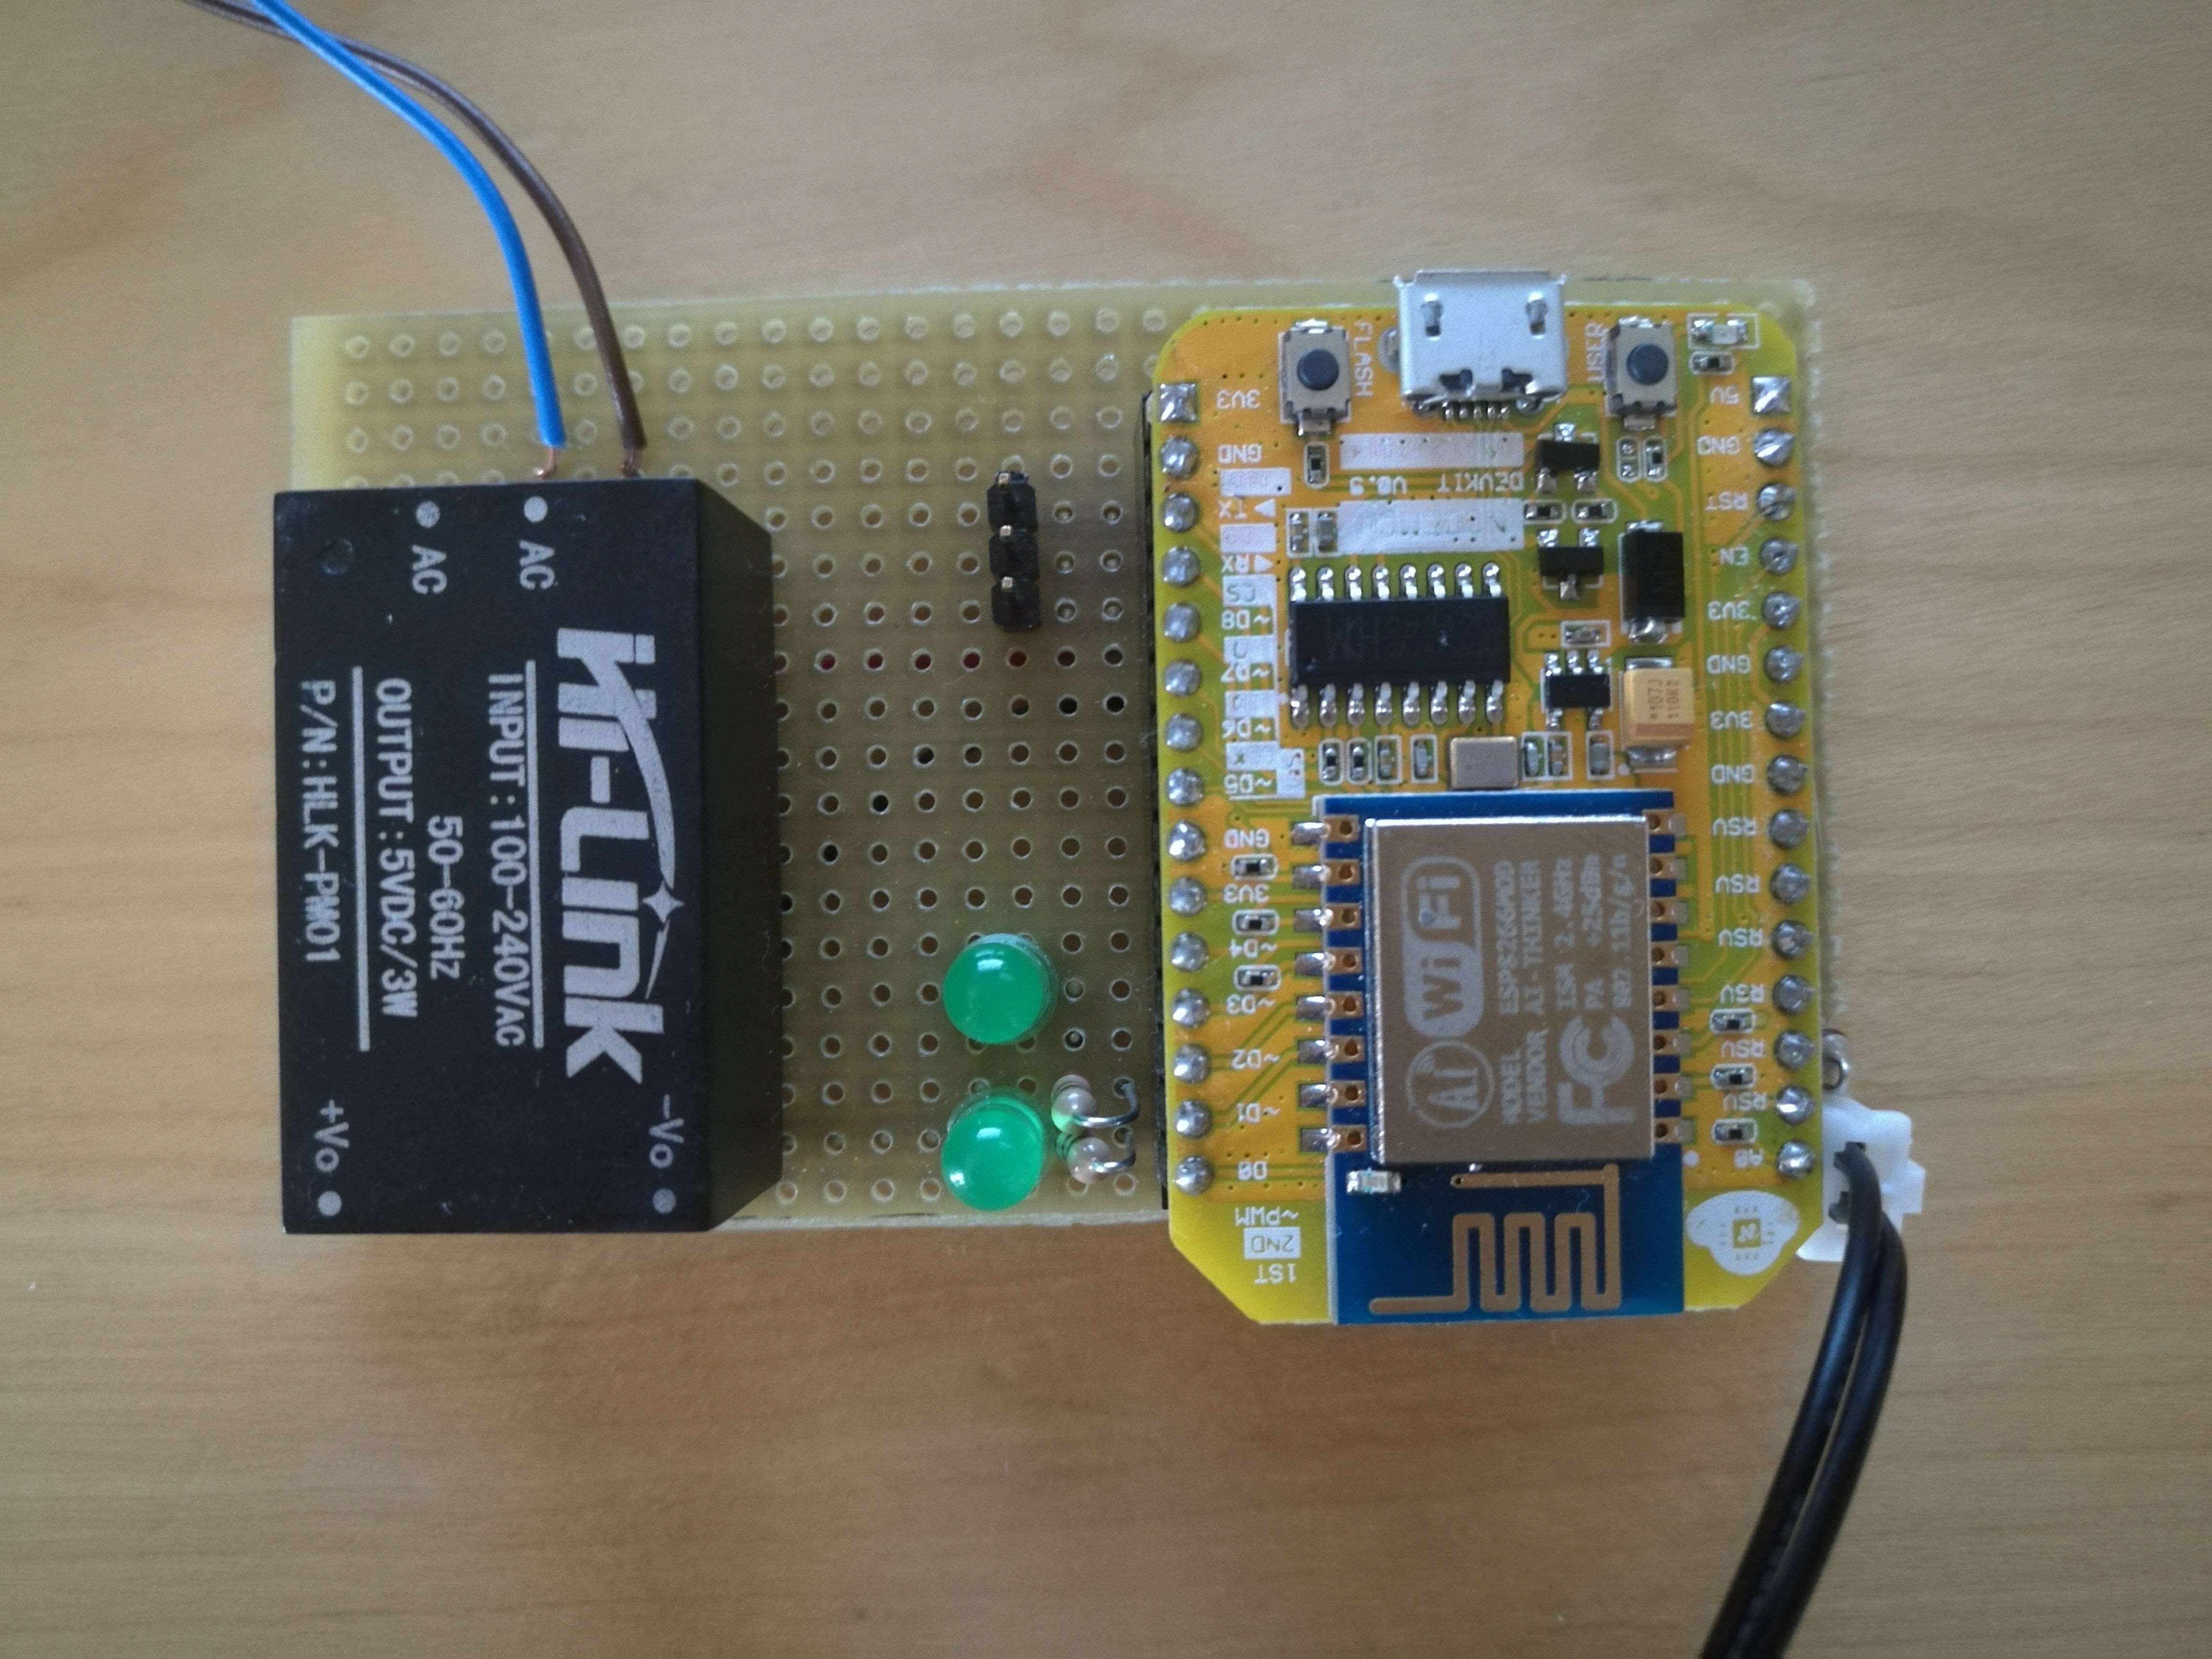
Pictures of the system, I used ESP12E Devkit and some cheap parts:
References in Aliexpress where I bought the hardware:
Reading time: < 1 minute
In this video I describe deeply a convention called "Homie“; thanks to that we have a set of rules and assumptions very useful when a firmware device is created and/or an IoT platform have to be configured to support those devices. I love that convention and I used it during my demonstration scenario in Lviv IT Arena.
After this video I’ll follow a series of some other videos, describing how to develop devices following Homie conventions.
Official documentation of the convention can be found in the Github Homie project.
Last weekend I talked on IT Arena event organized in Lviv (Ukraine) at Lviv Arena Stadium created for the Football Eurocup of 2012. It was a very good and well organized event, it was a privilege to participate. I gave a presentation about the automation’s that I created latest years at home thanks to the open software and open hardware. The second part of the presentation was a demonstration about how to set up some IoT devices created ad-hoc.
If you want to review the slides, they are available at slideshare.
Conference was recorded but for a while I don’t have the video clip, if I can get access to the video I’ll upload it to youtube and referenced here. Anyway I created a photo album that you can review in LVIV trip pictures photo album.
Finally I want to give thanks to Mykhaylo Kramarenko because thanks to his invitation I had that great opportunity. Thanks to Marta Maksym to take care of my trip and accommodation. Thanks to organizers for the 3G SIM card with data and free calls, next time a micro-SIM card will be perfect for my mobile phone XD and last but not least a lot of thanks to Denis Kolesnikov for his guided visit to the Lviv center, really nice place I’ll go back to visit it properly.
Last Thursday I participated in a round table about Industry 4.0 as part of the Catalan Telecommunications Day, really interesting event in a very nice place. I haven’t been in Cosmo Caixa since it was called “Museu de la Ciència” a very long time ago. But I have to say that the place is very trendy and awesome.
Coming back to the event, I met some good friends and it’s always a pleasure but I also meet very interesting new people with who I’ll be happy to keep on talking and going deep on aligning synergies. One of those are i2cat people, guys we have to find the proper way to collaborate because again and again we meet each other with very compatible points of view.
About the content of my exposition I want to remark two things:
Firstly I think we have the debt to leadership the fourth industrial revolution, and catch up all those companies that never did the third revolution no the present. Catalonia has very powerful minds with a lot of entrepreneurs now it’s time to work together and demonstrate what we can do.
Secondly summarize the Fernando Trías de Bes article in “La Vanguardia”
In the 90s they said that Internet is going to be like another TV channel in our TVs; companies only need to create a Web page and they are ready for the future. But in the end it changed the ‘P’ of product in the marketing strategy.
Early 2000 e-commerce get it real and they said that it’s only another distribution channel, but finally it has been the change of two ‘P’s point of sale and price, both of them became obsolete.
In 2006 the revolution come through the social networks, they said only this is only personal webs instead of enterprise web; just create some accounts in those social networks and that’s all. But ‘P’ of promotion has been redefined with new market segmentation.
Since 2010 smartphones sales increased dramatically and they said this is just like a mini PC, just adapt web pages and everything is done. But a lot of markets disappeared or changed deeply: photo cameras, music CDs, telephony, etc. So ‘P’ of point of sale and ‘P’ of product totally redefined. Virtual and physical experiences unified.
First decade of new century Internet 2.0 has been consolidated, they said this is just web where people can participate. Companies only need to add a corner in their webpages where can discuss. ‘P’ of prices digital money and a lot of new business models.
Currently we talk about IoT and they say this is about adding electronics to the physical world. Instead of that what happen is all product in a digital environment tends to be converted in a service. Again the ‘P’ of product is obsolete and has to be totally redefined.
Having that in mind IMHO we have huge opportunities within reach.
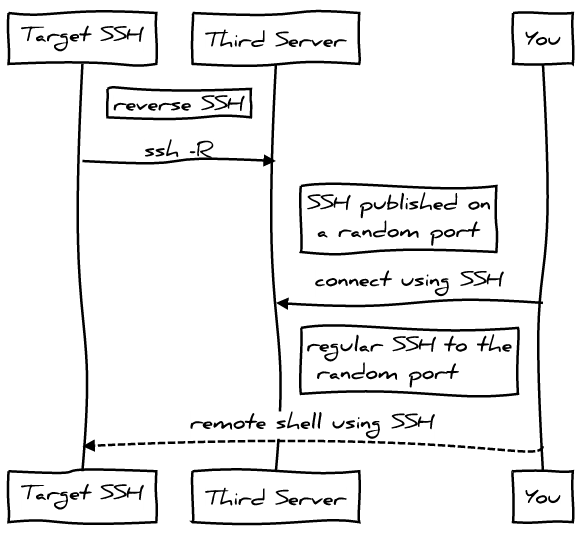
I love “ssh -R” reverse SSH is really useful when you have to get access to a Linux machine behind a NAT or firewall. One of the most powerful scenarios to get that running is use a third machine with a public IP address. The idea will be run reverse SSH command in target Linux and publish a forward port at the third server, so you only have to connect to a published port in that third server and you’ll get the target Linux thanks to the reverse SSH connection open between them.
A long time ago I talked about that in my podcast “2×04 SSH avançat“.
With this scenario we have a security challenge with the SSH user account on the “third server”, we want a secure user:
without shell and sftp access
secure enough to only allow port forwarding features
access only allowed with authorized keys
I’m not going to give precise Linux instructions on that limited user, but for user you’re not going to have problems to get that:
/etc/passwd(-):
limited-user:x:1001:1001::/home/limited-user:
/etc/shadow(-):
limited-user:!:17037:0:99999:7:::
/etc/ssh/sshd_config:
Match User limited-user
    GatewayPorts yes
    ForceCommand echo 'This account can only be used for maintenance purposes'
Of course, you’ll have your own UID, GID and use your own username. And at “/home/limite-user/.ssh/authorized_ssh” you’ll have to pub public key of the clients that want to use the service.
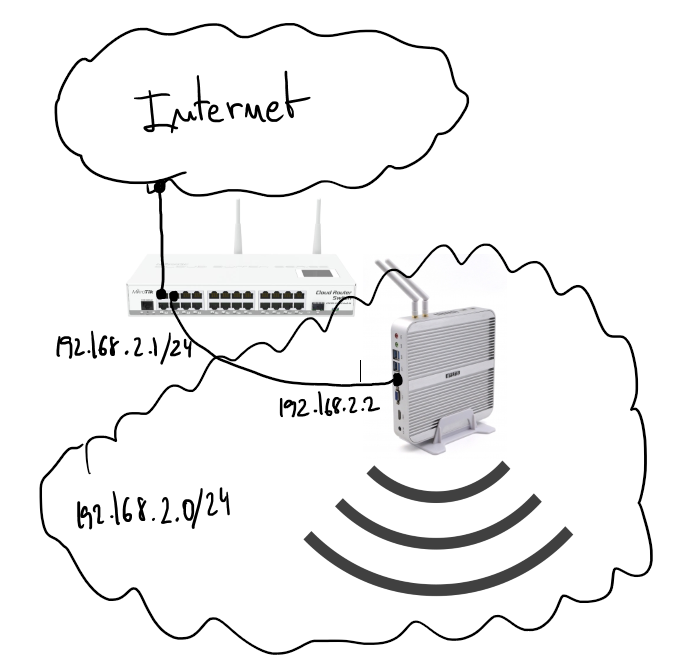
It’s important to have a very clear picture about the scenario that we’re going to configure in that case because it’s a little bit particular. This is an evolution of the previous post: Ubuntu server as wifi AP and Mikrotik as a DHCP server
There is a server running Ubuntu 16.04 and offering wifi service as an AP. The wifi interface is in bridge mode with the ethernet port and send all traffic to the Mikrotik gateway where there is a DHCP server in charge to serve IP address to wifi clients.
Start by configuring the bridge in the Ubuntu server. File “/etc/network/interfaces”:
Pay attention on “bridge_ports” the wifi interface is not added on the list, this is because until the hostapd is running it doesn’t make sense to do that. You’ll see “bridge=br0” option on hostapd.conf which will fix that misbehavior.
Wifi AP configuration, “/etc/default/hostapd”:
DAEMON_CONF="/etc/hostapd/hostapd.conf"
and “/etc/hostapd/hostapd.conf”:
bridge=br0 # bridge interfaceinterface=wlp3s0 # wifi interface namedriver=nl80211ssid=the_ssid_name # name of your networkhw_mode=gchannel=1macaddr_acl=0auth_algs=1ignore_broadcast_ssid=0wpa=3wpa_passphrase=the_secret_key # secret key to joing with the wifi networkwpa_key_mgmt=WPA-PSKwpa_pairwise=TKIPrsn_pairwise=CCMPlogger_syslog=-1logger_syslog_level=3logger_stdout=-1logger_stdout_level=1
DHCP server configuration on Mikrotik:
# setting the interface address, in my case ether4/ip addressadd address=192.168.2.1/24 interface=ether4 network=192.168.2.0# setting up DHCP on interface 4 of the mikrotik device/ip dhcp-serveradd address-pool=dhcp-pool disabled=no interface=ether4 name=dhcp-pool# network of the DHCP server/ip dhcp-server networkadd address=192.168.2.1.0/24 dns-server=8.8.8.8 domain=your_network.local gateway=192.168.2.1 netmask=24# IP pool used by the DHCP server/ip pooladd name=dhcp-pool ranges=192.168.2.65-192.168.2.70
Sometimes TFTP is the only protocol available to exchange files with an embedded system. So, it’s very easy to have that supported in our workstation or any other place to exchange files with those systems.
Set up steps:
apt-get install tftpd-hpa
modify file “/etc/default/tftpd-hpa”:
TFTP_OPTIONS="--secure --create"
–secure: Change root directory on startup. This means the remote host does not need to pass along the directory as part of the transfer, and may add security. When –secure is specified, exactly one directory should be specified on the command line. The use of this option is recommended for security as well as compatibility with some boot ROMs which cannot be easily made to include a directory name in its request.
–create Allow new files to be created. By default, tftpd will only allow upload of files that already exist. Files are created with default permissions allowing anyone to read or write them, unless the –permissive or –umask options are specified.
Needed to allow uploads in that directory:
chown -R tftp /var/lib/tftpboot
Restart and check if the service is running:
service tftpd-hpa restartservice tftpd-hpa statusnetstat -a | grep tftp
At the beginning of August I’ve received a new home server, I decided to stop my old HP ML110 G5 and substitute that by a new silent and low power server also based on Intel technologies in this case it’s al i5 with 8G of RAM and 128GB of SSD for less than 300€ including custom costs I think it’s a very good investment.
I installed Ubuntu 16.04 LTS server, I don’t tried de Win10 pre-installed. I happy to see a very new and powerful BIOS with tons of options. But in this blog entry I want to explain how to set-up the wifi card as a wifi AP. I didn’t have to do anything to configure the card. It worked by default.
Ralink corp. RT3090 Wireless 802.11n 1T/1R PCIe
The first thing is check if the wifi network is compatible with the AP mode.
Next thing is install the “hostapd” which is going to take care to set-up the AP. The configuration file have to be something like that “/etc/hostapd/hostpad.conf
interface=wlan0 # change that with the wifi interface namedriver=nl80211ssid=test # your wifi network namehw_mode=gchannel=1 # look up for a free channelmacaddr_acl=0auth_algs=1ignore_broadcast_ssid=0wpa=3wpa_passphrase=1234567890 # passwor to join the wifi networkwpa_key_mgmt=WPA-PSKwpa_pairwise=TKIPrsn_pairwise=CCMP
Modify “/etc/default/hostapd” and put that:
DAEMON_CONF="/etc/hostapd/hostapd.conf"
Start the hostapd service:
sudo service hostapd start
Now the AP is running but a DHCP service giving IPs it’s need, I used “isc-dhcp-server”. First thing to configure is “/etc/default/isc-dhcp-server” with the wireless network name:
INTERFACES="wlan0"
Next file to be configured is “/etc/dhcp/dhcpd.conf”:
If it’s needed remember to create the proper iptables rules and enable “ip_forward” in /proc filesystem. I’m not going to describe that because in my case it’s not going to be useful.
This is not a specially interesting post entry but useful as a reference, when you have to use a fast and easy cookbook to setup a wifi AP.
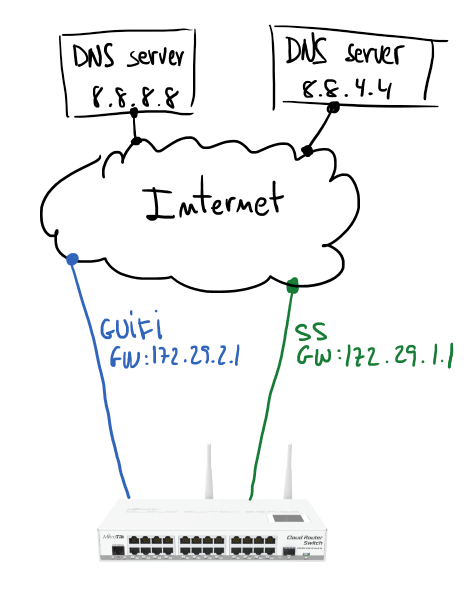
Based on my home configuration I’m going to describe how to set up a Mikrotik to manage fail over Internet connection. Next schema describes a Mikrotik gateway with two internet connections (GUIFI and SS). Assuming GUIFI as a default Internet connection periodic checks on Google DNSes (8.8.8.8 and 8.8.4.4) will allow to know when it’s good to change the default route.
If you have some Linux routing background it will be easier to understand the configuration. Main idea is use policy routing tables and mark packets to use one table or other. In my case I have two routing tables GUIFI and SS, and of course, the default gateway of each of those tables is the gateway indicated in the schema.
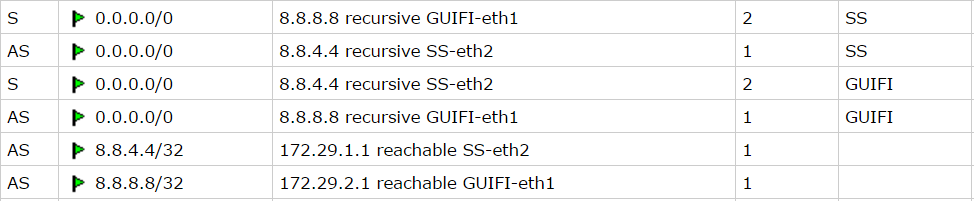
First step is take care about the routes for hosts to monitor; using GUIFI connection will be checking connectivity to 8.8.8.8 and using SS the monitored host will be 8.8.4.4.
Second step is configure two routing tables, those routes will check Internet hosts availability. Routes are resolved recursively (more info), and will be active only if any host is pingable.
Next step will be create marking rules in the firewall:
# next rule mark all LAN traffic (10.2.0.0/26) before routing# it'll be processed by routing table GUIFI# it makes GUIFI the default Internet connection /ip firewall mangleadd action=mark-routing chain=prerouting comment="All LAN traffic" dst-address=\!10.0.0.0/8 new-routing-mark=GUIFI passthrough=no src-address=10.2.0.0/26
If any specific host, service or whatever want to use specific routing table, then you can create new rules with proper mark to redirect the traffic to that Internet connection. But if that path fails other Internet connection will be used.
In my case I have a more complicated scenario, internal VoIP server uses a IP Telephony service only available through GUIFI connection. The way to force that is forbidding traffic to SS connection. A simple firewall rule will help to do that:
# X.X.X.X = IP address of the IP telephony provider/ip firewall filteradd action=reject chain=forward dst-address=X.X.X.X in-interface=\ bridge-lan out-interface=SS-eth2