Category: Networking and Internet

Mini-guia de com usar l’ImageMagick

Reading time: 4 – 6 minutes

imagemagick.png
Es tracta de manipular imatges a través de la línia de comandes, la potència de l’Imagemagick és brutal, així doncs aquí no veurem ni l’1% de tot el que és capaç de fer. Però intentaré fer una petita guia amb algunes funcions força útils. Si voleu aprofundir més amb el tema: Examples of ImageMagick Usage (version 6). Concretament les eines del Imagemagick que usaré són el convert i el composite. Els textos que veureu a continuació estan inspirats també en un parell d’articles d’IBM: Graphics from the command line i l’altre: More graphics from the command line.

Sempre usem la mateixa imatge origen en tots els exemples: (mussols.jpg)

mussols.jpg

Creem marcs a les imatges

Creem un marc amb una doble ralla negre i un fons blanc de 3pixels entre les dues ralles negres d’1pixel al voltant de la imatge origen.

Codi:

convert -mattecolor black -frame 1x1 mussols.jpg mussols-11.jpg
convert -mattecolor white -frame 3x3 mussols-11.jpg mussols-12.jpg
convert -mattecolor black -frame 1x1 mussols-12.jpg mussols-13.jpg

Resultat:

mussols-13.jpg

Haureu vist que al portal uso un codi CSS que em fa apareixer un marc de color gris a una distància de 4 pixels del contorn de la imatge. Doncs bé a continuació us explico com podriem incrustar aquest marc en la propia imatge.

Codi CSS que uso per fer l’efecte:

.imatge img {background-color: #fff;border: 1px solid #a9a9a9;margin: 5px 5px 5px -5px;padding: 4px;line-height:0px;}

Com fer-ho amb Imagemagick:

convert -mattecolor white -frame 4x4 mussols.jpg mussols-7.jpg
convert -mattecolor "#a9a9a9" -frame 1x1 mussols-7.jpg mussols-8.jpg

Resultat:

mussols-8.jpg

Per acabar amb el tema dels marcs, com arrodonir els contorns de la imatge i a més afegir un contorn blanc de 4px i un marc gris d’1px. Aquesta tècnica l’he tret d’un document anomenat: Cutting up Images.

Codi: ( ronded-ne.png, ronded-nw.png, ronded-sw.png i ronded-se.png )

composite -gravity NorthEast rounded-ne.png mussols.jpg mussols-1.jpg
composite -gravity NorthWest rounded-nw.png mussols-1.jpg mussols-2.jpg
composite -gravity SouthWest rounded-sw.png mussols-2.jpg mussols-3.jpg
composite -gravity SouthEast rounded-se.png mussols-3.jpg mussols-4.jpg
convert -mattecolor white -frame 4x4 mussols-4.jpg mussols-5.jpg
convert -mattecolor "#a9a9a9" -frame 1x1 mussols-5.jpg mussols-6.jpg

Resultat:

mussols-6.jpg

Escribint sobre una imatge

Simplement vull afegir una nota de l’autoria i la llicència (autor: Mussols i llicència:”Creative Commons”) de la foto a la part inferior dreta de la imatge, amb lletra arial i mida 20, amb una separació de 2px per sota i per la dreta del marc de la foto.

Codi:

convert -font /usr/X11R6/lib/X11/fonts/truetype/arial.ttf -fill white -pointsize 20 -draw 'gravity SouthEast text 2,2 "(cc) Mussols"' mussols.jpg mussols-9.jpg

Resultat:

mussols-9.jpg

Canviant la mida de les imatges (resize & scale)

Una altre cosa que necessitava fer era canviar de mides les imatges, però sense perdre la geometria de les mateixes. Això ho he trobat al document ImageMagick v6 Examples — Resize or Scaling.Podem mirar aquest exemple, agafem com sempre la imatge origen ‘mussols.jpg’:

convert -resize 320x320 mussols.jpg mussols-10.jpg

Resultat:

mussols-10.jpg

Això no converteix la imatge a 320×320 sinó a 320×240 que és la proporció real de la imatge origen. O sigui que no perd la geometria de la imatge origen. Això és molt útil, perquè podem posar 1024×768 per exemple, i no tindrem mai una imatge més ampla de 1024 ni més alta de 768. Per imatges que han de ser usades en aplicatius que corren sobre una pantalla pot ser molt útil.

També hi ha formes de perdre la gemotria però pel meu cas no era necessari, així que no ho he comentat, però ho podeu mirar al document que he referenciat més amunt i trobareu com fer-ho.

Extensions de Firefox que uso

Reading time: 3 – 5 minutes

firefox.png

Per win ja fa temps que uso Firefox i totes les versions que han anat sortint fins a la versió 1, que tan soroll va fer fa uns dies. Però al linux fins avui usava el Mozilla, així que finalment m’he decidit a instal·lar la versió 1.0 de Firefox i disfrutar de les seves millores sobretot a nivell de velocitat. També he notat que usa una serie de fonts que no són iguals que les que em sortien en Mozilla, molt més boniques, és clar. Bé doncs com no li he posat algunes extensions que em són molt útils:

  • Linky permet administrar enllaços existens dis d’una pàgina, encara que no estiguin marcats com a tal en el codi HTML. La utilitat més interessant que li trobo és permetre verificar que tots els enllaços inclosos en un post publicat al weblog són vàlids. Per això només cal seleccionar l’entrada, primer el botó dret del ratolí­ i seleccionar l’opció Linky -> Open Selected Links in Tabs. D’aquesta forma tots els enllaços que tenim dins el text seleccionat es previsualitzen i, si volem, s’obren en pestanyes separades la qual cosa ens permet verificar que realment funcionen d’una forma encara més comode.
  • BUGMENOT ens dona un usuari i un pass en milers de pàgines que ho requereixen, sobre tot les més famoses. Tot i que jo dec ser gafe perquè al NYT no m’ha funcionat mai.
  • MozEx podem editar una ‘textarea’ amb l’editor que volguem. Aquesta extensió la vaig coneixer a partir del forum del Blog:CMS, concretament en aquest article, on es parla del mozex de mozilla.
  • Web Developer es tracta d’una barra de botons, que no tinc sempre carregada, però que és molt útil quan alguna de les webs personals que mantinc dona algún que altre problema de codi, és realment útils si toqueu webs a nivell de codi, o su uns ‘fisgons’.
  • AdBlock simplement una extensió que intenta bloquejar-nos tots els anuncis que porten les webs d’avui en dia, un ‘incordio’ realment. No va malament del tot.
  • Bloglines Toolkit permet sindicar-se als RSS a través de bloglines mentre estas navegant.
  • SiteBar aquesta extensió em permet usar el SiteBar a la sidebar del Firefox. Si no coneixeu el SiteBar, jo el trobo molt més útil que el del.icio.us. Fa temps vaig escriure sobre el SiteBar: SiteBar: Servidor de Bookmarks/Favoritos

Si busqueu alguna extensió més ‘rara’ que jo no uso, podeu passar-vos per la part d’extensions de la web de mozilla, concretament al producte firefox. Per altra banda també he trobat una pàgina amb una recopilació de les extensions que esta molt bé: Extensions Room de mozdev.org. Si algú vol desenvolupar extensions per Firefox he trobat una guia ràpida.

Una cosa que no sé fer amb el firefox i que m’agradaria saber fer, per si algú ho sap, és aconseguir que es guardin les pàgines de tots els tabs quan tanqui el navegador de forma que quan el torni a obrir es tornin a carregar automàticament.

Linux Tips: Modules, Who Are They, And How Do They Work?

Reading time: 2 – 3 minutes

[ Via Migraine Heartache ] A very nice feature of the Linux kernel is the modules. Modules are pieces of software that can be loaded and unloaded from the kernel at runtime. That way you can save kernel memory (and that’s important for small machines, since kernel memory is never swapped out on disk), and keep your kernel clean when you’re not working with some of your hardware.

Especially sound and network cards are really good to compile as modules, since sometimes they are a bit hard to configure, and when you have a module, you don’t have to recompile and reboot your kernel to configure some irq or io setting.

The Tools Used

The tools you use to handle modules are all located in /sbin. They are insmod, modprobe, lsmod, depmod and rmmod.. Notice the names, and compare them to some often used unix commands such as ls and rm and you’ll immediatelly understand what each command will do for you. As always I recommend reading the manual pages. Anyway, here’s what they do:

  • lsmod – List the modules currently loaded. A completely harmless command, even a normal user can run it.
  • rmmod – Removes a loaded module from memory. Checks dependencies, ie if a module needs another module, the other module may not be unloaded before the first one.
  • insmod – Inserts a specific module in memory. You may give a path, or just a filename with or without extension. In the latter case, insmod will search some standard module paths to find the module.
  • modprobe – Inserts a module in memory, but checks dependencies. If you modprobe module A, and module A needs module B to run, modprobe will insert module B and then module A.
  • depmod – Calculates dependencies between modules needed by the other module commands. This is most probably done by your init scripts at system startup, but some time you may need to execute a depmod -a.
  • modinfo – ens dona informació sobre les funcions del mòdul, els paràemtres que suporta, etc.(se l’havien deixat)

How do I make modules?

When you compile your kernel, you choose to make things as modules, instead of into the kernel itself.

The modules will be installed when you do a make modules ; make modules_install after your kernel is compiled. They will reside in a directory called /lib/modules/xx.yy.zz where xx.yy.zz is your kernel version.

Treballant amb cookies de sessió i PHP

Reading time: 1 – 2 minutes

A vegades necessitem parlar amb una web des de PHP i aquesta usa cookies de sessió sense les quals no podem parlar amb la web. Per agafar la cookie d’inici de sessió podem usar aquesta funció:

function getgaleta($server, $port)
{
   $cont = "";
   $ip = gethostbyname($server);
   $fp = fsockopen($ip, $port);
   if (!$fp)
   {
       return "Unknown";
   }
   else
   {
       $com = "GET http://www.barcelonastyle.com/gc/web/webesp/framesetxsl.asp HTTP/1.0rnrn";
       fputs($fp, $com);
       while (!feof($fp))
       {
           $cont .= fread($fp, 500);
       }
       fclose($fp);
       return substr($cont, strpos($cont, "Set-Cookie: ")+12, 45);
   }
}

Si ara que ja tenim la cookie el que volem fer és usar-la per fer peticions contra el site, podem usar aquesta altre funció:

function getcontent($server, $port, $file,$galeta)
{
   $cont = "";
   $ip = gethostbyname($server);
   $fp = fsockopen($ip, $port);
   if (!$fp)
   {
       return "Unknown";
   }
   else
   {
       $com = "GET http://".$server.$file." HTTP/1.0rnCookie:".$galeta."rnrn";
       fputs($fp, $com);
       while (!feof($fp))
       {
           $cont .= fread($fp, 500);
       }
       fclose($fp);
       return $cont;
   }
}

Tonto però útil, tinc moltíssimes més funcions però tampoc és qüestió de marejar, només que les he trobat útils aquestes junt amb les dues anteriors.

Understanding and Attacking DNS

Reading time: 2 – 2 minutes

dns.gif

The Domain Name System (DNS) is a distributed resource used by most every network application. DNS data is generally trusted implicitly; false data therefore can jeopardize the integrity of network traffic and allow attackers to play manin- the-middle with all traffic. DNS security depends on the client, server, and their respective trust relationship. Securing the trust relationship and building a reliable server can create a reliable and secure DNS structure for the system administrator behind your corporate and private communication requirements. Security of a DNS server varies according to its active role and name resolution requirements. Server responsibilities can be classified as one of three types. Depending on the need of the server, one specific role should be chosen; in particular situations, multiple roles can be supported simultaneously on one physical server. In this shared configuration, authoritative and resolver servers are generally together. Running an individual server for each DNS role is ideal, specifically in a large production environment. After understanding the individual roles and mechanics between each server and experiencing problems individually, an administrator can securely and reliably maintain multiple DNS roles on a single system. DNS security is custom for each type of server, each type of communication, and each common software distribution, all of which will be explained in this article via an in-depth walkthrough.

OpenSSH for Windows

Reading time: < 1 minute

OpenSSH for Windows is a free package that installs a minimal
OpenSSH server and client utilities in the Cygwin package without
needing the full Cygwin installation. This is similar to the package
formerly available from NetworkSimplicity.

The OpenSSH for Windows package provides full SSH/SCP/SFTP support.
SSH terminal support provides a familiar Windows Command prompt, while
retaining Unix/Cygwin-style paths for SCP and SFTP.

Sancho: mldonkey GUI

Reading time: < 1 minute

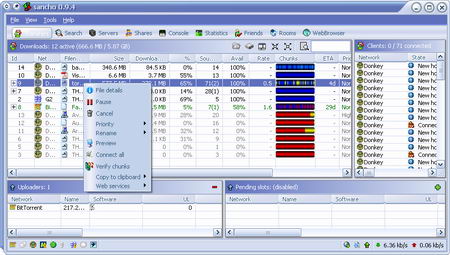
Sancho is a gui that connects to a p2p core application. Power users
that use p2p applications usually choose one that has core/gui
separation. sancho provides an easy to use, powerful, and configurable
gui, currently supporting the gui protocol of the popular mldonkey
core.

The sancho project is written for fun, but also to test some new
and exciting technologies. It is written in Java using the SWT widget
toolkit and can be compiled on multiple platforms with the gcj compiler
to native machine code (java=slow and bulky? not anymore! no external
java runtime required!). Windows, Linux, OSX and other popular
operating systems are supported.

sancho.jpg

HTTrack: web spider

Reading time: 2 – 2 minutes

La Daphne em va demanar si li podia fer la còpia en local d’una pàgina web d’acpuntura, ja que aquesta pertany a un portal generalista i té por de que un dia deixi d’exisitir. Així que m’ha vingut al cap provar el Pavuk un webspider que vaig veure a gentoo packages fa uns dies. No us faré perdre massa el temps, la meva valoració és: eggs!

Així que m’he dirigit al goolge i he buscat un webspider GPL i que si pogués ser tingués versió per win, per si la Daphne volia fer una altre còpia d’alguna altre pàgina. El primer de la llista he trobat el HTTrack, i d’aquí ja no he passat. Després d’usar-lo us puc assegurar que és una passada lluny de les complexitats del pavuk i el wget. No has de ser un gurú del HTTP per poder fer un mirroring sense suar.

httrack.jpg

Obviament també teniu versió per linux i per: Windows 9x/NT/2000/XP o Linux/Unix/BSD. Ho podeu comprobar a la pàgina de descàrregues. Per cert, en linux només he trobat una interficie per KDE a la Gentoo si algú en sap alguna per GNOME que m’avisi, malgrat això la interficie esta molt bé.

Maia Mailguard: GUI d’amavisd-new (PHP+perl)

Reading time: 1 – 2 minutes

A tavés d’un article de la Linux Journald he trobat una eina que em canviarà la vida a nivell del correu brossa, una passada:

The Maia Mailguard project began its life as a simple Web front end for amavisd-new, designed to let users
adjust their content filter settings and manage their quarantines from a convenient interface. The project
proved quite popular with ISPs, Web-mail providers and companies offering off-site content filtering,
however, and the needs of these larger-scale clients soon developed Maia Mailguard into something much more
sophisticated.

Maia Mailguard is a complete spam and virus management system, consisting of PHP, SQL and Perl scripts, a
MySQL or PostgreSQL database and, of course, amavisd-new, SpamAssassin and supported virus scanners. Arrays
of content filters can be managed from a single Maia interface, all sharing the same SQL database. Designed
to make content filtering, quarantine management and spam reporting easier, Maia Mailguard is in many ways a
new kind of tool for mail users.

LUFS: ex ftpfs, sshfs, etc

Reading time: 2 – 4 minutes

LUFS
is enabling you to mount into your file hierarchy a remote computer’s file
system, which is accessible by various means (ftp, ssh, etc.). Then, the access
to the remote files will be completely network transparent. In other words,
you’ll be able to read/modify remote files as if they were local, watch
movies/listen to MP3s from FTP/SSH/Gnutella servers without copying them
locally.

The reason for the
userspace stuff: there are operations only suited for userspace
(cryptography for example) and implementing them in kernel would be
bloat.

The reason for the kernel
stuff: I think it’s important to keep the file system access point at
the lowest level in order to allow all the applications to use it.
Consider KDE: it implements its own virtual file system, a great one,
but only KDE applications can take advantage of it. So does GNOME, MC
and others. Suddenly we have lots of overlapping userspace file
system implementations, a real waste…

Communication between the
kernel module and the daemon is done through UNIX domain sockets.
This makes LUFS best suited for networked file systems, where this
indirection overhead (userspace <-> kernel <-> userspace)
is small compared to the speed penalty due to the network itself.

LUFS can be regarded as
doing the same job as the VFS (virtual file system switch) in the
kernel: it is a switch, distributing the file system calls to its
supported file systems. With a big difference: LUFS file systems are
implemented in userspace. This would be a drawback for local file
systems where the access speed is important, but proves to be a huge
advantage for networked file systems where the userland
flexibility is most important.

This flexibility allowed
for implementation of SSHFS for example, in a pretty straightforward
manner, using the already existing openssh
infrastructure. Lots of other “exotic” file systems are in the
planning phase: socketfs, httpfs, webdavfs, freenetfs, etc. Just
imagine mounting a freenet file system and accessing all the goodies
as they were local…

Scroll to Top