New home server working as a wifi AP and DHCP server
At the beginning of August I’ve received a new home server, I decided to stop my old HP ML110 G5 and substitute that by a new silent and low power server also based on Intel technologies in this case it’s al i5 with 8G of RAM and 128GB of SSD for less than 300€ including custom costs I think it’s a very good investment.

I installed Ubuntu 16.04 LTS server, I don’t tried de Win10 pre-installed. I happy to see a very new and powerful BIOS with tons of options. But in this blog entry I want to explain how to set-up the wifi card as a wifi AP. I didn’t have to do anything to configure the card. It worked by default.
Ralink corp. RT3090 Wireless 802.11n 1T/1R PCIeThe first thing is check if the wifi network is compatible with the AP mode.
iw list
...
Supported interface modes:
         * IBSS
         * managed
         * AP
         * AP/VLAN
         * monitor
         * mesh point
...
Next thing is install the “hostapd” which is going to take care to set-up the AP. The configuration file have to be something like that “/etc/hostapd/hostpad.conf
interface=wlan0   # change that with the wifi interface name
driver=nl80211
ssid=test         # your wifi network name
hw_mode=g
channel=1         # look up for a free channel
macaddr_acl=0
auth_algs=1
ignore_broadcast_ssid=0
wpa=3
wpa_passphrase=1234567890   # passwor to join the wifi network
wpa_key_mgmt=WPA-PSK
wpa_pairwise=TKIP
rsn_pairwise=CCMP
Modify “/etc/default/hostapd” and put that:
DAEMON_CONF="/etc/hostapd/hostapd.conf"Start the hostapd service:
sudo service hostapd startNow the AP is running but a DHCP service giving IPs it’s need, I used “isc-dhcp-server”. First thing to configure is “/etc/default/isc-dhcp-server” with the wireless network name:
INTERFACES="wlan0"Next file to be configured is “/etc/dhcp/dhcpd.conf”:
ddns-update-style none;
log-facility local7;

subnet 192.168.1.0 netmask 255.255.255.0 {
    range 192.168.1.128 192.168.1.253;
    option domain-name-servers 192.168.1.1;
    option routers 192.168.1.1;
}
Don’t forget to start the service:
sudo service isc-dhcp-server startIf it’s needed remember to create the proper iptables rules and enable “ip_forward” in /proc filesystem. I’m not going to describe that because in my case it’s not going to be useful.
This is not a specially interesting post entry but useful as a reference, when you have to use a fast and easy cookbook to setup a wifi AP.
Internet fail over connection with Mikrotik
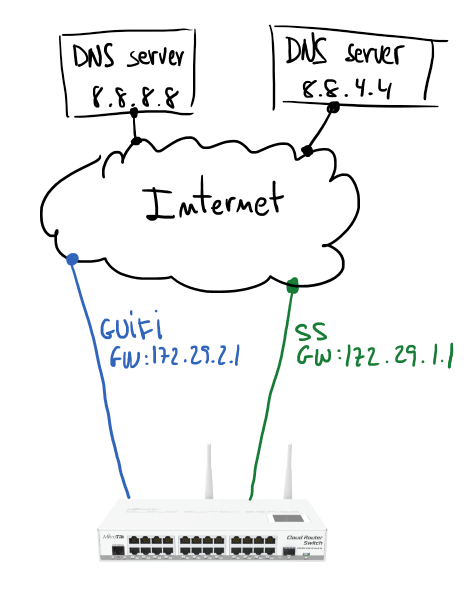
Based on my home configuration I’m going to describe how to set up a Mikrotik to manage fail over Internet connection. Next schema describes a Mikrotik gateway with two internet connections (GUIFI and SS). Assuming GUIFI as a default Internet connection periodic checks on Google DNSes (8.8.8.8 and 8.8.4.4) will allow to know when it’s good to change the default route.
If you have some Linux routing background it will be easier to understand the configuration. Main idea is use policy routing tables and mark packets to use one table or other. In my case I have two routing tables GUIFI and SS, and of course, the default gateway of each of those tables is the gateway indicated in the schema.
First step is take care about the routes for hosts to monitor; using GUIFI connection will be checking connectivity to 8.8.8.8 and using SS the monitored host will be 8.8.4.4.
/ip route
add dst-address=8.8.8.8 gateway=172.29.2.1 scope=10
add dst-address=8.8.4.4 gateway=172.29.1.1 scope=10
Second step is configure two routing tables, those routes will check Internet hosts availability. Routes are resolved recursively (more info), and will be active only if any host is pingable.
# routing table for GUIFI
/ip route
add distance=1 gateway=8.8.8.8 routing-mark=GUIFI check-gateway=ping
add distance=2 gateway=8.8.4.4 routing-mark=GUIFI check-gateway=ping
# routing table for SS
/ip route
add distance=1 gateway=8.8.4.4 routing-mark=SS check-gateway=ping
add distance=2 gateway=8.8.8.8 routing-mark=SS check-gateway=ping
Routing table looks like that:

Next step will be create marking rules in the firewall:
# next rule mark all LAN traffic (10.2.0.0/26) before routing
# it'll be processed by routing table GUIFI
# it makes GUIFI the default Internet connection
/ip firewall mangle
add action=mark-routing chain=prerouting comment="All LAN traffic" dst-address=\
    !10.0.0.0/8 new-routing-mark=GUIFI passthrough=no src-address=10.2.0.0/26
If any specific host, service or whatever want to use specific routing table, then you can create new rules with proper mark to redirect the traffic to that Internet connection. But if that path fails other Internet connection will be used.
In my case I have a more complicated scenario, internal VoIP server uses a IP Telephony service only available through GUIFI connection. The way to force that is forbidding traffic to SS connection. A simple firewall rule will help to do that:
# X.X.X.X = IP address of the IP telephony provider
/ip firewall filter
add action=reject chain=forward dst-address=X.X.X.X in-interface=\
    bridge-lan out-interface=SS-eth2
I hope previous simple notes are useful for you, they are inspired by Advanced Routing Failover without Scripting.
OpenVPN between pfSense and Mikrotik
 Assuming previous scenario I’m going to describe the required configurations on pfSense and Mikrotik. Certifcate creation is not part of the scope of this document, if you are not familiar about how to do that it’s a good idea to use the pfSense certificate manager to do it. My last advice is take care with certificates 90% of problems that I found in my life when I was working on VPNs are because of that. Take your time to check it before spend your time playing with other configurations.
In that scenario pfSense will play the role of the VPN server and Mikrotik will be the client, so I’m going to start describing pfSense configurations.
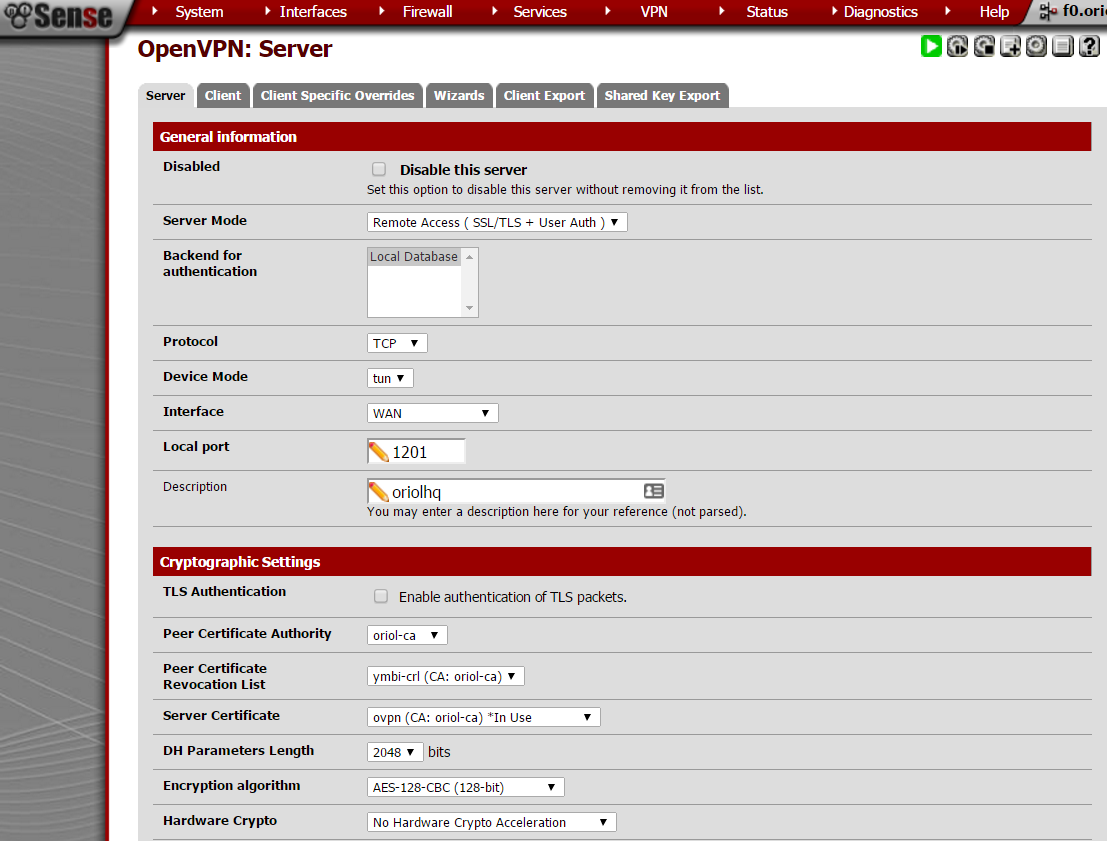
Create OpenVPN server on proper section:
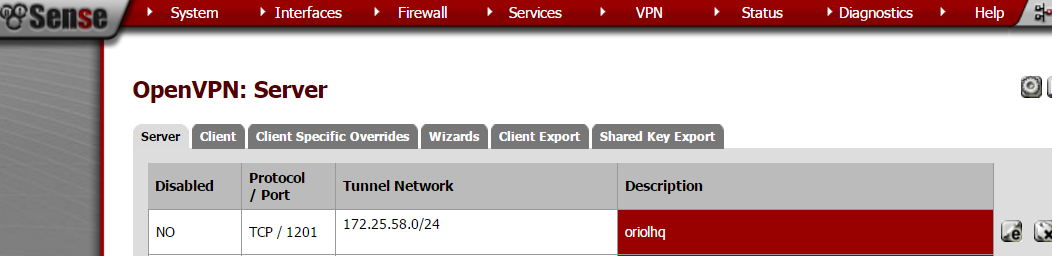
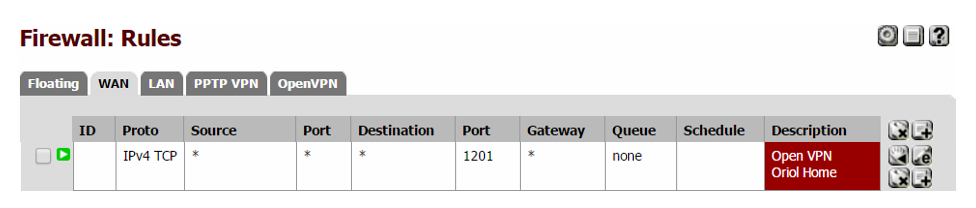
Important things to take in account when you set up the parameters are socket has to be a TCP socket in my case I decided to use port 1201:
 Next settings on the same place are about local network and tunnel IP addresses, this is required to create proper routing rules on the server and the client.
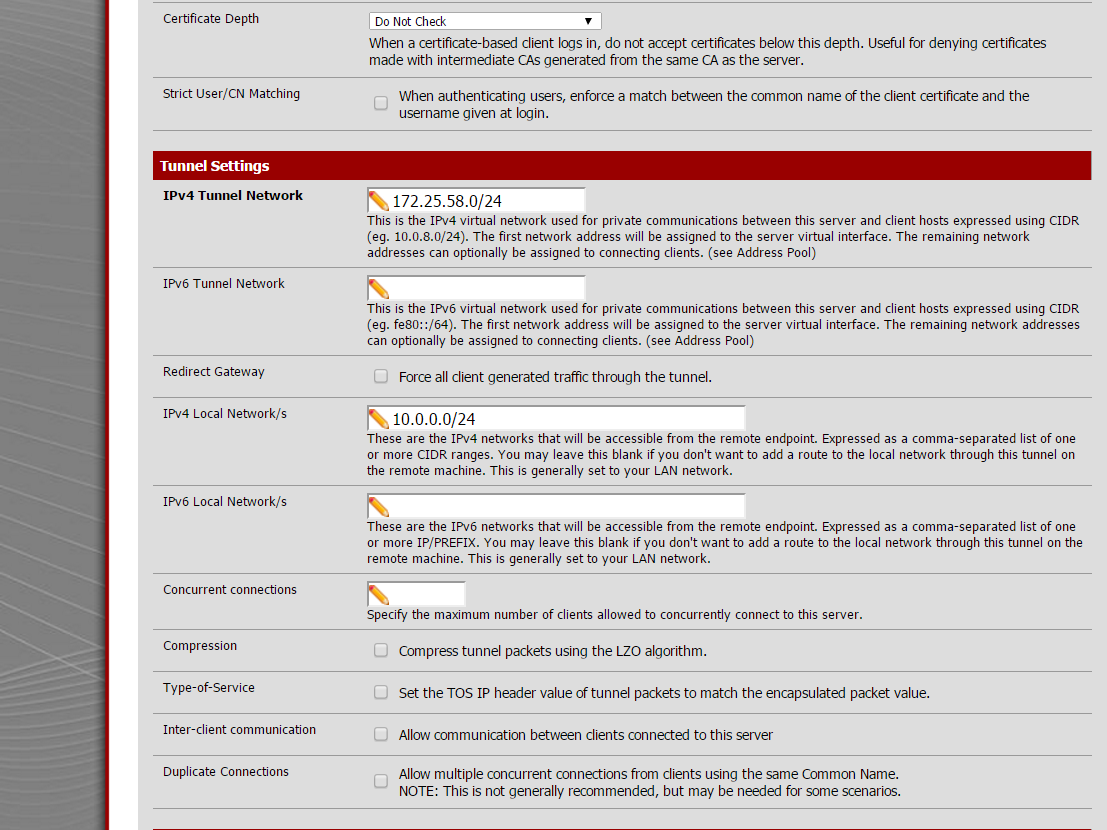
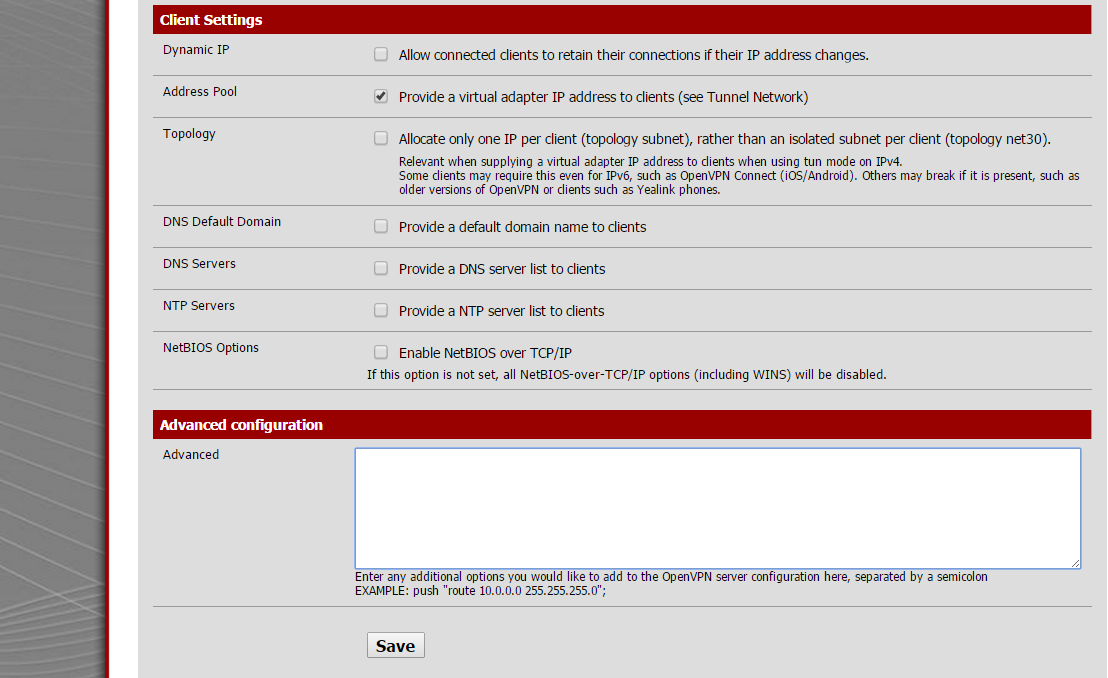
Last part to configure on this sections is extremly simple, only take care to unmark everything and check “address pool” setting.
Remember to open that port on Firewall rules.
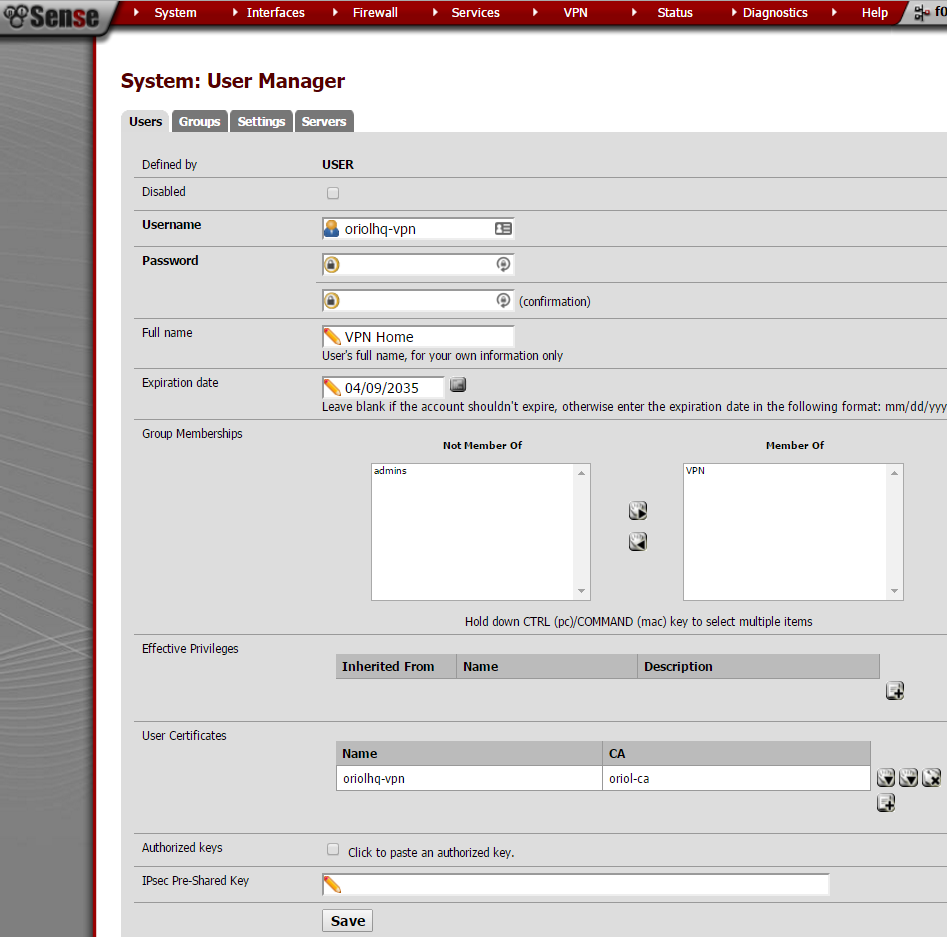
A VPN user is required to authenticate the process, just go to “User Management” inside the “System” menu:
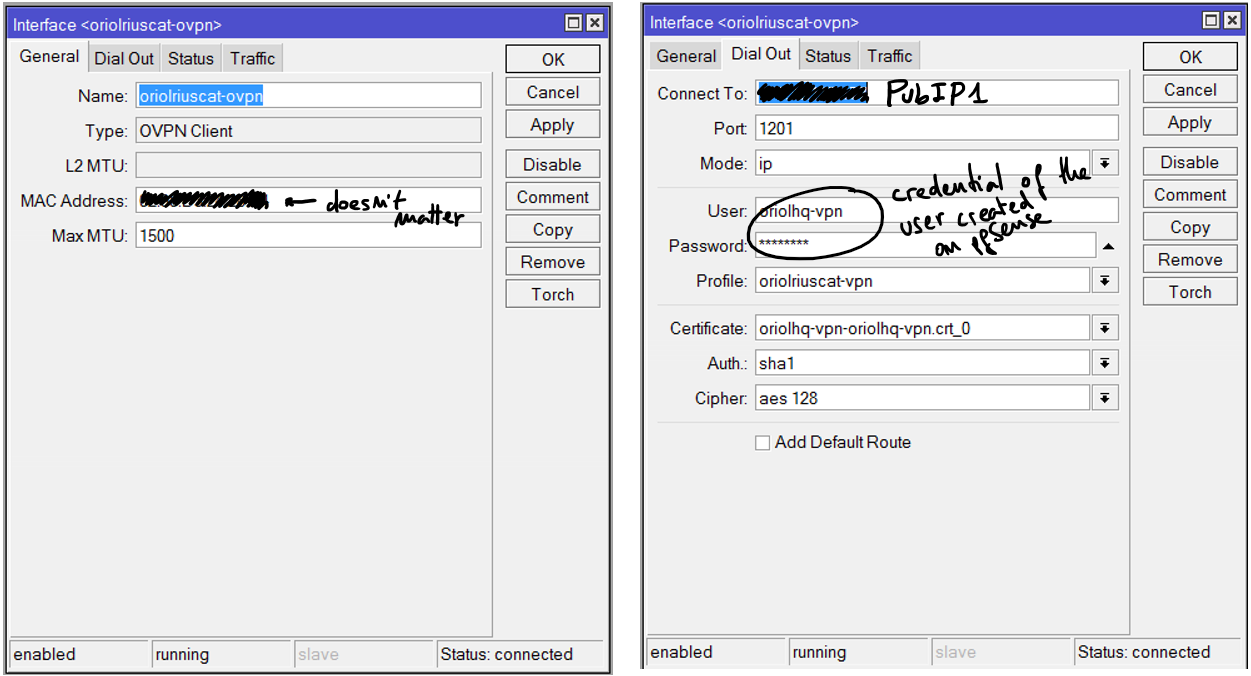
pfSense is configured, now it’s time to set-up the OpenVPN client on Mikrotik using Winbox. Remember to import the certificates:

Click on “PPP” this on the left menu:
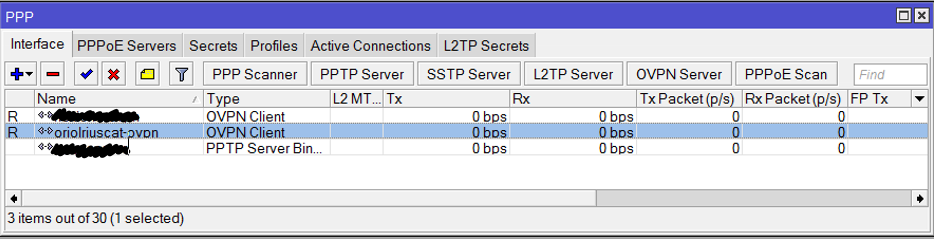
Add an OVPN Client connection using the “+” button, the parameters for that connection are:
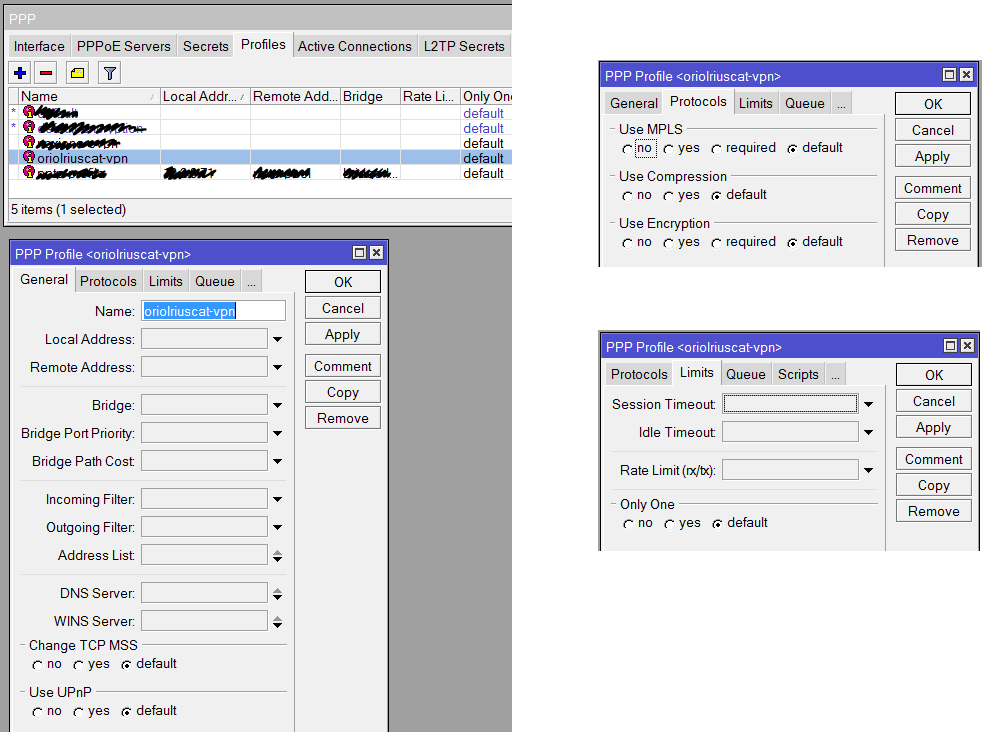
Another required thing to define on “PPP” is the profile, click on the tab “Profile” and using the button with symbol “+” create a new profile like that:
Everything is ready, now it’s time to check if the connection is OK. First go to the OVPN client on Mikrotik, remember this is on “PPP” menu option and inside tab “Interfaces”. Clicking on the interface you’ll see the status details. If it’s disconnect going to pfSense or Mikrotik logs you can see the negotiation details.
Remember usually the problem is with your certificates, but first of all you have to ensure that the negotiation tries to start.
Enjoy it and good luck.
Sniffing on Mikrotik and streaming in real-time to Wireshark
When you have a Mikrotik in any point of your network and you want to launch a sniffer for debugging or troubleshooting, a part from original RouterOS tools, you can stream captured traffic in real-time to Wireshark and inspect packets there.
The idea is exactly the same like I explained on the entry: Sniffing traffic in a Linux box and streaming in real-time to Wireshark on Windows.
Mikrotik configuration using the web interface is like that:
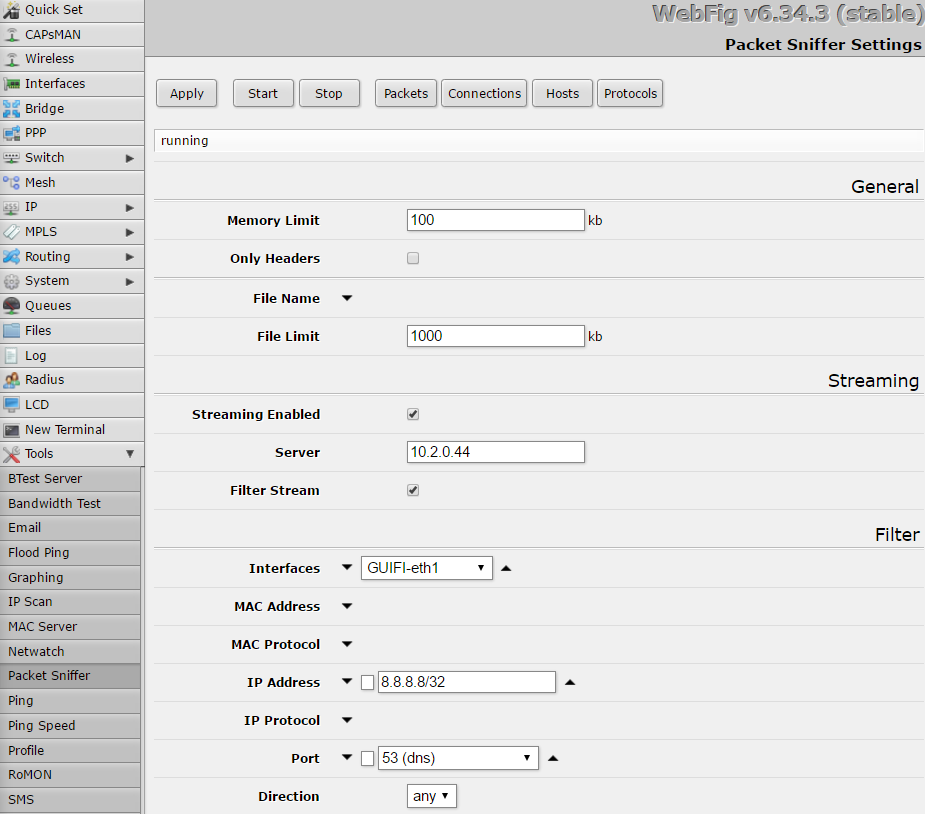
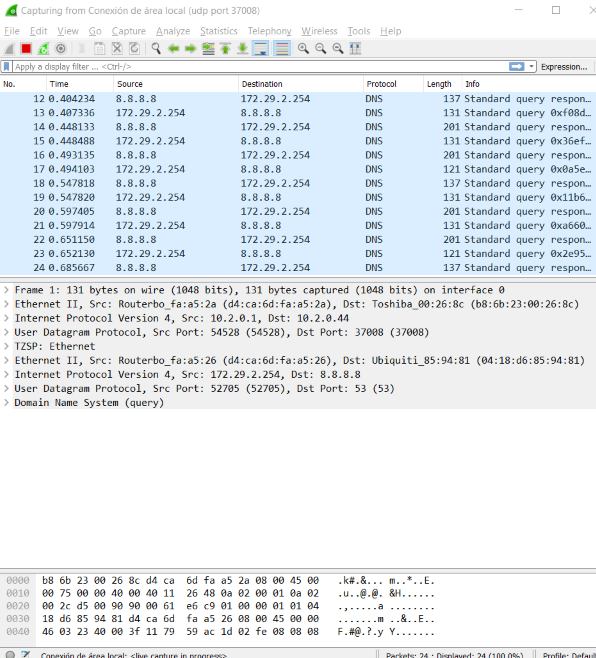
We assume 10.2.0.44 is the IP address of the Wireshark box, ensure that you don’t block UDP traffic on port 37008 because the stream from Mikrotik uses that target port. And define your own filters.
About Wireshark configuration is really simple, just set up the filter to allow only traffic from sniffing stream and select the network interface where traffic comes.
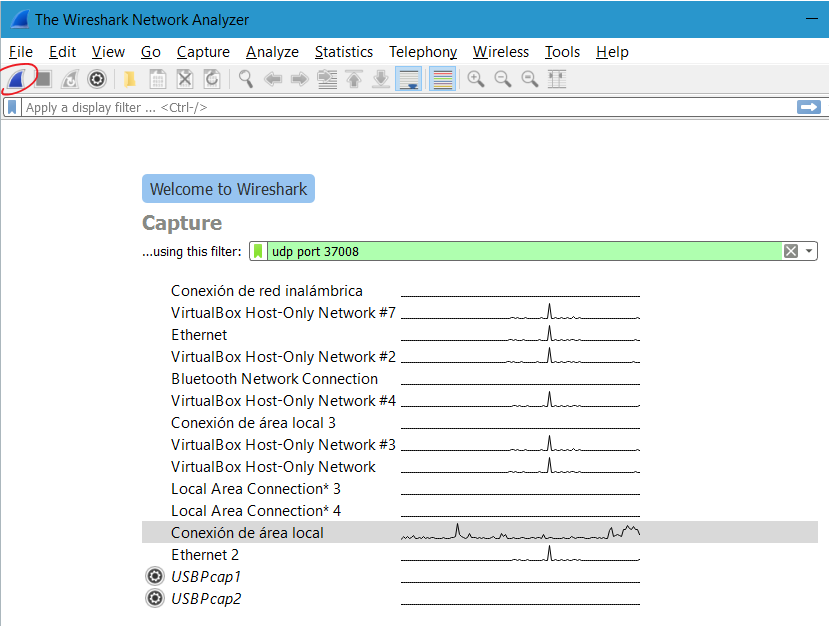
Previous captures allow us to debug DNS queries to Google DNS service, this is the result when you click to the icon marked with a red circle on previous screen capture.
Setting alternative getty service on Ubuntu with systemd
There is an a curses app called wicd-curses which uses a service called wicd, thanks to that app is possible to setup networking configuration for wired and wireless networks using a ncurses environment.
The purpose of the next cookbook is get the wicd-curses running on tty1 after the Ubuntu boots; allowing a console user configure networking settings without login in the system. After installing the wicd-curses package we have the daemon running. The first thing to do is ensure that systemd is taking take of the service:
systemctl enable wicd.serviceNext we have to stop the service that launch getty on tty1 when the system boots:
systemctl disable getty@tty1.serviceNow it’s time to define configuration file for our service /etc/systemd/system/wicd-boot.service:
[Unit]
Description=WICD ncurses on tty
After=wicd.service

[Service]
Type=simple
StandardInput=tty
StandardOutput=tty
RemainAfterExit=yes
ExecStart=/usr/bin/wicd-curses
Restart=always
RestartSec=2


[Install]
WantedBy=multi-user.target
Finally enable wicd-boot.service is required:
systemctl enable wicd-boot.serviceTry new configuration is possible without reboot just doing:
systemctl daemon-reload
systemctl restart wicd-boot.service
# check if the service is running with
systemctl status wicd-boot.service
On other tty consoles we also have getty but not in tty1 where we have the wicd-curses interface. When we reboot the system we have the same behavior. Before finish the email I want to mention two helping references:
- Arch linux forum: how autostart Interactive program at boot before tty appears
- systemd man page
Extracting private and public keys from a p12 file
PKCS#12 is a container for storing many cryptography objects as a single file. It is commonly used to bundle a private key with its X.509 certificate or to bundle all the members of a chain of trust. This is a fast and simple summary about how to extract your keys from those kind of files:
#Private key:
openssl pkcs12 -in file_name.p12 -nocerts -out private.key
#Certificates:
openssl pkcs12 -in file_name.p12 -clcerts -nokeys -out public.crt
Recurrently I have to access to a usuful guide about those kind of openssl parameters, let me refer that guide:
The Most Common OpenSSL Commands (local copy)
Update 2016/09/19
Usefull links for SSL: