How to install Homie libraries on Arduino IDE
The steps that explain how to install Homie libraries and its dependencies on the official documentation are a little bit tricky and some of you asked me about how I did it. So I decided to record a clip explaining the steps:
Please tell if it was useful for you, and thanks for your interest.
Local copy of the video:
Entrevista a Radio Vilafranca sobre el meu blog
Ahir dilluns es va emetre per Radio Vilafranca una entrevista de 20 minuts que hem van fer relativa al meu blog. Concretament al magazine “Penedès Gamma extra” hi ha una secció dedicada a la Penedesfera, comunicatat de bloguers del Penedès, en la que van entrevistant a diferents autors de blogs i aquest cop m’ha tocat a mi contestar algunes preguntes sobre l’origen del blog i d’altres similars.
A continuació teniu l’entrevista enregistrada:
També esta disponible a través d’ivoox:
Per cert, el Daniel Garcia a través del seu blog també ha fet menció de l’entrevista en aquesta entrada. Aprofito des d’aquí per donar-li les gràcies a l’oportunitat que em va oferir ja que ell és l’impulsor de la idea. MOLTES GRÀCIES.
Video of the conference about my Smart Home in the IT Arena (Lviv,UA)
Finally I have the chance to share with you the video of the conference that I gave some months ago. Remember it was about my low cost home automation systems, may be the most interesting thing will be that most of the presentation is a real time demostration aobut how I create those systems.
If you want to take a look of the presentation slides:
I hope it was interesting, or useful for you.
Tancant el 2016
Comencem parlant de la família, la casa i el poble…
Aquest any hem donat la benvinguda al 2017 des de Cuba; així doncs, durant aquestes vacances nadalenques envoltades per celebracions familiars la meva interacció amb l’ordinador ha estat pràcticament nula i per si fos poc durant les vacances no vaig connectar a Internet ni amb el mòbil. Sembla impossible, oi? doncs es pot fer i a més es posa molt bé. La veritat és que el mes de desembre va arribar amb una agenda pleníssima plena de compromisos personals i professionals. Tot plegat es va convertir en una cursa que ha acabat amb la tornada a la feina el passat dilluns dia 9. Així doncs tot i que amb retard ara toca fer el tradicional, i tan útil, resum anual.
Com no pot ser d’una altre manera aquest any ha vingut marcat per una notícia meravellosament inqualificalble. Ben a principi d’any, concretament el 17 de febrer el Roc va arribar a les nostres vides i com tothom diu, perquè és ben cert, ens va canviar la vida per sempre. Ja res tornarà a ser igual i totes les prioritats que t’havies marcat amb aquells valors que creies que tenies tan marcats canvien totalment. Potser no és algo que passi realment de cop, almenys jo he anat necessitant el meu temps per anar-me’n adonant i comprovant com això era així però no es pot negar que ara el centre de l’univers és el Roc. És curiós perquè quan més miro el Roc més recordo el Pol, no és algo que m’entristeixi però evidenment hem posa nostàlgic i el trobo a faltar. Per sort, una bona abraçada del Roc ajuda a agafar forces per mirar endavant.
Ara mateix el Roc és a piscina, va a la llar d’infants i ja s’enfila per tot arreu. Amb quasi 11 mesos té unes ganes d’explorar el món increïbles i amb un somriure als llavis que realment et fan tenir ganes de dir-li t’estimo i fer-li mil petons. Algunes de les meves sanes rutines les he hagut de canviar, per exemple, he deixat spinning i ho he canviat per Befit que en menys temps faig un treball més complert pel cos. Per sort continuo poden practicar el tennis i la piscina ha quedat aparcada després d’un inici molt prometedor. Pel que fa al meu tema físic aquest any m’han hagut d’infiltrar el colze i la munyeca del braç dret perquè no podia jugar a tennis del dolor que tenia. Cal dir que des de llavors estic súper bé.
A casa hem continuat fent obres, enrajolant diverses parts del jardí i deixant-ho tot apunt per acabar la zona de la barbacoa. Pel que fa al poble estic veient moltíssimes transformacions i grandíssimes millores, potser la última ha estat el centre d’interpretació de l’aigua. Però activitats com engalanar els carrers per la festa major i moltíssimes cosetes més hem fan notar que Torrelavit es modernitza i s’obre a la gent de fora. Com que els temps actuals no només porten bones coses, durant la nit de Sant Joan i estant de vacances a Sardenya ens varen entrar a robar a casa. Així que durant aquest any també hem hagut d’instal·lar una alarma a casa; mai hagués imaginat que això caldria al meu poble. Un lloc on durant molts anys havia aparcat el cotxe davant la porta de casa i amb les claus posades.
Per cert, pels més geeks que llegiu aquesta entrada, l’alarma que m’he posat és una G90B comprada a Aliexpress. Això si, també he comprat unes quantes càmares de videovigilància noves i un grabador. Diria que al proper que se li acudeixi entrar a casa tindrà un bon reportatge a més d’una bona festa de llum i sorolls quan entri. El millor de tot és que he aconseguit connectar els sitemes que he comprat amb el nou sistema domòtic de la casa.
Una altre taca negativa de la modernització del poble és que s’han registrat tres incèndis ben aprop del nucli del poble. Té tota la pinta que van estar provocats, però això encara no s’ha pogut demostrar lamentablement. Tristament en el darrer dels casos les flames van arribar fins al jardí d’una de les cases del barri. Per sort, tot es va poder resoldre en una mala tarda de diumenge i el millor és que el paissatge no ha quedat gaire malmès. Gràcies bombers.
La feina
Pel que fa a aspectes professionals, la companyia que vaig co-fundar fa uns anys ja no es diu M2M Cloud Factory, ara som “Nexiona, IoT connectocrats“. Aprofitant el MWC’16 el recent estrenat departament de marketing va fer el llençament de la nova marca. Però no només hem estat al MWC; hem tingut presència en altres fires com el METIC, WPC de Microsoft a Toronto, però sobretot on ho hem donat tot ha estat al IoT SWC de Barcelona. Durant l’any hem presentat el nou MIIMETIQ LITE; el MIIMETIQ EDGE que va acompanyat d’un hardware de DELL i fins hi tot hem tret productes no-oficials però que s’han venut a clients interessants com el MIIMETIQ Agent. Però a vegades, hi ha petites coses que acompanyen als productes que et fan tanta o més il·lusió, per exemple, finalment el serveis en els que es basa el sistema ja corren en contenidors de Docker, també disposem d’una interfícia gràfica per gestionar les actualitzacions i llicències del producte, a més d’un mòdul per demanar assistència remota de forma automàtica.
Cal dir també que hi ha algún dels nostres clients que han tret solucions realment interessants basades en els nostres productes. Com a ara Vadecity, que ofereix un servei de lloguer de parking per bicicletes a Barcelona. Alguna altre solució pot ser també el sistema de control d’impresores de gran format de Ricoh; o el més que original sistema de vacunació per pollastres d’Hipra que hem montat conjutament amb IBM. Tot plegat amb tecnologia Nexiona. Però la gran notícia de l’any és l’entrada en l’accionariat de l’empresa per part de Tech Data, un dels proveedors d’informàtica més grans del món. Cal dir que és un èxit que realment fa molta il·lusió.
També he pogut dedicar una estona als meus projectes
El més conegut i de moment el més llarg és el blog, aquest any ja ha fet 16 anys des de la primera entrada que hi vaig fer. Així que malgrat sempre arrossegues el sentiment de que voldries haver-hi compartit moltíssimes més coses cal estar content per haver continuat aquesta feina tenaç.
La infrastructura que tinc a casa i a Internet també ha canviat força, la cosa continua en plè procés de re-estructuració i els canvis es succeixen sense parar però algunes cosetes que puc rescatar podrien ser que he parat definitivament el servidor VMWare ESXi que tenia corrent sobre un HP Proliant ML100. Una de les migracions més difícils ha estat canviar el pfSense virtualitzat que hi tenia, el que he fet ha estat programar serveis equivalents dins del Mikrotik CloudSwitch que tinc. Creant-me fins a sis xarxes locals per separar el tràfic de diferents serveis que tinc a la xarxa local. Per exemple, tinc xarxes pels sistemes de seguretat; pels sitemes domòtics; per la veu sobre IP; pels serveis d’internet (DMZ) o per les persones. Fins hi tot m’he creat una xarxa on poso els equips en proves i que de moment no vull que afectin serveis en producció.
Referent als servidors dedicats que tenia a Internet, i que també eren màquines virtuals corrent en un gran servidor VMWare ESXi, els he migrat tots a VPS d’OVH amb l’objectiu de reduir radicalment els costos i baixar les necessitats de manteniment. Per tant ara amb dos servidors VPS i snapshots que faig periódicament m’asseguro que el pitjor que hem pot passar és haver de restaurar la màquina. També disposo d’un tercer servidor dedicat amb moltíssima més capacitat de disc per fer-hi còpies de seguretat.
Degut a tota aquesta migració durant l’any he publicat alguns articles que diria que cal resaltar:
- VPN senzilla amb l’Android i el Mikrotik
- Esnifar tràfic al Mikrotik i enviar-lo al Wireshark
- VPN entre Mikrotik i pfSense
- Connexió a Internet amb control fail-over pel Mikrotik
- Ubuntu server com a AP i servidor DHCP al Mikrotik
- Nou servidor per casa sense ventiladors, petitó, potent i econòmic; amb explicació de com configurar-lo com a AP i servidor DHCP
- Referència a un servei anti-spam de correu ideal per usar davant del nostre servidor privat de correu, competitiu en preu.
Pel que fa a l’smart home (sistema domòtic) aquest any m’he centrat en refer el sistema de calefacció que tenia basat en Panstamp. El nou sistema usa ESP8266 a més d’estar montat fora de cada calefacció a diferència del vell, a més la lògica ara esta enmatzemada en el servidor i no en cada radiador; tota la programació de servidor va sobre NodeRED i per tant és molt senzill mantenir-la. Pel que fa a l’interficie d’usuari estic migrant d’OpenHAB a HomeAssistant, el nou sistema es basa en Python 3 i malgrat estar més verd m’hi trobo molt més còmode. Per desgràcia tot això no esta acabat i malgrat la inestimable ajuda del Dani i alguna altre persona el tema encara esta en fase alpha.
Algunes coses curioses, la primera que m’ha passat aquest any és que m’ha explotat la bateria del Macbook Air que ja tenia aparcat i que per cert tinc a la venta. Una altre és que en un viatge en avió vaig esquerdar la pantalla del portàtil Toshiba i hem va tocar canviar-la per una de nova.
Fins hi tot he donat alguna conferència
Aquest any la meva disponibilitat per assistir a events ha estat molt reduida, però encara he pogut donar tres conferències. Per ser més exactes, he participat en dues taules rodones sobre Industria 4.0; la primera al col·legi d’enginyers de Barcelona i l’altre durant el “Catalan Telecommunications day“. Però la que realment hem va fer més il·lusió sobretot perquè és el primer com que hem criden a parlar a un altre país és la que vaig donar a Lviv (Ucraïna) durant l’IT Arena. En aquesta ocasió vaig parlar sobre la meva “Smart Home” i a més vaig dedicar la major part de la xerrada a fer una demostració de com crear un automatísme per casa “low cost”.
Aquest any també he pogut viatjar
Quan el Roc només tenia dos mesos vaig haver d’anar a Itàlia per temes de feina, així doncs, hem vaig emportar l’Estefania i el Roc i varem poder disfrutar de Cèrvia un petit poble de platja, a més de Bolònia i San Marino. Al cap de dos mesos aprofitant la baixa per maternitat de l’Estefania varem escapar-nos una setmaneta a Sardenya; aquest cop varem viatjar en vaixell, no en avió, les vacances varen estar molt xules tot i que va costar una mica manegar el Roc perquè li van sortir les seves primeres dues dents durant aquella setmana.
També hem fet algunes escapades durant els ponts de l’any a Viella, Puigcerdà i fins hi tot a Menorca on ens hi varem escapar amb el Xavi, la Sabina i les bessones per cel·lebrar el seu aniversari de casament. Però el viatge estrella de l’any ha estat l’escapada a Cuba. Des del 27 de desembre fins el 5 de gener varem poder gaudir de l’hospitalitat cubana. La Havana vieja ens va encantar i el resort turístic del Ocean Varadero “El Patriarca” ens va permetre descansar i disfrutar moltíssim no només del Roc, sinó també de la companyia dels cunyats.
Sense la família a part del viatge a Ucraïna per fer la conferència també he viatjat a Florida, més concretament a St. Petersburg i Clearwater; aprop de Tampa. Tot plegat arrant de la visita als HQ de Tech Data en motiu de la seva entrada a Nexiona. A més de visitar uns quants cops anglaterra per visitar alguns clients, per cert, després de molts anys vaig poder tornar a estar a Oxford realment una ciutat molt interessant.
Windows 10: enable/disable Hyper-V from CLI
Assuming we’re running a Windows shell with administrator privileges, using next commands is possible to enable, or disable, Hyper-V. In my case this is needed because when Hyper-V is running Virtualbox only can run 32bit virtual machines. I require Microsoft VM manager Hyper-V because I also run Docker for Windows and it’s a requirement.
#enable Hyper-V
dism.exe /Online /Enable-Feature:Microsoft-Hyper-V /All

#disable Hyper-V
dism.exe /Online /Disable-Feature:Microsoft-Hyper-V
Using Homie for a temperature sensor
The second episode of ESP8266 programming series. In the next video I describe how to code a firmware for ESP8266 using Arduino IDE. The purpose of that firmware is create a temperature sensor and publish the reading in a MQTT broker.
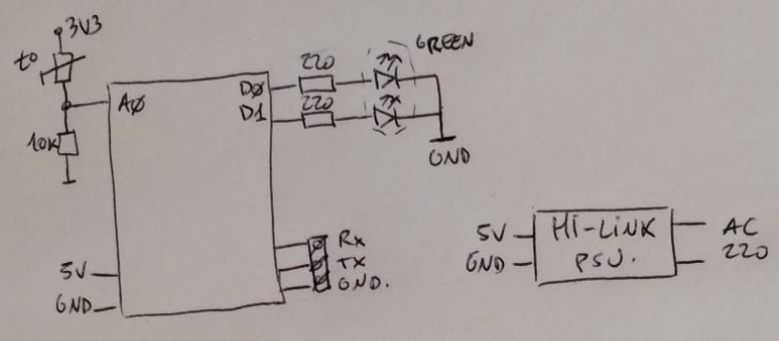
Schema of the system:
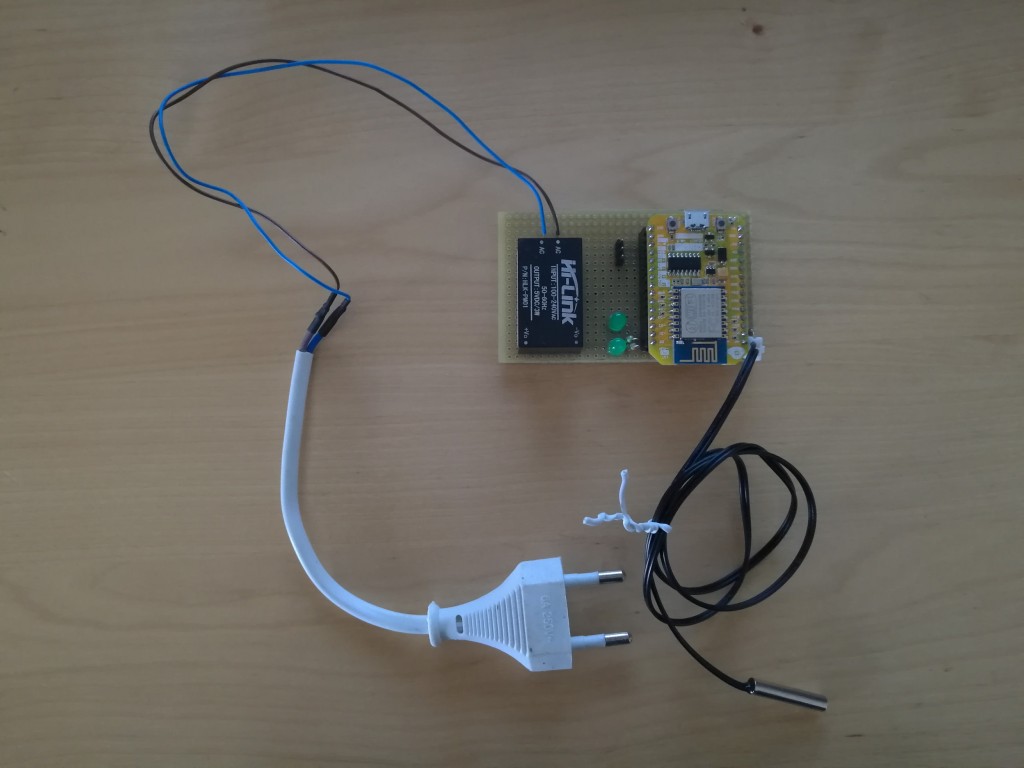
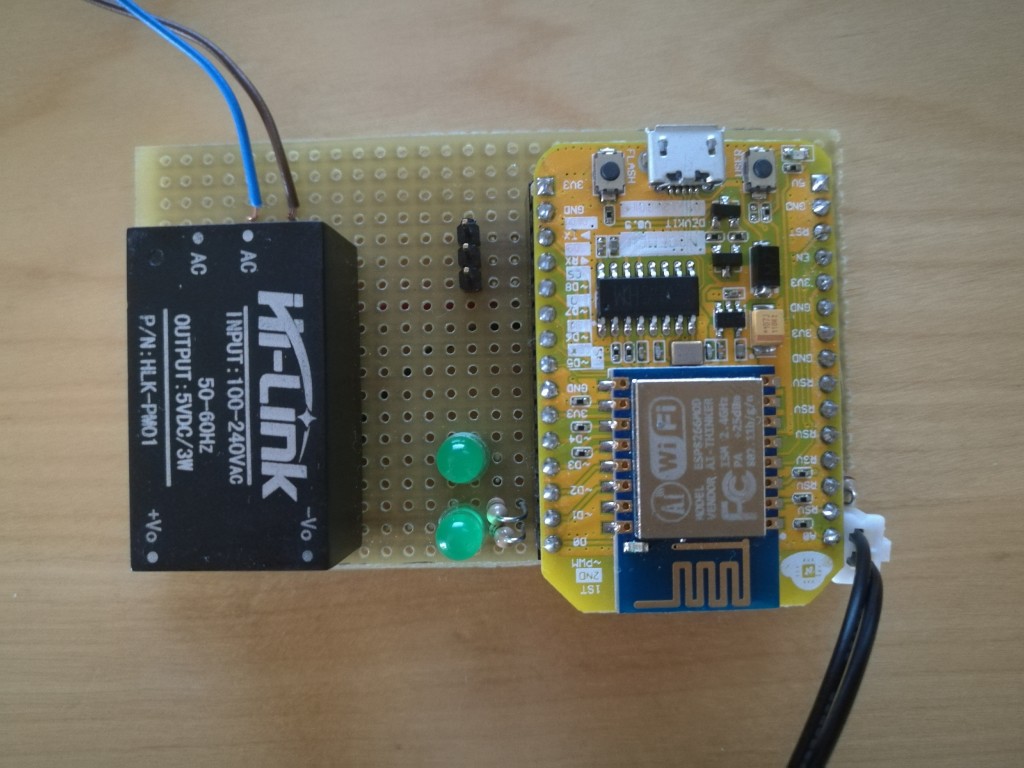
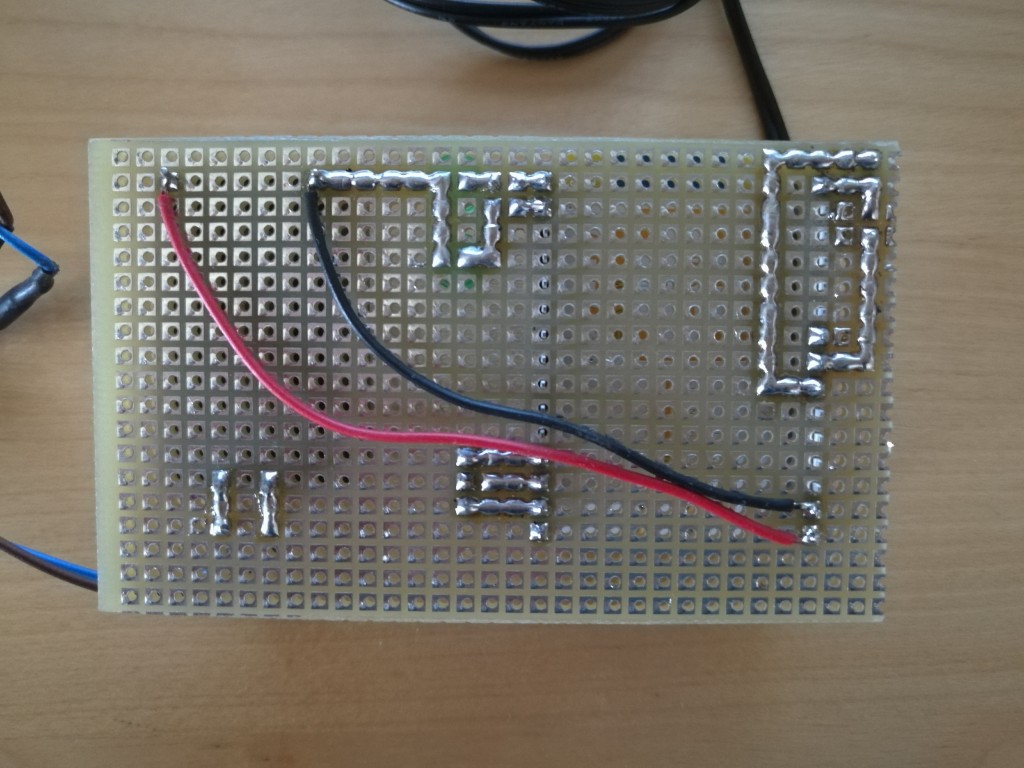
Pictures of the system, I used ESP12E Devkit and some cheap parts:
References in Aliexpress where I bought the hardware:
Firmware source code is publishied in my github account: temperature sensor source code for ESP8266.


