Scripted Grafana dashboards
Reading time: < 1 minute A few minutes of video for explaining how to create dashboards on Grafana using Javascript code:
The code used for hello world script is available as a gist.
Reading time: < 1 minute A few minutes of video for explaining how to create dashboards on Grafana using Javascript code:
The code used for hello world script is available as a gist.
Nowadays last version of browsers support websockets and it’s a good a idea to use them to connect to server a permanent channel and receive push notifications from server. In this case I’m going to use Mosquitto (MQTT) server behind lighttpd with mod_websocket as notifications server. Mosquitto is a lightweight MQTT server programmed in C and very easy to set up. The best advantage to use MQTT is the possibility to create publish/subscriber queues and it’s very useful when you want to have more than one notification channel. As is usual in pub/sub services we can subscribe the client to a well-defined topic or we can use a pattern to subscribe to more than one topic. If you’re not familiarized with MQTT now it’s the best moment to read a little bit about because that interesting protocol. It’s not the purpose of this post to explain MQTT basics.
A few weeks ago I set up the next architecture just for testing that idea:
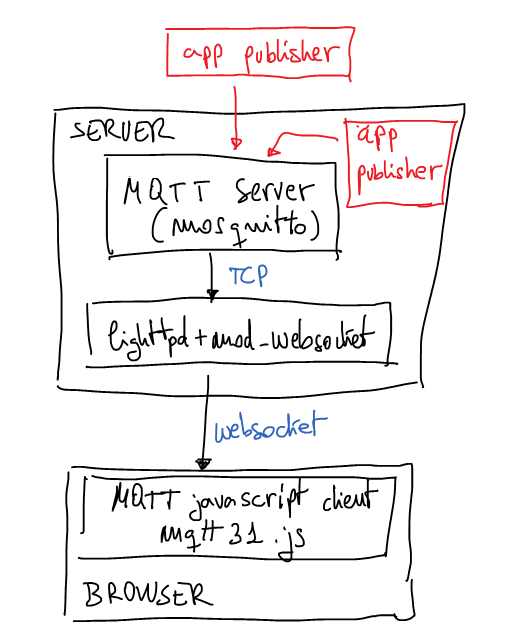
Now it’s time to explain this proof of concept. HTML page will contain a simple Javascript code which calls mqttws31.js library from Paho. This Javascript code will connect to the server using secure websockets. It doesn’t have any other security measure for a while may be in next posts I’ll explain some interesting ideas to authenticate the websocket. At the end of the post you can download all source code and configuration files. But now it’s time to understand the most important parts of the client code.
client = new Messaging.Client("ns.example.tld", 443, "unique_client_id");
client.onConnectionLost = onConnectionLost;
client.onMessageArrived = onMessageArrived;
client.connect({onSuccess:onConnect, onFailure:onFailure, useSSL:true});
Last part is very simple, the client connects to the server and links some callbacks to defined functions. Pay attention to ‘useSSL’ connect option is used to force SSL connection with the server.
There are two specially interesting functions linked to callbacks, the first one is:
function onConnect() {
  client.subscribe("/news/+/sport", {qos:1,onSuccess:onSubscribe,onFailure:onSubscribeFailure});
}
As you can imagine this callback will be called when the connections is established, when it happens the client subscribes to all channels called ‘/news/+/sports’, for example, ‘/news/europe/sports/’ or ‘/news/usa/sports/’, etc. We can also use, something like ‘/news/#’ and it will say we want to subscribe to all channels which starts with ‘/news/’. If only want to subscribe to one channel put the full name of the channel on that parameter. Next parameter are dictionary with quality of service which is going to use and links two more callbacks.
The second interesting function to understand is:
function onMessageArrived(message) {
  console.log("onMessageArrived:"+message.payloadString);
};
It’s called when new message is received from the server and in this example, the message is printed in console with log method.
I used an Ubuntu 12.04 server with next extra repositories:
# lighttpd + mod_webserver
deb http://ppa.launchpad.net/roger.light/ppa/ubuntu precise main
deb-src http://ppa.launchpad.net/roger.light/ppa/ubuntu precise main

# mosquitto
deb http://ppa.launchpad.net/mosquitto-dev/mosquitto-ppa/ubuntu precise main
deb-src http://ppa.launchpad.net/mosquitto-dev/mosquitto-ppa/ubuntu precise main
With these new repositories you can install required packages:
apt-get install lighttpd lighttpd-mod-websocket mosquitto mosquitto-clientsAfter installation it’s very easy to run mosquitto in test mode, use a console for that and write the command: mosquitto, we have to see something like this:
# mosquitto
1379873664: mosquitto version 1.2.1 (build date 2013-09-19 22:18:02+0000) starting
1379873664: Using default config.
1379873664: Opening ipv4 listen socket on port 1883.
1379873664: Opening ipv6 listen socket on port 1883.
The configuration file for lighttpd in testing is:
server.modules = (
        "mod_websocket",
)

websocket.server = (
        "/mqtt" => (
                "host" => "127.0.0.1",
                "port" => "1883",
                "type" => "bin",
                "subproto" => "mqttv3.1"
        ),
)

server.document-root        = "/var/www"
server.upload-dirs          = ( "/var/cache/lighttpd/uploads" )
server.errorlog             = "/var/log/lighttpd/error.log"
server.pid-file             = "/var/run/lighttpd.pid"
server.username             = "www-data"
server.groupname            = "www-data"
server.port                 = 80

$SERVER["socket"] == ":443" {
    ssl.engine = "enable"
    ssl.pemfile = "/etc/lighttpd/certs/sample-certificate.pem"
    server.name = "ns.example.tld"
}
Remember to change ‘ssl.pemfile’ for your real certificate file and ‘server.name’ for your real server name. Then restart the lighttpd and validate SSL configuration using something like:
openssl s_client -host ns.example.tld -port 443You have to see SSL negotiation and then you can try to send HTTP commands, for example: “GET / HTTP/1.0” or something like this. Now the server is ready.
Now you have to load the HTML test page in your browser and validate how the connections is getting the server and then how the mosquitto console says how it receives the connection. Of course, you can modify the Javascript code to print more log information and follow how the client is connected to MQTT server and how it is subscribed to the topic pattern.
If you want to publish something in MQTT server we could use the CLI, with a command mosquitto_pub:
mosquitto_pub -h ns.example.tld -t '/news/europe/sport' -m 'this is the message about european sports'Take a look in your browser Javascript consle you have to see how the client prints the message on it. If it fails, review the steps and debug each one to solve the problem. If you need help leave me a message. Of course, you can use many different ways to publish messages, for example, you could use python code to publish messages in MQTT server. In the same way you could subscribe not only browsers to topics, for example, you could subscribe a python code:
import mosquitto

def on_connect(mosq, obj, rc):
    print("rc: "+str(rc))

def on_message(mosq, obj, msg):
    print(msg.topic+" "+str(msg.qos)+" "+str(msg.payload))

def on_publish(mosq, obj, mid):
    print("mid: "+str(mid))

def on_subscribe(mosq, obj, mid, granted_qos):
    print("Subscribed: "+str(mid)+" "+str(granted_qos))

def on_log(mosq, obj, level, string):
    print(string)

mqttc = mosquitto.Mosquitto("the_client_id")
mqttc.on_message = on_message
mqttc.on_connect = on_connect
mqttc.on_publish = on_publish
mqttc.on_subscribe = on_subscribe

mqttc.connect("ns.example.tld", 1883, 60)
mqttc.subscribe("/news/+/sport", 0)

rc = 0
while rc == 0:
    rc = mqttc.loop()
Pay attention to server port, it isn’t the ‘https’ port (443/tcp) because now the code is using a real MQTT client. The websocket gateway isn’t needed.
Reading time: 1 – 2 minutes
I’m a ExtJS JavaScript framework believer, but there other interesting and famous JavaScript frameworks like Bootstrap and jQuery. IMHO ExtJS is more focused on web applications than public web. In this post I want to share two ExtJS themes that helps to improve UI look and feel.
The first one is a bootstrap look and feel for ExtJS:
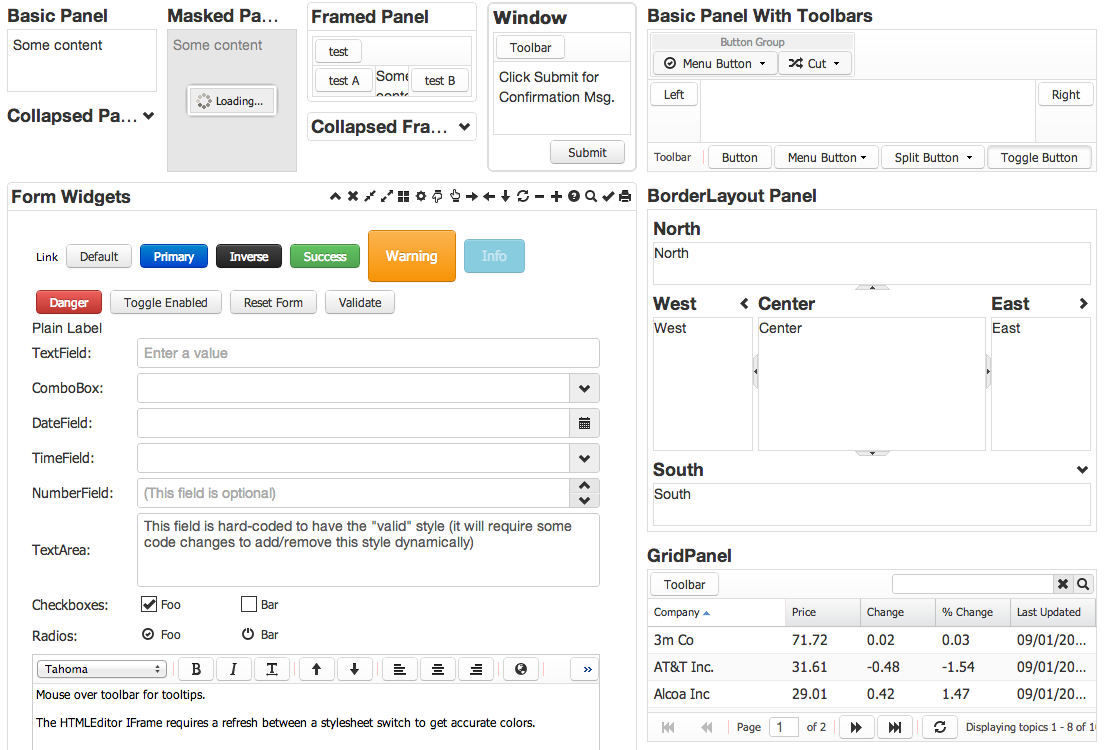
if you want to test it take a look to demo site. The theme is opensource and you can find the source in github.
The second and last one is Clifton theme.
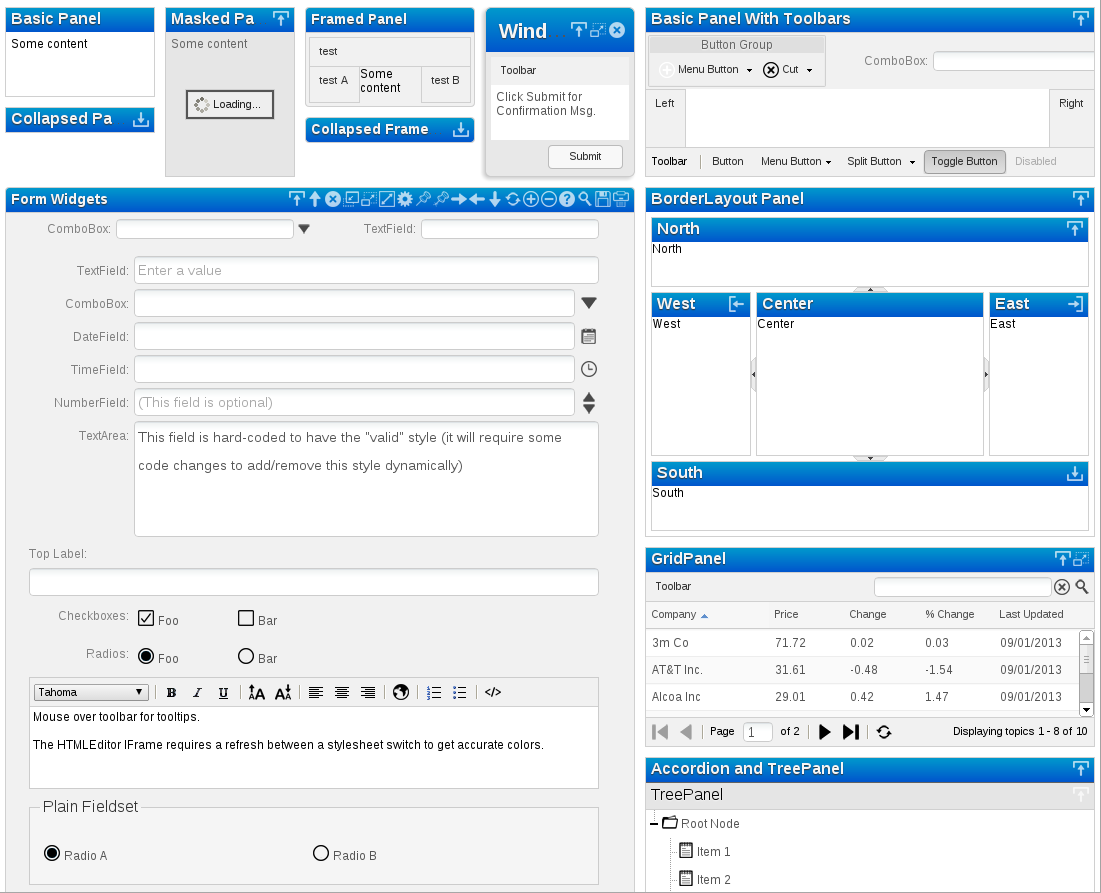
IMHO is a nice theme although it’s not really free. It costs around 320€, but in some professional projects it could be a really low price if you consider the effort to get a professional look and feel . You can try it in demo page.
I want to recommend to you to watch the YouTube video called RESTful API design of Brian Mulloy. In this post I make an small abstract of the most important ideas of the video, of course from my point of view:
JSON response example can be like this:<br><pre>{ 'message':'problem description', 'more_info':'http://api.domain.tld/errors/12345' }</pre><br>Workaround, if REST client doesn’t know how to capture HTTP error codes and raise up an error losing the control of the client, you can use HTTP response code 200 and put ‘response_code’ field in JSON response object. It’s a good idea use this feature as optional across URL parameter ‘supress_response_code=true’.
Versioning the API. Use a literal ‘v’ followed by an integer number before the resource reference in the URL. It could be the most simple and powerful solution in this case. Example: /v1/clients/
The selection of what information will be returned in the response can be defined in the URL parameters, like in this example: /clients/23?fields=name,address,city
Pagination of the response. Use the parameters ‘limit’ and ‘offset’, keep simple. Example: ?limit=10&offset=0
Format of the answer, in this case I’m not completely agree with Brian. I prefer to use HTTP header ‘Accept’ than his proposal. Anyway both ideas are:
Sometimes APIs need to share actions. Then we can’t define an action with a noun, in this case use verb. Is common to need actions like: convert, translate, calculate, etc.
Searching, there are two cases:
To keep your API KISS usually it’s a good idea develop SDK in several languages, where you can put more high level features than in API.
Inside an application each resource has its own API but it’s not a good idea publish it to the world, maybe use a virtual API in a layer above it’s more secure and powerful.
Reading time: 2 – 2 minutes
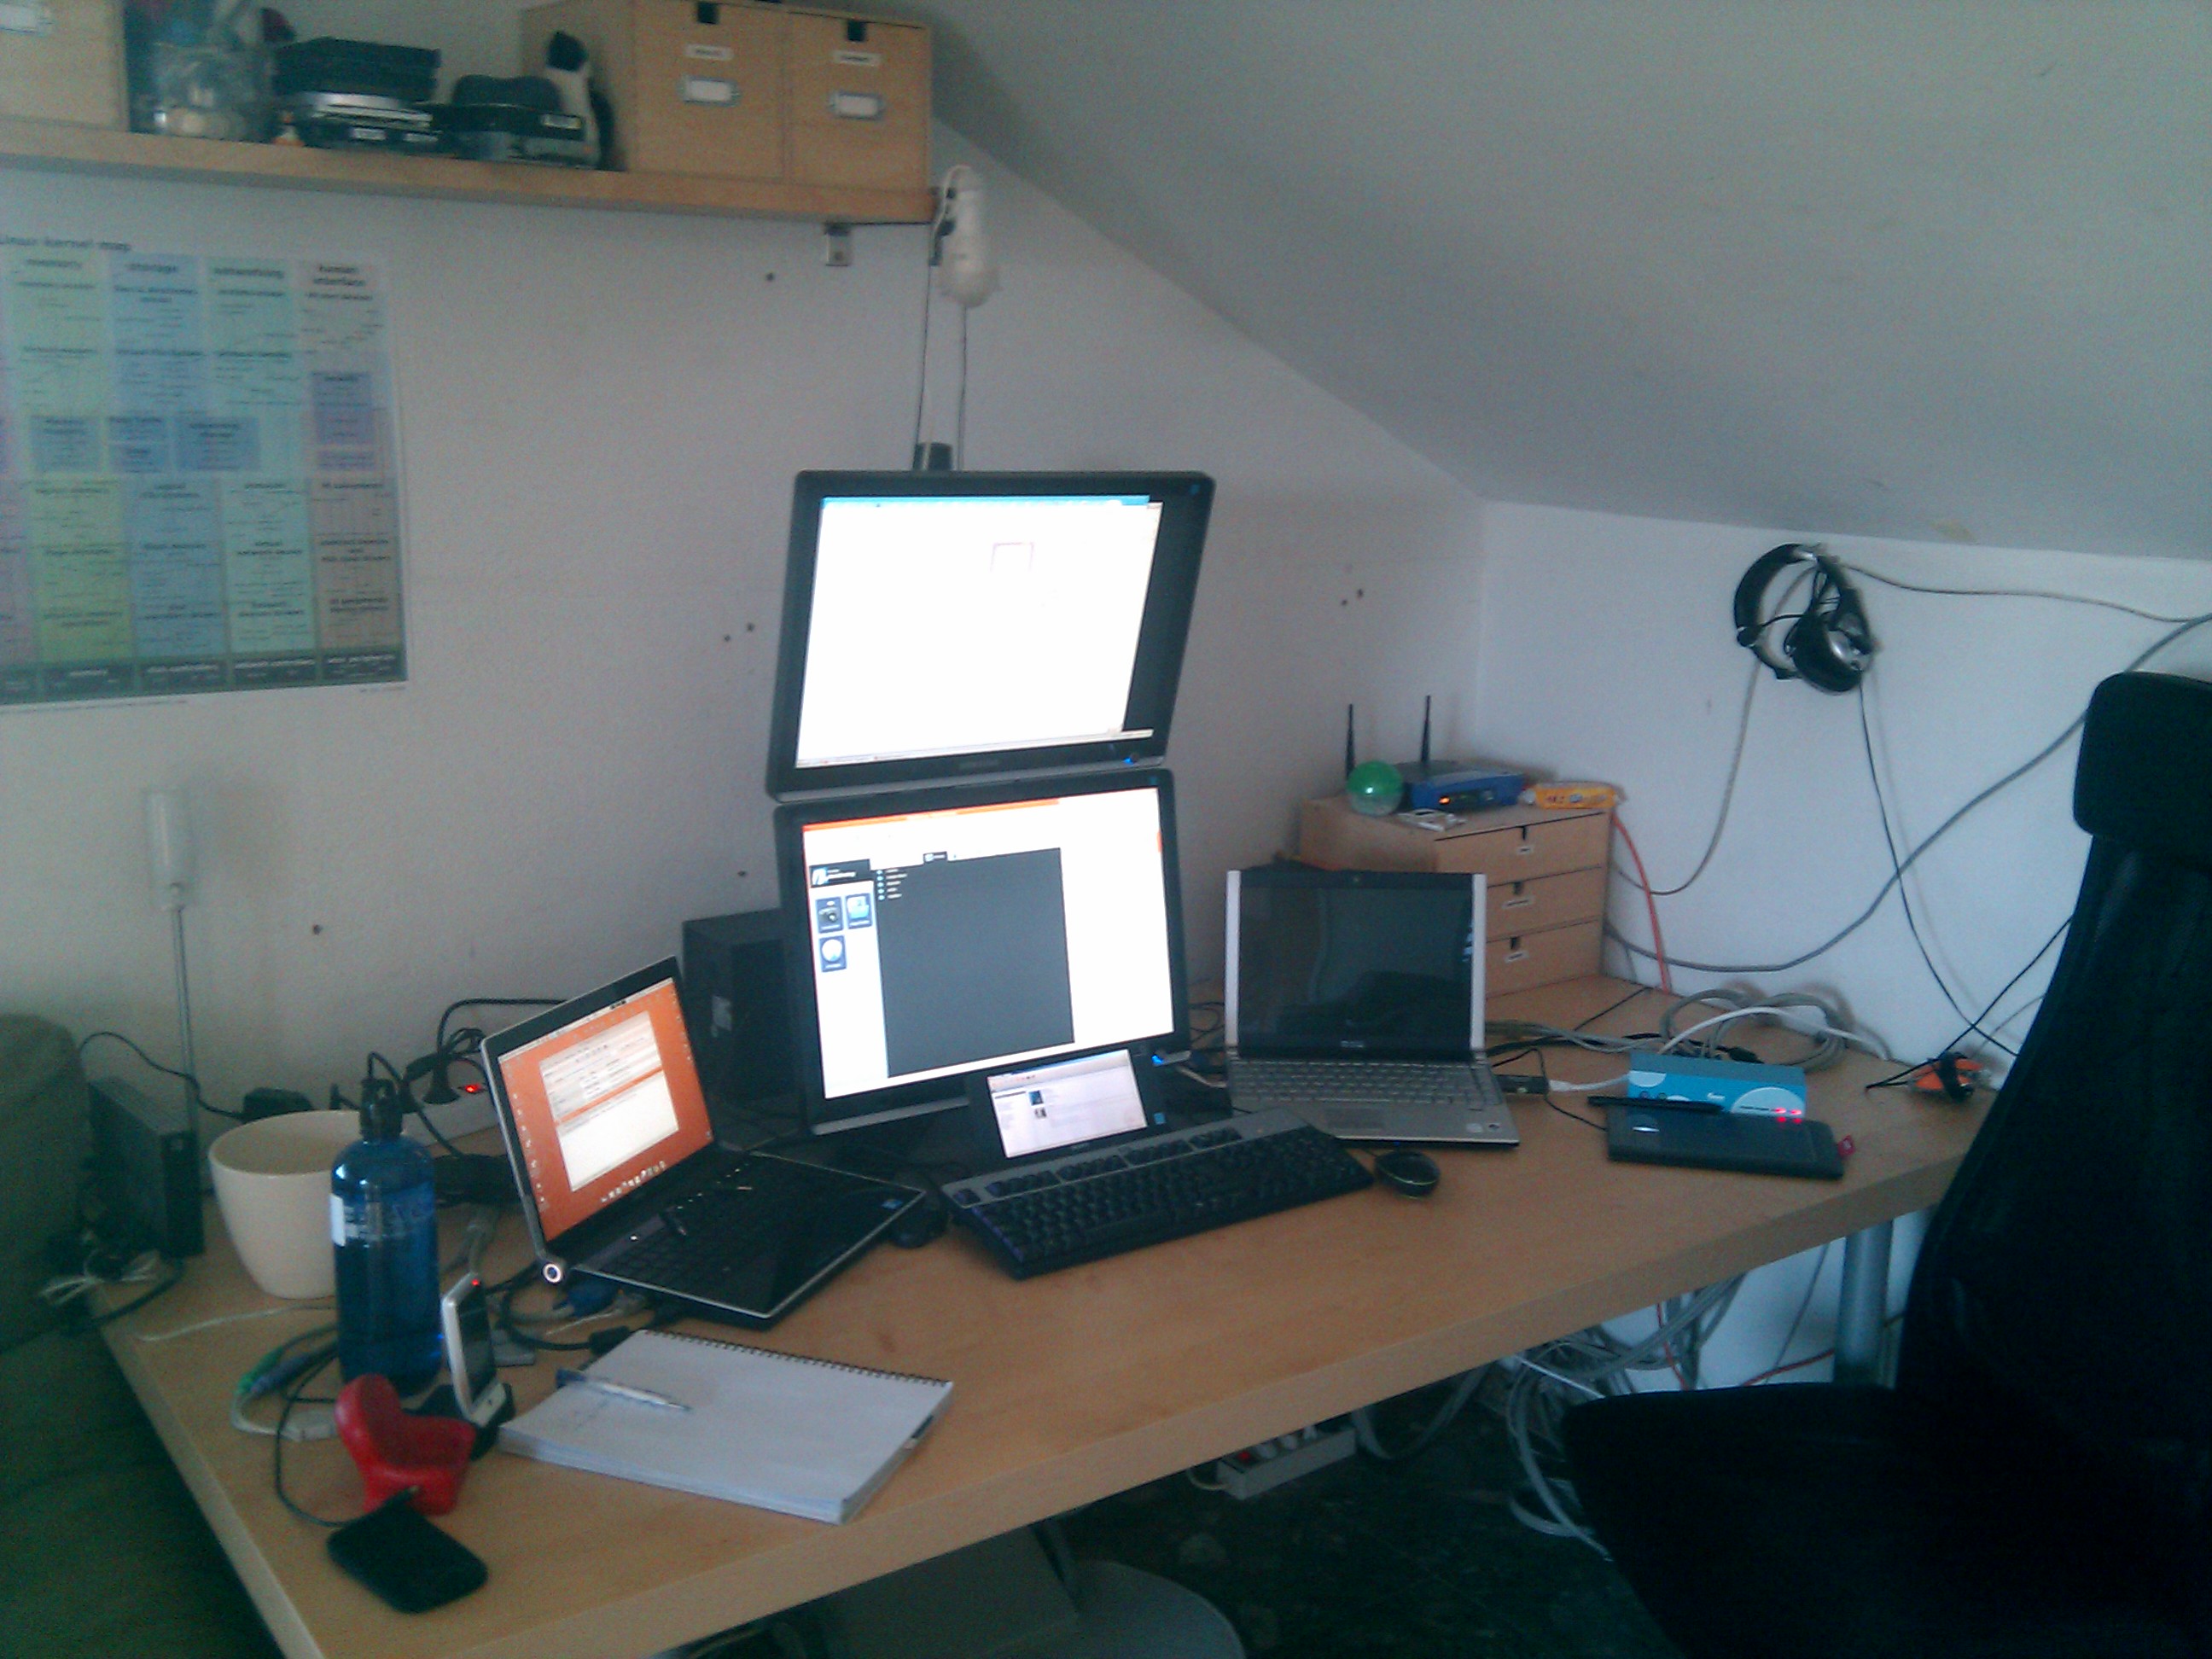
Aquest és el meu entorn de treball a dia d’avui, de fet, he volgut mostrar-lo perquè volia provar de fer una petita integració entre jquery-notes i wordpress. Ja que jo diria que malgrat aquesta funcionalitat és típica de flickr quan s’exporten imatges des d’aquest sistema al nostre blog les notes de la imatge es perden. Així doncs, he pensat que era una bona idea tenir el meu propi sistema de posar notes a les imatges.
La cosa ha estat senzilla només:
UPDATE: casualment avui al blog: freelance switch han pubilcat un article amb diversos workspaces.
Reading time: 3 – 4 minutes
Pensava que la extenció web developer toolbar del firefox era la bomba, però avui l’Ernest m’ha obert els ulls. Realment el Firebug li dona mil patades. És realment impresionant. El meu no és programar web ni molt menys varallar-me sovint amb els CSS, JavaScript ni HTMLs. Però sovint quan programes aplicacions ASP una eina d’aquestes t’estalvia moltes hores de feina. Per exemple, el model de templates que usa symfony no seria precisament un model WYSIWYG. Així doncs, quan toca escriure codi pelat, el Firebug ens pot fer anar molt al gra. La veritat és que l’Oriol ho hagués agraït en algún moment en que depurava un codi JavaScript, oi Oriol?

Les funcions del Firebug són tantes que fa fins hi tot mandre repassar-les, però en faré una breu llista a base de copy/paste:
Reading time: 1 – 2 minutes
L’últim snippet que han pujat al repositori de symfony és un somni fet realitat. Sempre m’ha fet molta ràbia haver de montar-me un sistema de tabbing per una interficie web (UI web) i el que ens proposa aquest snippet és un helper que permet cridar una llibreria anomenada Tab Pane (llicència web 2.0) que a través de javascript modifica els objectes DOM de la pàgina web i ens permet treballar amb uns tabuladors molt ràpids. A més fins hi tot suporta diferents aspectes. Realment una forma molt còmode i senzilla de treballar amb interficies tabulades.

Doncs tornant a l’snippet de symfony podem cridar el helper i començar a usar el codi de forma ben senzilla, a la pròpia descripció en podeu veure un exemple. Doneu-hi un cop d’ull a Helper for Javascript Tabbed Panes. Com és obvi recordeu que aquest helper s’ha d’invocar des de la vista (template).
Reading time: 2 – 2 minutes
aptana esta disponible per Mac, Windows, Linux i fins hi tot com a plug-in per l’Eclipse. Així doncs es tracta d’una eina que ens ajudarà a programar. Com ja posava en el títol esta orientada a la creació d’interficies d’usuari via web. Ralment és per gent molt i molt professionals, abstenir-se principiants. Ja que li treurem realment el suc quan treballem amb JavaScript, AJAX, Yahoo UI, CSS, Dojo Javascript library, etc. De fet no em declaro ni usuari de l’eina ni segurament futur usuari de la mateixa, però això no treu que després de veure els screencast que té l’eina m’hagi caigut la baba i hagi sabut apreciar la gran feina que s’ha fet per crear una eina com aquesta.

Per si tot això fos poc es tracta d’una eina OpenSource i com ja he dit multiplataforma. L’aspecte gràfic esta molt acurat i a més suporta força navegadors per comprobar que el codi que anem programant és compatible en tots ells. Com passa en tots els projectes vanguardistes també disposa d’un blog des d’on podeu anar seguint les millores que va tenint el programa, ja que ara mateix només hi ha disponible la versió beta.
Reading time: 1 – 2 minutes

Symfony usa prototype com a framework de JavaScript. Malgrat la potència del projecte té un petit problema de disseny que ens dona problemes quan intentem integrar el nostre codi fet en prototype/symfony amb codi JavaScript de tercers. De fet, el problema de disseny és molt senzill prototype exten dues classes bàsiques de JavaScript: Object i Array ambdues són classes molt bàsiques i sovint usades en qualsevol script així doncs quan aquest codi intenta usar aquestes classes bàsiques al estar exteses no tenen el comportament habitual, així doncs el codi d’aquestes persones s’ha d’adaptar per suportar les modificacions de prototype. Així doncs, si això no és possible tindrem un problema d’incompatibilitat entre codis.
Si voleu més detalls tèncis sobre el problema l’Oriol m’ha passat un parell d’enllaços es raona el problema: