Lately, I started running my own URL shortener service because of Google URL shortener service is going to shut down. Below there is a short video showing how the service runs and also there is a Google Chrome extension which I created for integrating the service with the browser.
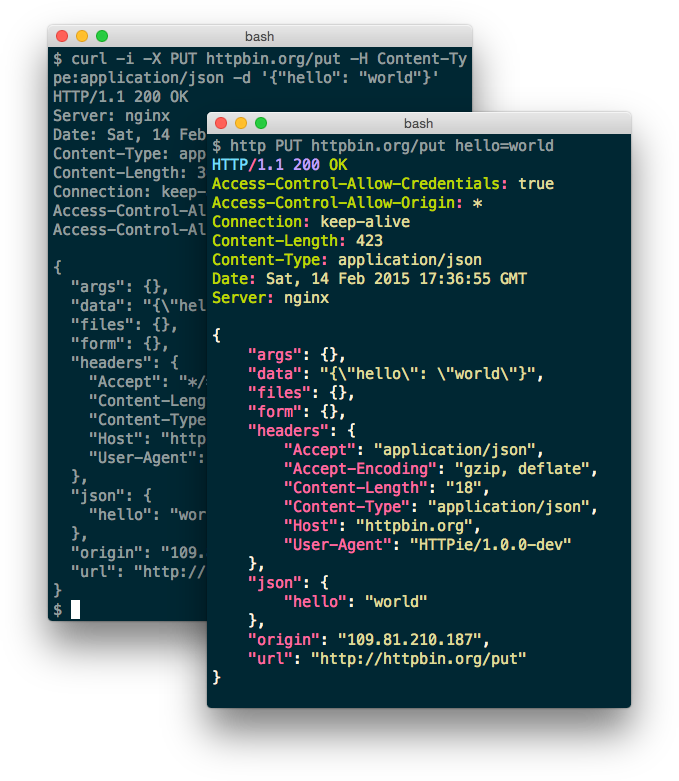
I imagine you are used to using curl for many command line scripts, tests, and much more things. I did the same but some weeks ago I discovered HTTPie which is the best substitute that I’ve ever found for curl. Of course, it’s also available for a lot of Linux distributions, Windows, and Mac. But I used it with docker which is much more transparent for the operative system and easy to update. To be more precise I use next alias trick for using this tool:
alias http='sudo docker run -it --rm --net=host clue/httpie'
Reading time: < 1 minute
This is another short entry, in this case for recommending a service which we solve typical problem solved using a DNAT. Once we have a service on our laptop, or on a private server and we have to expose that service on the internet for some time or permanently usually we have to go the firewall, or router and create a NAT rule forwarding a port. This is a simple and powerful service which is going to solve that for you.
There is a free account for understanding and testing the service, other plans are available and especially affordable for professional requirements.
This is a super useful and simple tool, first of all, let me say thanks to Dani because I found the tool thanks to him. Very often I have the requirement to set up small virtual, real or hybrid networks using my laptop as a server and I had to boot a VM for getting a DHCP server simple to manage and powerful. Now, this is not required anymore because thanks to this tool I found a super small and flexible tool, I can set up all that I need using an INI file or just a wizard. It’s a pleasure and I don’t have to install anything if I don’t want, just a tray icon application is running for allowing me to give the service to my experimental networks.
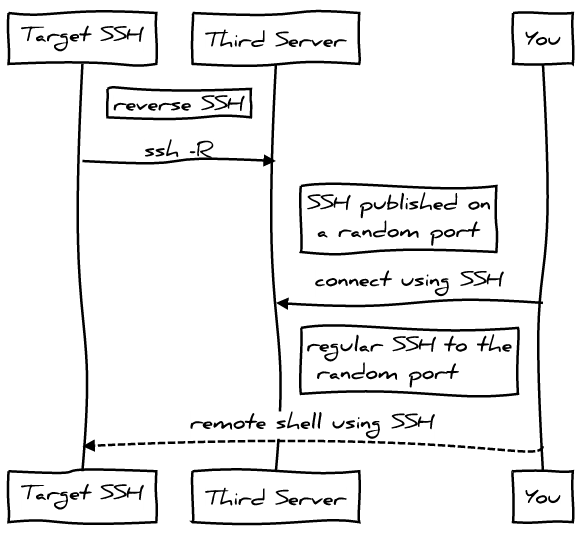
I love “ssh -R” reverse SSH is really useful when you have to get access to a Linux machine behind a NAT or firewall. One of the most powerful scenarios to get that running is use a third machine with a public IP address. The idea will be run reverse SSH command in target Linux and publish a forward port at the third server, so you only have to connect to a published port in that third server and you’ll get the target Linux thanks to the reverse SSH connection open between them.
A long time ago I talked about that in my podcast “2×04 SSH avançat“.
With this scenario we have a security challenge with the SSH user account on the “third server”, we want a secure user:
without shell and sftp access
secure enough to only allow port forwarding features
access only allowed with authorized keys
I’m not going to give precise Linux instructions on that limited user, but for user you’re not going to have problems to get that:
/etc/passwd(-):
limited-user:x:1001:1001::/home/limited-user:
/etc/shadow(-):
limited-user:!:17037:0:99999:7:::
/etc/ssh/sshd_config:
Match User limited-user
    GatewayPorts yes
    ForceCommand echo 'This account can only be used for maintenance purposes'
Of course, you’ll have your own UID, GID and use your own username. And at “/home/limite-user/.ssh/authorized_ssh” you’ll have to pub public key of the clients that want to use the service.
Sometimes TFTP is the only protocol available to exchange files with an embedded system. So, it’s very easy to have that supported in our workstation or any other place to exchange files with those systems.
Set up steps:
apt-get install tftpd-hpa
modify file “/etc/default/tftpd-hpa”:
TFTP_OPTIONS="--secure --create"
–secure: Change root directory on startup. This means the remote host does not need to pass along the directory as part of the transfer, and may add security. When –secure is specified, exactly one directory should be specified on the command line. The use of this option is recommended for security as well as compatibility with some boot ROMs which cannot be easily made to include a directory name in its request.
–create Allow new files to be created. By default, tftpd will only allow upload of files that already exist. Files are created with default permissions allowing anyone to read or write them, unless the –permissive or –umask options are specified.
Needed to allow uploads in that directory:
chown -R tftp /var/lib/tftpboot
Restart and check if the service is running:
service tftpd-hpa restartservice tftpd-hpa statusnetstat -a | grep tftp
At the beginning of August I’ve received a new home server, I decided to stop my old HP ML110 G5 and substitute that by a new silent and low power server also based on Intel technologies in this case it’s al i5 with 8G of RAM and 128GB of SSD for less than 300€ including custom costs I think it’s a very good investment.
I installed Ubuntu 16.04 LTS server, I don’t tried de Win10 pre-installed. I happy to see a very new and powerful BIOS with tons of options. But in this blog entry I want to explain how to set-up the wifi card as a wifi AP. I didn’t have to do anything to configure the card. It worked by default.
Ralink corp. RT3090 Wireless 802.11n 1T/1R PCIe
The first thing is check if the wifi network is compatible with the AP mode.
Next thing is install the “hostapd” which is going to take care to set-up the AP. The configuration file have to be something like that “/etc/hostapd/hostpad.conf
interface=wlan0 # change that with the wifi interface namedriver=nl80211ssid=test # your wifi network namehw_mode=gchannel=1 # look up for a free channelmacaddr_acl=0auth_algs=1ignore_broadcast_ssid=0wpa=3wpa_passphrase=1234567890 # passwor to join the wifi networkwpa_key_mgmt=WPA-PSKwpa_pairwise=TKIPrsn_pairwise=CCMP
Modify “/etc/default/hostapd” and put that:
DAEMON_CONF="/etc/hostapd/hostapd.conf"
Start the hostapd service:
sudo service hostapd start
Now the AP is running but a DHCP service giving IPs it’s need, I used “isc-dhcp-server”. First thing to configure is “/etc/default/isc-dhcp-server” with the wireless network name:
INTERFACES="wlan0"
Next file to be configured is “/etc/dhcp/dhcpd.conf”:
If it’s needed remember to create the proper iptables rules and enable “ip_forward” in /proc filesystem. I’m not going to describe that because in my case it’s not going to be useful.
This is not a specially interesting post entry but useful as a reference, when you have to use a fast and easy cookbook to setup a wifi AP.