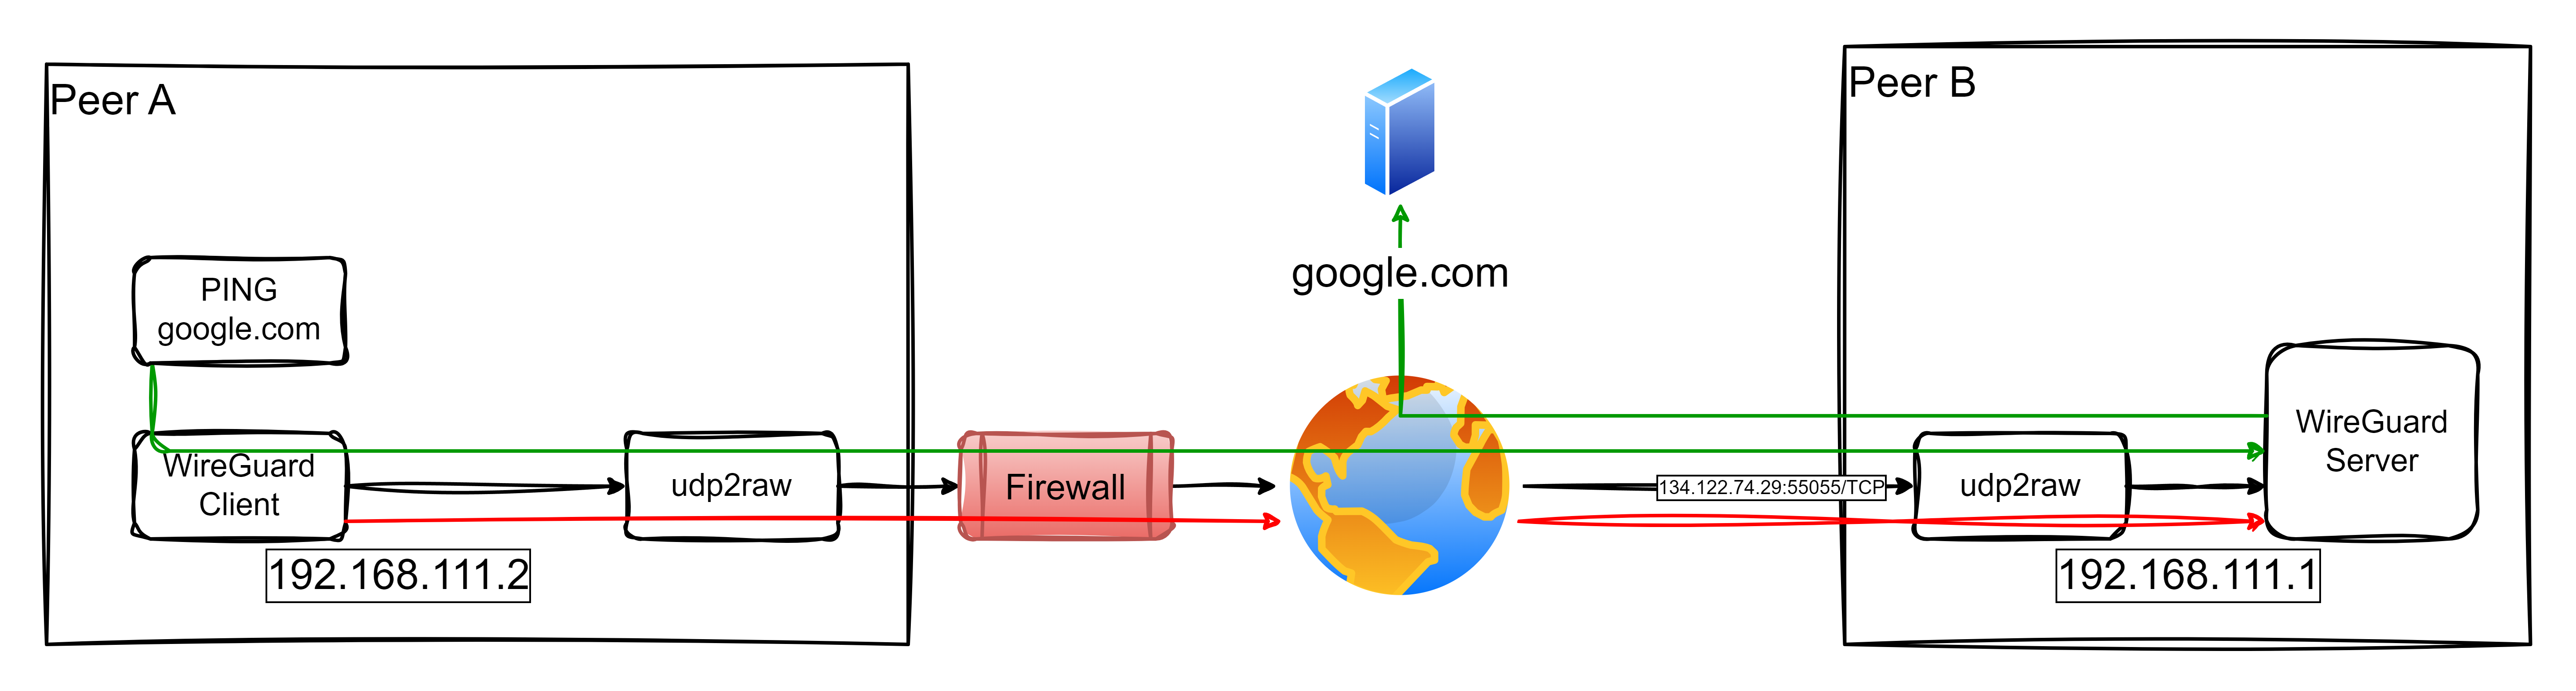
The architecture for this setup is illustrated below:
Install udp2raw, Wireguard and generate keys
cd/tmpwgethttps://github.com/wangyu-/udp2raw/releases/download/20230206.0/udp2raw_binaries.tar.gztarxvfzudp2raw_binaries.tar.gzcpudp2raw_amd64/usr/local/bin/udp2rawrmudp2raw*# based on Ubuntuaptinstallwireguard# we'll work on /etc/wireguardcd/etc/wireguard# generate privatekeywggenkey|sudotee/etc/wireguard/private.keysudochmodgo=/etc/wireguard/private.key# obtain public keysudocat/etc/wireguard/private.key|wgpubkey|sudotee/etc/wireguard/public.key
When eveything is installend and configured, just run in all endpoints next commands:
sudowg-quickupwg0# for status check:wg# udp2raw logs at:tail-f/var/log/udp2raw.log# enable automatic wireward service in Ubuntusudosystemctlenablewg-quick@wg0.service# start and stop service like alwayssudosystemctlstartwg-quick@wg0.servicesudosystemctlstopwg-quick@wg0.servicesudosystemctlstatuswg-quick@wg0.service
Configuration Files
Endpoint A /etc/wireguard/wg0
# local settings for Endpoint A[Interface]PrivateKey=WMUerfcUpSxUlOp1UmaS2uwelnk8AxhAFrlIWpjheWM=Address=192.168.111.1/24ListenPort=51822# receive wg through udp2rawMTU=1342PreUp=udp2raw-s-l167.99.130.97:55055-r127.0.0.1:51822-k"The2password."-a>/var/log/udp2raw.log2>&1&PostDown=killalludp2raw||true# Enable NAT for traffic forwarding (corporate and fallback internet access)PreUp=echo1>/proc/sys/net/ipv4/ip_forward||truePreUp=iptables-tnat-IPOSTROUTING-oeth0-jMASQUERADE||truePreDown=iptables-tnat-DPOSTROUTING-oeth0-jMASQUERADE||true# remote settings for Endpoint B[Peer]PublicKey=XWl8HeAinHlAZTvaCXDlmO9n/CQLg5qH8jmtROK4jBg=AllowedIPs=192.168.111.2/32PersistentKeepalive=120# remote settings for Endpoint C[Peer]PublicKey=I+gi8l9QRe00W8pTpp8CSoIabz/RXXQXwquXj7eKNwU=AllowedIPs=192.168.111.3/32PersistentKeepalive=120
Endpoint B /etc/wireguard/wg0
# Endpoint B[Interface]PrivateKey=+BB3NI2SUYeKcRoPrZE2+Ot5KnLZJBycPzJ17kfbn34=Address=192.168.111.2/24# Route configuration for public IPPreUp=iproutedeldefault||truePreUp=iprouteadd167.99.130.97via10.2.0.1deveth0||truePostDown=iproutedel167.99.130.97via10.2.0.1deveth0||truePostDown=iprouteadddefaultvia10.2.0.1||trueMTU=1342PreUp=udp2raw-c-l127.0.0.1:50001-r167.99.130.97:55055-k"The2password."-a>/var/log/udp2raw.log2>&1&PostDown=killalludp2raw||true# Endpoint A[Peer]PublicKey=z73wM1b7fhMRA8fmeQw4FntRvgJ9JwTdsQHssXHg3DE=Endpoint=127.0.0.1:50001AllowedIPs=0.0.0.0/0PersistentKeepalive=120
Endpoint C /etc/wireguard/wg0
# Endpoint C[Interface]PrivateKey=YCGzsfeed8QumpfE8bdWRheMzBiUsTB7vXj0YVOQQX0=Address=192.168.111.3/24# Route configuration for public IPPreUp=iproutedeldefault||truePreUp=iprouteadd167.99.130.97via10.2.0.1deveth0||truePostDown=iproutedel167.99.130.97via10.2.0.1deveth0||truePostDown=iprouteadddefaultvia10.2.0.1||trueMTU=1342PreUp=udp2raw-c-l127.0.0.1:50001-r167.99.130.97:55055-k"The2password."-a>/var/log/udp2raw.log2>&1&PostDown=killalludp2raw||true# Endpoint A[Peer]PublicKey=z73wM1b7fhMRA8fmeQw4FntRvgJ9JwTdsQHssXHg3DE=Endpoint=127.0.0.1:50001AllowedIPs=0.0.0.0/0PersistentKeepalive=120
In this post, I’ll share how I set up a WireGuard VPN over TCP using udp2raw, which provides secure access to corporate networks and serves as a fallback for internet access when customer networks impose heavy restrictions. Inspired by Pro Custodibus, this solution enables IoT gateways to seamlessly connect to both the company’s internal services and the broader internet under constrained conditions.
Scenario Overview
The architecture for this setup is illustrated below:
Key Features of the Solution:
Access to Corporate Networks: IoT Gateways securely connect to the corporate network for accessing internal services.
Fallback Internet Access: When the customer’s network restricts internet access but allows TCP connections to the company infrastructure, the IoT Gateway routes its internet traffic through the company’s network.
How It Works:
Endpoint A (Client): An IoT Gateway connects through the restrictive customer network.
Endpoint B (Server): The WireGuard server is accessible via a public IP (134.122.74.29) on TCP port 55055.
Traffic flows through a TCP tunnel created with udp2raw, enabling the gateway to securely access the corporate network or relay internet traffic via the company’s infrastructure.
This dual-purpose setup ensures robust connectivity for IoT devices even in challenging environments.
Video Demonstration (in Spanish)
I’ve created a video demonstration in Spanish showcasing the entire setup and functionality of this scenario. The video walks through the following steps:
Explaining the problem and network constraints.
Demonstrating the configuration of both endpoints (client and server).
Showing the connection initiation and testing, including how traffic flows through the VPN tunnel.
Verifying fallback internet access through the company network.
This video is ideal for those who prefer visual explanations or need extra guidance in implementing this solution.
Configuration Files
1. Endpoint B (server, /etc/wireguard/wg0.conf)
This configuration allows Endpoint B to act as a gateway for both corporate access and fallback internet connectivity:
# local settings for Endpoint B[Interface]PrivateKey=EMqyADu4Xeu95ZpNZE97FET5eKzN1WSwBkeBWtX1yGg=Address= 192.168.111.1/32ListenPort= 51822# receive wg through udp2rawMTU= 1342PreUp= udp2raw -s -l 134.122.74.29:55055 -r 127.0.0.1:51822 -k "The2password." -a >/var/log/udp2raw.log 2>&1 &PostDown= killall udp2raw || true# Enable NAT for traffic forwarding (corporate and fallback internet access)PreUp= echo 1 > /proc/sys/net/ipv4/ip_forward || truePreUp= iptables -t nat -I POSTROUTING -o eth0 -j MASQUERADE || truePreDown= iptables -t nat -D POSTROUTING -o eth0 -j MASQUERADE || true# remote settings for Endpoint A[Peer]PublicKey=Xt70DJy8ldPcDNW4YM2Dt94n16pTQKFxhmvpgKvJyng=AllowedIPs= 192.168.111.2/32PersistentKeepalive= 120
Key Points:
NAT Rules: These rules enable traffic originating from Endpoint A to use Endpoint B for accessing the internet.
MTU Adjustment: The MTU is set to 1342 to prevent fragmentation issues over the TCP tunnel.
Assumptions:
eth0, is the name of the interface for reaching Internet.
192.168.111.0/24 is available for point-to-point connections in the tunnels.
ud2raw is in PATH.
Don’t re-use my pub and private keys. Neither the pre-shared key of used by udp2raw.
Endpoint A (client, /etc/wireguard/wg0.conf)
This configuration sets up Endpoint A to route all traffic (corporate and internet) through Endpoint B:
[Interface]PrivateKey=yAxByb468bAuMdg5S6AlfYkxbeYDOMEKxdaJ7d2p83g=Address= 192.168.111.2/32# Route configuration for public IPPreUp= ip route del default || truePreUp= ip route add 134.122.74.29 via 10.2.0.1 dev eth0 || truePostDown= ip route del 134.122.74.29 via 10.2.0.1 dev eth0 || truePostDown= ip route add default via 10.2.0.1 || trueMTU= 1342PreUp= udp2raw -c -l 127.0.0.1:50001 -r 134.122.74.29:55055 -k "The2password." -a >/var/log/udp2raw.log 2>&1 &PostDown= killall udp2raw || true[Peer]PublicKey= VUN2JqZiGQ1V46PDoFECw/nMs3/o6n8PvGMV+ad+Hww=Endpoint= 127.0.0.1:50001AllowedIPs= 0.0.0.0/0PersistentKeepalive= 120
Key Points:
Fallback Internet Routing: The AllowedIPs = 0.0.0.0/0 directive ensures all traffic is routed through Endpoint B, including internet traffic.
Dynamic Route Adjustments: The PreUp and PostDown commands manage routes for efficient fallback connectivity.
Here’s the improved Implementation Steps section based on your feedback and expertise in WireGuard and udp2raw:
Implementation Steps
This section outlines the precise steps required to set up the WireGuard VPN over TCP using udp2raw. Follow these instructions carefully for both Endpoint A (client) and Endpoint B (server).
1. Pre-requisites
WireGuard Installation: Ensure WireGuard is installed on both systems. This can usually be done via the package manager of your operating system (e.g., apt install wireguard for Debian-based distributions).
udp2raw Binary: Download the appropriate udp2raw binary from its GitHub Releases Page. Binaries are available for various architectures. For simplicity:
Extract the binary from the tarball (e.g., udp2raw_amd64 for most x86_64 systems).
Place the binary in a directory accessible from your PATH (e.g., /usr/local/bin).
Verify the installation: which udp2raw udp2raw -h # Should display the help menu
2. Prepare the Configuration Files
The configuration files should be located at /etc/wireguard/wg0.conf. Each endpoint has its own specific configuration:
Endpoint A: Use the wg0.conf provided earlier, replacing placeholders like keys and IPs as needed.
Endpoint B: Use the wg0.conf provided earlier.
Ensure both files reflect the IP addresses, MTU settings, and public/private keys accurately.
3. Generate WireGuard Keys
WireGuard requires public-private key pairs for secure communication. Generate them as follows:
Generate the Private Key: wg genkey > privatekey
Generate the Public Key from the private key: cat privatekey | wg pubkey > publickey
Place the private key in the [Interface] section of the respective configuration file (PrivateKey = ...) and the corresponding public key of the peer in the [Peer] section (PublicKey = ...).
Note: Never share your private keys.
4. Start the VPN Tunnel
Start the Server First (Endpoint B):
Bring up the WireGuard interface using wg-quick: sudo wg-quick up wg0
Verify that the interface is active: wg show
Start the Client (Endpoint A):
Bring up the client WireGuard interface: sudo wg-quick up wg0
Verify that the interface is active: wg show
5. Test the Connection
Once both endpoints are active, initiate traffic from Endpoint A to Endpoint B. This step ensures the udp2raw TCP socket is properly established and functioning:
If the ping succeeds, the connection is working as expected.
If it fails, check the logs for udp2raw and WireGuard on both endpoints for errors: less /var/log/udp2raw.log
Once the initial handshake completes, the tunnel will remain active as long as PersistentKeepalive is configured in the client configuration (e.g., PersistentKeepalive = 120).
6. Validate Fallback Internet Access
To confirm the fallback internet routing through Endpoint B:
On Endpoint A, run a test to confirm external connectivity: curl -I https://www.google.com
If the response headers are received, the internet routing through Endpoint B is functioning.
Verify that the traffic is routed through the WireGuard tunnel: traceroute google.com
If fallback internet access fails, ensure that NAT is correctly configured on Endpoint B: iptables -t nat -L -n
7. Troubleshooting
Log Files:
Check the udp2raw logs on both endpoints for issues (e.g., MTU mismatches, handshake failures).
Review WireGuard logs for additional details.
MTU Issues:
If large packets fail but small packets (e.g., ping) succeed, reduce the MTU (e.g., to 1280).
8. Automate Startup
To ensure the VPN starts automatically on boot:
Enable the WireGuard service: sudo systemctl enable wg-quick@wg0
Add udp2raw commands to a systemd service or the PreUp directive in wg0.conf (as shown in the configuration files).
With these steps, you now have a fully operational WireGuard tunnel over TCP, enabling secure communication between endpoints and fallback internet connectivity via the company’s infrastructure.
Conclusion
This configuration provides a robust solution for IoT Gateways operating in restrictive environments. By leveraging udp2raw, WireGuard traffic is tunneled over TCP, enabling:
Seamless Corporate Access.
Fallback Internet Connectivity through the company network when customer environments impose constraints.
This versatile setup ensures uninterrupted operations and secure communications for IoT devices. Explore the Pro Custodibus guide and udp2raw GitHub repository for additional insights.
Zerotier offers a powerful REST API that allows for seamless integration and management of your network. By default, the API is accessible on TCP port 9993. To securely interact with this API, an authentication token is required.
The authentication token is stored in the following file:
/var/lib/zerotier-one/authtoken.secret
To check if the Zerotier service is running correctly, you can use the curl command with the necessary authentication header. Here’s how to do it:
Assuming previous scenario I’m going to describe the required configurations on pfSense and Mikrotik. Certifcate creation is not part of the scope of this document, if you are not familiar about how to do that it’s a good idea to use the pfSense certificate manager to do it. My last advice is take care with certificates 90% of problems that I found in my life when I was working on VPNs are because of that. Take your time to check it before spend your time playing with other configurations.
In that scenario pfSense will play the role of the VPN server and Mikrotik will be the client, so I’m going to start describing pfSense configurations.
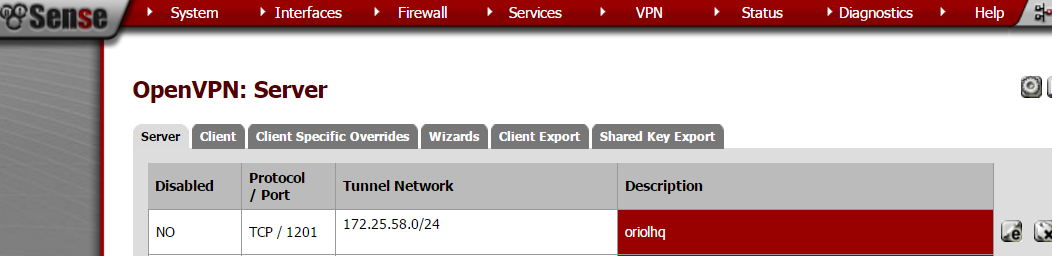
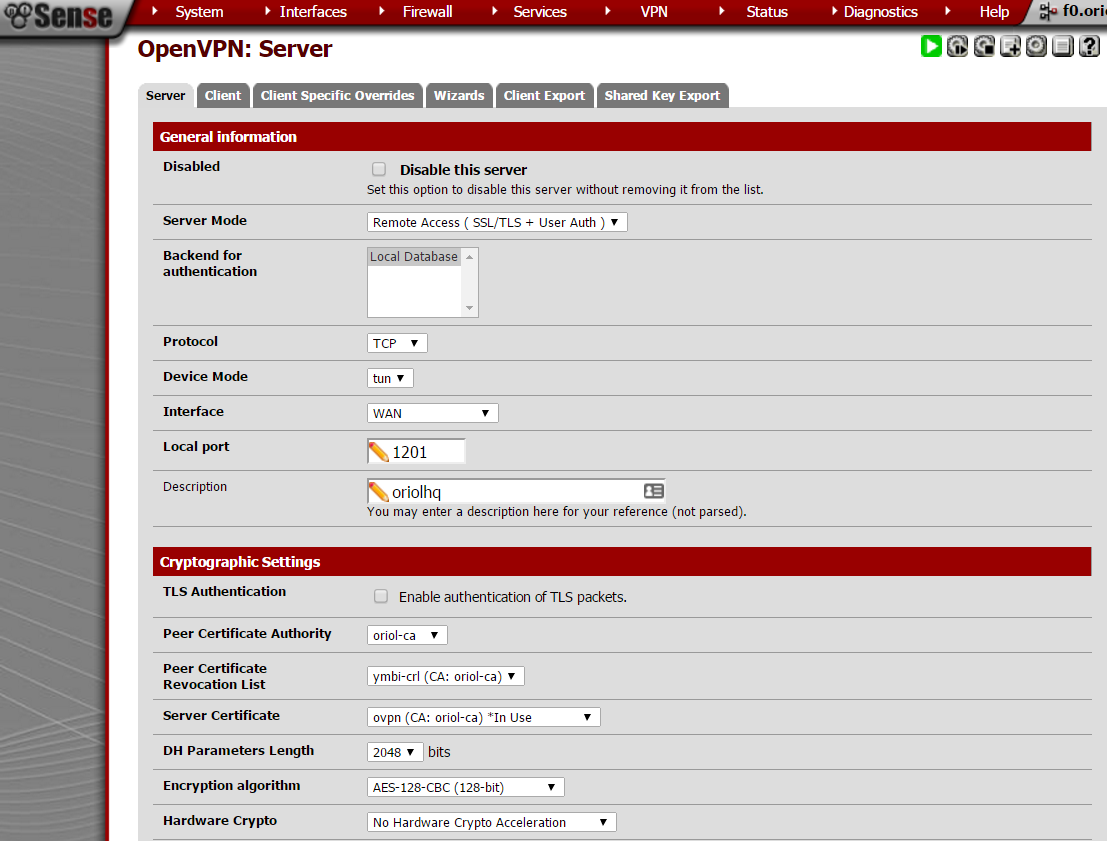
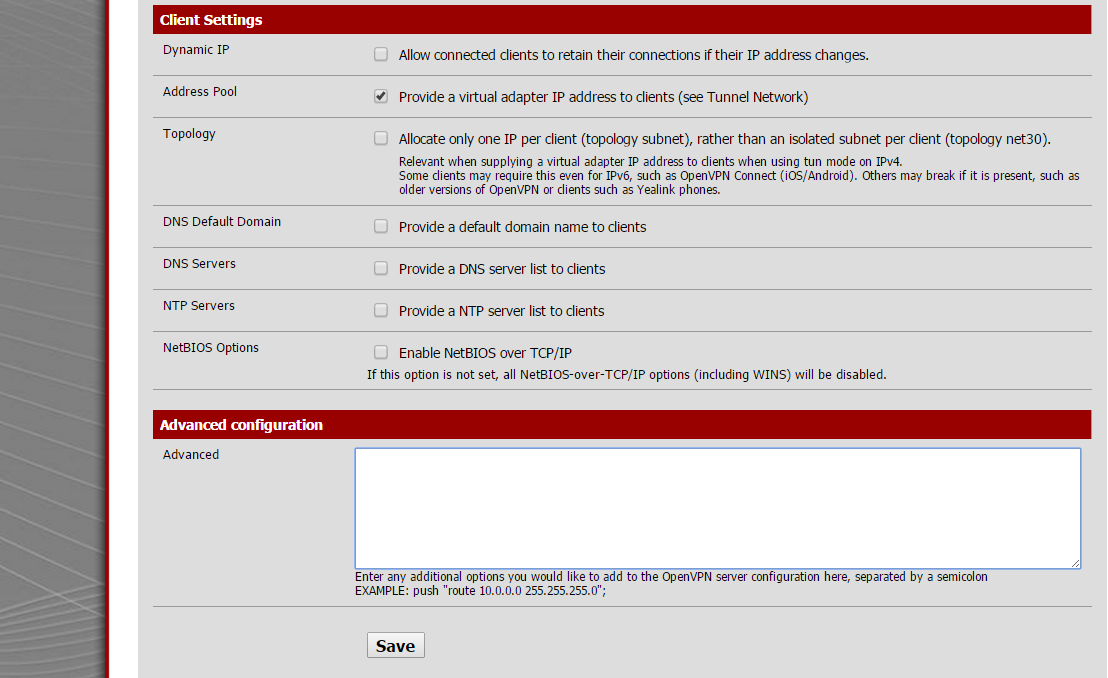
Create OpenVPN server on proper section:
Important things to take in account when you set up the parameters are socket has to be a TCP socket in my case I decided to use port 1201:
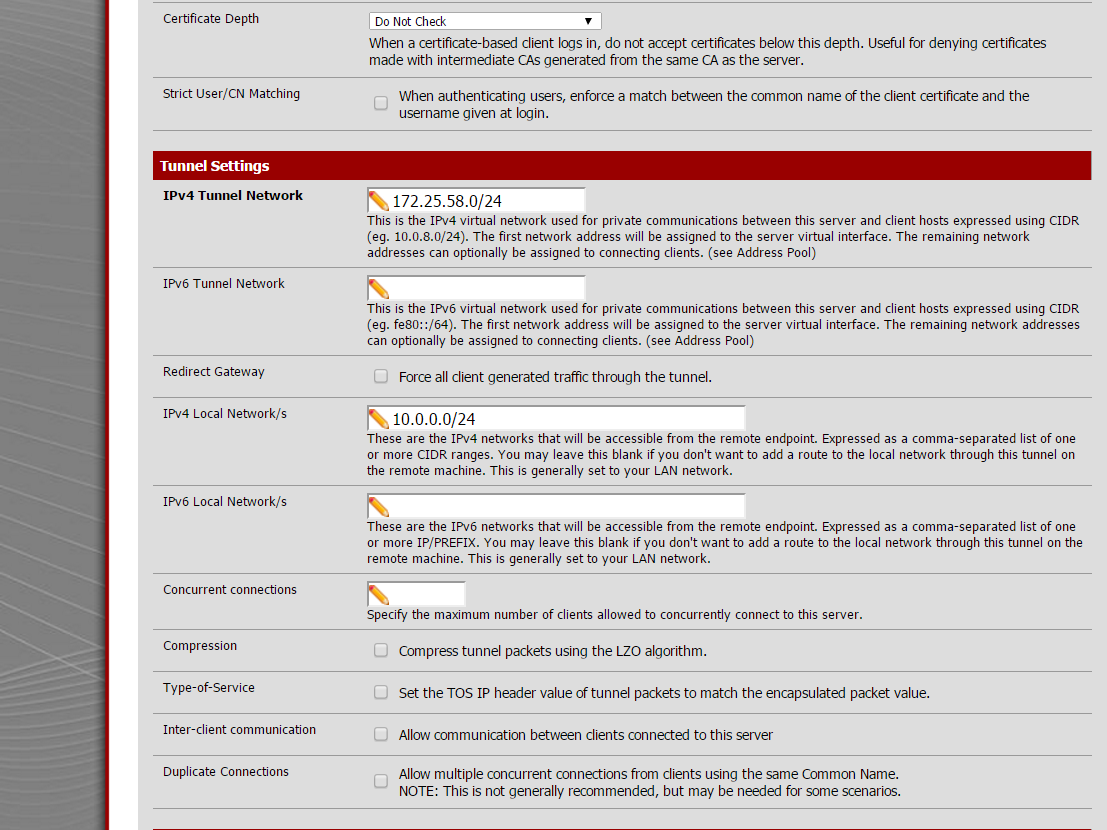
Next settings on the same place are about local network and tunnel IP addresses, this is required to create proper routing rules on the server and the client.
Last part to configure on this sections is extremly simple, only take care to unmark everything and check “address pool” setting.
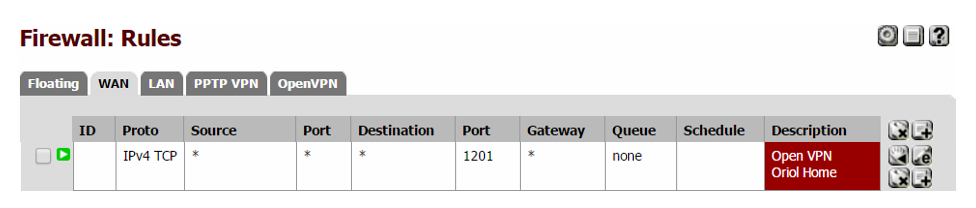
Remember to open that port on Firewall rules.
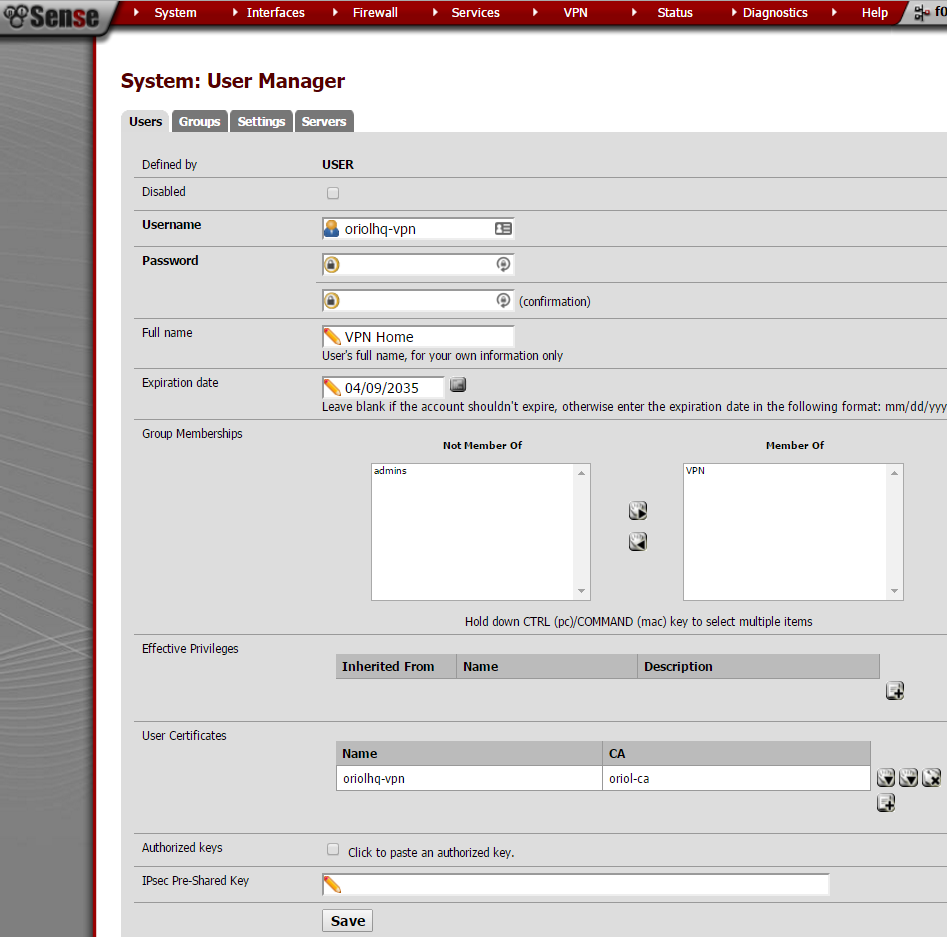
A VPN user is required to authenticate the process, just go to “User Management” inside the “System” menu:
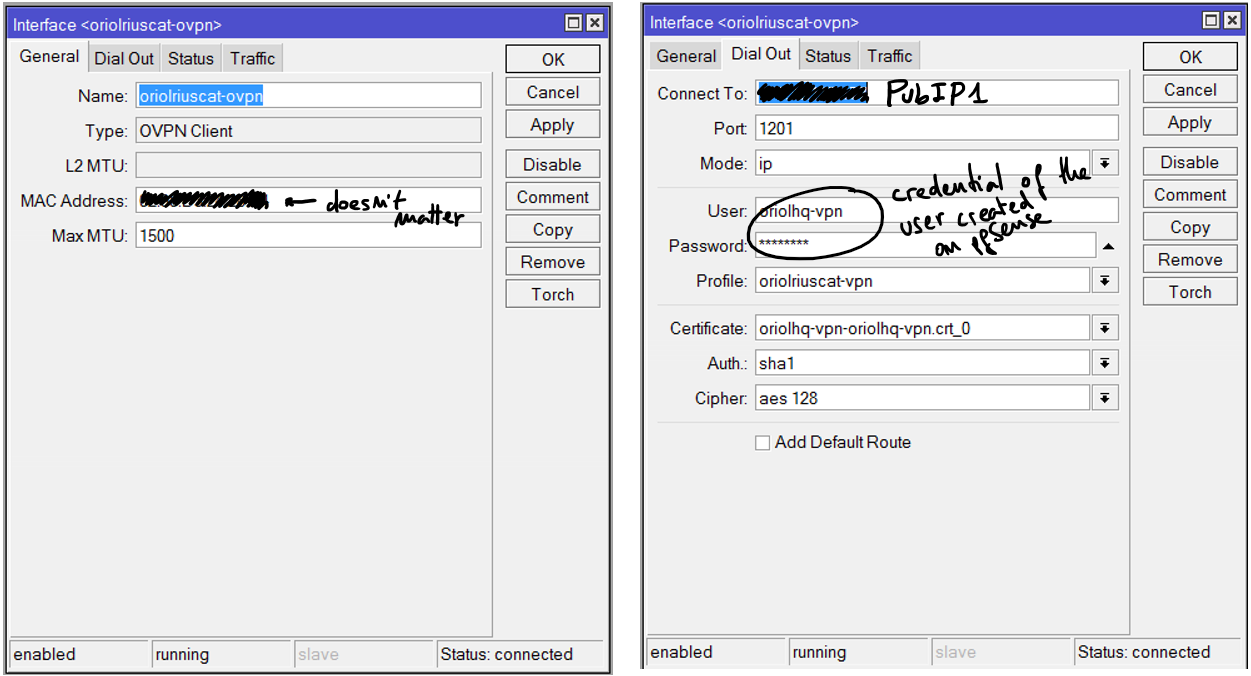
pfSense is configured, now it’s time to set-up the OpenVPN client on Mikrotik using Winbox. Remember to import the certificates:
Click on “PPP” this on the left menu:
Add an OVPN Client connection using the “+” button, the parameters for that connection are:
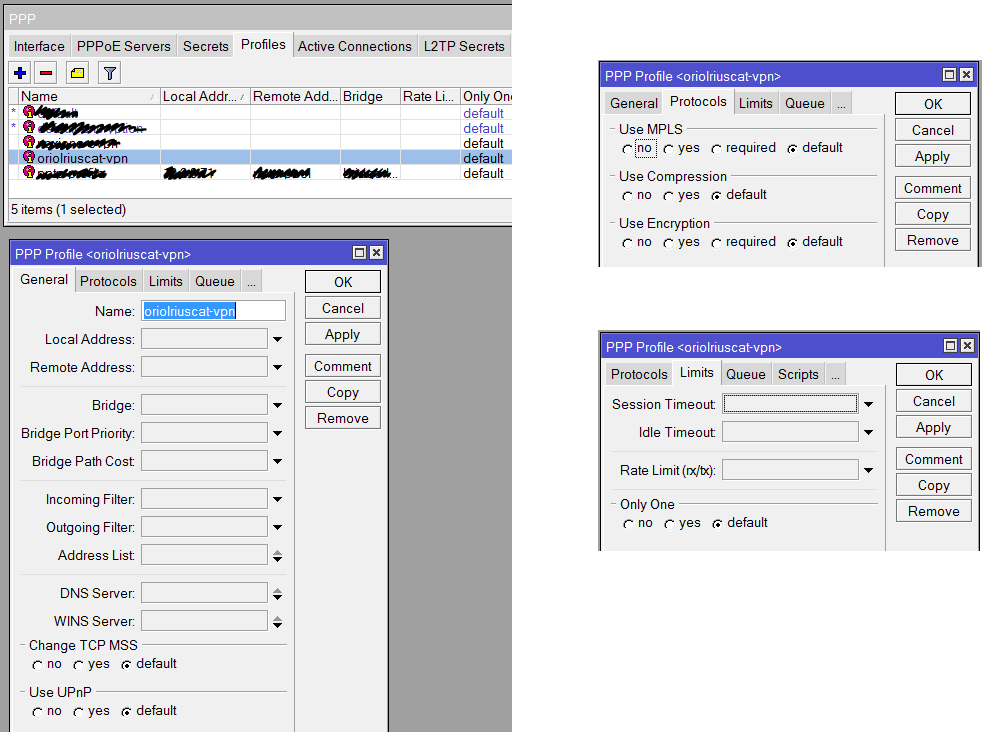
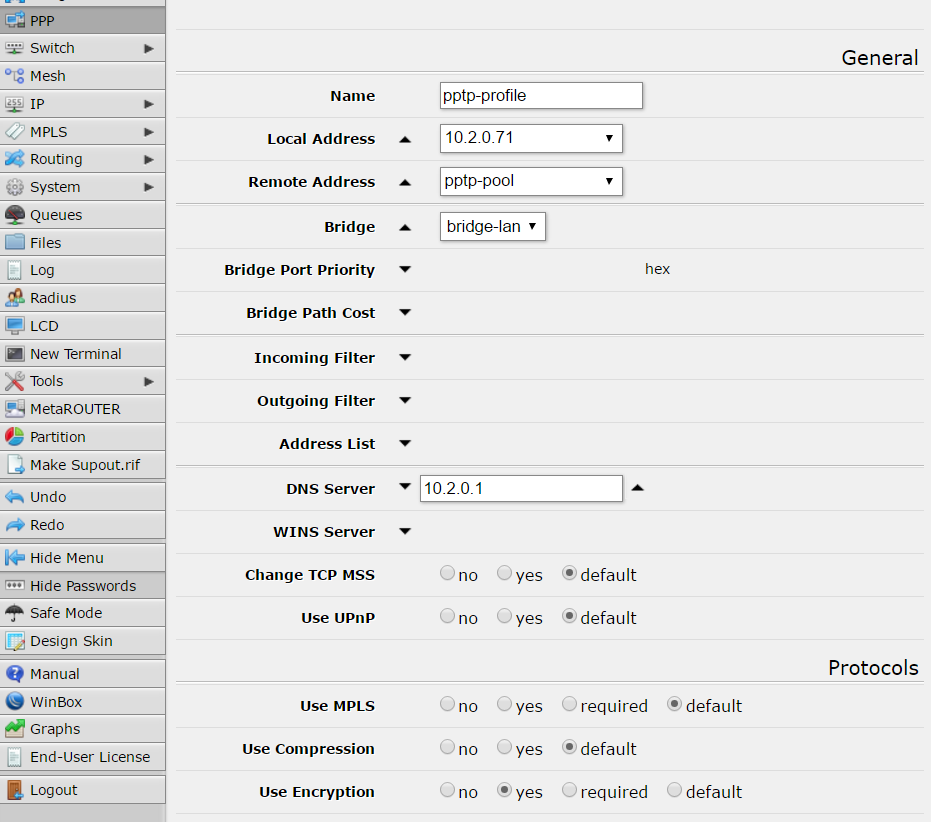
Another required thing to define on “PPP” is the profile, click on the tab “Profile” and using the button with symbol “+” create a new profile like that:
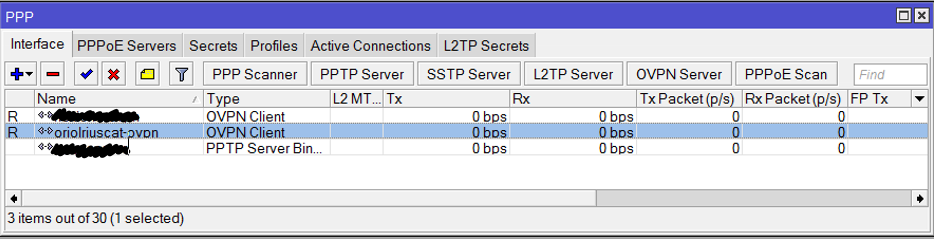
Everything is ready, now it’s time to check if the connection is OK. First go to the OVPN client on Mikrotik, remember this is on “PPP” menu option and inside tab “Interfaces”. Clicking on the interface you’ll see the status details. If it’s disconnect going to pfSense or Mikrotik logs you can see the negotiation details.
Remember usually the problem is with your certificates, but first of all you have to ensure that the negotiation tries to start.
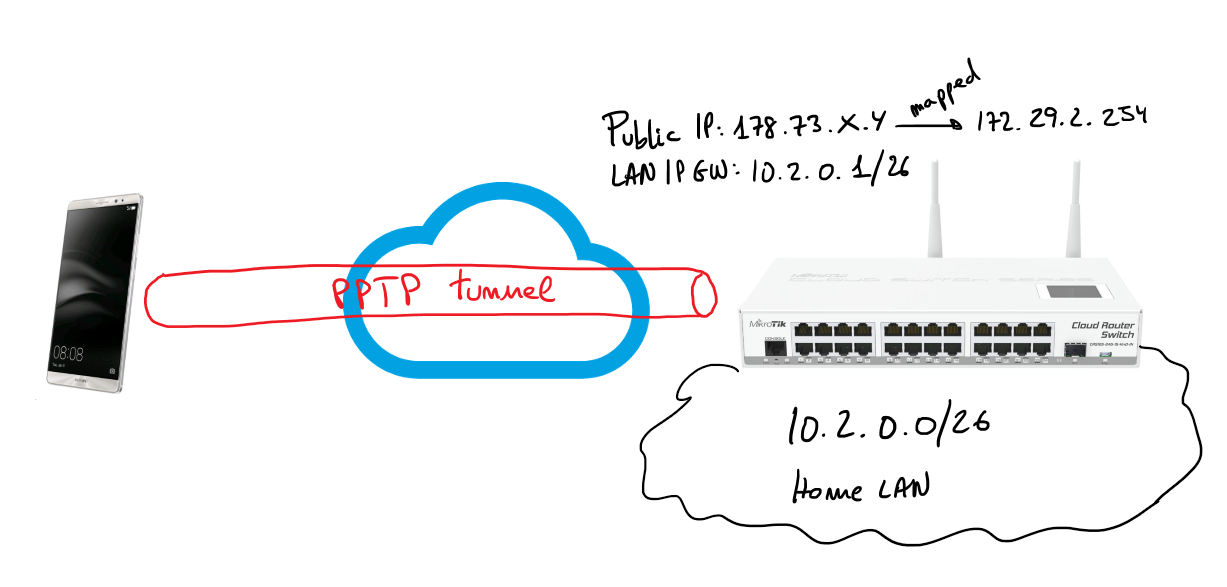
Two years ago I installed a Mikrotik Cloud Switch and lately I stoped my pfSense and I started using that switch as my network router, firewall and also as a switch. RouterOS is really powerful and allows to do a lot of things with that hardware. One of those things is set-up a VPN server based on PPTP. This is not the most secure way to create VPNs but usually the only requirement is a little bit of security on top of an IP over IP service that allows us to use local service when we’re in remote. In my case I have a lot of services in my LAN and I need some of them when I’m out of home specially I need to use them from my mobile phone.
Next steps describe how I set-up a PPTP server on my Mikrotik server allowing my Android 6 device (Huawei Mate 8) to connect to my home services through the VPN. Bellow you have a simple schema representing the schenario of the solution:
I’m only going to describe steps from the web console, of course, all those steps can be done using Winbox or the command line. To be honest I’m not used to RouterOS CLI but I think it’s not difficult to figure out the CLI commands to get the same result.
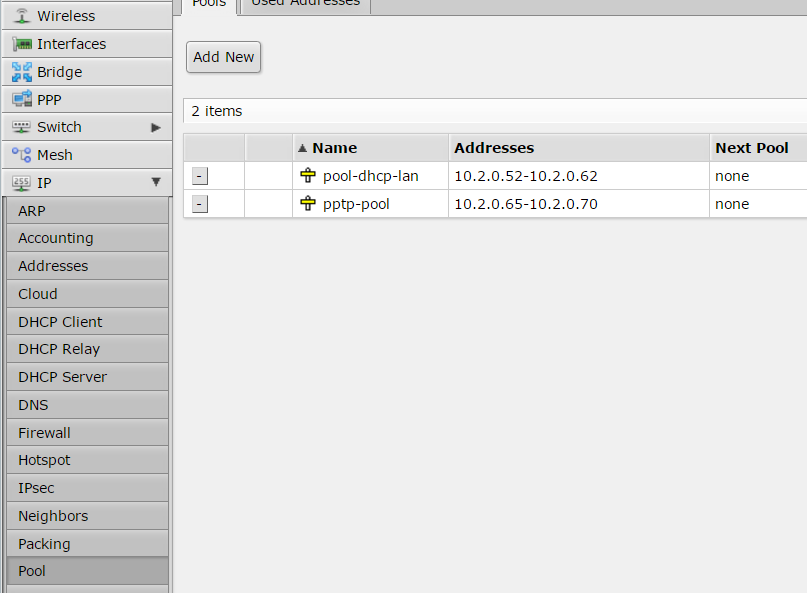
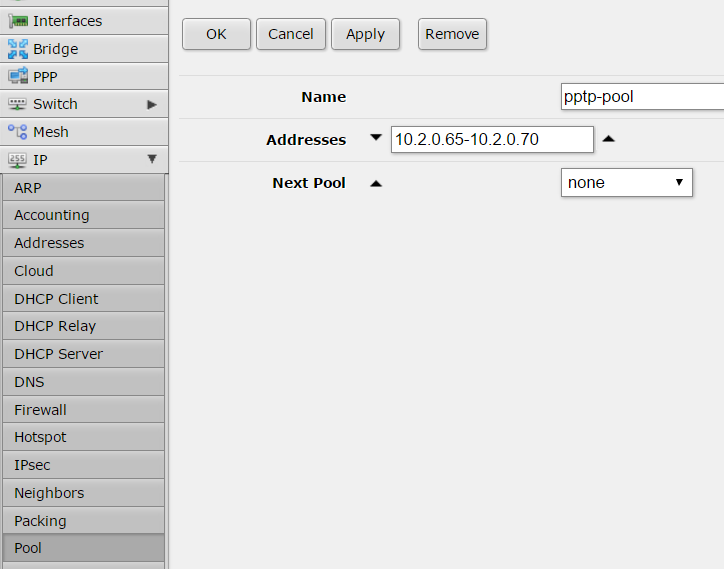
First step is set-up a pool of IP addresses to be assigned to the tunnel endpoints.
Thanks to an ARP proxy those IP addresses will be available like local IPs, this is transparent for the VPN configuration.
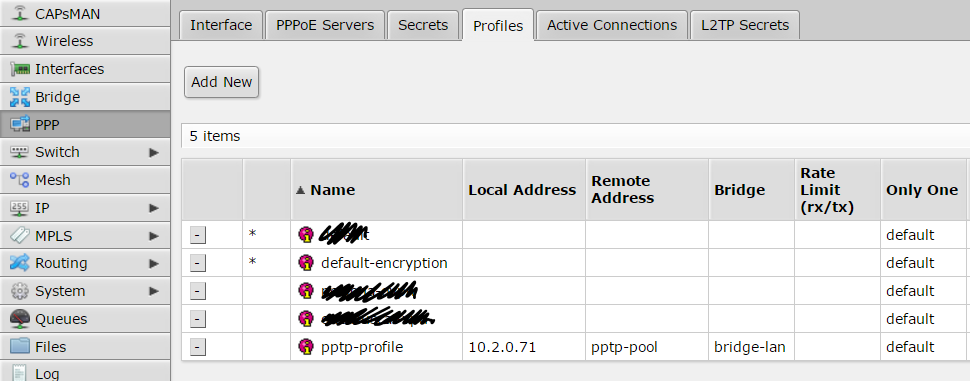
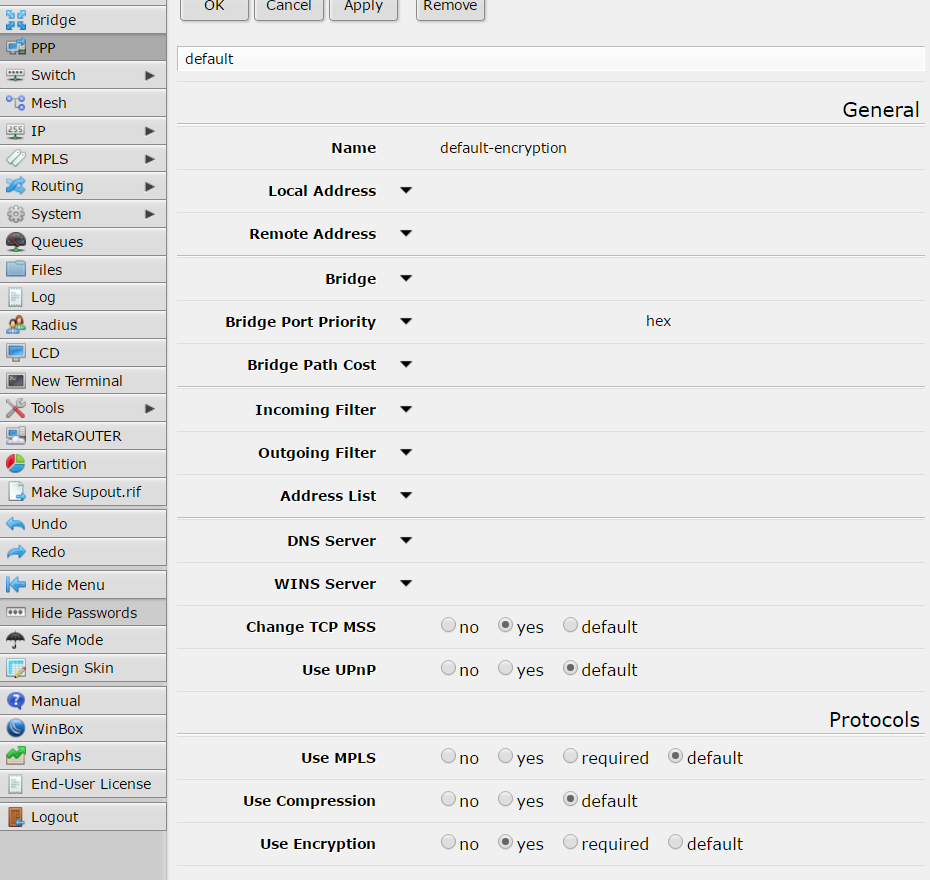
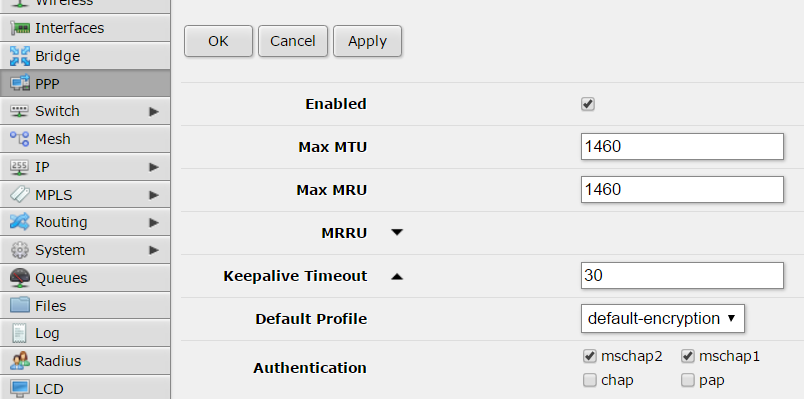
configuration of connection profile is done inside “Profiles” tab:
first of all create a new profile called “default-encription”:
and another profile called “pptp-profile”:
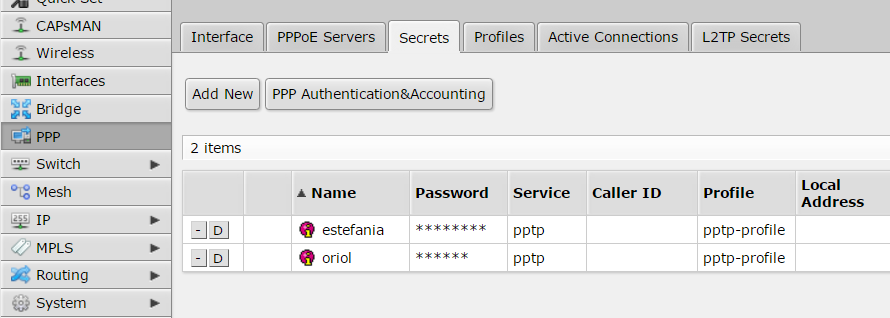
“Secrets” tab is where you have to manage users, in my case only two users are created:
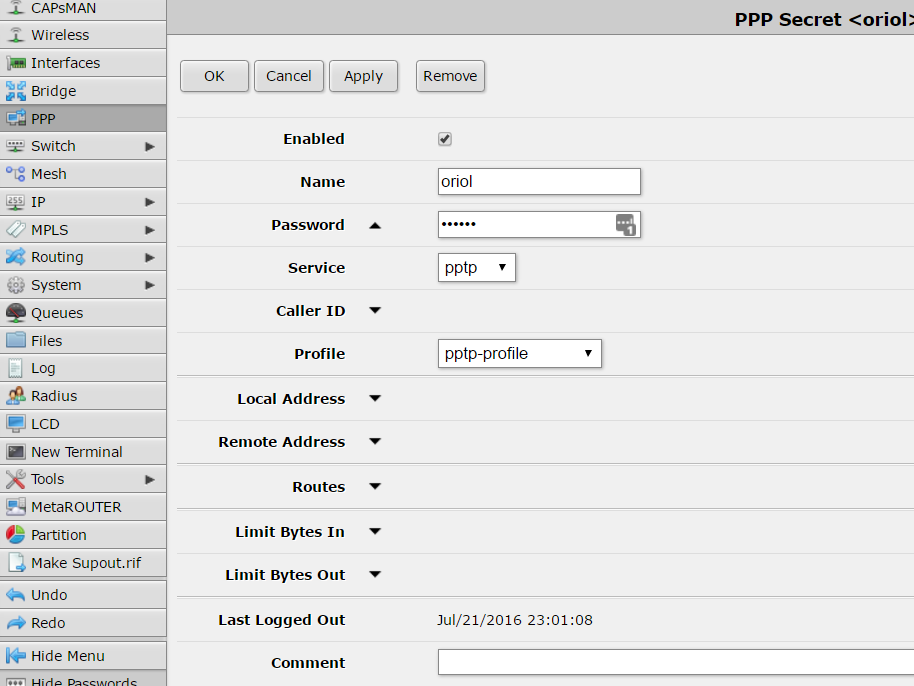
configuration details about my user are:
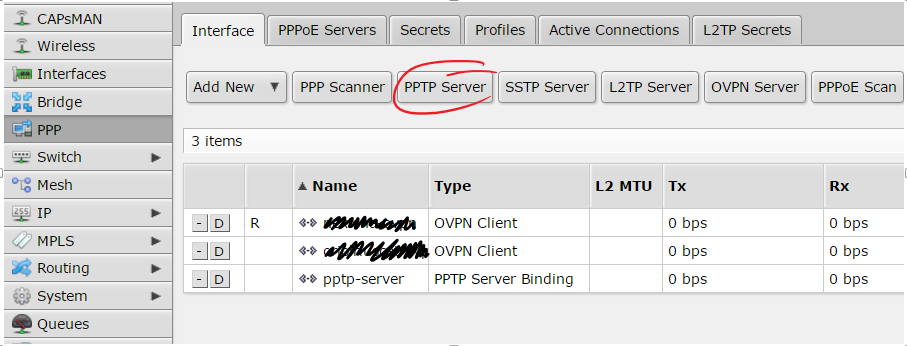
Inside PPP menu there is a button with a label “PPTP server” click there…
… and copy next settings:
Don’t forget to check that your PPTP port is accessible from your public IP address. Remember it’s 1723/TCP.
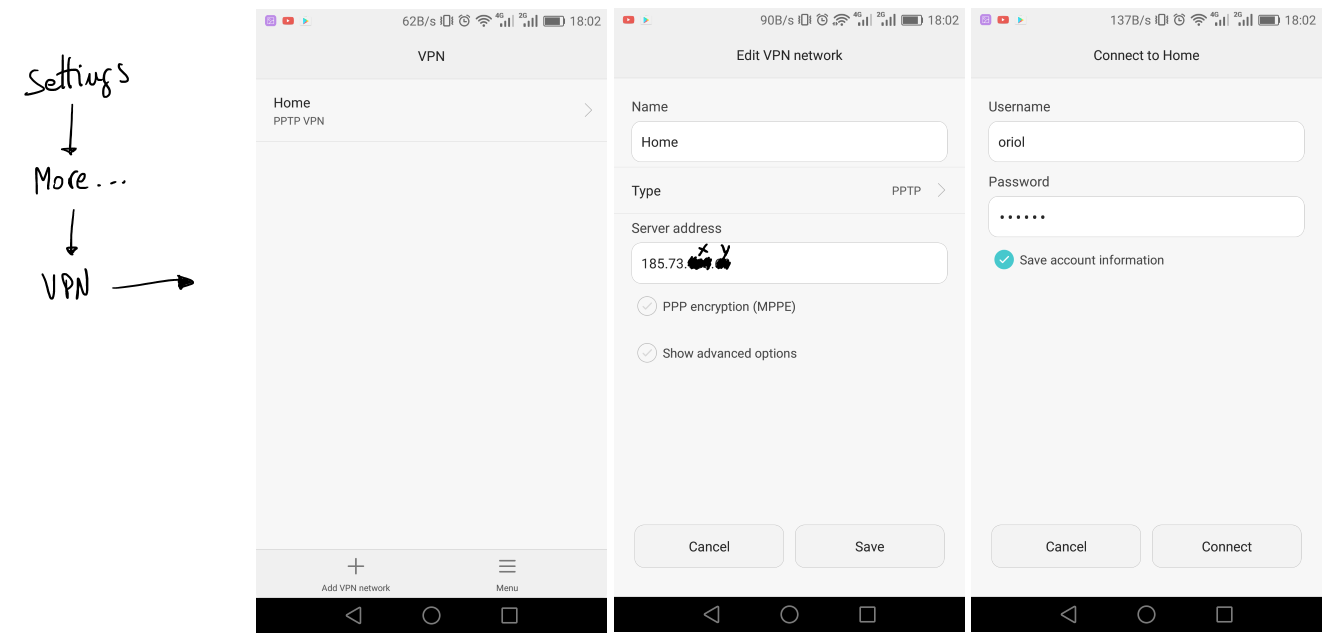
Android configuration is simple, first of all go to “settings” icon. Look for a “More” section bellow network options, and you’ll find VPN managment. Add a new connection, define a name, the type and the IP address and leave the rest by default. After that when you come back to VPN list you’ll find your new VPN in the list, click there and just set-up your PPTP credentials.
If you have some trouble the only thing that you can do is go to Mikrotik logs or start sniffing to figure out where is the problem. I had to do some tests before it was working but in the end everything was so simple like I explained here.
Fast trick for linux users, do you know how to setup a VPN using PPP and SSH? of course you can setup a secure tunnel using ‘-w- or ‘-W’ ssh parameters in last versions of SSH. But in this case I want to share with you this idea:
Havia tingut l’oportunintat de veure funcionar aquest tipus de concentradors d’VPN en diverses ocasions però mai n’havia configurat cap. De fet, el model en concret del que us parlo el vaig descobrir a través de Tecnología Pymes. El que més em va sorprendre és la quantitat d’VPNs que gestionava i el seu preu, són 25 VPNs concurrents per uns 350€ de PVD. Després vaig estar mirant-me a fons el manual i les seves especificacions tècniques i crec que és una de les solucions més competitives per montar VPNs a usuaris remots (roadwarriors) de forma senzilla. En aquest cas, senzilla vol dir que no s’hagi d’anar usuari per usuari a configurar-los l’VPN. Sinó que ells mateixos simplement accedint a una pàgina web i amb un simple usuari/password més el suport d’un plug-in Java/ActiveX passin a ser un client de l’VPN.
Al accedir via web després de l’autenticació el dispositiu facilita un portal d’enllaços als usuaris on poden amb un simple clic accedir a aplicacions a través del navegador, per exemple, usant VNC, RDP, Telnet, SSH, IE i d’altres protocols l’usuari pot iniciar per exemple una sessió amb una aplicació que estigui en un servidor local: Word, Excel, ERP, CRM, Web, etc. O sigui, que és ideal per quan tenim usuaris amb coneixements molt bàsics perquè els podem donar accés directe a les típiques coses que usaran i per l’usuari és molt senzill d’entendre. Obviament si no volem accedir via web a la xarxa remota ho podem fer des del sistema, o sigui, que per exmemple si obrim una consola podem llençar un ping sense problemes als servidors remots. No deixa de ser una VPN de les de sempre, però usant com a client el navegador.
Pel que fa al firmware que usa després de connectar-hi via RS232 he pogut veure que és un Linux, al qual pel mateix CLI serie podem tenir-hi accés i tocar el que ens convingui. Per cert, enlloc he trobat la configuració del port serie per connectar-hi però fent proves la que m’ha funcionat ha estat: 9600 8N1 no control de fluxe per hardware ni tampoc per software.
Al iniciar el router aquest portava un firmware força antic que no suportava Windows Vista i que només podia treballar amb clients IE via ActiveX. Però després d’actualitzar el firmware a la versió 2.3.03 no només ja es suporta el Windows Vista sinó que també funciona amb clients Linux amb Firefox usant un applet de Java. Això si hem de tenir permisos d’administrador perquè sinó no pot crear les rutes i d’altres similars al sistema.
Els usuaris de l’VPN poden estar guardats en diversos llocs:
Local user database
Microsoft Active Directory
LDAP directory
NT domains
RADIUS (PAP, CHAP, MSCHAP, MSCHAPv2)
A més disposa d’un sistema de grups i de polítiques de permisos que malgrat no ser res de l’altre món ens permet crear certs tipus de perfils restringint els accessos de forma simple i fàcil de gestionar als grups o usuaris.
Quan montem aquesta solució podem treballar de diverses formes. Diposa de dues sortides ethernet i podem treballar amb només una sortida:
o usant dues interficies de xarxa:
a partir d’aquí podem adaptar el sistema d’VPN al que més ens interessi dins de l’empresa.
Abans d’acabar només un apunt sobre el tema de la configuració. Cal dir que no és complicat de configurar, però en primera instància és una mica engorrós tenir tantes opcions i tan poc intuitives. Una bona recomanació és que no deixeu de llegir-vos atentament l’ajuda en línia (apareix a la part dreta) que es mostra en la WebUI de configuració.
Un altre cop doncs NetGear ens ha presentat un producte molt decent i recomanable, he de dir que és una marca que al igual que Linksys m’acostuma a deixar un bon gust de boca.
Aquesta empresa de capital risc acaba de presentar un mini-caixa de la mida d’una targeta de crèdit, amb dues connexions ethernet una cap a l’ordinador i l’altre cap a internet. La idea és fer de firewall personal per ordinadors aïllats o com a molt protegir petites xarxes de fins a 5 o 6 ordinadors connectant-hi un petit switch (o HUB). Com no podia ser d’una altre manera aquesta caixeta porta un Linux que s’encarrega de fer el que a Yoggie en diuen Personal Security Gatekeeper, o sigui donar funcions de:
Stateful inspection firewall
VPN client
Intrusion detection and prevention
Four transparent proxies: HTTP, FTP, POP3 (Pro model only), and SMTP (Pro model only)
Antivirus, antispyware, antispam (Pro model only), antiphishing (Pro model only)
Yoggie “Layer 8” security engine (patent pending)
Yoggie multilayer security agent
Content filtering
White and black lists
Yoggie health monitoring
Web management and monitoring said to provide “real time, constant, consistent and un-paralleled visibility into distributed laptop platforms, regardless of location”
Tot això en ordinador ben petit però ben potent al mateix temps, de fet, esta disponible en dues versions la versió basic i la pro; les característiques del hardware són les següents:
Intel PXA270 (Bulverde) a 416MHz (basic) o 642MHz (pro)
64 o 128Mb SDRAM
64 o 128Mb Flash
SD slot (suport SDIO)
4Mb de secured flash
2 port 10/100 Ethernet
USB OTG (on-the-go)
El producte es comercialitzarà al novembre a través de distribuidors a EUA, UK i Alemanya. El model basic costarà uns 180$ i el Pro uns 220$. Realment crec que relació qualitat preu és un molt bon producte per molts tipus d’usuaris. Sobretot en el camp del SOHO o els RoadWarriors que van per tot arreu amb el portàtil. Esta clar que pels professionals de les TIC no és res de l’altre món però pels usuaris en general crec que per fi hi ha una bona alternativa a les appliances que treuen les companyies d’antivirus que sota la meva opinió en general són lamentables i una presa de pel.