oriolrius.cat

Des del 2000 compartiendo sobre…

Tag: internet

Secure download URLs with expiration time

Reading time: 4 – 6 minutes

Requirements

Imagine a HTTP server with those restrictions:

  • only specific files can be downloaded
  • with a limited time (expiration date)
  • an ID allows to trace who download files
  • with minimal maintenance and dependencies (no databases, or things like that)

the base of the solution that I designed is the URL format:

http://URL_HOST/<signature>/<customer_id>/<expire_date>/<path_n_file>
  • signature: is calculated with the next formula, given a “seed”
    • seed = “This is just a random text.”
    • str = customer_id + expire_date + path_n_file
    • signature = encode_base64( hmac_sha1( seed, str))
  • customer_id: just an arbitrary identifier when you want to distinguish who use the URL
  • expire_date: when the generated URL stops working
  • path_n_file: relative path in your private repository and the file to share

Understanding the ideas explained before I think it’s enough to understand what is the goal of the solution. I developed the solution using NGINX and LUA. But the NGINX version used is not the default version is a very patched version called Openresty. This version is specially famous because some important Chinese webs works with that, for instance, Taobao.com

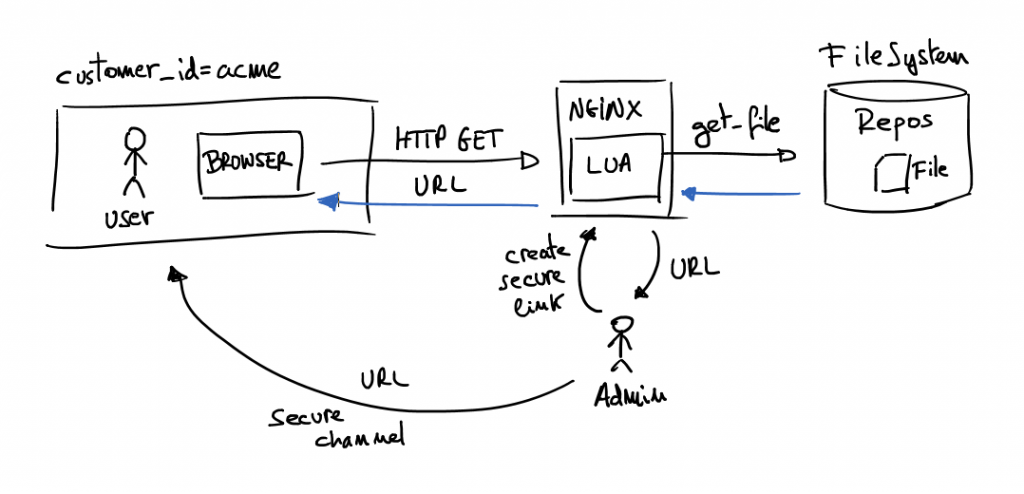
Expiration URL solution Architecture schema

In the above schema there is a master who wants to share a file which is in the internal private repository, but the file has a time restriction and the URL is only for that customer. Then using the command line admin creates a unique URL with desired constrains (expiration date, customer to share and file to share). Next step is send the URL to the customer’s user. When the URL is requested NGINX server evaluates the URL and returns desired file only if the user has a valid URL. It means the URL is not expired, the file already exists, the customer identification is valid and the signature is not modified.

NGINX Configuration

server {
 server_name downloads.local;

 location ~ ^/(?<signature>[^/]+)/(?<customer_id>[^/]+)/(?<expire_date>[^/]+)/(?<path_n_file>.*)$ {
 content_by_lua_file "lua/get_file.lua";
 }

 location / {
 return 403;
 }
}

This is the server part of the NGINX configuration file, the rest of the file can as you want. Understanding this file is really simple, because the “server_name” works as always. Then only locations command are relevant. First “location” is just a regular expression which identifies the relevant variables of the URL and passes them to the LUA script. All other URLs that doesn’t match with the URI pattern fall in path “/” and the response is always “Forbiden” (HTTP 403 code). Then magics happen all in LUA code.

LUA scripts

There are some LUA files required:

  • create_secure_link.lua: creates secure URLs
  • get_file.lua: evaluates URLs and serves content of the required file
  • lib.lua: module developed to reuse code between other lua files
  • sha1.lua: SHA-1 secure hash computation, and HMAC-SHA1 signature computation in Lua (get from https://github.com/kikito/sha.lua)

It’s required to configure “lib.lua” file, at the beginning of the file are three variables to set up:

lib.secret = "This is just a long string to set a seed"
lib.base_url = "http://downloads.local/"
lib.base_dir = "/tmp/downloads/"

Create secure URLs is really simple, take look of the command parameters:

$ ./create_secure_link.lua 

 ./create_secure_link.lua <customer_id> <expiration_date> <relative_path/filename>

Create URLs with expiration date.

 customer_id: any string identifying the customer who wants the URL
 expiration_date: when URL has to expire, format: YYYY-MM-DDTHH:MM
 relative_path/filename: relative path to file to transfer, base path is: /tmp/downloads/

Run example:

$ mkdir -p /tmp/downloads/dir1
$ echo hello > /tmp/downloads/dir1/example1.txt
$ ./create_secure_link.lua acme 2015-08-15T20:30 dir1/example1.txt
http://downloads.local/YjZhNDAzZDY0/acme/2015-08-15T20:30/dir1/example1.txt
$ date
Wed Aug 12 20:27:14 CEST 2015
$ curl http://downloads.local:55080/YjZhNDAzZDY0/acme/2015-08-15T20:30/dir1/example1.txt
hello
$ date
Wed Aug 12 20:31:40 CEST 2015
$ curl http://downloads.local:55080/YjZhNDAzZDY0/acme/2015-08-15T20:30/dir1/example1.txt
Link expired

Little video demostration

Resources

Disclaimer and gratefulness


Free dynamic DNS service

Reading time: < 1 minute A long time ago there were several free dynamic DNS services but nowadays it's difficult to find one of them. And when you find the service usually you have some important restrictions like: number of updates per day or only few subdomains per account. But in the end I found a good free service of that, it's part of the project guifi.net and is called: Qui; you only need a guifi.net account to use the service and it’s really simple and clear. From my part the compatibility with “ddclient” and the “mikrotik” script are really useful and I want tu highlight this functionality.

Enabling linux kernel to open LOTS of concurrent connections

Reading time: < 1 minute Just a small recipe about how to enable linux kernel to open tons of concurrent connections. Really simple and useful post entry.

echo “10152 65535″ > /proc/sys/net/ipv4/ip_local_port_range
sysctl -w fs.file-max=128000
sysctl -w net.ipv4.tcp_keepalive_time=300
sysctl -w net.core.somaxconn=250000
sysctl -w net.ipv4.tcp_max_syn_backlog=2500
sysctl -w net.core.netdev_max_backlog=2500
ulimit -n 10240

Routerboard CRS125-24G-1S-2HnD-IN (Mikrotik) Cloud Switch

Reading time: 1 – 2 minutes

I bought this product a few weeks ago and finally I can enjoy it at home. With this product you have a firewall, gateway, switch and wireless box with:

  • 25x Gigabit Ethernet ports
  • 1x Fiber channel
  • 3G, 4G or any optional USB modem
  • With RouterOS inside you can manage: gateway, firewall, VPN and ad-hoc switching and routing configurations
  • 1000mW high power 2.4GHz 11n wireless AP
CRS125-24G-1S-2HnD-IN

CRS125-24G-1S-2HnD-IN

The official product page is here where you can find brochure in PDF and other useful information.

If you are looking for a powerful product for your SOHO network this is the solution as I like to say ‘this is one of the best communications servers’. It will be very difficult to find some feature or functionality that you can not get from this product. The product is robust and stable with the flexibility of RouterOS.

Some recommendations about RESTful API design

Reading time: 4 – 6 minutes

I want to recommend to you to watch the YouTube video called RESTful API design of Brian Mulloy. In this post I make an small abstract of the most important ideas of the video, of course from my point of view:

  • Use concrete plural nouns when you are defining resources.
  • Resource URL has to be focused in access collection of elements and specific element. Example:
    • /clients – get all clients
    • /clients/23 – get the client with ID 23
  • Map HTTP methods to maintein elements (CRUD):
    • POST – CREATE
    • GET – READ
    • PUT – UPDATE
    • DELETE – DELETE
  • Workaround, if your REST client doesn’t support HTTP methods, use a parameter called ‘method’ could be a good idea. For example, when you have to use a method HTTP PUT it could be changed by method HTTP GET and the parameter ‘method=put’ in the URL.
  • Sweep complexity behind the ‘?’. Use URL parameters to filter or put some optional information to your request.
  • How to manage errors:
    • Use HTTP response codes to refer error codes. You can find a list of HTTP response codes  in Wikipedia.
    • JSON response example can be like this:
      { 'message':'problem description', 'more_info':'http://api.domain.tld/errors/12345' }
    • Workaround, if REST client doesn’t know how to capture HTTP error codes and raise up an error losing the control of the client, you can use HTTP response code 200 and put ‘response_code’ field in JSON response object. It’s a good idea use this feature as optional across URL parameter ‘supress_response_code=true’.
  • Versioning the API. Use a literal ‘v’ followed by an integer number before the resource reference in the URL. It could be the most simple and powerful solution in this case. Example: /v1/clients/
  • The selection of what information will be returned in the response can be defined in the URL parameters, like in this example: /clients/23?fields=name,address,city
  • Pagination of the response. Use the parameters ‘limit’ and ‘offset’, keep simple. Example: ?limit=10&offset=0
  • Format of the answer, in this case I’m not completely agree with Brian. I prefer to use HTTP header ‘Accept’ than his proposal. Anyway both ideas are:
    • Use HTTP header ‘Accept’ with proper format request in the answer, for example, ‘Accept: application/json’ when you want a JSON response.
    • or, use extension ‘.json’ in URL request to get the response in JSON format.
  • Use Javascript format for date and time information, when you are formatting JSON objects.
  • Sometimes APIs need to share actions. Then we can’t define an action with a noun, in this case use verb. Is common to need actions like: convert, translate, calculate, etc.
  • Searching, there are two cases:
    • Search inside a resource, in this case use parameters to apply filters.
    • Search across multiple resource, here is useful to create the resource ‘search’.
  • Count elements inside a resource, simply add ‘/count’ after the resource. Example: /clients/count
  • As far as you can use a single base URL for all API resources, something like this: ‘http://api.domain.tld’.
  • Authentication, simply use OAuth 2.0
  • To keep your API KISS usually it’s a good idea develop SDK in several languages, where you can put more high level features than in API.
  • Inside an application each resource has its own API but it’s not a good idea publish it to the world, maybe use a virtual API in a layer above it’s more secure and powerful.


Postfix autenticació amb sasldb

Reading time: 2 – 2 minutes

Quatre notes que tinc pendents de classificar, com donar suport d’autenticació a postfix de forma ràpida i senzilla.

Paquets que cal tenir a més del postfix: cyrus-sasl, cyrus-sasl-md5.

Línies que cal tenir al /etc/postfix/main.cf:

smtpd_sasl_application_name = smtpd
smtpd_sasl_type = cyrus
smtpd_sasl_path = sasl2/smtpd.conf
smtpd_sasl_local_domain =
smtpd_sasl_security_options = noanonymous
broken_sasl_auth_clients = yes
smtpd_sasl_auth_enable = yes
smtpd_recipient_restrictions = permit_sasl_authenticated, permit_mynetworks, reject_unauth_destination

Fitxer de configuració del servei d’autenticació /etc/sasl2/smtpd.conf:

pwcheck_method: auxprop
auxprop_plugin: sasldb
mech_list: PLAIN LOGIN CRAM-MD5 DIGEST-MD5 NTLM

Assegurar-se que el propietari del fitxer /etc/sasldb2 és postfix.

El fitxer /etc/sasldb2 és una base de dades Berkeley DB que guarda els usuaris i les seves paraules de pas en text pla. Així doncs, no és molt segur però una solució més que suficient per molts entorns SOHO.

Gestió d’usuaris:

# afegir usuari
saslpasswd2 -a smtpd -u domini_exemple.com nom_usuari

# borrar usuari
saslpasswd2 -d -u domini_exemple.com nom_usuari

# llistar usuaris
sasldblistusers2

La configuració que heu de posar al MUA pel que fa al servidor de correu ha de ser del tipus:

usuari: nom_usuari@domini_exemple.com
pass: el que hagiu definit
mecanisme d'autenticació suportats:  PLAIN LOGIN CRAM-MD5 DIGEST-MD5 NTLM

UPDATE 27/2/2012:

Perquè es pugui tenir accés al fitxer /etc/sasldb2 cal que el mòdul smtpd de postfix no es llenci com a chroot. Per evitar això cal modificar el fitxer /etc/postfix/master.cf concretament la línia del dimoni smtpd ha de quedar així:

smtp      inet  n       -       n       -       -       smtpd

Per tenir suport de SASL a Ubuntu Lucid cal instal·lar els paquets: sasl2-binlibsasl2-modules.

APT protocol o AptURL – instal·lant soft des del browser

Reading time: < 1 minute

AptURL o APT protocol plateja una idea molt interessant. Per exemple, quan estem mirant una pàgina web i aquesta ens parla d’un aplicatiu per Debian/Ubuntu la idea seria clicar a un enllaç del tipus: apt:exampleapp i això llençaria el gestor d’aplicacions (package manager) del sistema APT que instal·laria aquesta applicació en el nostre sistema.
Per tal de fer això possible hi ha una serie d’extencions per diversos navegadors: firefox, crhome, konqueror, opera, etc. si voleu més informació podeu consultar el wiki d’ubuntu on parla de AptURL.

Què és un WebHook?

Reading time: < 1 minute WebHook logo
Un WebHook és una HTTP callback, o sigui, un HTTP POST que es dona quan algo passa (un event); o sigui, que podem definir WebHook com a sistema de notificació d’events per HTTP POST.

El valor més important dels WebHooks és la possibilitat de poder rebre events quan aquest passen no a través dels ineficaços mecanismes de polling.

Si voleu més informació sobre aquest tema: WebHooks site.

httptunnel: TCP sobre HTTP

Reading time: 2 – 2 minutes

HTTPtunnel logo

Amb httptunnel es poden establir connexions TCP sobre un enllaç HTTP, és a dir, disposem de dues eines el htc i el hts, escencialment el que fa és:

  • hts: publica un port simulant un servidor HTTP al conectar-hi amb htc ens enviarà cap al HOST:PORT configurats
  • htc: es conecta a hts usant HTTP i simulant un client HTTP normal (ffx, crhome, ie, etc) però en realitat transporta paquets TCP en el payload de les queries, l’usuari pot conectar-se a un port local que es publica i que permet accedir al HOST:PORT al que ha conectat hts de forma transparent

Per fer una prova de concepte jo el que he fet és conectar el hts amb un servidor VNC, al costat del htc he connectat un client VNC i he accedit al VNC de forma totalment transparent, a més amb un sniffer he comprovat que els paquets que passeben per la xarxa eren paquets HTTP estàndards, i així era. Tan senzill com això:

server:
./hts -w -F 127.0.0.1:5900 1080

client:
./htc -F 2300 server:1080
vinagre localhost:2300

A més també suporta la possibilitat de fer-ho a través d’un proxy, això si aquest només esta suportat si és sense autenticació o amb autenticació bàsica. Així doncs, a partir d’això em venen al cap algunes millores interessants:

  • suportar autenticació Digest i NTLM.
  • permetre accés al tunel via stdin/stdout (així ho podriem usar amb SSH com a ProxyCommand).
  • poder connectar-se a un segon proxy en l’extrem remot, és a dir, hts no té l’enllaç pre-establert.
  • suportar SSL, així ens estalbiariem haver d’usar stunnel per simular HTTPs.

long polling amb jquery+jsonp+couchdb (cross domain suportat)

Reading time: 6 – 9 minutes

Porto mesos somiant amb fer la prova de concepte que explico en aquest article, intentaré descriure en que consisteix però ja aviso que la cosa és un pèl complicadilla.

Funcionalitats requerides:

  • long polling: l’objectiu és rebre els canvis d’una base de dades de couchdb en temps real sense haver d’anar preguntant si hi ha canvis, sinó que aquest s’envien cada vegada que es donen de forma automàtica.
  • A través de jQuery el que vull és actualitzar una pàgina web de forma asíncrona, de forma que els nous resultats que vagin entrant a la BBDD es vagin mostrant en temps real a la pantalla.
  • JSONP, és una tècnica que ens permet rebre la sortida JSON de CouchDB i després cridar una funció de callback de JavaScript. El problema és que la funció jQuery.getJSON() original de jQuery té algunes mancances que gràcies a el plugin jQuery-JSONP podem solucionar, aquestes són: (copy/paste de la web del plugin)
    • error recovery in case of network failure or ill-formed JSON responses,
    • precise control over callback naming and how it is transmitted in the URL,
    • multiple requests with the same callback name running concurrently,
    • two caching mechanisms (browser-based and page based),
    • the possibility to manually abort the request just like any other AJAX request,
    • a timeout mechanism.
  • CouchDB és una base de dades NoSQL basada en documents que és capaç d’emetre una senyal (trigger) cada vegada que el contingut d’una base de dades canvia. Per més informació sobre el tema es pot consultar a: CouchDB: The Definitive Guide al capítol Change Notifications.
  • Cross-domain: quan es llença una petició XmlHttpRequest (la base del AJAX) amb JavaScript tenim la limitació de només poder-ho fer sobre el domini que serveix la pàgina web, cap altre port ni subdomini. Obviament tampoc un altre host. Per saltar-se aquesta restricción és quan cal recorrer a JSONP.

La prova de concepte ha estat crear una base de dades anomenada: notifcations on es guarden documents que són notificacions a mostrar a la pàgina web.

Després he programat la següent web:

<html>
<head>
<script type="text/javascript" src="jquery-1.4.2.min.js"></script>
<script type="text/javascript" src="jquery.jsonp-1.1.4.js"></script>
<script type="text/javascript">
function longpoll(since) {
    var url = "http://IP_COUCHDB_SERVER:5984/notifications/_changes?include_docs=true&feed=longpoll&since="+since+"&callback=?";
    console.log("since="+since);
    $.jsonp({
        "url":url,
        "success":function(data) {
            //console.log(data);
            since=data.last_seq;
            try {
                console.log(data.results[0].doc.msg);
            } catch(err) {
                console.log("error:"+err);
            };
            longpoll(since);
        },
        "error":function(msg) {
            //console.log(msg);
            console.log('capturat error');
        }
    });
};

var url = "http://IP_COUCHDB_SERVER:5984/notifications?callback=?";
$.jsonp({
    "url":url,
    "success":function(data) {
        //console.log(data);
        longpoll(data.update_seq);
    },
    "error":function(msg) {
        console.log(msg);
    }
});
</script>
</head>
<body>
cos
</body>
</html>

El codi és força simple de seguir, primer de tot es carreguen les llibreries: jQuery 1.4.2 i jquery-jsonp 1.1.4, ambdues necessaries per cridar el métode $.jsonp que és el que realment farà la feina.

A continuació es declara la funció longpoll que té com a paràmetre el númeral que indica quin ha estat el últim canvi a la base de dades. Aquest s’utiliza per construir la petició que es fa a CouchDB:

var url = "http://IP_COUCHDB_SERVER:5984/notifications/_changes?include_docs=true&feed=longpoll&since="+since+"&callback=?";

La URL el que fa és demanar el següent:

  • els canvis (_changes)
  • incloent els documents que han canviat (include_docs=true)
  • tracta la petició com a long polling (feed=longpoll)
  • mostra els canvis des de la versió X (since=X)
  • quan enviis els canvis fes una crida a la funció de callback definida aquí (callback=?)
    • ‘?’ és substituit per jquery-jsonp per la funció anomenada ‘C’, aquest nom es pot canviar usant paràmetres en la declaració de $.jsonp() que ve a continuació

Els missatges de l’estil ‘console.log()‘ són per tenir un seguiment del que va passant a la consola de javascript del navegador.

$.jsonp() té força paràmetres possibles definits a la API, però en aquesta prova de concepte només uso ‘url’, ‘success’ i ‘error’. El primer esta clar que és, els altres dos són les funcions a cridar quan l’acció va bé o malament respectivament. Dins de la funció posem el codi referent a les accions que volem fer, per exemple, actualitzar la pàgina actual. Com que això només és una prova de concepte el que faig és mostrar missatges per consola i llestos. La part més important és fixar-se que quan la cosa ha anat bé es fa una crida a ella mateix de forma que la cosa no acabi mai. De fet quan hi ha un error es podria també fer una crida a si mateix perquè no pares de provar de llençar la petició un i altre cop, però el que he fet per provar eś que es notifiqui a la consola de javascript i prou.

Fora de la funció longpoll el que es fa és una petició JSONP per saber quina és l’últim número de seqüència de la base de dades, paràmetre necessari per entrar per primera vegada a la funció recursiva de longpoll.

Conclusions

Pot semblar tot una mica enravassat però diria que he simplificat el problema moltíssim, ja que fins ara havia estat teoritzant moltíssim sobre el tema. Fins que ahir i abans d’ahir vaig haver de posar-me a provar-ho a la pràctica per saber exactament com es podia implementar. Sota el meu punt de vista ha quedat tot força net i entenedor.

Pels que sou programadors de webs habitualment haureu tingut necessitats semblants així doncs espero que ús pugui ser tan útil com a mi, de fet, fa unes setmanes que estic treballant amb Tiny Core Linux montant un Quiet PC sobre una DOM de 512MB per usar-la de sistema de monitorització de les meves xarxes i les d’alguns clients, espero que d’aquí uns mesos pugui donar-vos més informació del projecte.