2013/09/25
10 comentaris
Reading time: 5 – 8 minutes
Nowadays last version of browsers support websockets and it’s a good a idea to use them to connect to server a permanent channel and receive push notifications from server. In this case I’m going to use Mosquitto (MQTT) server behind lighttpd with mod_websocket as notifications server. Mosquitto is a lightweight MQTT server programmed in C and very easy to set up. The best advantage to use MQTT is the possibility to create publish/subscriber queues and it’s very useful when you want to have more than one notification channel. As is usual in pub/sub services we can subscribe the client to a well-defined topic or we can use a pattern to subscribe to more than one topic. If you’re not familiarized with MQTT now it’s the best moment to read a little bit about because that interesting protocol. It’s not the purpose of this post to explain MQTT basics.
A few weeks ago I set up the next architecture just for testing that idea:
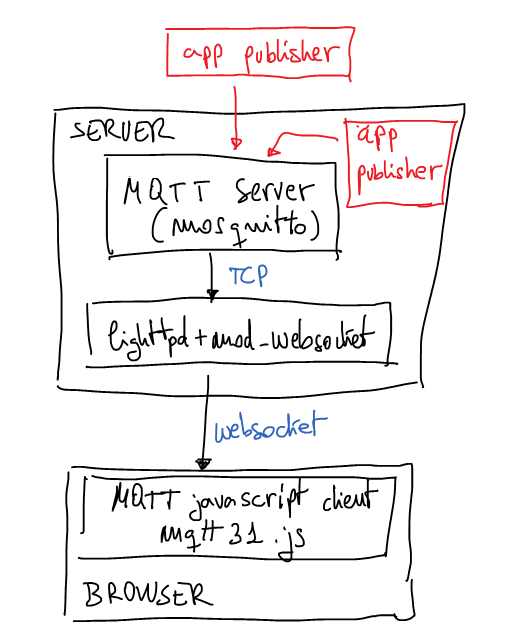
weboscket gateway to mosquitto mqtt server with javascrit mqtt client
The browser
Now it’s time to explain this proof of concept. HTML page will contain a simple Javascript code which calls mqttws31.js library from Paho. This Javascript code will connect to the server using secure websockets. It doesn’t have any other security measure for a while may be in next posts I’ll explain some interesting ideas to authenticate the websocket. At the end of the post you can download all source code and configuration files. But now it’s time to understand the most important parts of the client code.
client = new Messaging.Client("ns.example.tld", 443, "unique_client_id");
client.onConnectionLost = onConnectionLost;
client.onMessageArrived = onMessageArrived;
client.connect({onSuccess:onConnect, onFailure:onFailure, useSSL:true});
Last part is very simple, the client connects to the server and links some callbacks to defined functions. Pay attention to ‘useSSL’ connect option is used to force SSL connection with the server.
There are two specially interesting functions linked to callbacks, the first one is:
function onConnect() {
  client.subscribe("/news/+/sport", {qos:1,onSuccess:onSubscribe,onFailure:onSubscribeFailure});
}
As you can imagine this callback will be called when the connections is established, when it happens the client subscribes to all channels called ‘/news/+/sports’, for example, ‘/news/europe/sports/’ or ‘/news/usa/sports/’, etc. We can also use, something like ‘/news/#’ and it will say we want to subscribe to all channels which starts with ‘/news/’. If only want to subscribe to one channel put the full name of the channel on that parameter. Next parameter are dictionary with quality of service which is going to use and links two more callbacks.
The second interesting function to understand is:
function onMessageArrived(message) {
  console.log("onMessageArrived:"+message.payloadString);
};
It’s called when new message is received from the server and in this example, the message is printed in console with log method.
The server
I used an Ubuntu 12.04 server with next extra repositories:
# lighttpd + mod_webserver
deb http://ppa.launchpad.net/roger.light/ppa/ubuntu precise main
deb-src http://ppa.launchpad.net/roger.light/ppa/ubuntu precise main

# mosquitto
deb http://ppa.launchpad.net/mosquitto-dev/mosquitto-ppa/ubuntu precise main
deb-src http://ppa.launchpad.net/mosquitto-dev/mosquitto-ppa/ubuntu precise main
With these new repositories you can install required packages:
apt-get install lighttpd lighttpd-mod-websocket mosquitto mosquitto-clients
After installation it’s very easy to run mosquitto in test mode, use a console for that and write the command: mosquitto, we have to see something like this:
# mosquitto
1379873664: mosquitto version 1.2.1 (build date 2013-09-19 22:18:02+0000) starting
1379873664: Using default config.
1379873664: Opening ipv4 listen socket on port 1883.
1379873664: Opening ipv6 listen socket on port 1883.
The configuration file for lighttpd in testing is:
server.modules = (
        "mod_websocket",
)

websocket.server = (
        "/mqtt" => (
                "host" => "127.0.0.1",
                "port" => "1883",
                "type" => "bin",
                "subproto" => "mqttv3.1"
        ),
)

server.document-root        = "/var/www"
server.upload-dirs          = ( "/var/cache/lighttpd/uploads" )
server.errorlog             = "/var/log/lighttpd/error.log"
server.pid-file             = "/var/run/lighttpd.pid"
server.username             = "www-data"
server.groupname            = "www-data"
server.port                 = 80

$SERVER["socket"] == ":443" {
    ssl.engine = "enable"
    ssl.pemfile = "/etc/lighttpd/certs/sample-certificate.pem"
    server.name = "ns.example.tld"
}
Remember to change ‘ssl.pemfile’ for your real certificate file and ‘server.name’ for your real server name. Then restart the lighttpd and validate SSL configuration using something like:
openssl s_client -host ns.example.tld -port 443
You have to see SSL negotiation and then you can try to send HTTP commands, for example: “GET / HTTP/1.0” or something like this. Now the server is ready.
The Test
Now you have to load the HTML test page in your browser and validate how the connections is getting the server and then how the mosquitto console says how it receives the connection. Of course, you can modify the Javascript code to print more log information and follow how the client is connected to MQTT server and how it is subscribed to the topic pattern.
If you want to publish something in MQTT server we could use the CLI, with a command mosquitto_pub:
mosquitto_pub -h ns.example.tld -t '/news/europe/sport' -m 'this is the message about european sports'
Take a look in your browser Javascript consle you have to see how the client prints the message on it. If it fails, review the steps and debug each one to solve the problem. If you need help leave me a message. Of course, you can use many different ways to publish messages, for example, you could use python code to publish messages in MQTT server. In the same way you could subscribe not only browsers to topics, for example, you could subscribe a python code:
import mosquitto

def on_connect(mosq, obj, rc):
    print("rc: "+str(rc))

def on_message(mosq, obj, msg):
    print(msg.topic+" "+str(msg.qos)+" "+str(msg.payload))

def on_publish(mosq, obj, mid):
    print("mid: "+str(mid))

def on_subscribe(mosq, obj, mid, granted_qos):
    print("Subscribed: "+str(mid)+" "+str(granted_qos))

def on_log(mosq, obj, level, string):
    print(string)

mqttc = mosquitto.Mosquitto("the_client_id")
mqttc.on_message = on_message
mqttc.on_connect = on_connect
mqttc.on_publish = on_publish
mqttc.on_subscribe = on_subscribe

mqttc.connect("ns.example.tld", 1883, 60)
mqttc.subscribe("/news/+/sport", 0)

rc = 0
while rc == 0:
    rc = mqttc.loop()
Pay attention to server port, it isn’t the ‘https’ port (443/tcp) because now the code is using a real MQTT client. The websocket gateway isn’t needed.
The files
- mqtt.tar.gz – inside this tar.gz you can find all referenced files